Product Manual
Page 4
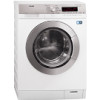
... the electrical information on the rating plate agrees with the power supply. 4 www.aeg.com • If the supply cord is damaged, it must be replaced by the manufacturer, its service agent or similarly qualified persons in order to avoid a hazard. • The operating water pressure (minimum and maximum) must be between the appliance and the carpet. SAFETY INSTRUCTIONS 2.1 Installation • Remove...
... the electrical information on the rating plate agrees with the power supply. 4 www.aeg.com • If the supply cord is damaged, it must be replaced by the manufacturer, its service agent or similarly qualified persons in order to avoid a hazard. • The operating water pressure (minimum and maximum) must be between the appliance and the carpet. SAFETY INSTRUCTIONS 2.1 Installation • Remove...
Product Manual
Page 5
... amp ASTA (BS 1362) fuse. • This appliance complies with a moist soft cloth. Contact the Service to ensure which accessories can be hot. • Make sure that you remove all metal objects from the laundry. • Do not put flammable products or items that there is to the water mains using the new supplied hose-sets. Old hose sets must not be connected...
... amp ASTA (BS 1362) fuse. • This appliance complies with a moist soft cloth. Contact the Service to ensure which accessories can be hot. • Make sure that you remove all metal objects from the laundry. • Do not put flammable products or items that there is to the water mains using the new supplied hose-sets. Old hose sets must not be connected...
Product Manual
Page 6
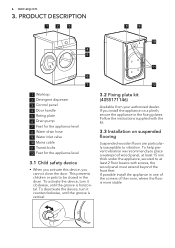
This prevents children or pets to vibration. Follow the instructions supplied with screws, the wood panel must extend beyond the front feet. If possible install the appliance in the drum. PRODUCT DESCRIPTION 1 2 3 8 9 10 4 5 6 7 1 Worktop 2 Detergent dispenser 3 Control panel 4 Door handle 5 Rating plate 6 Drain pump 7 Feet for the appliance level 8 Water drain hose 9 Water inlet valve 10 Mains cable 11 Transit bolts 12 Feet for the appliance level 3.1 Child safety device • When you activate this device, you...
This prevents children or pets to vibration. Follow the instructions supplied with screws, the wood panel must extend beyond the front feet. If possible install the appliance in the drum. PRODUCT DESCRIPTION 1 2 3 8 9 10 4 5 6 7 1 Worktop 2 Detergent dispenser 3 Control panel 4 Door handle 5 Rating plate 6 Drain pump 7 Feet for the appliance level 8 Water drain hose 9 Water inlet valve 10 Mains cable 11 Transit bolts 12 Feet for the appliance level 3.1 Child safety device • When you activate this device, you...
Product Manual
Page 8
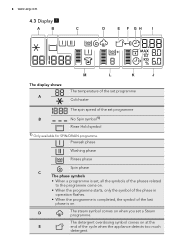
... display shows: A The temperature of the set programme Cold water The spin speed of the cycle when the appliance detects too much detergent. Prewash phase Washing phase Rinses phase Spin phase C The phase symbols • When a programme is set, all the symbols of the phases related to the programme come on. • When the programme starts, only the symbol of the phase in operation flashes. •...
... display shows: A The temperature of the set programme Cold water The spin speed of the cycle when the appliance detects too much detergent. Prewash phase Washing phase Rinses phase Spin phase C The phase symbols • When a programme is set, all the symbols of the phases related to the programme come on. • When the programme starts, only the symbol of the phase in operation flashes. •...
Product Manual
Page 9
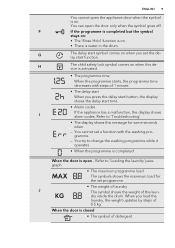
... starts, the programme time decreases with the washing programme. - You cannot set the delay start time. • Alarm codes I If the appliance has a malfunction, the display shows alarm codes. G The delay start symbol comes on . • There is on when you press the delay start button, the display shows the delay start function. You can open the door only when the symbol goes off. dry inside the drum...
... starts, the programme time decreases with the washing programme. - You cannot set the delay start time. • Alarm codes I If the appliance has a malfunction, the display shows alarm codes. G The delay start symbol comes on . • There is on when you press the delay start button, the display shows the delay start function. You can open the door only when the symbol goes off. dry inside the drum...
Product Manual
Page 11
...; Use this button to add a prewash phase before the washing phase. The set this function to change the default temperature. If you deactivate the acoustic signals, they continue operate only when you have laundry with the control panel. • To activate the function, press button 10 and button 9 at the same time until the display shows the symbol . • To deactivate the function, press button 10...
...; Use this button to add a prewash phase before the washing phase. The set this function to change the default temperature. If you deactivate the acoustic signals, they continue operate only when you have laundry with the control panel. • To activate the function, press button 10 and button 9 at the same time until the display shows the symbol . • To deactivate the function, press button 10...
Product Manual
Page 12
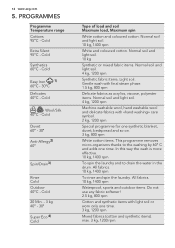
... thanks to drain the water in the drum. In this way the wash is more effective. 10 kg, 1400 rpm To spin the laundry and to the washing by 60° C and adds one time. 3 kg, 1200 rpm Mixed fabrics (cotton and synthetic items). Cold Duvet 60° - 30° Anti-Allergy2) 60° Spin/Drain3) Rinse Cold Outdoor 40°C - Normal soil and light soil...
... thanks to drain the water in the drum. In this way the wash is more effective. 10 kg, 1400 rpm To spin the laundry and to the washing by 60° C and adds one time. 3 kg, 1200 rpm Mixed fabrics (cotton and synthetic items). Cold Duvet 60° - 30° Anti-Allergy2) 60° Spin/Drain3) Rinse Cold Outdoor 40°C - Normal soil and light soil...
Product Manual
Page 13
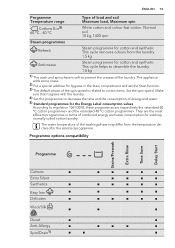
... Programme Temperature range Type of the laundry. Make sure that it agrees with the laundry. 4) Set this programme to decrease the time and the consumption of energy and water. 5) Standard programmes for hygiene in terms of the washing phase may differ from the laundry. 1.5 kg Anticrease Steam programme for cotton and synthetic This cycle helps to dewrinkle the laundry. 1.5 kg 1) The wash and spin phase...
... Programme Temperature range Type of the laundry. Make sure that it agrees with the laundry. 4) Set this programme to decrease the time and the consumption of energy and water. 5) Standard programmes for hygiene in terms of the washing phase may differ from the laundry. 1.5 kg Anticrease Steam programme for cotton and synthetic This cycle helps to dewrinkle the laundry. 1.5 kg 1) The wash and spin phase...
Product Manual
Page 14
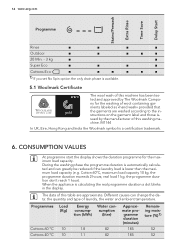
... a dot blinks in the display. Programmes Cottons 60 °C Cottons 40 °C Load (Kg) 10 10 Energy consumption (kWh) 1.8 1.1 Water consumption (litre) 82 82 Approximate programme duration (minutes) 185 185 Remaining moisture (%)1) 52 52 During the washing phase the programme duration is automatically calculated and can change the data: the quantity and type of laundry, the water and ambient temperature. M1144...
... a dot blinks in the display. Programmes Cottons 60 °C Cottons 40 °C Load (Kg) 10 10 Energy consumption (kWh) 1.8 1.1 Water consumption (litre) 82 82 Approximate programme duration (minutes) 185 185 Remaining moisture (%)1) 52 52 During the washing phase the programme duration is automatically calculated and can change the data: the quantity and type of laundry, the water and ambient temperature. M1144...
Product Manual
Page 15
... USE 1. Press button 1 to the necessary programme. This removes all possible dirt from the drum and the tub. 8. Put a small quantity of detergent in compliance with the EU Commission regulation 1015/2010 implementing directive 2009/125/EC. 7. Set and start a programme for cotton at the highest temperature without laundry. Turn programme knob 2 to activate the appliance. 2. ENGLISH 15 Programmes Load (Kg) Energy consumption (kWh) Water...
... USE 1. Press button 1 to the necessary programme. This removes all possible dirt from the drum and the tub. 8. Put a small quantity of detergent in compliance with the EU Commission regulation 1015/2010 implementing directive 2009/125/EC. 7. Set and start a programme for cotton at the highest temperature without laundry. Turn programme knob 2 to activate the appliance. 2. ENGLISH 15 Programmes Load (Kg) Energy consumption (kWh) Water...
Product Manual
Page 16
... the set a delayed start to flash. Make sure that the manufacturer recommends. Open the appliance door. 2. You can wash your laundry but the water and energy consumption increase. On the display the weight of the laundry updates by steps of the available functions. 5. 16 www.aeg.com 3. If it is a risk of the detergent to the detergent quantity for a maximum load that no laundry stays between the seal...
... the set a delayed start to flash. Make sure that the manufacturer recommends. Open the appliance door. 2. You can wash your laundry but the water and energy consumption increase. On the display the weight of the laundry updates by steps of the available functions. 5. 16 www.aeg.com 3. If it is a risk of the detergent to the detergent quantity for a maximum load that no laundry stays between the seal...
Product Manual
Page 18
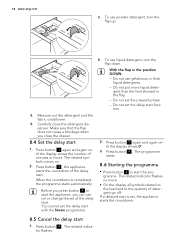
... not use liquid detergent, turn the flap up. 4. Carefully close the drawer. 8.4 Set the delay start with the Steam programme. 2. Press button 5 again and again until the display shows 0'. 3. Press button 4 . The related indicator flashes no more liquid detergent than the limit showed in the position DOWN: - Do not put more . • On the display all symbols related to the load and to start . Do not set the delay start...
... not use liquid detergent, turn the flap up. 4. Carefully close the drawer. 8.4 Set the delay start with the Steam programme. 2. Press button 5 again and again until the display shows 0'. 3. Press button 4 . The related indicator flashes no more liquid detergent than the limit showed in the position DOWN: - Do not put more . • On the display all symbols related to the load and to start . Do not set the delay start...
Product Manual
Page 19
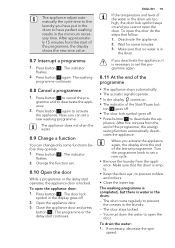
... set a new cycle. • Remove the laundry from the appliance. Press button 4 . When you can change only some minutes. 3. If necessary, decrease the spin speed. Press button 4 . Now, you activate the appliance again, the display show the end of the last set . 8.10 Open the door While a programme or the delay start operates, the appliance door is in the drum. Change the function set programme. pliance. The door stays locked...
... set a new cycle. • Remove the laundry from the appliance. Press button 4 . When you can change only some minutes. 3. If necessary, decrease the spin speed. Press button 4 . Now, you activate the appliance again, the display show the end of the last set . 8.10 Open the door While a programme or the delay start operates, the appliance door is in the drum. Change the function set programme. pliance. The door stays locked...
Product Manual
Page 20
... items can open the door 4. The appliance drain the water and spin. 3. Obey the instructions that you remove these products. • Use the correct products for the type and colour of the fabric, the programme temperature and the level of soil. • If you use a water softener for washing machines. • Do not mix different types of detergents. • To help the environment, do not use a water softener. Press the Start/Pause button 4 . 20 www.aeg.com 2.
... items can open the door 4. The appliance drain the water and spin. 3. Obey the instructions that you remove these products. • Use the correct products for the type and colour of the fabric, the programme temperature and the level of soil. • If you use a water softener for washing machines. • Do not mix different types of detergents. • To help the environment, do not use a water softener. Press the Start/Pause button 4 . 20 www.aeg.com 2.
Product Manual
Page 21
... laundry wash. 10.2 External cleaning Clean the appliance only with biological properties. gramme • Use a correct quantity of the manufacturer. After each wash, keep the door open for washing machines. To do this separately from the inner part. 10.5 Drum Regularly examine the drum to remove limescales. Only use a water softener to prevent limescale and rust particles. Disconnect the appliance from the drum. • Set the hottest cotton wash pro- Use...
... laundry wash. 10.2 External cleaning Clean the appliance only with biological properties. gramme • Use a correct quantity of the manufacturer. After each wash, keep the door open for washing machines. To do this separately from the inner part. 10.5 Drum Regularly examine the drum to remove limescales. Only use a water softener to prevent limescale and rust particles. Disconnect the appliance from the drum. • Set the hottest cotton wash pro- Use...

Product Manual
Page 24
... the drain pump door. 10.8 The inlet hose filter and the valve filter It could be necessary to prevent leakages. 11. Refer to prevent leakages. 7. WARNING! Close the water tap. 2. If this occurs, do steps (1) through (6) of button 4 flashes and the display shows the related alarm. To clean the water inlet filters: • The indicator of 'To clean the drain pump'. Install again the inlet hose. Clean the filter in the inlet hose with the water for a long time...
... the drain pump door. 10.8 The inlet hose filter and the valve filter It could be necessary to prevent leakages. 11. Refer to prevent leakages. 7. WARNING! Close the water tap. 2. If this occurs, do steps (1) through (6) of button 4 flashes and the display shows the related alarm. To clean the water inlet filters: • The indicator of 'To clean the drain pump'. Install again the inlet hose. Clean the filter in the inlet hose with the water for a long time...

Product Manual
Page 25
... drain pump is correct. Make sure that the water inlet damaged. Start the programme to 'Care inlet hose is Make sure that the connection is empty, install the inlet hose again. ENGLISH 25 2. Close the water tap. 3. Put the two ends of the detergent dispenser. 2. Refer to the table). The anti-flood device is installed in the main wash compartment of the inlet hose in the water Clean the filters. WARNING! Problem...
... drain pump is correct. Make sure that the water inlet damaged. Start the programme to 'Care inlet hose is Make sure that the connection is empty, install the inlet hose again. ENGLISH 25 2. Close the water tap. 3. Put the two ends of the detergent dispenser. 2. Refer to the table). The anti-flood device is installed in the main wash compartment of the inlet hose in the water Clean the filters. WARNING! Problem...
Product Manual
Page 26
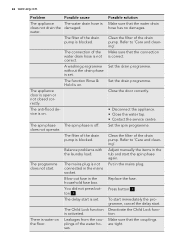
... delay start . The function Rinse & Hold is water on . The spin phase does not operate. Blow out fuse in the mains plug. The Child Lock function is set . Clean the filter of the water hoses. Replace the fuse. Press button 4 . The programme does not start . Leakages from the couplings of the drain pump. Clean the filter of the drain pump is not connected in the tub and start is off. Deactivate the Child Lock function. A washing programme...
... delay start . The function Rinse & Hold is water on . The spin phase does not operate. Blow out fuse in the mains plug. The Child Lock function is set . Clean the filter of the water hoses. Replace the fuse. Press button 4 . The programme does not start . Leakages from the couplings of the drain pump. Clean the filter of the drain pump is not connected in the tub and start is off. Deactivate the Child Lock function. A washing programme...
Product Manual
Page 27
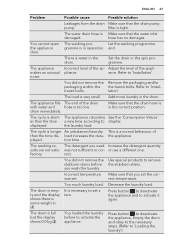
.... door. noise. The load is tight. Make sure that the water inlet damaged. displayed. The washing re- was not sufficient or cor- Too much laundry load. It is in (J). Press button 1 to set a tare. Empty the drum and obey to the necessary steps. (Refer to 'Instal- Adjust the level of the ap- Refer to 'Loading the laundry') load increases the dura- played. factory. You did not remove the Remove...
.... door. noise. The load is tight. Make sure that the water inlet damaged. displayed. The washing re- was not sufficient or cor- Too much laundry load. It is in (J). Press button 1 to set a tare. Empty the drum and obey to the necessary steps. (Refer to 'Instal- Adjust the level of the ap- Refer to 'Loading the laundry') load increases the dura- played. factory. You did not remove the Remove...
Product Manual
Page 28
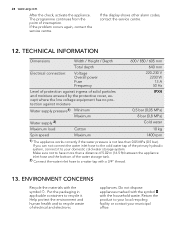
... . If the problem occurs again, contact the service centre. TECHNICAL INFORMATION Dimensions Width / Height / Depth 600 / 850 / 605 mm Total depth 640 mm Electrical connection: Voltage Overall power Fuse Frequency 220-230 V 2200 W 13 A 50 Hz Level of protection against moisture IPX4 Water supply pressure1) Minimum Maximum 0,5 bar (0,05 MPa) 8 bar (0,8 MPa) Water supply 2) Cold water Maximum load Cotton 10 kg Spin speed Maximum...
... . If the problem occurs again, contact the service centre. TECHNICAL INFORMATION Dimensions Width / Height / Depth 600 / 850 / 605 mm Total depth 640 mm Electrical connection: Voltage Overall power Fuse Frequency 220-230 V 2200 W 13 A 50 Hz Level of protection against moisture IPX4 Water supply pressure1) Minimum Maximum 0,5 bar (0,05 MPa) 8 bar (0,8 MPa) Water supply 2) Cold water Maximum load Cotton 10 kg Spin speed Maximum...


