
Product Manual
Page 2
... best from it to keep all your AEG appliances looking spotless and working perfectly. 2 FOR PERFECT RESULTS Thank you impeccable performance for choosing this AEG product. features you might not find everything you need to give you for many years, with a wide range of accessories designed and built to the high quality standards you 'll find on...
... best from it to keep all your AEG appliances looking spotless and working perfectly. 2 FOR PERFECT RESULTS Thank you impeccable performance for choosing this AEG product. features you might not find everything you need to give you for many years, with a wide range of accessories designed and built to the high quality standards you 'll find on...

Product Manual
Page 3
General information and tips Environmental information Subject to avoid damaging the appliance. CONTENTS Contents 3 4 Safety information 5 Installation instructions 7 Product description 8 Operating instructions 8 Helpful hints and tips 9 Care and cleaning 10 What to do if... 10 Environment concerns The following symbols are used in this user manual: Important information concerning your personal safety and information on how to change without notice
General information and tips Environmental information Subject to avoid damaging the appliance. CONTENTS Contents 3 4 Safety information 5 Installation instructions 7 Product description 8 Operating instructions 8 Helpful hints and tips 9 Care and cleaning 10 What to do if... 10 Environment concerns The following symbols are used in this user manual: Important information concerning your personal safety and information on how to change without notice
Product Manual
Page 4
...cook, as a work or a storage surface. • Do not put or keep these instructions with ignition very quickly. Do not let the electricity bonds touch the appliance or hot cookware. How to prevent a damage to the appliance • If the objects or cookware fall on the glass ceramic, the surface...children away from the appliance before the installation and use . • Set the cooking zones to "off" after the operation, until the ap- pliance is responsible for the operation of the appliance. The users must have supervision or instruction for their safety. • Keep ...
...cook, as a work or a storage surface. • Do not put or keep these instructions with ignition very quickly. Do not let the electricity bonds touch the appliance or hot cookware. How to prevent a damage to the appliance • If the objects or cookware fall on the glass ceramic, the surface...children away from the appliance before the installation and use . • Set the cooking zones to "off" after the operation, until the ap- pliance is responsible for the operation of the appliance. The users must have supervision or instruction for their safety. • Keep ...
Product Manual
Page 5
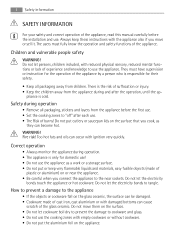
... electrical current. Risk of the worktop from steam and moisture, e.g. Keep safe the cut surfaces of injury and damage to give shock protection. • Loose and incorrect plug and socket connections can install, connect or repair this product. You must install the connections in units and work top with no space between with a correct sealant! INSTALLATION INSTRUCTIONS Before the installation, note down the serial number (Ser. Carefully...
... electrical current. Risk of the worktop from steam and moisture, e.g. Keep safe the cut surfaces of injury and damage to give shock protection. • Loose and incorrect plug and socket connections can install, connect or repair this product. You must install the connections in units and work top with no space between with a correct sealant! INSTALLATION INSTRUCTIONS Before the installation, note down the serial number (Ser. Carefully...
Product Manual
Page 6
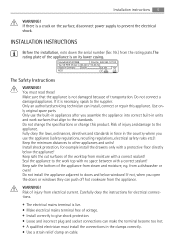
6 Installation instructions • Use the correct mains cable of minimum 3 mm. You must have correct devices to isolate: line protecting cut-outs, fuses (screw type fuses removed from the mains at all poles with a contact opening width of type H05BB-F Tmax 90°C (or higher) for a single phase or two phase connection. • Replace the damaged mains cable with a special cable (type H05BB-F Tmax 90...
6 Installation instructions • Use the correct mains cable of minimum 3 mm. You must have correct devices to isolate: line protecting cut-outs, fuses (screw type fuses removed from the mains at all poles with a contact opening width of type H05BB-F Tmax 90°C (or higher) for a single phase or two phase connection. • Replace the damaged mains cable with a special cable (type H05BB-F Tmax 90...
Product Manual
Page 7
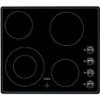
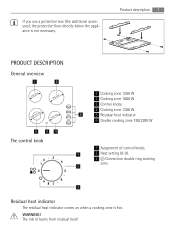
... of control knobs. 1 2 Heat setting (0-9). 3 Connection double ring cooking zone. 2 3 Residual heat indicator The residual heat indicator comes on when a cooking zone is not necessary. If you use a protection box (the additional accessory), the protective floor directly below the appliance is hot. WARNING! Product description 7 PRODUCT DESCRIPTION General overview 1 2 145 mm 180 mm 120/210 mm 145 mm 1 Cooking zone 1200 W 2 Cooking zone 1800 W 3 Control knobs 4 Cooking zone 1200 W 3 5 Residual heat indicator 6 Double cooking...
... of control knobs. 1 2 Heat setting (0-9). 3 Connection double ring cooking zone. 2 3 Residual heat indicator The residual heat indicator comes on when a cooking zone is not necessary. If you use a protection box (the additional accessory), the protective floor directly below the appliance is hot. WARNING! Product description 7 PRODUCT DESCRIPTION General overview 1 2 145 mm 180 mm 120/210 mm 145 mm 1 Cooking zone 1200 W 2 Cooking zone 1800 W 3 Control knobs 4 Cooking zone 1200 W 3 5 Residual heat indicator 6 Double cooking...
Product Manual
Page 8
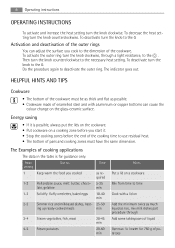
... can adjust the surface you start it. • Stop the cooking zones before the end of the cooking time to use residual heat. • The bottom of the cookware must have the same dimension. The Examples of potatoes To decrease the heat setting turn the knob counterclockwise to the necessary heat setting. HELPFUL HINTS AND TIPS Cookware • The bottom of pans and cooking zones...
... can adjust the surface you start it. • Stop the cooking zones before the end of the cooking time to use residual heat. • The bottom of the cookware must have the same dimension. The Examples of potatoes To decrease the heat setting turn the knob counterclockwise to the necessary heat setting. HELPFUL HINTS AND TIPS Cookware • The bottom of pans and cooking zones...
Product Manual
Page 9
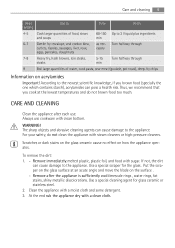
... or high-pressure cleaners. Always use . Use a special cleaning agent for the glass . Clean the appliance with a clean cloth. Care and cleaning 9 Heat setting Use to: Time Hints 4-5 Cook larger quantities of water, cook pasta, sear meat (goulash, pot roast), deep-fry chips Information on acrylamides Important! To remove the dirt: 1. - Use a special scraper for glass ceramic or stainless steel. 2. Scratches or dark stains on the glass-ceramic cause no effect on the glass surface...
... or high-pressure cleaners. Always use . Use a special cleaning agent for the glass . Clean the appliance with a clean cloth. Care and cleaning 9 Heat setting Use to: Time Hints 4-5 Cook larger quantities of water, cook pasta, sear meat (goulash, pot roast), deep-fry chips Information on acrylamides Important! To remove the dirt: 1. - Use a special scraper for glass ceramic or stainless steel. 2. Scratches or dark stains on the glass-ceramic cause no effect on the glass surface...
Product Manual
Page 10
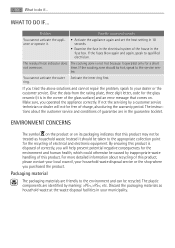
... heat indicator does The cooking zone is not hot because it operated only for the glass ceramic (it is disposed of correctly, you purchased the product. Make sure, you tried the above solutions and cannot repair the problem, speak to qualified electrician. For more detailed information about the customer service and conditions of charge, also during the warranty period. If the fuses...
... heat indicator does The cooking zone is not hot because it operated only for the glass ceramic (it is disposed of correctly, you purchased the product. Make sure, you tried the above solutions and cannot repair the problem, speak to qualified electrician. For more detailed information about the customer service and conditions of charge, also during the warranty period. If the fuses...

Product Manual
Page 12
www.aeg-electrolux.com/shop 892934465-B-462010
www.aeg-electrolux.com/shop 892934465-B-462010


