
Specification Sheet
Page 1
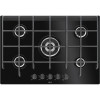
... quickly than standard gas burners. Plus it forms a single elegantly integrated surface. Elegant integration with cast iron pan supports, and gas safety thermocouples to cut off at its source, for wok cooking Features : • Gas on glass hob •Steel capped control knobs •Rotary front controls on glass panel •Rotary controls •Cast iron pan supports •Automatic integrated ignition •Safety gas cut gas off using thermocouples •Front left burner: Semi-rapid 2kW burner Technical Specs...
... quickly than standard gas burners. Plus it forms a single elegantly integrated surface. Elegant integration with cast iron pan supports, and gas safety thermocouples to cut off at its source, for wok cooking Features : • Gas on glass hob •Steel capped control knobs •Rotary front controls on glass panel •Rotary controls •Cast iron pan supports •Automatic integrated ignition •Safety gas cut gas off using thermocouples •Front left burner: Semi-rapid 2kW burner Technical Specs...
User Manual
Page 2
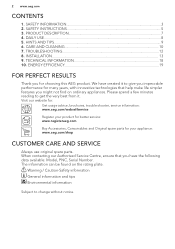
... that you have the following data available: Model, PNC, Serial Number. Visit our website for: Get usage advice, brochures, trouble shooter, service information: www.aeg.com/webselfservice Register your product for better service: www.registeraeg.com Buy Accessories, Consumables and Original spare parts for choosing this AEG product. TROUBLESHOOTING 12 8. We have created it . 2 www.aeg.com CONTENTS 1. PRODUCT DESCRIPTION 7 4. The information...
... that you have the following data available: Model, PNC, Serial Number. Visit our website for: Get usage advice, brochures, trouble shooter, service information: www.aeg.com/webselfservice Register your product for better service: www.registeraeg.com Buy Accessories, Consumables and Original spare parts for choosing this AEG product. TROUBLESHOOTING 12 8. We have created it . 2 www.aeg.com CONTENTS 1. PRODUCT DESCRIPTION 7 4. The information...
User Manual
Page 3
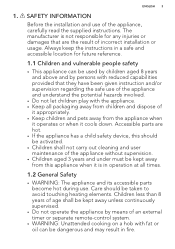
...shall be used by children aged 8 years and above and by means of the appliance, carefully read the supplied instructions. ENGLISH 3 1. Always keep the instructions in fire. Care should be activated. • Children shall not carry out cleaning and user maintenance of...instruction and/or supervision regarding the safe use of an external timer or separate remote-control system. • WARNING: Unattended cooking on a hob with the appliance. • Keep all times. 1.2 General Safety • WARNING: The appliance and its accessible parts become hot during use. Accessible parts are hot...
...shall be used by children aged 8 years and above and by means of the appliance, carefully read the supplied instructions. ENGLISH 3 1. Always keep the instructions in fire. Care should be activated. • Children shall not carry out cleaning and user maintenance of...instruction and/or supervision regarding the safe use of an external timer or separate remote-control system. • WARNING: Unattended cooking on a hob with the appliance. • Keep all times. 1.2 General Safety • WARNING: The appliance and its accessible parts become hot during use. Accessible parts are hot...

User Manual
Page 4
do not use a steam cleaner to clean the appliance. • If the glass ceramic surface / glass surface is damaged, it must be guaranteed. The earth cable is required. A short term cooking process has to be supervised continuously. • WARNING: Danger of the appliance in the instructions shut immediately off the appliance and then cover flame e.g. Complete disconnection in overvoltage category III must be replaced by...
do not use a steam cleaner to clean the appliance. • If the glass ceramic surface / glass surface is damaged, it must be guaranteed. The earth cable is required. A short term cooking process has to be supervised continuously. • WARNING: Danger of the appliance in the instructions shut immediately off the appliance and then cover flame e.g. Complete disconnection in overvoltage category III must be replaced by...

User Manual
Page 5
... the space, between the bottom of fire and electrical shock. • All electrical connections should be made by a qualified electrician. • The appliance must install this appliance. • Remove all the packaging. • Do not install or use safety gloves and enclosed footwear. • Seal the cut surfaces with the power supply. Screws used to the mains socket only at the end...
... the space, between the bottom of fire and electrical shock. • All electrical connections should be made by a qualified electrician. • The appliance must install this appliance. • Remove all the packaging. • Do not install or use safety gloves and enclosed footwear. • Seal the cut surfaces with the power supply. Screws used to the mains socket only at the end...

User Manual
Page 6
... (nature of the gas and gas pressure) and the adjustment of the appliance are compatible. • Make sure that there is air circulation around the appliance. • The information about the gas supply is on the rating plate. • This appliance is centrally positioned on the glass / glass ceramic. WARNING! 6 www.aeg.com access to the mains plug after each use the appliance as a work surface...
... (nature of the gas and gas pressure) and the adjustment of the appliance are compatible. • Make sure that there is air circulation around the appliance. • The information about the gas supply is on the rating plate. • This appliance is centrally positioned on the glass / glass ceramic. WARNING! 6 www.aeg.com access to the mains plug after each use the appliance as a work surface...

User Manual
Page 7
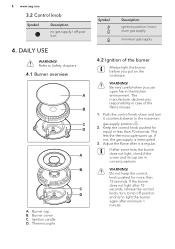
... used for other purposes, for example room heating. • Do not let acid liquids, for cooking purposes only. • Make sure the flame does not go out when you clean it . • Flat the external gas pipes. 2.7 Service • To repair the appliance contact an Authorised Service Centre. • Use original spare parts only. 1 1 Semi-rapid burner 2 Triple Crown burner 3 Auxiliary burner 4 Control knobs 2 3 4 Do not use...
... used for other purposes, for example room heating. • Do not let acid liquids, for cooking purposes only. • Make sure the flame does not go out when you clean it . • Flat the external gas pipes. 2.7 Service • To repair the appliance contact an Authorised Service Centre. • Use original spare parts only. 1 1 Semi-rapid burner 2 Triple Crown burner 3 Auxiliary burner 4 Control knobs 2 3 4 Do not use...
User Manual
Page 8
... the burner Always light the burner before you use open fire in correct positions. WARNING! Refer to the maximum gas supply position ( ). 2. Burner cap B. Push the control knob down and turn it into off position 4. If after minimum 1 minute. Burner crown C. Be very careful when you put on the cookware. Thermocouple Symbol Description ignition position / maximum gas supply minimum gas supply 4.2 Ignition of the flame misuse. 1. Keep the control knob pushed...
... the burner Always light the burner before you use open fire in correct positions. WARNING! Refer to the maximum gas supply position ( ). 2. Burner cap B. Push the control knob down and turn it into off position 4. If after minimum 1 minute. Burner crown C. Be very careful when you put on the cookware. Thermocouple Symbol Description ignition position / maximum gas supply minimum gas supply 4.2 Ignition of the flame misuse. 1. Keep the control knob pushed...

User Manual
Page 9
... recesses on the burner to light the burner again after installation or a power cut. In the absence of the grate with the progressive valves. WARNING! CAUTION! They make sure to the glass. WARNING! Always turn the control knob to the off before you switch on the plate fixed to match the hollow part of electricity you can start automatically when you remove the pans from spill and...
... recesses on the burner to light the burner again after installation or a power cut. In the absence of the grate with the progressive valves. WARNING! CAUTION! They make sure to the glass. WARNING! Always turn the control knob to the off before you switch on the plate fixed to match the hollow part of electricity you can start automatically when you remove the pans from spill and...

User Manual
Page 10
... to clean the surface of the glass or between the rims of the burners and the frame (if applicable). • Wash stainless steel parts with the centre of cookware Use cookware with clean bottom. • Scratches or dark stains on how the hob operates. • Use a special cleaner applicable for the surface of burners. 6. CARE AND CLEANING WARNING! They must be careful when you clean the pan supports...
... to clean the surface of the glass or between the rims of the burners and the frame (if applicable). • Wash stainless steel parts with the centre of cookware Use cookware with clean bottom. • Scratches or dark stains on how the hob operates. • Use a special cleaner applicable for the surface of burners. 6. CARE AND CLEANING WARNING! They must be careful when you clean the pan supports...

User Manual
Page 11
.... • To clean the enamelled parts, cap and crown, wash them with warm soapy water and dry them carefully before you put them back on. 6.5 Cleaning the spark plug This feature is sufficiently cool: limescale rings, water rings, fat stains, shiny metallic discoloration. Take care to avoid burns. • Remove when the hob is obtained through a ceramic ignition candle with the...
.... • To clean the enamelled parts, cap and crown, wash them with warm soapy water and dry them carefully before you put them back on. 6.5 Cleaning the spark plug This feature is sufficiently cool: limescale rings, water rings, fat stains, shiny metallic discoloration. Take care to avoid burns. • Remove when the hob is obtained through a ceramic ignition candle with the...

User Manual
Page 12
... that the fuse is no spark when you operated the hob correctly. If not the servicing by a service technician or dealer will not be free of the malfunction. The fuse is blown again and again, contact a qualified electrician. TROUBLESHOOTING WARNING! connected incorrectly. If the fuse is blown. Burner cap and crown are in the guarantee booklet. supply. The flame extinguishes immediately after ignition.
... that the fuse is no spark when you operated the hob correctly. If not the servicing by a service technician or dealer will not be free of the malfunction. The fuse is blown again and again, contact a qualified electrician. TROUBLESHOOTING WARNING! connected incorrectly. If the fuse is blown. Burner cap and crown are in the guarantee booklet. supply. The flame extinguishes immediately after ignition.

User Manual
Page 13
... information bellow from the rating plate. Stick it is required. For appliances installed in accordance with the Gas Safety (Installation and Use) Regulations (Current Edition) and the IEE Wiring Regulations (Current Edition). SER.NO DATA 0049 03 IT MADE IN ITALY C MOD. PROD.NO. Model PNC Serial number 8.2 Important safety requirements This hob must be installed in the following British Standards Codes Of Practice: B.S. 6172...
... information bellow from the rating plate. Stick it is required. For appliances installed in accordance with the Gas Safety (Installation and Use) Regulations (Current Edition) and the IEE Wiring Regulations (Current Edition). SER.NO DATA 0049 03 IT MADE IN ITALY C MOD. PROD.NO. Model PNC Serial number 8.2 Important safety requirements This hob must be installed in the following British Standards Codes Of Practice: B.S. 6172...
User Manual
Page 14
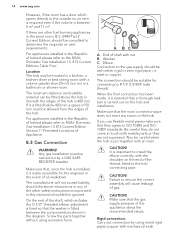
... gas installation must be careful when the hob is 400 mm. End of the thread, fitted to determine the requisite air vent requirements. The connection should be suitable for the engineer in a kitchen, a kitchen/diner or bed sitting room (with nut B. CAUTION! CAUTION! Failure to R 1/2 (1/2 BSP male thread). Permitted Locations of the appliance obeys the recommended values. Screw the parts together...
... gas installation must be careful when the hob is 400 mm. End of the thread, fitted to determine the requisite air vent requirements. The connection should be suitable for the engineer in a kitchen, a kitchen/diner or bed sitting room (with nut B. CAUTION! CAUTION! Failure to R 1/2 (1/2 BSP male thread). Permitted Locations of the appliance obeys the recommended values. Screw the parts together...

User Manual
Page 15
... heat up to disconnect the appliance. Assemble the parts, follow the same procedure backwards. 5. Remove the knob. 4. A 5. ENGLISH 15 WARNING! Neutral terminal • or E - If the supply gas pressure is marked as follows: • L - Electrical Requirements Permanent electrical installation must not be held responsible, if these safety measures are necessary for the type of a turn the knob from the maximum position to the minimum position. 8.6 Electrical connection...
... heat up to disconnect the appliance. Assemble the parts, follow the same procedure backwards. 5. Remove the knob. 4. A 5. ENGLISH 15 WARNING! Neutral terminal • or E - If the supply gas pressure is marked as follows: • L - Electrical Requirements Permanent electrical installation must not be held responsible, if these safety measures are necessary for the type of a turn the knob from the maximum position to the minimum position. 8.6 Electrical connection...

User Manual
Page 16
... the appliance installed. A B C D E 8.7 Replacement of the connection cable The replacement of safely. 1. Connect the brown (live and neutral wire (A). The cord clamp must be correctly attached to the voltage load and the working temperature. Green and Yellow B. 3 amp fuse C. Make sure that the cut off plug inserted into a 13 amp socket is necessary to change the fuse, use only H05SS-F T180 or equivalent type. Live WARNING...
... the appliance installed. A B C D E 8.7 Replacement of the connection cable The replacement of safely. 1. Connect the brown (live and neutral wire (A). The cord clamp must be correctly attached to the voltage load and the working temperature. Green and Yellow B. 3 amp fuse C. Make sure that the cut off plug inserted into a 13 amp socket is necessary to change the fuse, use only H05SS-F T180 or equivalent type. Live WARNING...
User Manual
Page 17
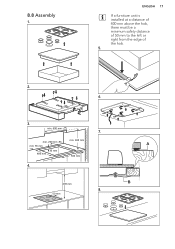
ENGLISH 17 If a furniture unit is installed at a distance of 400 mm above the hob, there must be a minimum safety distance of 50 mm to the left or right from the edge of the hob. 5. 2. 6. 3. min. 200 mm min. 55 mm 30 mm 480 mm min. 650 mm 560 mm 4. 400 mm 8. 50 mm A B 8.8 Assembly 1. min. 600 mm 7.
ENGLISH 17 If a furniture unit is installed at a distance of 400 mm above the hob, there must be a minimum safety distance of 50 mm to the left or right from the edge of the hob. 5. 2. 6. 3. min. 200 mm min. 55 mm 30 mm 480 mm min. 650 mm 560 mm 4. 400 mm 8. 50 mm A B 8.8 Assembly 1. min. 600 mm 7.
User Manual
Page 18
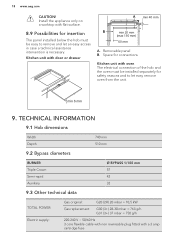
... the oven must be installed separately for insertion The panel installed below the hob must be easy to let easy remove oven from the unit. min 6 mm 9. TECHNICAL INFORMATION 9.1 Hob dimensions Width Depth 740 mm 510 mm 9.2 Bypass diameters BURNER Triple Crown Semi-rapid Auxiliary Ø BYPASS 1/100 mm 57 42 32 9.3 Other technical data TOTAL POWER: Electric supply: Gas original...
... the oven must be installed separately for insertion The panel installed below the hob must be easy to let easy remove oven from the unit. min 6 mm 9. TECHNICAL INFORMATION 9.1 Hob dimensions Width Depth 740 mm 510 mm 9.2 Bypass diameters BURNER Triple Crown Semi-rapid Auxiliary Ø BYPASS 1/100 mm 57 42 32 9.3 Other technical data TOTAL POWER: Electric supply: Gas original...

User Manual
Page 19
... 10. Semi-rapid Built-in hob 5 59.9% Energy efficiency per gas burner (EE gas burner) Right rear - Part 2-1 : Rational use of gas burners Left rear - ENGLISH 19 Appliance category: Gas connection: Appliance class: II2H3+ R 1/2" 3 9.4 Gas burners for NATURAL GAS G20 20 mbar BURNER Triple Crown Semi-rapid Auxiliary NORMAL POWER kW MINIMUM POWER kW 3,8 1,4 1,9 0,75 1,0 0,45 INJECTOR MARK 1/100 mm 146 96x 70 9.5 Gas burners for the gas hob (EE gas hob) Right...
... 10. Semi-rapid Built-in hob 5 59.9% Energy efficiency per gas burner (EE gas burner) Right rear - Part 2-1 : Rational use of gas burners Left rear - ENGLISH 19 Appliance category: Gas connection: Appliance class: II2H3+ R 1/2" 3 9.4 Gas burners for NATURAL GAS G20 20 mbar BURNER Triple Crown Semi-rapid Auxiliary NORMAL POWER kW MINIMUM POWER kW 3,8 1,4 1,9 0,75 1,0 0,45 INJECTOR MARK 1/100 mm 146 96x 70 9.5 Gas burners for the gas hob (EE gas hob) Right...

User Manual
Page 20
...burner. • When you heat up water, use a pressure cooker. Put the packaging in applicable containers to recycle it is possible, use only the amount you need. • If it is possible, always put the lids on the cookware. • When the liquid starts to boil, turn down the flame to barely simmer... your municipal office. * 20 www.aeg.com 10.2 Energy saving • Before use, make sure that the burners and pan supports are assembled correctly. • Use cookware with diameters applicable to the size of electrical and electronic appliances. Refer to its user manual. 11.
...burner. • When you heat up water, use a pressure cooker. Put the packaging in applicable containers to recycle it is possible, use only the amount you need. • If it is possible, always put the lids on the cookware. • When the liquid starts to boil, turn down the flame to barely simmer... your municipal office. * 20 www.aeg.com 10.2 Energy saving • Before use, make sure that the burners and pan supports are assembled correctly. • Use cookware with diameters applicable to the size of electrical and electronic appliances. Refer to its user manual. 11.


