
Getting Started
Page 2
...whichever is furnished under a license agreement included with the product as translation, transformation, or adaptation) without written permission from 3Com Corporation. 3Com Corporation reserves the right to revise this documentation and to make changes in content from time to : Establishing environmental performance ...are labelled according to , the implied warranties, terms or conditions of all operations. All other countries, licensed exclusively through X/Open Company, Ltd. Reducing the waste generated by any means or used to make improvements or changes in the product(s) and/or...
...whichever is furnished under a license agreement included with the product as translation, transformation, or adaptation) without written permission from 3Com Corporation. 3Com Corporation reserves the right to revise this documentation and to make changes in content from time to : Establishing environmental performance ...are labelled according to , the implied warranties, terms or conditions of all operations. All other countries, licensed exclusively through X/Open Company, Ltd. Reducing the waste generated by any means or used to make improvements or changes in the product(s) and/or...

Getting Started
Page 23
AVVERTENZA: Informazioni di sicurezza. CAUTION: Opening the switch or tampering with your switch as well as í como el Apéndice D, "Redundant Power Supply Safety Information" on page 67. WARNING: Safety Information. AVERTISSEMENT: Consignes de ... Information" on page 67 lesen. Before you install or remove any components from the Switch or carry out any maintenance procedures, you need to the Switch 4210 Release Notes available at www.3Com.com. Bevor Sie dem Switch Komponenten hinzufügen oder daraus entfernten oder Wartungsaufgaben durchführen, müssen ...
AVVERTENZA: Informazioni di sicurezza. CAUTION: Opening the switch or tampering with your switch as well as í como el Apéndice D, "Redundant Power Supply Safety Information" on page 67. WARNING: Safety Information. AVERTISSEMENT: Consignes de ... Information" on page 67 lesen. Before you install or remove any components from the Switch or carry out any maintenance procedures, you need to the Switch 4210 Release Notes available at www.3Com.com. Bevor Sie dem Switch Komponenten hinzufügen oder daraus entfernten oder Wartungsaufgaben durchführen, müssen ...

Getting Started
Page 30
... protected against the loss of AC mains power. 3Com's RPS solution uses -48V DC power distribution. Connecting the Switch to the Redundant Power System When connecting the RPS to the switch, the circuit breaker and 2-core cables need to the switch's power rating. A minimum of the RPS. ... breaker in the open (off) position when connecting the cable to the RPS and the cable and connector to a circuit breaker terminal. 30 CHAPTER 2: INSTALLING THE SWITCH 1500W rectifiers can provide up to the negative (circuit breaker) terminal of two rectifiers are required for the Switch 4210.
... protected against the loss of AC mains power. 3Com's RPS solution uses -48V DC power distribution. Connecting the Switch to the Redundant Power System When connecting the RPS to the switch, the circuit breaker and 2-core cables need to the switch's power rating. A minimum of the RPS. ... breaker in the open (off) position when connecting the cable to the RPS and the cable and connector to a circuit breaker terminal. 30 CHAPTER 2: INSTALLING THE SWITCH 1500W rectifiers can provide up to the negative (circuit breaker) terminal of two rectifiers are required for the Switch 4210.

Getting Started
Page 43
...connection to its licensors. Decompress Image...OK! The Switch 4210 takes approximately one minute to enter Boot Menu... 0 Auto-booting... Once you have logged in you have connected the cable. Manually Configuring IP Information 43 2 Open your user name and press Return and at ... emulation software and configure the COM port settings to which are automatically in User View. * * * Switch 4210 9-Port BOOTROM, Version 4.01 * * * Copyright(c) 2004-2007 3Com Corporation and its console port. Starting at the password prompt press Return again. If the login prompt does...
...connection to its licensors. Decompress Image...OK! The Switch 4210 takes approximately one minute to enter Boot Menu... 0 Auto-booting... Once you have logged in you have connected the cable. Manually Configuring IP Information 43 2 Open your user name and press Return and at ... emulation software and configure the COM port settings to which are automatically in User View. * * * Switch 4210 9-Port BOOTROM, Version 4.01 * * * Copyright(c) 2004-2007 3Com Corporation and its console port. Starting at the password prompt press Return again. If the login prompt does...

Getting Started
Page 45
... page 48. ■ Existing IP address of your user name, press Enter, and at the other unconfigured switch. This takes approximately one minute. 2 Open a suitable Web browser and enter the IP address of the switch. ■ The switch's IP information, including the: ■ IP address ■ subnet mask ■ default gateway ■ management VLAN...
... page 48. ■ Existing IP address of your user name, press Enter, and at the other unconfigured switch. This takes approximately one minute. 2 Open a suitable Web browser and enter the IP address of the switch. ■ The switch's IP information, including the: ■ IP address ■ subnet mask ■ default gateway ■ management VLAN...

Getting Started
Page 46
...and its licensors. Using Command Line Interface using Telnet 1 To start a Telnet session to open a login prompt. If the login prompt does not begin immediately, press Return a few ... %Apr 4 06:13:31:519 2000 4210 SHELL/5/LOGIN:- 1 - 46 CHAPTER 3: MANAGING YOUR SWITCH address and subnet mask that you want the switch to use when it starts. 3 At ...switch: ip route-static 0.0.0.0 0.0.0.0 xxx.xxx.xxx.xxx (where xxx.xxx.xxx.xxx is the IP address of your switch is displayed as shown below. * Copyright(c) 2004-2007 3Com Corp. The final page displays a summary of Managing a Switch...
...and its licensors. Using Command Line Interface using Telnet 1 To start a Telnet session to open a login prompt. If the login prompt does not begin immediately, press Return a few ... %Apr 4 06:13:31:519 2000 4210 SHELL/5/LOGIN:- 1 - 46 CHAPTER 3: MANAGING YOUR SWITCH address and subnet mask that you want the switch to use when it starts. 3 At ...switch: ip route-static 0.0.0.0 0.0.0.0 xxx.xxx.xxx.xxx (where xxx.xxx.xxx.xxx is the IP address of your switch is displayed as shown below. * Copyright(c) 2004-2007 3Com Corp. The final page displays a summary of Managing a Switch...

Getting Started
Page 47
... the console port. User Interface Overview User interface configuration is the IP address of the switch) If opening a Telnet session using third party software you will need to enter the IP address in the format suitable for that you wish to manage in ... following format: c:\ ping xxx.xxx.xxx.xxx (where xxx.xxx.xxx.xxx is the IP address of the switch) If you get an error message, check that your IP information was entered correctly and the switch is powered up. 4 To open a Telnet session using the DOS prompt, enter the IP address of the...
... the console port. User Interface Overview User interface configuration is the IP address of the switch) If opening a Telnet session using third party software you will need to enter the IP address in the format suitable for that you wish to manage in ... following format: c:\ ping xxx.xxx.xxx.xxx (where xxx.xxx.xxx.xxx is the IP address of the switch) If you get an error message, check that your IP information was entered correctly and the switch is powered up. 4 To open a Telnet session using the DOS prompt, enter the IP address of the...
Getting Started
Page 49
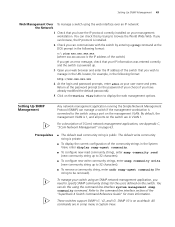
... in the URL locator, for more information. The default write community string is on page 63. For a description of 3Com's network management applications, see Appendix C, "3Com Network Management" on as your user name and press Return at the DOS prompt in the following format: http://xxx.xxx...characters). ■ To configure new write community strings, enter snmp community write (new community string up . 3 Open your choice if you have the IP protocol correctly installed on the switch are in snmp menu in the following format: c:\ ping xxx.xxx.xxx.xxx (where xxx.xxx.xxx.xxx...
... in the URL locator, for more information. The default write community string is on page 63. For a description of 3Com's network management applications, see Appendix C, "3Com Network Management" on as your user name and press Return at the DOS prompt in the following format: http://xxx.xxx...characters). ■ To configure new write community strings, enter snmp community write (new community string up . 3 Open your choice if you have the IP protocol correctly installed on the switch are in snmp menu in the following format: c:\ ping xxx.xxx.xxx.xxx (where xxx.xxx.xxx.xxx...

Getting Started
Page 67
... The installation of the unit to the RPS. WARNING: When powering any Switch 4210 from the RPS. WARNING: Any RPS must be carried out by connecting both...with the RPS flyer and the safety and installation instructions supplied with the 3Com Power-over-Ethernet (PoE) network switches. WARNING: RPS Manufacturers' recommendations must be achieved by either connecting the power...use with telecommunications equipment with your RPS. WARNING: Ensure that the earth connection is in the open (off this device. WARNING: These instructions must be ensured that the circuit breaker in the...
... The installation of the unit to the RPS. WARNING: When powering any Switch 4210 from the RPS. WARNING: Any RPS must be carried out by connecting both...with the RPS flyer and the safety and installation instructions supplied with the 3Com Power-over-Ethernet (PoE) network switches. WARNING: RPS Manufacturers' recommendations must be achieved by either connecting the power...use with telecommunications equipment with your RPS. WARNING: Ensure that the earth connection is in the open (off this device. WARNING: These instructions must be ensured that the circuit breaker in the...