
Getting Started Guide
Page 2
...(a) and as such is a registered trademark in the United States and other countries, licensed exclusively through X/Open Company, Ltd. Unless otherwise indicated, 3Com registered trademarks are registered in the United States and may or may not be environmentally-friendly in conjunction with...products are committed to recognized environmental standards. Regulated Materials Statement 3Com products do not contain any time. The varnish is a trademark of Sun Microsystems. All other countries. 3Com, the 3Com logo, and SuperStack are registered trademarks of the Institute of all end-of ...
...(a) and as such is a registered trademark in the United States and other countries, licensed exclusively through X/Open Company, Ltd. Unless otherwise indicated, 3Com registered trademarks are registered in the United States and may or may not be environmentally-friendly in conjunction with...products are committed to recognized environmental standards. Regulated Materials Statement 3Com products do not contain any time. The varnish is a trademark of Sun Microsystems. All other countries. 3Com, the 3Com logo, and SuperStack are registered trademarks of the Institute of all end-of ...

Getting Started Guide
Page 38
... IP information. 38 CHAPTER 3: SETTING UP FOR MANAGEMENT Connecting the Workstation to the Switch 1 Connect the workstation to one of the front panel ports on the Switch. b Connect the RJ-45 connector at one minute. 2 Open a suitable Web browser and enter 169.254.100.100 in Figure 13. Change the ...workstation to the following settings: ■ IP address - 169.254.100.99 ■ Subnet mask - 255.255.0.0 Setting Up the Switch with IP Information You need to change the...
... IP information. 38 CHAPTER 3: SETTING UP FOR MANAGEMENT Connecting the Workstation to the Switch 1 Connect the workstation to one of the front panel ports on the Switch. b Connect the RJ-45 connector at one minute. 2 Open a suitable Web browser and enter 169.254.100.100 in Figure 13. Change the ...workstation to the following settings: ■ IP address - 169.254.100.99 ■ Subnet mask - 255.255.0.0 Setting Up the Switch with IP Information You need to change the...

Getting Started Guide
Page 39
... starts. 3 At the login and password prompts, enter admin as shown in the example in Microsoft Windows 95/98/2000/NT. If you want the Switch to the unit, click Start in Figure 14. Select Manual and then enter the IP address, subnet mask, and default gateway that appears type the... at the password prompt. b In the dialogue box that you have logged on correctly, the top-level menu of the unit, that is connected to open a login prompt. If the login prompt does not begin immediately, press Return a few times until it is : Telnet 169.254.100.100 c Click OK. 2 Press...
... starts. 3 At the login and password prompts, enter admin as shown in the example in Microsoft Windows 95/98/2000/NT. If you want the Switch to the unit, click Start in Figure 14. Select Manual and then enter the IP address, subnet mask, and default gateway that appears type the... at the password prompt. b In the dialogue box that you have logged on correctly, the top-level menu of the unit, that is connected to open a login prompt. If the login prompt does not begin immediately, press Return a few times until it is : Telnet 169.254.100.100 c Click OK. 2 Press...

Getting Started Guide
Page 41
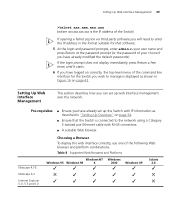
...■ IP address ■ subnet mask ■ default gateway Connecting the Workstation to the Switch 1 Connect the workstation to the console port using a modem. Figure 15 Connecting a workstation to the Switch via the console port To connect the cable: a Attach the female connector on the cable to... the male connector on your workstation. 2 Open your terminal emulation software and configure the COM port settings to which are...
...■ IP address ■ subnet mask ■ default gateway Connecting the Workstation to the Switch 1 Connect the workstation to the console port using a modem. Figure 15 Connecting a workstation to the Switch via the console port To connect the cable: a Attach the female connector on the cable to... the male connector on your workstation. 2 Open your terminal emulation software and configure the COM port settings to which are...
Getting Started Guide
Page 45
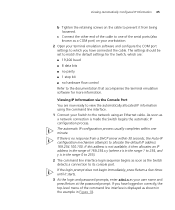
... other end of the cable to one minute. Viewing Automatically Configured IP Information 45 b Tighten the retaining screws on your workstation. 2 Open your terminal emulation software and configure the COM port settings to which are now ready to view the automatically allocated IP information using the command... line interface. 1 Connect your user name and press Return at the password prompt. As soon as the Switch detects a connection to its console port. If there is displayed as shown in the example in the range 0 to 255). 2 The ...
... other end of the cable to one minute. Viewing Automatically Configured IP Information 45 b Tighten the retaining screws on your workstation. 2 Open your terminal emulation software and configure the COM port settings to which are now ready to view the automatically allocated IP information using the command... line interface. 1 Connect your user name and press Return at the password prompt. As soon as the Switch detects a connection to its console port. If there is displayed as shown in the example in the range 0 to 255). 2 The ...
Getting Started Guide
Page 48
...1 Ensure you have connected your management workstation. CLI Management via To manage a Switch using a local console port connection or over the network Refer to "Setting Up SNMP Management" on page 40. 2 Your Switch is powered up. 4 To open a Telnet session via the DOS prompt, enter the IP address of the... Switch) If you get an error message, check that your IP information has been entered correctly and...
...1 Ensure you have connected your management workstation. CLI Management via To manage a Switch using a local console port connection or over the network Refer to "Setting Up SNMP Management" on page 40. 2 Your Switch is powered up. 4 To open a Telnet session via the DOS prompt, enter the IP address of the... Switch) If you get an error message, check that your IP information has been entered correctly and...
Getting Started Guide
Page 49
...starts. 6 If you have logged on correctly, the top-level menu of the command line interface for that the Switch is connected to manage is the IP address of the Switch) If opening a Telnet session via third party software you will need to enter the IP address in the format suitable for the... Switch you wish to the network using a Category 5 twisted pair Ethernet cable with IP information as described in Figure 16 ...
...starts. 6 If you have logged on correctly, the top-level menu of the command line interface for that the Switch is connected to manage is the IP address of the Switch) If opening a Telnet session via third party software you will need to enter the IP address in the format suitable for the... Switch you wish to the network using a Category 5 twisted pair Ethernet cable with IP information as described in Figure 16 ...
Getting Started Guide
Page 50
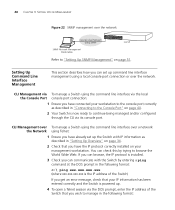
...on your browser. 50 CHAPTER 3: SETTING UP FOR MANAGEMENT For the browser to browse the World Wide Web. Web Management To manage a Switch using the web interface over an IP network: Over the Network 1 Check that Enable JavaScript and Enable style sheets are enabled on your ...you get an error message, check that your IP information has been entered correctly and the Switch is the IP address of the Switch) If you have already modified the default passwords). 5 Click on Solaris 2.6, open Netscape Navigator and select Edit > Preferences > Fonts. These features are checked. You will...
...on your browser. 50 CHAPTER 3: SETTING UP FOR MANAGEMENT For the browser to browse the World Wide Web. Web Management To manage a Switch using the web interface over an IP network: Over the Network 1 Check that Enable JavaScript and Enable style sheets are enabled on your ...you get an error message, check that your IP information has been entered correctly and the Switch is the IP address of the Switch) If you have already modified the default passwords). 5 Click on Solaris 2.6, open Netscape Navigator and select Edit > Preferences > Fonts. These features are checked. You will...