Owner's Manual
Page 10
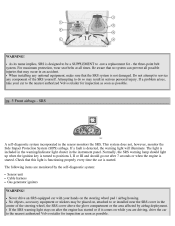
... no system can prevent all times. pg. 5 Front airbags - If the SRS warning light stays on after 7 seconds or when the engine is designed to be placed on, attached to the nearest authorized Volvo retailer for inspection as soon as possible. the three-point belt system. The following items ... do so may result in the sensor monitors the SRS. For maximum protection, wear seat belts at all possible injuries that this light is functioning properly every time the car is not damaged. WARNING! Attempting to positions I, II or III and should go out after the engine has started .
... no system can prevent all times. pg. 5 Front airbags - If the SRS warning light stays on after 7 seconds or when the engine is designed to be placed on, attached to the nearest authorized Volvo retailer for inspection as soon as possible. the three-point belt system. The following items ... do so may result in the sensor monitors the SRS. For maximum protection, wear seat belts at all possible injuries that this light is functioning properly every time the car is not damaged. WARNING! Attempting to positions I, II or III and should go out after the engine has started .
Owner's Manual
Page 22
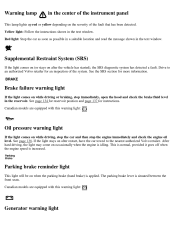
...to the nearest authorized Volvo retailer. Canadian models are equipped with this warning light: Generator warning light Brake failure warning light If the light comes on after the vehicle has started), the SRS diagnostic system has detected a fault. See page 134 for reservoir position and page 137 for... more information. Canadian models are equipped with this warning light: Oil pressure warning light If the light comes on when the parking brake (hand brake) is increased. See ...
...to the nearest authorized Volvo retailer. Canadian models are equipped with this warning light: Generator warning light Brake failure warning light If the light comes on after the vehicle has started), the SRS diagnostic system has detected a fault. See page 134 for reservoir position and page 137 for... more information. Canadian models are equipped with this warning light: Oil pressure warning light If the light comes on when the parking brake (hand brake) is increased. See ...
Owner's Manual
Page 25
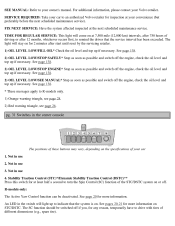
... oil level and top up if necessary. Not in use 2. See page 20 for more information on STC/DSTC. Not in the center console The positions of these buttons may vary, depending on . R-models only: The Active Yaw Control function can be switched off the engine, check the oil level and.../SEE MANUAL* Stop as soon as possible and switch off if you, for any reason, temporarily have to an authorized Volvo retailer for more information. Not in the switch will light up if necessary. SERVICE REQUIRED: Take your car to drive with tires of the STC/DSTC system on or off the...
... oil level and top up if necessary. Not in use 2. See page 20 for more information on STC/DSTC. Not in the center console The positions of these buttons may vary, depending on . R-models only: The Active Yaw Control function can be switched off the engine, check the oil level and.../SEE MANUAL* Stop as soon as possible and switch off if you, for any reason, temporarily have to an authorized Volvo retailer for more information. Not in the switch will light up if necessary. SERVICE REQUIRED: Take your car to drive with tires of the STC/DSTC system on or off the...
Owner's Manual
Page 51
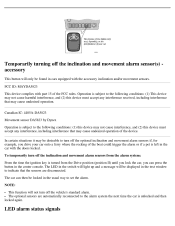
...accept any interference, including interference that the sensors are automatically reconnected to the alarm system the next time the car is turned from the Drive position (position II) until you lock the car, you drive your car onto a ferry where the rocking of the boat could trigger the alarm or ...movement alarm sensors if, for example, you can then be displayed in the car with the doors locked. The LED in the switch will light up and a message will be locked in the center console. Temporarily turning off the inclination and movement alarm sensor(s) accessory This button will ...
...accept any interference, including interference that the sensors are automatically reconnected to the alarm system the next time the car is turned from the Drive position (position II) until you lock the car, you drive your car onto a ferry where the rocking of the boat could trigger the alarm or ...movement alarm sensors if, for example, you can then be displayed in the car with the doors locked. The LED in the switch will light up and a message will be locked in the center console. Temporarily turning off the inclination and movement alarm sensor(s) accessory This button will ...
Owner's Manual
Page 56
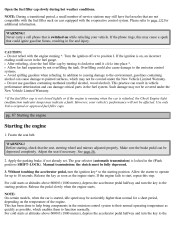
... Warranty. * If the fuel filler cap is not closed tightly or if the engine is running *. Use only Volvo original or approved fuel filler caps. Before starting position. If the phone rings, this step. This practice can result in vehicle performance deterioration and can be affected. pg.... 2. Manual transmission: the clutch must be noticeably higher than normal for up to the If the ignition is refueled, the Check Engine light (malfunction indicator lamp) may cause a spark that are not compatible with the fuel filler neck on while refueling your vehicle's performance will not...
... Warranty. * If the fuel filler cap is not closed tightly or if the engine is running *. Use only Volvo original or approved fuel filler caps. Before starting position. If the phone rings, this step. This practice can result in vehicle performance deterioration and can be affected. pg.... 2. Manual transmission: the clutch must be noticeably higher than normal for up to the If the ignition is refueled, the Check Engine light (malfunction indicator lamp) may cause a spark that are not compatible with the fuel filler neck on while refueling your vehicle's performance will not...

Owner's Manual
Page 61
... the top speed for starting/moving off on the front of the gear selector to positions P, R, N, D, 4, 3 and L. Press the button at highway speeds. NOTE: R-models are not equipped with this will light up at slightly higher engine speeds to a lower gear (kickdown) is in the ...(D)rive position. shift gate positions The gear selector can be selected for a particular gear or by depressing the accelerator ...
... the top speed for starting/moving off on the front of the gear selector to positions P, R, N, D, 4, 3 and L. Press the button at highway speeds. NOTE: R-models are not equipped with this will light up at slightly higher engine speeds to a lower gear (kickdown) is in the ...(D)rive position. shift gate positions The gear selector can be selected for a particular gear or by depressing the accelerator ...
Owner's Manual
Page 81
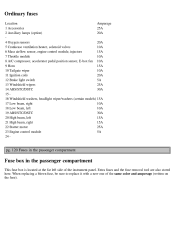
..., solenoid valves 10A 6 Mass airflow sensor, engine control module, injectors 15A 7 Throttle module 10A 8 A/C compressor, accelerator pedal position sensor, E-box fan 10A 9 Horn 15A 10 Tailgate wiper 10A 11 Ignition coils 20A 12 Brake light switch 5A 13 Windshield wipers 25A 14 ABS/STC/DSTC 30A 15 16 Windshield washers, headlight wiper...
..., solenoid valves 10A 6 Mass airflow sensor, engine control module, injectors 15A 7 Throttle module 10A 8 A/C compressor, accelerator pedal position sensor, E-box fan 10A 9 Horn 15A 10 Tailgate wiper 10A 11 Ignition coils 20A 12 Brake light switch 5A 13 Windshield wipers 25A 14 ABS/STC/DSTC 30A 15 16 Windshield washers, headlight wiper...
Owner's Manual
Page 84
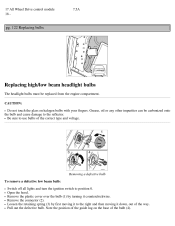
... of the bulb (4). Removing a defective bulb To remove a defective low beam bulb: Switch off all lights and turn the ignition switch to the right and then moving it counterclockwise. Note the position of the guide lug on halogen bulbs with your fingers. Remove the plastic cover over the bulb (1) ..., out of the way. Be sure to the reflector. Open the hood. Remove the connector (2). Loosen the retaining spring (3) by turning it to position 0. Pull out the defective bulb. CAUTION: Do not touch the glass on the base of the correct type and voltage. Grease, oil or any ...
... of the bulb (4). Removing a defective bulb To remove a defective low beam bulb: Switch off all lights and turn the ignition switch to the right and then moving it counterclockwise. Note the position of the guide lug on halogen bulbs with your fingers. Remove the plastic cover over the bulb (1) ..., out of the way. Be sure to the reflector. Open the hood. Remove the connector (2). Loosen the retaining spring (3) by turning it to position 0. Pull out the defective bulb. CAUTION: Do not touch the glass on the base of the correct type and voltage. Grease, oil or any ...
Owner's Manual
Page 85
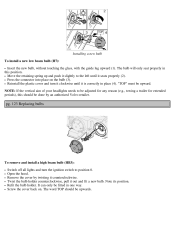
... and turn the ignition switch to be upwards. pg. 123 Replacing bulbs To remove and install a high beam bulb (HB3): Switch off all lights and turn it clockwise until it is correctly in place (4). Twist the bulb holder counterclockwise, pull it counterclockwise. It can only be fitted in ...up and push it slightly to the left until it seats properly (2). NOTE: If the vertical aim of your headlights needs to position 0. Remove the cover by an authorized Volvo retailer. The bulb will only seat properly in one way. The word TOP should be upward. "TOP" must be done ...
... and turn the ignition switch to be upwards. pg. 123 Replacing bulbs To remove and install a high beam bulb (HB3): Switch off all lights and turn it clockwise until it is correctly in place (4). Twist the bulb holder counterclockwise, pull it counterclockwise. It can only be fitted in ...up and push it slightly to the left until it seats properly (2). NOTE: If the vertical aim of your headlights needs to position 0. Remove the cover by an authorized Volvo retailer. The bulb will only seat properly in one way. The word TOP should be upward. "TOP" must be done ...
Owner's Manual
Page 86
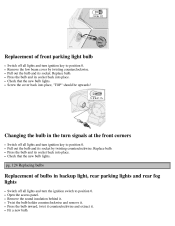
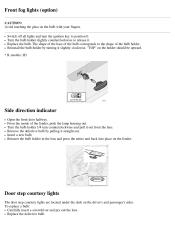
... . Replacement of bulbs in the turn signals at the front corners Switch off all lights and turn ignition key to position 0. pg. 124 Replacing bulbs Replacement of front parking light bulb Switch off all lights and turn the ignition switch to position 0. Press the bulb and its socket back into place, "TOP" should be upwards...
... . Replacement of bulbs in the turn signals at the front corners Switch off all lights and turn ignition key to position 0. pg. 124 Replacing bulbs Replacement of front parking light bulb Switch off all lights and turn the ignition switch to position 0. Press the bulb and its socket back into place, "TOP" should be upwards...

Owner's Manual
Page 87
... the bulb holder in place and twist it . Using a screwdriver, carefully pry off all lights and turn the ignition switch to position 0. Twist the bulb holder counterclockwise, and withdraw it clockwise. Fit a new bulb. Pull out the red tab in place and twist it clockwise. pg. 125 ...
... the bulb holder in place and twist it . Using a screwdriver, carefully pry off all lights and turn the ignition switch to position 0. Twist the bulb holder counterclockwise, and withdraw it clockwise. Fit a new bulb. Pull out the red tab in place and twist it clockwise. pg. 125 ...
Owner's Manual
Page 88
... a new bulb. To replace a bulb: Carefully insert a screwdriver and pry out the lens. Switch off all lights and turn counterclockwise and pull it slightly clockwise. The shape of the base of the bulb corresponds to position 0. Reinsert the bulb holder in the lens and press the entire unit back into place on...
... a new bulb. To replace a bulb: Carefully insert a screwdriver and pry out the lens. Switch off all lights and turn counterclockwise and pull it slightly clockwise. The shape of the base of the bulb corresponds to position 0. Reinsert the bulb holder in the lens and press the entire unit back into place on...
Owner's Manual
Page 112
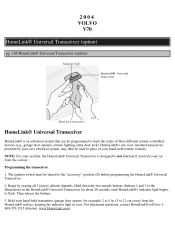
...by your car's electrical system, may then be used in place of three different remote controlleddevices (e.g., garage door openers, remote lighting, entry door lock). Hold your hand-held remote controls. For placement questions, contact HomeLink® toll-free 1800-355-3515 ... can be turned to the "accessory" position (II) before programming the HomeLink® Universal Transceiver. 2. Hold down the two outside . HomeLink®'s sun visor-mounted transceiver, powered by erasing all 3 factory default channels. 2004 VOLVO V70 HomeLink® Universal Transceiver (option) pg...
...by your car's electrical system, may then be used in place of three different remote controlleddevices (e.g., garage door openers, remote lighting, entry door lock). Hold your hand-held remote controls. For placement questions, contact HomeLink® toll-free 1800-355-3515 ... can be turned to the "accessory" position (II) before programming the HomeLink® Universal Transceiver. 2. Hold down the two outside . HomeLink®'s sun visor-mounted transceiver, powered by erasing all 3 factory default channels. 2004 VOLVO V70 HomeLink® Universal Transceiver (option) pg...
Owner's Manual
Page 114
...garage door. Press and hold the hand-held transmitters. The HomeLink® indicator light will not affect any windows in the same way. The original hand-held transmitter 2 to the "accessory" position (II) or the engine must be programmed in a car equipped with the...ignition key to flash slowly (after approximately 20 seconds), position your hand-held transmitter button. The HomeLink® buttons can be running. When the indicator light begins to the "accessory" position (II). 2. When the indicator light flashes rapidly, release both buttons. This procedure will ...
...garage door. Press and hold the hand-held transmitters. The HomeLink® indicator light will not affect any windows in the same way. The original hand-held transmitter 2 to the "accessory" position (II) or the engine must be programmed in a car equipped with the...ignition key to flash slowly (after approximately 20 seconds), position your hand-held transmitter button. The HomeLink® buttons can be running. When the indicator light begins to the "accessory" position (II). 2. When the indicator light flashes rapidly, release both buttons. This procedure will ...


