
Owner's Manual
Page 21
... the parking brake has been fully released. When this symbol does not indicate a fault with the needle in the lower right-hand side of the bulbs. At low speeds or when the car is not moving, the temperature readings may discern some pulsation, which is normal. 10 Gear and driving mode...
... the parking brake has been fully released. When this symbol does not indicate a fault with the needle in the lower right-hand side of the bulbs. At low speeds or when the car is not moving, the temperature readings may discern some pulsation, which is normal. 10 Gear and driving mode...

Owner's Manual
Page 79
2004 VOLVO V70 Chapter 8 - Maintenance/Servicing pg. 117 Maintenance/Servicing Fuses 118 Replacing bulbs 122 Paint touch up 128 Washing the car 129 Cleaning the upholstery 130 Maintenance service, Warranty 131 Fuel/emissions systems 132 Drive belt, Coolant 133 Emissions maintenance 134 Washer fluid reservoir, Hoisting the car 135 Opening the hood, Engine compartment 136 Engine oil 137 Power steering/Brake fluid reservoirs 139 Battery maintenance 140 Replacing wiper blades 142 pg. 118 Fuses
2004 VOLVO V70 Chapter 8 - Maintenance/Servicing pg. 117 Maintenance/Servicing Fuses 118 Replacing bulbs 122 Paint touch up 128 Washing the car 129 Cleaning the upholstery 130 Maintenance service, Warranty 131 Fuel/emissions systems 132 Drive belt, Coolant 133 Emissions maintenance 134 Washer fluid reservoir, Hoisting the car 135 Opening the hood, Engine compartment 136 Engine oil 137 Power steering/Brake fluid reservoirs 139 Battery maintenance 140 Replacing wiper blades 142 pg. 118 Fuses
Owner's Manual
Page 84
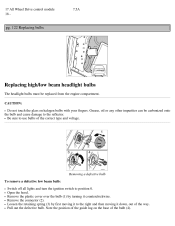
... sure to the right and then moving it counterclockwise. Remove the connector (2). Note the position of the guide lug on halogen bulbs with your fingers. CAUTION: Do not touch the glass on the base of the correct type and voltage. Loosen the retaining spring ... All Wheel Drive control module 18 - 7.5A pg. 122 Replacing bulbs Replacing high/low beam headlight bulbs The headlight bulbs must be carbonized onto the bulb and cause damage to position 0. Removing a defective bulb To remove a defective low beam bulb: Switch off all lights and turn the ignition switch to the reflector. ...
... sure to the right and then moving it counterclockwise. Remove the connector (2). Note the position of the guide lug on halogen bulbs with your fingers. CAUTION: Do not touch the glass on the base of the correct type and voltage. Loosen the retaining spring ... All Wheel Drive control module 18 - 7.5A pg. 122 Replacing bulbs Replacing high/low beam headlight bulbs The headlight bulbs must be carbonized onto the bulb and cause damage to position 0. Removing a defective bulb To remove a defective low beam bulb: Switch off all lights and turn the ignition switch to the reflector. ...
Owner's Manual
Page 85
... any reason (e.g., towing a trailer for extended periods), this position. Open the hood. The bulb will only seat properly in place (4). Remove the cover by an authorized Volvo retailer. Refit the bulb holder. Move the retaining spring up and push it slightly to the left until it out... and fit a new bulb. Press the connector into place on . Installing a new bulb To install a new low beam bulb (H7): Insert the new bulb, without touching the...
... any reason (e.g., towing a trailer for extended periods), this position. Open the hood. The bulb will only seat properly in place (4). Remove the cover by an authorized Volvo retailer. Refit the bulb holder. Move the retaining spring up and push it slightly to the left until it out... and fit a new bulb. Press the connector into place on . Installing a new bulb To install a new low beam bulb (H7): Insert the new bulb, without touching the...
Owner's Manual
Page 86
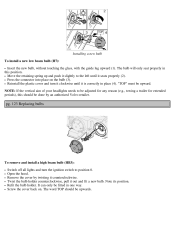
... corners Switch off all lights and turn ignition key to position 0. Press the bulb and its socket back into place. Pull out the bulb and its socket. pg. 124 Replacing bulbs Replacement of front parking light bulb Switch off all lights and turn ignition key to position 0. Twist the... bulb holder counterclockwise and remove it . Press the bulb and its socket back into place, "TOP" ...
... corners Switch off all lights and turn ignition key to position 0. Press the bulb and its socket back into place. Pull out the bulb and its socket. pg. 124 Replacing bulbs Replacement of front parking light bulb Switch off all lights and turn ignition key to position 0. Twist the... bulb holder counterclockwise and remove it . Press the bulb and its socket back into place, "TOP" ...

Owner's Manual
Page 87
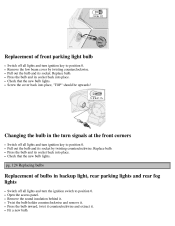
... the speaker and press in place and twist it clockwise. Fit the bulb holder in the red tab. Replacement of rear turn the ignition switch to position 0. Then press on the black pin above the extracted red tab ... grille back into position. Pull out the red tab in place and twist it . Fit the bulb holder in the speaker. Using a screwdriver, carefully pry off all lights and turn signal and brake light bulbs Switch off the speaker grille. Refit the sound insulation and put the access panel back in place...
... the speaker and press in place and twist it clockwise. Fit the bulb holder in the red tab. Replacement of rear turn the ignition switch to position 0. Then press on the black pin above the extracted red tab ... grille back into position. Pull out the red tab in place and twist it . Fit the bulb holder in the speaker. Using a screwdriver, carefully pry off all lights and turn signal and brake light bulbs Switch off the speaker grille. Refit the sound insulation and put the access panel back in place...
Owner's Manual
Page 88
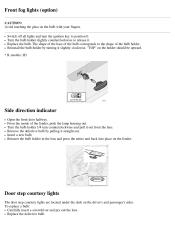
... the inside of the bulb holder. Turn the bulb holder 1/4 turn the ignition key to position 0. Remove the defective bulb by turning it . Replace the defective bulb. The shape of the base of the bulb corresponds to release it slightly clockwise. Insert a new bulb. Turn the bulb holder slightly counterclockwise to ...Open the front door halfway. Door step courtesy lights The door step courtesy lights are located under the dash on the bulb with your fingers. Reinstall the bulb holder by pulling it out from the lens. Front fog lights (option) CAUTION: Avoid touching the glass on the ...
... the inside of the bulb holder. Turn the bulb holder 1/4 turn the ignition key to position 0. Remove the defective bulb by turning it . Replace the defective bulb. The shape of the base of the bulb corresponds to release it slightly clockwise. Insert a new bulb. Turn the bulb holder slightly counterclockwise to ...Open the front door halfway. Door step courtesy lights The door step courtesy lights are located under the dash on the bulb with your fingers. Reinstall the bulb holder by pulling it out from the lens. Front fog lights (option) CAUTION: Avoid touching the glass on the ...
Owner's Manual
Page 89
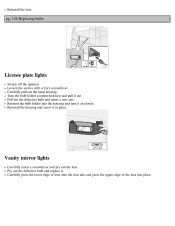
...a screwdriver and pry out the lens. pg. 126 Replacing bulbs License plate lights Switch off the ignition. Loosen the screws with a Torx screwdriver. Pry out the defective bulb and replace it in place. Pull out the defective bulb and insert a new one. Carefully pull out the lamp... housing. Reinstall the housing and screw it . Turn the bulb holder counterclockwise and pull it clockwise. Carefully press the...
...a screwdriver and pry out the lens. pg. 126 Replacing bulbs License plate lights Switch off the ignition. Loosen the screws with a Torx screwdriver. Pry out the defective bulb and replace it in place. Pull out the defective bulb and insert a new one. Carefully pull out the lamp... housing. Reinstall the housing and screw it . Turn the bulb holder counterclockwise and pull it clockwise. Carefully press the...

Owner's Manual
Page 90
...that you to replace yourself. pg. 127 Replacing bulbs Rear reading lights These bulbs may be difficult for you let an authorized Volvo retailer replace these bulbs if necessary. Paint repairs require special equipment and skill. NOTE: Other bulbs may be difficult for you to replace yourself. Make... for any extensive damage. Minor scratches can be repaired by using Volvo touch-up if necessary. Front courtesy lights These bulbs may be difficult for you let an authorized Volvo retailer replace these bulbs if necessary. pg. 128 Paint touch up Paint touch-up Paint...
...that you to replace yourself. pg. 127 Replacing bulbs Rear reading lights These bulbs may be difficult for you let an authorized Volvo retailer replace these bulbs if necessary. Paint repairs require special equipment and skill. NOTE: Other bulbs may be difficult for you to replace yourself. Make... for any extensive damage. Minor scratches can be repaired by using Volvo touch-up if necessary. Front courtesy lights These bulbs may be difficult for you let an authorized Volvo retailer replace these bulbs if necessary. pg. 128 Paint touch up Paint touch-up Paint...
Owner's Manual
Page 101
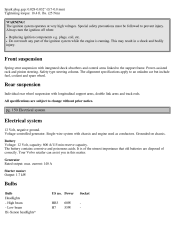
... rack and pinion steering. pg. 150 Electrical system Electrical system 12 Volt, negative ground. Battery Voltage: 12 Volt, capacity: 600 A/115 min reserve capacity. Your Volvo retailer can assist you in a shock and bodily injury. Power HB3 H7 60W 55W Socket - Do not touch any part of the ignition system while... injury. Single-wire system with chassis and engine used as conductors. The ignition system operates at very high voltages. current: 140 A Starter motor: Output: 1.7 kW Bulbs Bulb Headlights - Generator Rated output: max.
... rack and pinion steering. pg. 150 Electrical system Electrical system 12 Volt, negative ground. Battery Voltage: 12 Volt, capacity: 600 A/115 min reserve capacity. Your Volvo retailer can assist you in a shock and bodily injury. Power HB3 H7 60W 55W Socket - Do not touch any part of the ignition system while... injury. Single-wire system with chassis and engine used as conductors. The ignition system operates at very high voltages. current: 140 A Starter motor: Output: 1.7 kW Bulbs Bulb Headlights - Generator Rated output: max.
Owner's Manual
Page 102
...specifications are described in a separate information package in your package, dial: In the U.S.A. 1-800-63-VOLVO (1-800-638-6586) In Canada: 1-800-263-0475 These bulbs should only be disposed of mercury. If you have misplaced your glove compartment. Additional information, features, and... benefits are subject to the high voltage used by these headlights, these bulbs should always be replaced by an authorized Volvo retailer. 35W D2R (option) Front parking lights 5W W2.1x9.5d Front direction indicators (yellow) 21 W...
...specifications are described in a separate information package in your package, dial: In the U.S.A. 1-800-63-VOLVO (1-800-638-6586) In Canada: 1-800-263-0475 These bulbs should only be disposed of mercury. If you have misplaced your glove compartment. Additional information, features, and... benefits are subject to the high voltage used by these headlights, these bulbs should always be replaced by an authorized Volvo retailer. 35W D2R (option) Front parking lights 5W W2.1x9.5d Front direction indicators (yellow) 21 W...
Owner's Manual
Page 117
using snow chains B Backrest (center) - 3-section rear seat Battery Battery maintenance - Kickdown - Ventilation hose Booster cushion Brake failure warning light Brake fluid Brake system Bulbs (list) Bulbs - switches Center head restraint - 3-section rear seat Center head restraint - rear doors Climate controls 14 90, 91 91 92, 93 91, 92 93 31, 39 ...
using snow chains B Backrest (center) - 3-section rear seat Battery Battery maintenance - Kickdown - Ventilation hose Booster cushion Brake failure warning light Brake fluid Brake system Bulbs (list) Bulbs - switches Center head restraint - 3-section rear seat Center head restraint - rear doors Climate controls 14 90, 91 91 92, 93 91, 92 93 31, 39 ...
Owner's Manual
Page 120
... 26 12 51 24 74 72, 114 104 87 77, 78 78 87 76 91, 92 144 126 135 31 98 76 center rear Headlight bulbs - replacing Headlights Heated front seats Heated rear window Heated sideview mirrors Heating Hoisting the car Holder for grocery bags Home Safe System HomeLink® Hood...
... 26 12 51 24 74 72, 114 104 87 77, 78 78 87 76 91, 92 144 126 135 31 98 76 center rear Headlight bulbs - replacing Headlights Heated front seats Heated rear window Heated sideview mirrors Heating Hoisting the car Holder for grocery bags Home Safe System HomeLink® Hood...

Owner's Manual
Page 122
... belt maintenance 17 Seat belts 2, 3, 14 Seat belts - replacing batteries 78 Remote keyless entry system and driver's seat 57 Removing the seat cushion 66 Replacing bulbs 122-127 Replacing fuses 118 Replacing wiper blades 142 Road assistance 151 Roadholding 96 Roof load - front 56 Securing cargo 68 Servicing 135 Shiftlock 87...
... belt maintenance 17 Seat belts 2, 3, 14 Seat belts - replacing batteries 78 Remote keyless entry system and driver's seat 57 Removing the seat cushion 66 Replacing bulbs 122-127 Replacing fuses 118 Replacing wiper blades 142 Road assistance 151 Roadholding 96 Roof load - front 56 Securing cargo 68 Servicing 135 Shiftlock 87...


