Owner's Manual
Page 14
Instruments 18 Indicator and warning lights 21 Headlights, Parking lights, Instrument illumination, Fog lights 24 Turn signals, Home Safe lighting, Wipers/washers 25 Ignition switch/steering wheel locks, Flashers, Heated rear window/mirrors ... controls Instruments, switches and controls pg. 17 Instruments, switches and controls Instruments, switches and controls Instruments, switches, controls etc. are described on the following pages. 2004 VOLVO S40 & V40 Chapter 2 -
Instruments 18 Indicator and warning lights 21 Headlights, Parking lights, Instrument illumination, Fog lights 24 Turn signals, Home Safe lighting, Wipers/washers 25 Ignition switch/steering wheel locks, Flashers, Heated rear window/mirrors ... controls Instruments, switches and controls pg. 17 Instruments, switches and controls Instruments, switches and controls Instruments, switches, controls etc. are described on the following pages. 2004 VOLVO S40 & V40 Chapter 2 -

Owner's Manual
Page 15
... and controls. Note that vehicles may be equipped differently, depending on special legal requirements. Page 1 Adjustable door mirrors 50 2 Air vents 35 3 Headlight switch 24 4 Front foglight 24 5 Instrument lighting 24 6 Rear foglight 24 7 Turn signals, high/low beams, Home Safe Lighting, cruise control 25..., 31 8 Instruments, indicator and warning lights 20-21 9 Horn 10 Windshield wash/wipe, headlight wash/wipe 25 11 Blower control 36 12 Air distribution control 36 13 Hazard warning flashers 26 14 Passenger compartment temperature sensor 36 15...
... and controls. Note that vehicles may be equipped differently, depending on special legal requirements. Page 1 Adjustable door mirrors 50 2 Air vents 35 3 Headlight switch 24 4 Front foglight 24 5 Instrument lighting 24 6 Rear foglight 24 7 Turn signals, high/low beams, Home Safe Lighting, cruise control 25..., 31 8 Instruments, indicator and warning lights 20-21 9 Horn 10 Windshield wash/wipe, headlight wash/wipe 25 11 Blower control 36 12 Air distribution control 36 13 Hazard warning flashers 26 14 Passenger compartment temperature sensor 36 15...
Owner's Manual
Page 20
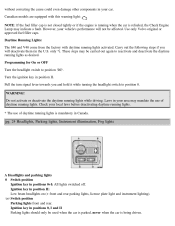
... daytime running lights as desired. However, your area may mandate the use of daytime running lights. Use only Volvo original or approved fuel filler caps. Daytime Running Lights: The S40 and V40 come from the factory with this warning light: NOTE : If the fuel filler cap is not... in your vehicle's performance will deactivate them (in position II. Carry out the following steps if you and hold it while turning the headlight switch to position Turn the ignition key in the U.S. These steps may indicate a fault. Do not activate or deactivate the daytime running when...
... daytime running lights as desired. However, your area may mandate the use of daytime running lights. Use only Volvo original or approved fuel filler caps. Daytime Running Lights: The S40 and V40 come from the factory with this warning light: NOTE : If the fuel filler cap is not... in your vehicle's performance will deactivate them (in position II. Carry out the following steps if you and hold it while turning the headlight switch to position Turn the ignition key in the U.S. These steps may indicate a fault. Do not activate or deactivate the daytime running when...
Owner's Manual
Page 21
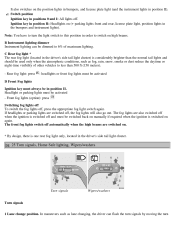
... Fog lights Ignition key must be in position II. Front fog lights (option): press Switching fog lights off To switch the fog lights off . headlights or front fog lights must always be activated pg. 25 Turn signals, Home Safe lighting, Wipers/washers Turn signals Wipers/washers Turn signals 1 Lane ...change position. Note: You have to turn the light switch to this position in the driver's side tail light cluster. - If headlights or parking lights are also switched off when the ignition is switched off and must be used only when the atmospheric conditions, such as lane...
... Fog lights Ignition key must be in position II. Front fog lights (option): press Switching fog lights off To switch the fog lights off . headlights or front fog lights must always be activated pg. 25 Turn signals, Home Safe lighting, Wipers/washers Turn signals Wipers/washers Turn signals 1 Lane ...change position. Note: You have to turn the light switch to this position in the driver's side tail light cluster. - If headlights or parking lights are also switched off when the ignition is switched off and must be used only when the atmospheric conditions, such as lane...

Owner's Manual
Page 22
...: A defective turn signal bulb will be on ). Pull the turn signal indicator and remaining signal lights to flash more rapidly than normal. The headlight high beam will cause the turn signal lever towards the steering wheel (as you keep the button depressed. Wipers/washers 1 "Single sweep" position... seconds to light your car at night, you want to switch off ). signal lever to the first stop and holding it . 4 Headlight flasher (headlights off the Home Safe Lighting. Move the lever towards the steering wheel. Move the lever towards the steering wheel and release it there....
...: A defective turn signal bulb will be on ). Pull the turn signal indicator and remaining signal lights to flash more rapidly than normal. The headlight high beam will cause the turn signal lever towards the steering wheel (as you keep the button depressed. Wipers/washers 1 "Single sweep" position... seconds to light your car at night, you want to switch off ). signal lever to the first stop and holding it . 4 Headlight flasher (headlights off the Home Safe Lighting. Move the lever towards the steering wheel. Move the lever towards the steering wheel and release it there....
Owner's Manual
Page 46
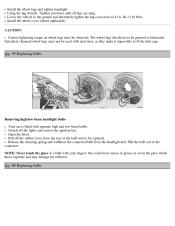
.... Open the hood. CAUTION: Correct tightening torque on the glass which then evaporate and may damage the reflector. Switch off the rubber cover from the headlight unit. Pull off the lights and remove the ignition key. pg. 90 Replacing bulbs lbs. (110 Nm). NOTE: Never touch the glass of the bulb.... Install the wheel lugs and tighten handtight. Using the lug wrench. Install the wheel cover (where applicable). pg. 89 Replacing bulbs Removing high/low beam headlight bulbs Your car is fitted with your fingers: this could leave traces of the connector.
.... Open the hood. CAUTION: Correct tightening torque on the glass which then evaporate and may damage the reflector. Switch off the rubber cover from the headlight unit. Pull off the lights and remove the ignition key. pg. 90 Replacing bulbs lbs. (110 Nm). NOTE: Never touch the glass of the bulb.... Install the wheel lugs and tighten handtight. Using the lug wrench. Install the wheel cover (where applicable). pg. 89 Replacing bulbs Removing high/low beam headlight bulbs Your car is fitted with your fingers: this could leave traces of the connector.

Owner's Manual
Page 47
...Replacing bulbs Front direction indicators and parking lights Removing the bulb: Loosen the screw (A) between the headlight and direction indicator housings (max. 2 complete turns counterclockwise), using the screwdriver supplied in the headlight unit Reconnect the connector and wiring. With the wiring still attached, turn bulb holder slightly counterclockwise .... Press clip (D) and move the direction indicator housing forward. Pull the bulb to secure the cover. Installing high/low beam headlight bulbs Insert the new bulb in the tool kit. Put the hard plastic cover in place above the...
...Replacing bulbs Front direction indicators and parking lights Removing the bulb: Loosen the screw (A) between the headlight and direction indicator housings (max. 2 complete turns counterclockwise), using the screwdriver supplied in the headlight unit Reconnect the connector and wiring. With the wiring still attached, turn bulb holder slightly counterclockwise .... Press clip (D) and move the direction indicator housing forward. Pull the bulb to secure the cover. Installing high/low beam headlight bulbs Insert the new bulb in the tool kit. Put the hard plastic cover in place above the...
Owner's Manual
Page 58
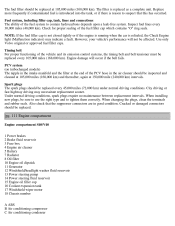
...if the engine is running when the car is refueled, the Check Engine light (Malfunction indicator) may necessitate replacement sooner. Use only Volvo original or approved fuel filler caps. When installing new plugs, be replaced at 105,000 miles (168,000 km). Cracked or ... under normal driving conditions. pg. 111 Engine compartment Engine compartment S40/V40 1 Power brakes 2 Brake fluid reservoir 3 Fuse box 4 Engine air cleaner 5 Battery 7 Radiator 8 Oil filter 10 Engine oil dipstick 11 Generator 12 Windshield/headlight washer fluid reservoir 13 Power steering pump 14 Power steering fluid ...
...if the engine is running when the car is refueled, the Check Engine light (Malfunction indicator) may necessitate replacement sooner. Use only Volvo original or approved fuel filler caps. When installing new plugs, be replaced at 105,000 miles (168,000 km). Cracked or ... under normal driving conditions. pg. 111 Engine compartment Engine compartment S40/V40 1 Power brakes 2 Brake fluid reservoir 3 Fuse box 4 Engine air cleaner 5 Battery 7 Radiator 8 Oil filter 10 Engine oil dipstick 11 Generator 12 Windshield/headlight washer fluid reservoir 13 Power steering pump 14 Power steering fluid ...

Owner's Manual
Page 64
... without notice. Single-wire system with chassis and engine used as recommended on the tire information label. Your Volvo retailer can possibly lead to change without prior warning. Headlights High beam H7 Low beam H7 Parking lights and 3457NA Turn signals, front Turn signals, rear 1156 Side ...direction indicators Tail lights 67 Brake lights 1156 Backup lights 1156 Rear fog light 1156 Front fog lights H3 License plate light (S40) License plate light ...
... without notice. Single-wire system with chassis and engine used as recommended on the tire information label. Your Volvo retailer can possibly lead to change without prior warning. Headlights High beam H7 Low beam H7 Parking lights and 3457NA Turn signals, front Turn signals, rear 1156 Side ...direction indicators Tail lights 67 Brake lights 1156 Backup lights 1156 Rear fog light 1156 Front fog lights H3 License plate light (S40) License plate light ...
Owner's Manual
Page 69
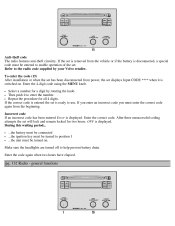
After three unsuccessful coding attempts the set . Make sure the headlights are turned off to use. During this waiting period...the battery must be connected ...the ignition key must be turned to position I ...the unit must ... been entered Error is disconnected, a special code must be entered to enable operation of the set will lock and remain locked for a digit by your Volvo retailer. Enter the correct code. pg. 132 Radio - general functions Enter the 4-digit code using the MENU knob. If the set is displayed. Repeat the...
After three unsuccessful coding attempts the set . Make sure the headlights are turned off to use. During this waiting period...the battery must be connected ...the ignition key must be turned to position I ...the unit must ... been entered Error is disconnected, a special code must be entered to enable operation of the set will lock and remain locked for a digit by your Volvo retailer. Enter the correct code. pg. 132 Radio - general functions Enter the 4-digit code using the MENU knob. If the set is displayed. Repeat the...
Owner's Manual
Page 83
... in engine compartment G Gas tank cover - Folding rear seat (sedan) Folding rear seat Front seats Front seats - opening Generator H Hand brake Handling Hazard warning flashers Headlight bulbs, replacing Heated front seats Heating Heating and air conditioning Home Safe lighting Hood I IC system Ignition switch Immobilizer (start inhibitor) Instruments Integrated booster cushion...
... in engine compartment G Gas tank cover - Folding rear seat (sedan) Folding rear seat Front seats Front seats - opening Generator H Hand brake Handling Hazard warning flashers Headlight bulbs, replacing Heated front seats Heating Heating and air conditioning Home Safe lighting Hood I IC system Ignition switch Immobilizer (start inhibitor) Instruments Integrated booster cushion...
