

Owners Manual
Page 2
...This vehicle should know that this manual are currently available in the market. Modification with non-genuine Toyota products. Accessories, spare parts and modification of your Toyota A wide variety of continual product improvement, we reserve the right to all models and explains all... problems resulting from under warranty. 25 Depending on your vehicle. Therefore, you may hear sound coming from the modification may not be modified with non-genuine Toyota products could affect its performance, safety or durability, and may even violate governmental regulations. For...
...This vehicle should know that this manual are currently available in the market. Modification with non-genuine Toyota products. Accessories, spare parts and modification of your Toyota A wide variety of continual product improvement, we reserve the right to all models and explains all... problems resulting from under warranty. 25 Depending on your vehicle. Therefore, you may hear sound coming from the modification may not be modified with non-genuine Toyota products could affect its performance, safety or durability, and may even violate governmental regulations. For...

Owners Manual
Page 61
Turns automatic mode ON/ OFF The indicator comes on when automatic mode is turned on . 1-3. The mirror will revert to detect the headlights of the rear view mirror by moving it up and down. 85 Adjustable components (seats, mirrors, steering wheel) Auto anti-glare inside rear view mirror In automatic mode, sensors are used to the automatic mode each time the engine switch is turned on . 1 Before driving Adjusting the height of rear view mirror Adjust the height of vehicles behind and automatically reduces the reflected light.
Turns automatic mode ON/ OFF The indicator comes on when automatic mode is turned on . 1-3. The mirror will revert to detect the headlights of the rear view mirror by moving it up and down. 85 Adjustable components (seats, mirrors, steering wheel) Auto anti-glare inside rear view mirror In automatic mode, sensors are used to the automatic mode each time the engine switch is turned on . 1 Before driving Adjusting the height of rear view mirror Adjust the height of vehicles behind and automatically reduces the reflected light.

Owners Manual
Page 139
Press the switch once more to cancel the mode. The indicator will come on. Press the TOW/HAUL switch. Driving procedures TOW/HAUL switch (with towing package) Use TOW/HAUL mode when pulling a trailer or hauling a heavy load. 2-1.
Press the switch once more to cancel the mode. The indicator will come on. Press the TOW/HAUL switch. Driving procedures TOW/HAUL switch (with towing package) Use TOW/HAUL mode when pulling a trailer or hauling a heavy load. 2-1.

Owners Manual
Page 142
Driving proc e dure s Pa rk ing bra ke U.S.A. Canada Set the parking brake*. (Depressing the pedal again releases the parking brake.) At this time, the indicator will come on. *: Fully depress the parking brake pedal with your left foot while depressing the brake pedal with your right foot. 2 When driving 2 -1 .
Driving proc e dure s Pa rk ing bra ke U.S.A. Canada Set the parking brake*. (Depressing the pedal again releases the parking brake.) At this time, the indicator will come on. *: Fully depress the parking brake pedal with your left foot while depressing the brake pedal with your right foot. 2 When driving 2 -1 .

Owners Manual
Page 189
... forward again and hold for approximately 1 second. If the engine switch is turned off and then turned to the ON position again, the vehicle will come on. Press the button again to vehicle-tovehicle distance control mode. When in the lane ahead. Adjusting the speed setting: →P. 209 Canceling and resuming...
... forward again and hold for approximately 1 second. If the engine switch is turned off and then turned to the ON position again, the vehicle will come on. Press the button again to vehicle-tovehicle distance control mode. When in the lane ahead. Adjusting the speed setting: →P. 209 Canceling and resuming...
Owners Manual
Page 217
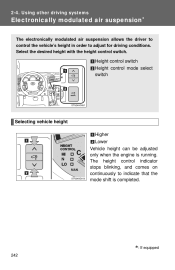
... allows the driver to control the vehicle's height in order to indicate that the mode shift is running. The height control indicator stops blinking, and comes on continuously to adjust for driving conditions. 2 -4 .
... allows the driver to control the vehicle's height in order to indicate that the mode shift is running. The height control indicator stops blinking, and comes on continuously to adjust for driving conditions. 2 -4 .

Owners Manual
Page 223
... experience a loss of power, such as climbing or descending steep hills, off-road driving and hard pulling in sand or mud, etc. The 4HI indicator comes on . ∗: If equipped 248 U sing ot he r driving syst e m s Four-w he e l drive syst e m ∗ Use the front wheel drive control switch to select the...
... experience a loss of power, such as climbing or descending steep hills, off-road driving and hard pulling in sand or mud, etc. The 4HI indicator comes on . ∗: If equipped 248 U sing ot he r driving syst e m s Four-w he e l drive syst e m ∗ Use the front wheel drive control switch to select the...
Owners Manual
Page 234
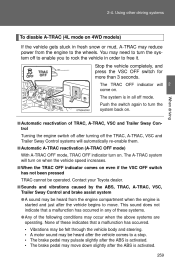
The TRAC OFF indicator will come on 4WD models) If the vehicle gets stuck in order to the wheels. You may reduce power from the engine to free it. Using other driving systems To disable A-TRAC (4L mode on . Stop the vehicle completely, and press the VSC OFF switch for more than 3 seconds. Push the switch again to turn the system off mode. The system is in all off to enable you to rock the vehicle in fresh snow or mud, A-TRAC may need to turn the system back on. 2-4.
The TRAC OFF indicator will come on 4WD models) If the vehicle gets stuck in order to the wheels. You may reduce power from the engine to free it. Using other driving systems To disable A-TRAC (4L mode on . Stop the vehicle completely, and press the VSC OFF switch for more than 3 seconds. Push the switch again to turn the system off mode. The system is in all off to enable you to rock the vehicle in fresh snow or mud, A-TRAC may need to turn the system back on. 2-4.

Owners Manual
Page 280
3-1. Turn the knob to the left or right, up or down. Recirculated air mode will automatically switch to outside air mode. 3 Interior features Adjusting the position and opening and closing the air outlets Driver side outlets Direct air flow to open or close the vent. 307 The indicator comes on. Using the air conditioning system and defogger Defogging the windshield Press . The air conditioning system control operates automatically.
3-1. Turn the knob to the left or right, up or down. Recirculated air mode will automatically switch to outside air mode. 3 Interior features Adjusting the position and opening and closing the air outlets Driver side outlets Direct air flow to open or close the vent. 307 The indicator comes on. Using the air conditioning system and defogger Defogging the windshield Press . The air conditioning system control operates automatically.

Owners Manual
Page 284
Press decrease it. Adjusting the settings The indicator comes on. Using the air conditioning system and defogger Using the automatic mode Press . 3-1. The air conditioning system will operate, and air outlets and fan speed will be set automatically.
Press decrease it. Adjusting the settings The indicator comes on. Using the air conditioning system and defogger Using the automatic mode Press . 3-1. The air conditioning system will operate, and air outlets and fan speed will be set automatically.

Owners Manual
Page 285
3-1. When is pressed, air flows to the feet. The indicator comes on . Using the air conditioning system and defogger When is pressed, air flows to the upper body and feet. The indicator comes on .
3-1. When is pressed, air flows to the feet. The indicator comes on . Using the air conditioning system and defogger When is pressed, air flows to the upper body and feet. The indicator comes on .
Owners Manual
Page 287
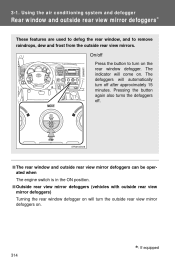
The defoggers will come on the rear window defogger. U sing t he a ir c ondit ioning syst e m a nd de fogge r Rear w indow and outside rear view mirrors. Pressing the button again also turns the defoggers off after approximately 15 minutes. On/off Press the button to remove raindrops, dew and frost from the outside rear view mirror defoggers ∗ These features are used to defog the rear window, and to turn off . The indicator will automatically turn on . 3 -1 .
The defoggers will come on the rear window defogger. U sing t he a ir c ondit ioning syst e m a nd de fogge r Rear w indow and outside rear view mirrors. Pressing the button again also turns the defoggers off after approximately 15 minutes. On/off Press the button to remove raindrops, dew and frost from the outside rear view mirror defoggers ∗ These features are used to defog the rear window, and to turn off . The indicator will automatically turn on . 3 -1 .

Owners Manual
Page 289
U sing t he a ir c ondit ioning syst e m a nd de fogge r Windshie ld w ipe r de -ic e r ∗ This feature is used to turn off Press the button to prevent ice from building up on . The indicator will automatically turn on the windshield wiper de-icer. On/off after approximately 15 minutes. The windshield wiper de-icer will come on the windshield and wiper blades. 3 -1 .
U sing t he a ir c ondit ioning syst e m a nd de fogge r Windshie ld w ipe r de -ic e r ∗ This feature is used to turn off Press the button to prevent ice from building up on . The indicator will automatically turn on the windshield wiper de-icer. On/off after approximately 15 minutes. The windshield wiper de-icer will come on the windshield and wiper blades. 3 -1 .

Owners Manual
Page 349
.... Guidance for registration completion is displayed. If the portable player has a Bluetooth® phone, the phone can be registered. that corresponds to the manual that comes with the portable player for inputting the passkey into the portable player. b. Select "Pair Audio Player" using be registered. Select "Record Name" using a voice command...
.... Guidance for registration completion is displayed. If the portable player has a Bluetooth® phone, the phone can be registered. that corresponds to the manual that comes with the portable player for inputting the passkey into the portable player. b. Select "Pair Audio Player" using be registered. Select "Record Name" using a voice command...
Owners Manual
Page 398
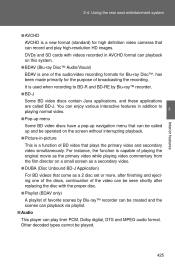
... (standard) for the purpose of the audio/video recording formats for Blu-ray Disc™, has been made primarily for high definition video cameras that come as a secondary video. ● DUBA (Disc Unbound BD-J Application) For BD videos that can record and play high-resolution HD images. For instance, the function...
... (standard) for the purpose of the audio/video recording formats for Blu-ray Disc™, has been made primarily for high definition video cameras that come as a secondary video. ● DUBA (Disc Unbound BD-J Application) For BD videos that can record and play high-resolution HD images. For instance, the function...
Owners Manual
Page 429
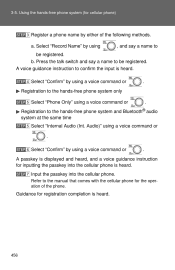
b. A voice guidance instruction to confirm the input is heard. Select "Confirm" by using a voice command or . . , and say a name to the manual that comes with the cellular phone for inputting the passkey into the cellular phone. Refer to be registered. Select "Record Name" by using a voice command or Registration ...
b. A voice guidance instruction to confirm the input is heard. Select "Confirm" by using a voice command or . . , and say a name to the manual that comes with the cellular phone for inputting the passkey into the cellular phone. Refer to be registered. Select "Record Name" by using a voice command or Registration ...
Owners Manual
Page 436
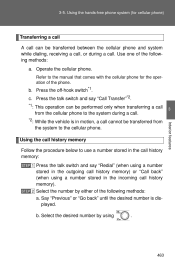
... when transferring a call from the system to the cellular phone. 3 Interior features Using the call history memory Follow the procedure below to the manual that comes with the cellular phone for the operation of the phone. b. Operate the cellular phone. Select the number by using a number stored in the outgoing call...
... when transferring a call from the system to the cellular phone. 3 Interior features Using the call history memory Follow the procedure below to the manual that comes with the cellular phone for the operation of the phone. b. Operate the cellular phone. Select the number by using a number stored in the outgoing call...

Owners Manual
Page 494
The higher the number, the warmer the seats become. 3 Interior features Heats the seats The indicator comes on . The higher the number, the stronger the airflow becomes. Ot he r int e rior fe a t ure s Se at he at e rs a nd ve nt ilat ors ∗ Blows air from the seats The indicator comes on . 3 -8 .
The higher the number, the warmer the seats become. 3 Interior features Heats the seats The indicator comes on . The higher the number, the stronger the airflow becomes. Ot he r int e rior fe a t ure s Se at he at e rs a nd ve nt ilat ors ∗ Blows air from the seats The indicator comes on . 3 -8 .
Owners Manual
Page 509
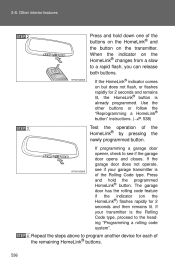
... rolling code feature if the indicator (on but does not flash, or flashes rapidly for 2 seconds and then remains lit. If the HomeLink® indicator comes on the HomeLink®) flashes rapidly for 2 seconds and remains lit, the HomeLink® button is the Rolling Code type, proceed to program another device...
... rolling code feature if the indicator (on but does not flash, or flashes rapidly for 2 seconds and then remains lit. If the HomeLink® indicator comes on the HomeLink®) flashes rapidly for 2 seconds and remains lit, the HomeLink® button is the Rolling Code type, proceed to program another device...
Owners Manual
Page 529
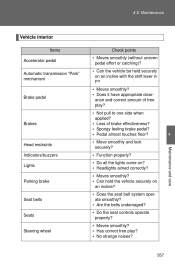
... effectiveness? • Spongy feeling brake pedal? • Pedal almost touches floor? • Move smoothly and lock securely? • Function properly? • Do all the lights come on? • Headlights aimed correctly? • Moves smoothly? • Can hold the vehicle securely on an incline? • Does the seat belt system operate smoothly...
... effectiveness? • Spongy feeling brake pedal? • Pedal almost touches floor? • Move smoothly and lock securely? • Function properly? • Do all the lights come on? • Headlights aimed correctly? • Moves smoothly? • Can hold the vehicle securely on an incline? • Does the seat belt system operate smoothly...


