

Owners Manual
Page 4
...) the driver was traveling. These data can read data recorded by your vehicle were operating; The main purpose of an EDR is equipped with the type of the circumstances in which crashes and injuries occur. To read the information if they have the special equipment, can help provide a better understanding of...
...) the driver was traveling. These data can read data recorded by your vehicle were operating; The main purpose of an EDR is equipped with the type of the circumstances in which crashes and injuries occur. To read the information if they have the special equipment, can help provide a better understanding of...

Owners Manual
Page 8
K e y inform a t ion Ke ys The following keys are provided with smart key system Electronic keys Operating the smart key system (→P. 25) • Operating the wireless remote control function (→P. 36) • Mechanical keys Key number plate Vehicles without smart key system (type A) Master keys Operating the wireless remote control function (→P. 36) Valet key Key number plate Vehicles without smart key system (type B) Master keys (black) Valet key (gray) Key number plate 22 Vehicles with the vehicle. 1 -1 .
K e y inform a t ion Ke ys The following keys are provided with smart key system Electronic keys Operating the smart key system (→P. 25) • Operating the wireless remote control function (→P. 36) • Mechanical keys Key number plate Vehicles without smart key system (type A) Master keys Operating the wireless remote control function (→P. 36) Valet key Key number plate Vehicles without smart key system (type B) Master keys (black) Valet key (gray) Key number plate 22 Vehicles with the vehicle. 1 -1 .
Owners Manual
Page 46
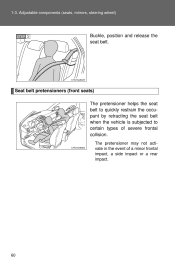
The pretensioner may not activate in the event of severe frontal collision. Seat belt pretensioners (front seats) The pretensioner helps the seat belt to quickly restrain the occupant by retracting the seat belt when the vehicle is subjected to certain types of a minor frontal impact, a side impact or a rear impact. 60 Adjustable components (seats, mirrors, steering wheel) STEP 3 Buckle, position and release the seat belt. 1-3.
The pretensioner may not activate in the event of severe frontal collision. Seat belt pretensioners (front seats) The pretensioner helps the seat belt to quickly restrain the occupant by retracting the seat belt when the vehicle is subjected to certain types of a minor frontal impact, a side impact or a rear impact. 60 Adjustable components (seats, mirrors, steering wheel) STEP 3 Buckle, position and release the seat belt. 1-3.

Owners Manual
Page 72
... with the seat belts to the occupants. Sa fe t y inform a t ion SRS a irba gs The SRS airbags inflate when the vehicle is subjected to certain types of severe impacts that may cause significant injury to help protect the torso of occupants in the outer seats. 86
... with the seat belts to the occupants. Sa fe t y inform a t ion SRS a irba gs The SRS airbags inflate when the vehicle is subjected to certain types of severe impacts that may cause significant injury to help protect the torso of occupants in the outer seats. 86
Owners Manual
Page 90
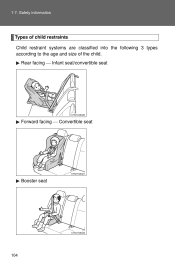
Safety information Types of child restraints Child restraint systems are classified into the following 3 types according to the age and size of the child. Rear facing ⎯ Infant seat/convertible seat Forward facing ⎯ Convertible seat Booster seat 104 1-7.
Safety information Types of child restraints Child restraint systems are classified into the following 3 types according to the age and size of the child. Rear facing ⎯ Infant seat/convertible seat Forward facing ⎯ Convertible seat Booster seat 104 1-7.
Owners Manual
Page 94
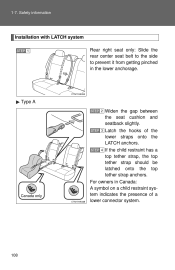
... latched onto the top tether strap anchors. Latch the hooks of a lower connector system. 108 STEP 3 STEP 4 Canada only For owners in the lower anchorage. Type A STEP 2 Widen the gap between the seat cushion and seatback slightly. Safety information Installation with LATCH system STEP 1 Rear right seat only: Slide the rear...
... latched onto the top tether strap anchors. Latch the hooks of a lower connector system. 108 STEP 3 STEP 4 Canada only For owners in the lower anchorage. Type A STEP 2 Widen the gap between the seat cushion and seatback slightly. Safety information Installation with LATCH system STEP 1 Rear right seat only: Slide the rear...

Owners Manual
Page 95
1-7. Safety information Type B STEP 2 Widen the gap between the seat cushion and seatback slightly. If the child restraint has a top tether strap, the top tether strap should be latched onto the top tether strap anchors. 1 STEP 3 Before driving STEP 4 Canada only For owners in Canada: A symbol on a child restraint system indicates the presence of a lower connector system. 109 Latch the buckles onto the LATCH anchors.
1-7. Safety information Type B STEP 2 Widen the gap between the seat cushion and seatback slightly. If the child restraint has a top tether strap, the top tether strap should be latched onto the top tether strap anchors. 1 STEP 3 Before driving STEP 4 Canada only For owners in Canada: A symbol on a child restraint system indicates the presence of a lower connector system. 109 Latch the buckles onto the LATCH anchors.

Owners Manual
Page 125
2-1. Driving procedures Multi-mode type While the engine switch is in the "ON" position, depress the brake pedal and move the shift lever. 140
2-1. Driving procedures Multi-mode type While the engine switch is in the "ON" position, depress the brake pedal and move the shift lever. 140
Owners Manual
Page 127
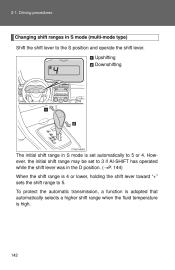
... selects a higher shift range when the fluid temperature is set to 3 if AI-SHIFT has operated while the shift lever was in S mode (multi-mode type) Shift the shift lever to 5 or 4. Driving procedures Changing shift ranges in the D position. (→P. 144) When the shift range is 4 or lower, holding the...
... selects a higher shift range when the fluid temperature is set to 3 if AI-SHIFT has operated while the shift lever was in S mode (multi-mode type) Shift the shift lever to 5 or 4. Driving procedures Changing shift ranges in the D position. (→P. 144) When the shift range is 4 or lower, holding the...
Owners Manual
Page 134
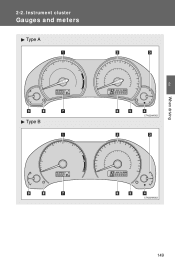
2 -2 . I nst rum e nt c lust e r Ga uge s a nd m e t e rs Type A 2 When driving Type B 149
2 -2 . I nst rum e nt c lust e r Ga uge s a nd m e t e rs Type A 2 When driving Type B 149
Owners Manual
Page 144
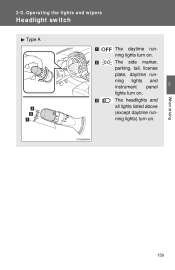
The side marker, parking, tail, license plate, daytime running lights and instrument panel lights turn on. 2 When driving 159 The headlights and all lights listed above (except daytime running lights turn on . Ope ra t ing t he light s a nd w ipe rs H e a dlight sw it ch Type A The daytime running lights) turn on . 2 -3 .
The side marker, parking, tail, license plate, daytime running lights and instrument panel lights turn on. 2 When driving 159 The headlights and all lights listed above (except daytime running lights turn on . Ope ra t ing t he light s a nd w ipe rs H e a dlight sw it ch Type A The daytime running lights) turn on . 2 -3 .
Owners Manual
Page 145
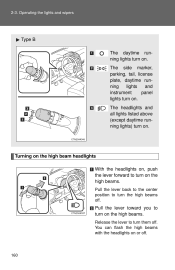
... high beams. Release the lever to turn on or off . You can flash the high beams with the headlights on . 2-3. Operating the lights and wipers Type B The daytime running lights) turn on .
... high beams. Release the lever to turn on or off . You can flash the high beams with the headlights on . 2-3. Operating the lights and wipers Type B The daytime running lights) turn on .
Owners Manual
Page 148
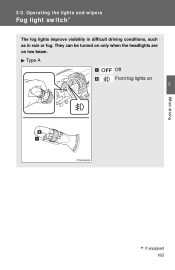
Type A Off Front fog lights on low beam. Ope ra t ing t he light s a nd w ipe rs Fog light sw it ch ∗ The fog lights improve visibility in difficult driving conditions, such as in rain or fog. They can be turned on only when the headlights are on 2 When driving ∗: If equipped 163 2 -3 .
Type A Off Front fog lights on low beam. Ope ra t ing t he light s a nd w ipe rs Fog light sw it ch ∗ The fog lights improve visibility in difficult driving conditions, such as in rain or fog. They can be turned on only when the headlights are on 2 When driving ∗: If equipped 163 2 -3 .

Owners Manual
Page 149
2-3. Operating the lights and wipers Type B Off Front fog lights on 164
2-3. Operating the lights and wipers Type B Off Front fog lights on 164
Owners Manual
Page 150
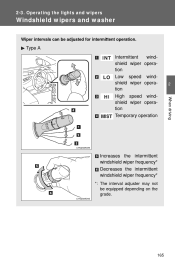
2 -3 . Ope ra t ing t he light s a nd w ipe rs Windshie ld w ipe rs a nd w a she r Wiper intervals can be equipped depending on the grade. 165 Type A Intermittent windshield wiper operation Low speed windshield wiper operation High speed windshield wiper operation Temporary operation 2 When driving Increases the intermittent windshield wiper frequency* Decreases the intermittent windshield wiper frequency* *: The interval adjuster may not be adjusted for intermittent operation.
2 -3 . Ope ra t ing t he light s a nd w ipe rs Windshie ld w ipe rs a nd w a she r Wiper intervals can be equipped depending on the grade. 165 Type A Intermittent windshield wiper operation Low speed windshield wiper operation High speed windshield wiper operation Temporary operation 2 When driving Increases the intermittent windshield wiper frequency* Decreases the intermittent windshield wiper frequency* *: The interval adjuster may not be adjusted for intermittent operation.

Owners Manual
Page 151
Type B Intermittent windshield wiper operation Low speed windshield wiper operation High speed windshield wiper operation Temporary operation Increases the intermittent windshield wiper frequency* Decreases the intermittent windshield wiper frequency* *: The interval adjuster may not be equipped depending on the grade. 166 2-3. Operating the lights and wipers Wash/wipe operation Wipers operate automatically.
Type B Intermittent windshield wiper operation Low speed windshield wiper operation High speed windshield wiper operation Temporary operation Increases the intermittent windshield wiper frequency* Decreases the intermittent windshield wiper frequency* *: The interval adjuster may not be equipped depending on the grade. 166 2-3. Operating the lights and wipers Wash/wipe operation Wipers operate automatically.
Owners Manual
Page 168
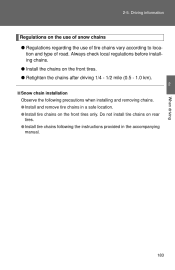
Always check local regulations before installing chains. ● Install the chains on the use of snow chains ● Regulations regarding the use of tire chains vary according to location and type of road. Driving information Regulations on the front tires. ● Retighten the chains after driving 1/4 - 1/2 mile (0.5 - 1.0 km). 2 2-5.
Always check local regulations before installing chains. ● Install the chains on the use of snow chains ● Regulations regarding the use of tire chains vary according to location and type of road. Driving information Regulations on the front tires. ● Retighten the chains after driving 1/4 - 1/2 mile (0.5 - 1.0 km). 2 2-5.
Owners Manual
Page 175
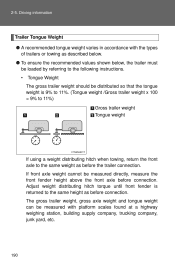
... weight is returned to the same weight as before connection. The gross trailer weight, gross axle weight and tongue weight can be measured with the types of trailers or towing as described below. ● To ensure the recommended values shown below, the trailer must be loaded by referring to the following...
... weight is returned to the same weight as before connection. The gross trailer weight, gross axle weight and tongue weight can be measured with the types of trailers or towing as described below. ● To ensure the recommended values shown below, the trailer must be loaded by referring to the following...

Owners Manual
Page 203
U sing t he a udio syst e m Audio syst e m t ype s Without Display Audio system Type A: CD player and AM/FM radio Type B: CD player and AM/FM radio 220 3 -2 .
U sing t he a udio syst e m Audio syst e m t ype s Without Display Audio system Type A: CD player and AM/FM radio Type B: CD player and AM/FM radio 220 3 -2 .

Owners Manual
Page 204
3-2. Type C Interior features 221 Using the audio system Title Using the radio Using the CD player Playing back MP3 and WMA discs Operating an iPod Operating a USB memory Optimal use of the audio system Using the AUX port Using the steering wheel audio switches Page P. 233 P. 237 P. 244 P. 253 P. 262 P. 270 P. 274 P. 276 3 With Display Audio system Owners of models equipped with a Display Audio system should refer to the "Display Audio System Owner's Manual".
3-2. Type C Interior features 221 Using the audio system Title Using the radio Using the CD player Playing back MP3 and WMA discs Operating an iPod Operating a USB memory Optimal use of the audio system Using the AUX port Using the steering wheel audio switches Page P. 233 P. 237 P. 244 P. 253 P. 262 P. 270 P. 274 P. 276 3 With Display Audio system Owners of models equipped with a Display Audio system should refer to the "Display Audio System Owner's Manual".


