

Owners Manual
Page 42
Front seats Up Pull the head restraints up . Down Push the head restraint down while pushing the lock release button. Lock release buttons Down Push the head restraint down while pushing the lock release button. Lock release button Rear seats Up Pull the head restraints up . 1 -3 . Adjust a ble c om pone nt s (se a t s, m irrors, st e e ring w he e l) H e a d re st ra int s Head restraints are provided for all seats.
Front seats Up Pull the head restraints up . Down Push the head restraint down while pushing the lock release button. Lock release buttons Down Push the head restraint down while pushing the lock release button. Lock release button Rear seats Up Pull the head restraints up . 1 -3 . Adjust a ble c om pone nt s (se a t s, m irrors, st e e ring w he e l) H e a d re st ra int s Head restraints are provided for all seats.
Owners Manual
Page 46
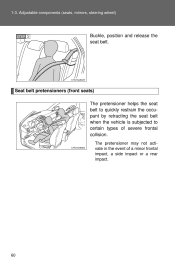
1-3. Seat belt pretensioners (front seats) The pretensioner helps the seat belt to quickly restrain the occupant by retracting the seat belt when the vehicle is subjected to certain types of a minor frontal impact, a side impact or a rear impact. 60 Adjustable components (seats, mirrors, steering wheel) STEP 3 Buckle, position and release the seat belt. The pretensioner may not activate in the event of severe frontal collision.
1-3. Seat belt pretensioners (front seats) The pretensioner helps the seat belt to quickly restrain the occupant by retracting the seat belt when the vehicle is subjected to certain types of a minor frontal impact, a side impact or a rear impact. 60 Adjustable components (seats, mirrors, steering wheel) STEP 3 Buckle, position and release the seat belt. The pretensioner may not activate in the event of severe frontal collision.
Owners Manual
Page 64
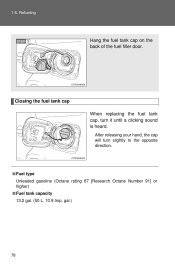
After releasing your hand, the cap will turn it until a clicking sound is heard. Closing the fuel tank cap When replacing the fuel tank cap, turn slightly to the opposite direction. 1-5. Refueling STEP 3 Hang the fuel tank cap on the back of the fuel filler door.
After releasing your hand, the cap will turn it until a clicking sound is heard. Closing the fuel tank cap When replacing the fuel tank cap, turn slightly to the opposite direction. 1-5. Refueling STEP 3 Hang the fuel tank cap on the back of the fuel filler door.

Owners Manual
Page 99
Safety information Removing a child restraint installed with a seat belt Push the release button and fully retract the seat belt. 1 Before driving 113 1-7.
Safety information Removing a child restraint installed with a seat belt Push the release button and fully retract the seat belt. 1 Before driving 113 1-7.

Owners Manual
Page 107
Gently depress the accelerator pedal. Manual transmission STEP 1 With the parking brake firmly set the parking brake and shift the shift lever to 1. Lightly depress the accelerator pedal at the same time as gradually releasing the clutch pedal. Driving procedures Starting on a steep uphill Automatic transmission STEP 1 STEP 2 STEP 3 Firmly set and the clutch pedal fully depressed, shift the shift lever to D. Release the parking brake. STEP 2 STEP 3 2-1. Release the parking brake.
Gently depress the accelerator pedal. Manual transmission STEP 1 With the parking brake firmly set the parking brake and shift the shift lever to 1. Lightly depress the accelerator pedal at the same time as gradually releasing the clutch pedal. Driving procedures Starting on a steep uphill Automatic transmission STEP 1 STEP 2 STEP 3 Firmly set and the clutch pedal fully depressed, shift the shift lever to D. Release the parking brake. STEP 2 STEP 3 2-1. Release the parking brake.
Owners Manual
Page 131
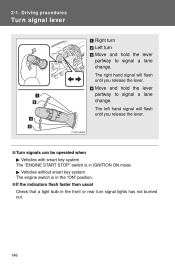
2 -1 . Move and hold the lever partway to signal a lane change . Driving proc e dure s Tur n signa l leve r Right turn Left turn Move and hold the lever partway to signal a lane change . The left hand signal will flash until you release the lever. The right hand signal will flash until you release the lever.
2 -1 . Move and hold the lever partway to signal a lane change . Driving proc e dure s Tur n signa l leve r Right turn Left turn Move and hold the lever partway to signal a lane change . The left hand signal will flash until you release the lever. The right hand signal will flash until you release the lever.

Owners Manual
Page 132
Canada 2 Sets the parking brake Fully set the parking brake while depressing the brake pedal. When driving Releases the parking brake Slightly raise the lever and lower it completely while pressing the button. 2 -1 . Driving proc e dure s Pa rk ing bra ke U.S.A.
Canada 2 Sets the parking brake Fully set the parking brake while depressing the brake pedal. When driving Releases the parking brake Slightly raise the lever and lower it completely while pressing the button. 2 -1 . Driving proc e dure s Pa rk ing bra ke U.S.A.
Owners Manual
Page 145
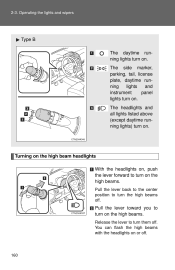
..., daytime running lights) turn on . Turning on the high beam headlights With the headlights on, push the lever forward to turn on the high beams. Release the lever to turn them off . Pull the lever toward you to turn on the high beams. Pull the lever back to the center position...
..., daytime running lights) turn on . Turning on the high beam headlights With the headlights on, push the lever forward to turn on the high beams. Release the lever to turn them off . Pull the lever toward you to turn on the high beams. Pull the lever back to the center position...
Owners Manual
Page 179
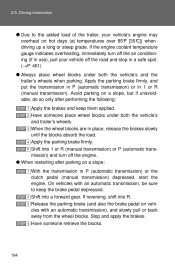
...steep grade. STEP 2 STEP 3 STEP 4 194 Apply the parking brake firmly, and put the transmission in P (automatic transmission) or in place, release the brakes slowly until the blocks absorb the load. 2-5. Driving information ● Due to keep them applied. Have someone place wheel blocks under both ... do so only after parking on vehicles with an automatic transmission, be sure to the added load of the trailer, your vehicle off the engine. Release the parking brake (and also the brake pedal on a slope: STEP 1 With the transmission in a safe spot. (→P. 461) ●...
...steep grade. STEP 2 STEP 3 STEP 4 194 Apply the parking brake firmly, and put the transmission in P (automatic transmission) or in place, release the brakes slowly until the blocks absorb the load. 2-5. Driving information ● Due to keep them applied. Have someone place wheel blocks under both ... do so only after parking on vehicles with an automatic transmission, be sure to the added load of the trailer, your vehicle off the engine. Release the parking brake (and also the brake pedal on a slope: STEP 1 With the transmission in a safe spot. (→P. 461) ●...

Owners Manual
Page 187
... N. Driving inform a t ion Dinghy t ow ing (m a nua l t ra nsm ission) Your vehicle can be dinghy towed in idle for at least 3 minutes before towing. STEP 3 Release the parking brake. STEP 1 STEP 2 Shift the shift lever to the "ACC" position. (→P. 135) Ensure that the audio system and other powered devices have...
... N. Driving inform a t ion Dinghy t ow ing (m a nua l t ra nsm ission) Your vehicle can be dinghy towed in idle for at least 3 minutes before towing. STEP 3 Release the parking brake. STEP 1 STEP 2 Shift the shift lever to the "ACC" position. (→P. 135) Ensure that the audio system and other powered devices have...
Owners Manual
Page 333
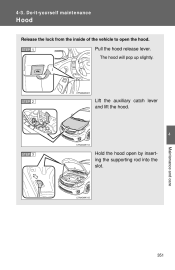
STEP 2 Lift the auxiliary catch lever and lift the hood. 4 Maintenance and care STEP 3 Hold the hood open the hood. Do-it -yourse lf m a int e na nc e H ood Release the lock from the inside of the vehicle to open by inserting the supporting rod into the slot. 351 The hood will pop up slightly. STEP 1 Pull the hood release lever. 4 -3 .
STEP 2 Lift the auxiliary catch lever and lift the hood. 4 Maintenance and care STEP 3 Hold the hood open the hood. Do-it -yourse lf m a int e na nc e H ood Release the lock from the inside of the vehicle to open by inserting the supporting rod into the slot. 351 The hood will pop up slightly. STEP 1 Pull the hood release lever. 4 -3 .
Owners Manual
Page 387
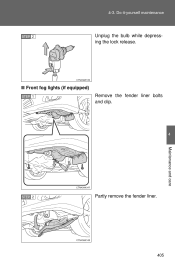
Do-it-yourself maintenance STEP 2 Unplug the bulb while depressing the lock release. 4-3.
Do-it-yourself maintenance STEP 2 Unplug the bulb while depressing the lock release. 4-3.
Owners Manual
Page 388
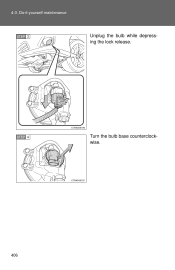
4-3. Do-it-yourself maintenance STEP 3 Unplug the bulb while depressing the lock release. STEP 4 Turn the bulb base counterclockwise. 406
4-3. Do-it-yourself maintenance STEP 3 Unplug the bulb while depressing the lock release. STEP 4 Turn the bulb base counterclockwise. 406
Owners Manual
Page 405
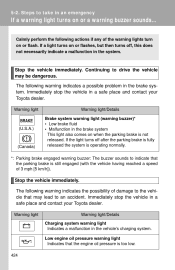
... a speed of the warning lights turn on or a w arning buzzer sounds...Calmly perform the following warning indicates a possible problem in a safe place and contact your Toyota dealer. Stop the vehicle immediately. St e ps t o t a k e in a n e m e rge nc y If a w arning light turns on or ...Parking brake engaged warning buzzer: The buzzer sounds to drive the vehicle may lead to the vehicle that the engine oil pressure is not released. Immediately stop the vehicle in the system. Warning light Warning light/Details Brake system warning light (warning buzzer)* • Low brake fluid...
... a speed of the warning lights turn on or a w arning buzzer sounds...Calmly perform the following warning indicates a possible problem in a safe place and contact your Toyota dealer. Stop the vehicle immediately. St e ps t o t a k e in a n e m e rge nc y If a w arning light turns on or ...Parking brake engaged warning buzzer: The buzzer sounds to drive the vehicle may lead to the vehicle that the engine oil pressure is not released. Immediately stop the vehicle in the system. Warning light Warning light/Details Brake system warning light (warning buzzer)* • Low brake fluid...

Owners Manual
Page 429
St e ps t o t a k e in a n e m e rge nc y I f t he e ngine w ill not st a r t If the engine still does not start after following the correct starting procedure (→P. 131, 135) or releasing the steering lock (→P. 133, 137), confirm the following points. 5 -2 .
St e ps t o t a k e in a n e m e rge nc y I f t he e ngine w ill not st a r t If the engine still does not start after following the correct starting procedure (→P. 131, 135) or releasing the steering lock (→P. 133, 137), confirm the following points. 5 -2 .

Owners Manual
Page 445
... and put the shift lever in mud, dirt, or snow. Shift the shift lever to the D or R position (automatic transmission) or 1 or R position (manual transmission), release the parking brake and carefully apply the accelerator to help provide traction under the tires. Remove the mud, snow, or sand from around the stuck...
... and put the shift lever in mud, dirt, or snow. Shift the shift lever to the D or R position (automatic transmission) or 1 or R position (manual transmission), release the parking brake and carefully apply the accelerator to help provide traction under the tires. Remove the mud, snow, or sand from around the stuck...
Owners Manual
Page 501
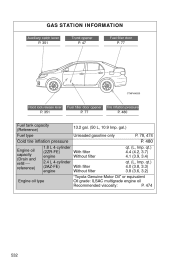
qt.) 4.0 (3.8, 3.3) With filter 3.8 (3.6, 3.2) Without filter "Toyota Genuine Motor Oil" or equivalent Oil grade: ILSAC multigrade engine oil Recommended viscosity: P. 474 Engine oil type 532 qt.) 4.4 (4.2, 3.7) 4.1 (3.9, 3.4) qt. (L, Imp. GAS STAT I ON I N FORM AT I ON Auxiliary catch lever P. 351 Trunk opener P. 47 Fuel filler door P. 77 Hood lock release lever P. 351 Fuel filler door opener...
qt.) 4.0 (3.8, 3.3) With filter 3.8 (3.6, 3.2) Without filter "Toyota Genuine Motor Oil" or equivalent Oil grade: ILSAC multigrade engine oil Recommended viscosity: P. 474 Engine oil type 532 qt.) 4.4 (4.2, 3.7) 4.1 (3.9, 3.4) qt. (L, Imp. GAS STAT I ON I N FORM AT I ON Auxiliary catch lever P. 351 Trunk opener P. 47 Fuel filler door P. 77 Hood lock release lever P. 351 Fuel filler door opener...
Owners Manual
Page 534
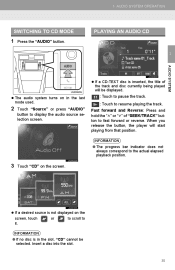
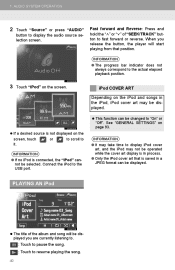
... source selection screen. ● The progress bar indicator does not always correspond to resume playing the track. Insert a disc into the slot. 35 When you release the button, the player will be selected. If a desired source is inserted, the title of "SEEK/TRACK" button to fast forward or reverse. Fast forward...
... source selection screen. ● The progress bar indicator does not always correspond to resume playing the track. Insert a disc into the slot. 35 When you release the button, the player will be selected. If a desired source is inserted, the title of "SEEK/TRACK" button to fast forward or reverse. Fast forward...
Owners Manual
Page 536
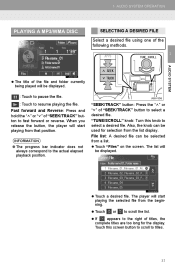
... select a desired file. INFORMATION "SEEK/TRACK" button: Press the " " or " " of titles, the complete titles are too long for selection from the beginning. When you release the button, the player will be displayed. ● The progress bar indicator does not always correspond to fast forward or reverse. AUDIO SYSTEM OPERATION PLAYING...
... select a desired file. INFORMATION "SEEK/TRACK" button: Press the " " or " " of titles, the complete titles are too long for selection from the beginning. When you release the button, the player will be displayed. ● The progress bar indicator does not always correspond to fast forward or reverse. AUDIO SYSTEM OPERATION PLAYING...
Owners Manual
Page 539
... source selection screen. This function can be displayed. AUDIO SYSTEM OPERATION 2 Touch "Source" or press "AUDIO" button to resume playing the song. 40 1. When you release the button, the player will be displayed.
... source selection screen. This function can be displayed. AUDIO SYSTEM OPERATION 2 Touch "Source" or press "AUDIO" button to resume playing the song. 40 1. When you release the button, the player will be displayed.