
Owners Manual
Page 1
... as door locks, mirrors, and steering column. 2 When driving Driving, stopping and safe-driving information. 3 Interior features Air conditioning and audio systems, as well as other interior features for a comfortable driving experience. 4 Maintenance and care Cleaning and protecting your vehicle, performing do-ityourself maintenance, and maintenance information. 5 When trouble arises What to...
... as door locks, mirrors, and steering column. 2 When driving Driving, stopping and safe-driving information. 3 Interior features Air conditioning and audio systems, as well as other interior features for a comfortable driving experience. 4 Maintenance and care Cleaning and protecting your vehicle, performing do-ityourself maintenance, and maintenance information. 5 When trouble arises What to...
Owners Manual
Page 34
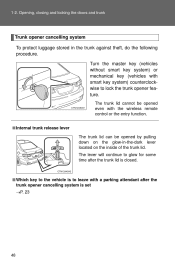
The trunk lid cannot be opened even with smart key system) counterclockwise to lock the trunk opener feature. Turn the master key (vehicles without smart key system) or mechanical key (vehicles with the wireless remote control or the entry function. 1-2. Opening, closing and locking the doors and trunk Trunk opener cancelling system To protect luggage stored in the trunk against theft, do the following procedure.
The trunk lid cannot be opened even with smart key system) counterclockwise to lock the trunk opener feature. Turn the master key (vehicles without smart key system) or mechanical key (vehicles with the wireless remote control or the entry function. 1-2. Opening, closing and locking the doors and trunk Trunk opener cancelling system To protect luggage stored in the trunk against theft, do the following procedure.
Owners Manual
Page 192
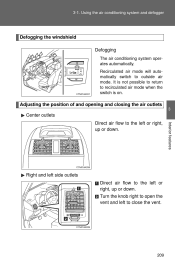
... conditioning system and defogger Defogging the windshield Defogging The air conditioning system operates automatically. It is not possible to return to outside air mode. Interior features Right and left side outlets Direct air flow to the left to close the vent. 209 Turn the knob right to the left or right...
... conditioning system and defogger Defogging the windshield Defogging The air conditioning system operates automatically. It is not possible to return to outside air mode. Interior features Right and left side outlets Direct air flow to the left to close the vent. 209 Turn the knob right to the left or right...

Owners Manual
Page 196
3-1. Using the air conditioning system and defogger Air conditioning system Air outlet selection dial Fan speed control dial Temperature control dial 3 Interior features Air intake mode switch Air conditioning ON/OFF switch Adjusting the settings
3-1. Using the air conditioning system and defogger Air conditioning system Air outlet selection dial Fan speed control dial Temperature control dial 3 Interior features Air intake mode switch Air conditioning ON/OFF switch Adjusting the settings

Owners Manual
Page 198
Using the air conditioning system and defogger Mainly air flows to the feet. : Some models Air flows to the windshield and side windows. The air intake is automatically switched to outside air mode. The air intake is automatically switched to recirculated air mode when the switch is on . It is not possible to return to outside air mode. It is not possible to return to recirculated air mode when the switch is on . 3 Interior features : Some models Air flows to the feet and the windshield defogger operates. 3-1.
Using the air conditioning system and defogger Mainly air flows to the feet. : Some models Air flows to the windshield and side windows. The air intake is automatically switched to outside air mode. The air intake is automatically switched to recirculated air mode when the switch is on . It is not possible to return to outside air mode. It is not possible to return to recirculated air mode when the switch is on . 3 Interior features : Some models Air flows to the feet and the windshield defogger operates. 3-1.

Owners Manual
Page 202
U sing t he a ir c ondit ioning syst e m a nd de fogge r Rear w indow and outside rear view mirror defoggers Clear the rear window using the defogger. Vehicles with manual air conditioning system On/off 3 Interior features The defoggers will automatically turn off after approximately 15 minutes. Vehicles with automatic air conditioning system On/off The defoggers will automatically turn off after approximately 15 minutes. 3 -1 .
U sing t he a ir c ondit ioning syst e m a nd de fogge r Rear w indow and outside rear view mirror defoggers Clear the rear window using the defogger. Vehicles with manual air conditioning system On/off 3 Interior features The defoggers will automatically turn off after approximately 15 minutes. Vehicles with automatic air conditioning system On/off The defoggers will automatically turn off after approximately 15 minutes. 3 -1 .

Owners Manual
Page 204
3-2. Type C Interior features 221 Using the audio system Title Using the radio Using the CD player Playing back MP3 and WMA discs Operating an iPod Operating a USB memory Optimal use of the audio system Using the AUX port Using the steering wheel audio switches Page P. 233 P. 237 P. 244 P. 253 P. 262 P. 270 P. 274 P. 276 3 With Display Audio system Owners of models equipped with a Display Audio system should refer to the "Display Audio System Owner's Manual".
3-2. Type C Interior features 221 Using the audio system Title Using the radio Using the CD player Playing back MP3 and WMA discs Operating an iPod Operating a USB memory Optimal use of the audio system Using the AUX port Using the steering wheel audio switches Page P. 233 P. 237 P. 244 P. 253 P. 262 P. 270 P. 274 P. 276 3 With Display Audio system Owners of models equipped with a Display Audio system should refer to the "Display Audio System Owner's Manual".
Owners Manual
Page 216
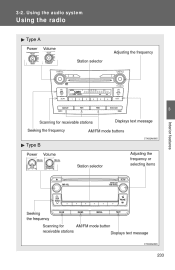
3 -2 . U sing t he a udio syst e m U sing t he ra dio Type A Power Volume Adjusting the frequency Station selector 3 Displays text message Scanning for receivable stations Seeking the frequency Interior features AM/FM mode buttons Type B Power Volume Station selector Adjusting the frequency or selecting items Seeking the frequency Scanning for AM/FM mode button receivable stations Displays text message 233
3 -2 . U sing t he a udio syst e m U sing t he ra dio Type A Power Volume Adjusting the frequency Station selector 3 Displays text message Scanning for receivable stations Seeking the frequency Interior features AM/FM mode buttons Type B Power Volume Station selector Adjusting the frequency or selecting items Seeking the frequency Scanning for AM/FM mode button receivable stations Displays text message 233

Owners Manual
Page 218
" is pressed, the display changes in the following Title (song/program title) → Name (artist name/feature)/Title (song/program title). 3-2. Using the audio system Switching the display Type A Press Each time order: . Press Interior features Type B Press . 3 If the text continues past the end of the display, " . is displayed.
" is pressed, the display changes in the following Title (song/program title) → Name (artist name/feature)/Title (song/program title). 3-2. Using the audio system Switching the display Type A Press Each time order: . Press Interior features Type B Press . 3 If the text continues past the end of the display, " . is displayed.

Owners Manual
Page 220
U sing t he a udio syst e m U sing t he CD pla ye r Type A Power Volume CD eject Displays text message Playback Selecting a track, fast-forwarding and rewinding Repeat play 3 Interior features Random playback Search playback Type B Power Volume CD eject Random playback Reverse Repeat play Selecting a track or displays track list Selecting a track Search playback Playback Fast-forward Displays text message 237 3 -2 .
U sing t he a udio syst e m U sing t he CD pla ye r Type A Power Volume CD eject Displays text message Playback Selecting a track, fast-forwarding and rewinding Repeat play 3 Interior features Random playback Search playback Type B Power Volume CD eject Random playback Reverse Repeat play Selecting a track or displays track list Selecting a track Search playback Playback Fast-forward Displays text message 237 3 -2 .

Owners Manual
Page 222
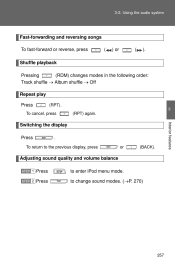
Using the audio system Selecting a track from a track list (type B) STEP 1 Press . or or . 3 The first ten seconds of each track will be played. STEP 2 again when the desired track is Interior features Random playback Press (RAND) or (RDM). STEP 2 Turn and press to the previous display, press Scanning tracks STEP 1 Press Press reached. To cancel, press the button once more . 239 To return to select a track. (BACK). The track list will be displayed. To cancel, press the button once more . Repeat play Press (RPT) or (RPT). 3-2.
Using the audio system Selecting a track from a track list (type B) STEP 1 Press . or or . 3 The first ten seconds of each track will be played. STEP 2 again when the desired track is Interior features Random playback Press (RAND) or (RDM). STEP 2 Turn and press to the previous display, press Scanning tracks STEP 1 Press Press reached. To cancel, press the button once more . 239 To return to select a track. (BACK). The track list will be displayed. To cancel, press the button once more . Repeat play Press (RPT) or (RPT). 3-2.
Owners Manual
Page 234
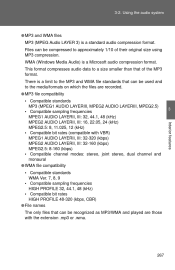
... may not play discs that can be recognized as with multi-sessions, it is based on ID3 Ver. 1.0 and 1.1.) WMA tags can be played. 3 Interior features 251 The system is compatible with ID3 Ver. 1.0, 1.1, and Ver. 2.2, 2.3 ID3 tags. (The number of music data and MP3 or WMA format data, only music...
... may not play discs that can be recognized as with multi-sessions, it is based on ID3 Ver. 1.0 and 1.1.) WMA tags can be played. 3 Interior features 251 The system is compatible with ID3 Ver. 1.0, 1.1, and Ver. 2.2, 2.3 ID3 tags. (The number of music data and MP3 or WMA format data, only music...
Owners Manual
Page 240
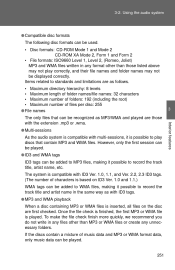
Using the audio system Fast-forwarding and reversing songs To fast-forward or reverse, press Shuffle playback Pressing (RDM) changes modes in the following order: Track shuffle → Album shuffle → Off Repeat play Press (RPT). 3 ( ) or ( ). To cancel, press (RPT) again. to enter iPod menu mode. To return to the previous display, press Adjusting sound quality and volume balance STEP 1 STEP 2 Press Press to change sound modes. (→P. 270) 257 Interior features Switching the display Press . or (BACK). 3-2.
Using the audio system Fast-forwarding and reversing songs To fast-forward or reverse, press Shuffle playback Pressing (RDM) changes modes in the following order: Track shuffle → Album shuffle → Off Repeat play Press (RPT). 3 ( ) or ( ). To cancel, press (RPT) again. to enter iPod menu mode. To return to the previous display, press Adjusting sound quality and volume balance STEP 1 STEP 2 Press Press to change sound modes. (→P. 270) 257 Interior features Switching the display Press . or (BACK). 3-2.
Owners Manual
Page 248
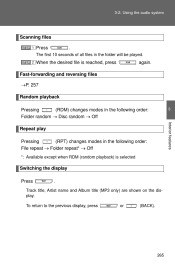
... will be played. Track title, Artist name and Album title (MP3 only) are shown on the display. STEP 2 When the desired file is selected 3 Interior features Switching the display Press . 3-2. Using the audio system Scanning files STEP 1 Press .
... will be played. Track title, Artist name and Album title (MP3 only) are shown on the display. STEP 2 When the desired file is selected 3 Interior features Switching the display Press . 3-2. Using the audio system Scanning files STEP 1 Press .
Owners Manual
Page 250
... The only files that can be used and to the media/formats on which the files are those with the extension .mp3 or .wma. 3 Interior features 267 This format compresses audio data to approximately 1/10 of the MP3 format. Using the audio system ● MP3 and WMA files MP3 (MPEG Audio...
... The only files that can be used and to the media/formats on which the files are those with the extension .mp3 or .wma. 3 Interior features 267 This format compresses audio data to approximately 1/10 of the MP3 format. Using the audio system ● MP3 and WMA files MP3 (MPEG Audio...

Owners Manual
Page 258
Using the audio system Type A STEP 2 Press . Type B STEP 2 Press . 3 Interior features 3-2.
Using the audio system Type A STEP 2 Press . Type B STEP 2 Press . 3 Interior features 3-2.

Owners Manual
Page 259
Type A Volume Radio mode: Selects radio stations CD mode: Selects tracks and files (MP3 and WMA) iPod mode: Selects songs USB memory mode∗: Selects folders files and Bluetooth® audio mode∗: Selects an album and tracks Turns the power on the steering wheel. U sing t he a udio syst e m U sing t he st e e ring w he e l a udio sw it che s ∗ Some audio features can be controlled using the switches on , selects audio source ∗: If equipped 276 3 -2 .
Type A Volume Radio mode: Selects radio stations CD mode: Selects tracks and files (MP3 and WMA) iPod mode: Selects songs USB memory mode∗: Selects folders files and Bluetooth® audio mode∗: Selects an album and tracks Turns the power on the steering wheel. U sing t he a udio syst e m U sing t he st e e ring w he e l a udio sw it che s ∗ Some audio features can be controlled using the switches on , selects audio source ∗: If equipped 276 3 -2 .

Owners Manual
Page 260
... memory mode∗: Selects folders files and 3 Bluetooth® audio mode∗: Selects an album and tracks Turns the power on, selects audio source Interior features Turning on . The or is turned off. If a audio source changes each time mode cannot be used, it will be skipped. ∗: If equipped 277...
... memory mode∗: Selects folders files and 3 Bluetooth® audio mode∗: Selects an album and tracks Turns the power on, selects audio source Interior features Turning on . The or is turned off. If a audio source changes each time mode cannot be used, it will be skipped. ∗: If equipped 277...

Owners Manual
Page 262
3-2. Using the audio system Selecting a track/file or song STEP 1 Press ® or to select CD, USB memory or 3 Bluetooth audio mode. Interior features STEP 2 Press and hold "∧" or "∨" on track/file or song. STEP 2 Press "∧" or "∨" on beep. or to select the desired Selecting a folder or album STEP 1 Press ® or to select CD, iPod, USB memory or Bluetooth audio mode. or until you hear a CAUTION
3-2. Using the audio system Selecting a track/file or song STEP 1 Press ® or to select CD, USB memory or 3 Bluetooth audio mode. Interior features STEP 2 Press and hold "∧" or "∨" on track/file or song. STEP 2 Press "∧" or "∨" on beep. or to select the desired Selecting a folder or album STEP 1 Press ® or to select CD, iPod, USB memory or Bluetooth audio mode. or until you hear a CAUTION

Owners Manual
Page 268
... to register (pair) a device: STEP 1 Press Press and select "Bluetooth" using and select "Pairing" using the Bluetooth® audio/phone, it may register automatically. 3 Interior features If a Bluetooth® device has both music player and cellular phone functions, both functions will be displayed. SSP (Secure Simple Pairing) compatible Bluetooth® devices...
... to register (pair) a device: STEP 1 Press Press and select "Bluetooth" using and select "Pairing" using the Bluetooth® audio/phone, it may register automatically. 3 Interior features If a Bluetooth® device has both music player and cellular phone functions, both functions will be displayed. SSP (Secure Simple Pairing) compatible Bluetooth® devices...


