
Owners Manual
Page 2
... manual are current at any time without notice. All specifications provided in the illustration may find some explanations for several minutes. However, because of the Toyota policy of printing. Therefore, you may hear sound coming from under the vehicle for equipment not installed on specifications, the vehicle shown in this manual...
... manual are current at any time without notice. All specifications provided in the illustration may find some explanations for several minutes. However, because of the Toyota policy of printing. Therefore, you may hear sound coming from under the vehicle for equipment not installed on specifications, the vehicle shown in this manual...
Owners Manual
Page 14
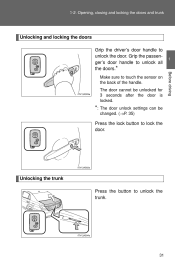
Opening, closing and locking the doors and trunk Unlocking and locking the doors Grip the driver's door handle to lock the door. The door cannot be unlocked for 3 seconds after the door is locked. 1 Before driving *: The door unlock settings can be changed. (→P. 35) Press the lock button to unlock the door. Unlocking the trunk Press the button to touch the sensor on the back of the handle. 1-2. Grip the passenger's door handle to unlock all the doors.* Make sure to unlock the trunk. 31
Opening, closing and locking the doors and trunk Unlocking and locking the doors Grip the driver's door handle to lock the door. The door cannot be unlocked for 3 seconds after the door is locked. 1 Before driving *: The door unlock settings can be changed. (→P. 35) Press the lock button to unlock the door. Unlocking the trunk Press the button to touch the sensor on the back of the handle. 1-2. Grip the passenger's door handle to unlock all the doors.* Make sure to unlock the trunk. 31
Owners Manual
Page 29
FCC WARNING: Changes or modifications not expressly approved by one or more of the following measures: ● Reorient or relocate the receiving antenna. ● Increase the separation between ...
FCC WARNING: Changes or modifications not expressly approved by one or more of the following measures: ● Reorient or relocate the receiving antenna. ● Increase the separation between ...
Owners Manual
Page 136
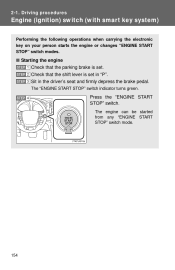
2 -1 . Driving proc e dure s Engine (ignition) sw itch (w ith smart key system) Performing the following operations when carrying the electronic key on your person starts the engine or changes "ENGINE START STOP" switch modes.
2 -1 . Driving proc e dure s Engine (ignition) sw itch (w ith smart key system) Performing the following operations when carrying the electronic key on your person starts the engine or changes "ENGINE START STOP" switch modes.
Owners Manual
Page 145
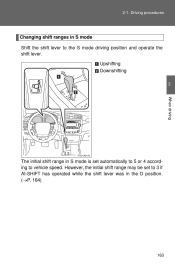
Upshifting Downshifting 2 When driving The initial shift range in S mode is set to 3 if AI-SHIFT has operated while the shift lever was in S mode Shift the shift lever to vehicle speed. 2-1. However, the initial shift range may be set automatically to 5 or 4 according to the S mode driving position and operate the shift lever. Driving procedures Changing shift ranges in the D position. (→P. 164) 163
Upshifting Downshifting 2 When driving The initial shift range in S mode is set to 3 if AI-SHIFT has operated while the shift lever was in S mode Shift the shift lever to vehicle speed. 2-1. However, the initial shift range may be set automatically to 5 or 4 according to the S mode driving position and operate the shift lever. Driving procedures Changing shift ranges in the D position. (→P. 164) 163
Owners Manual
Page 148
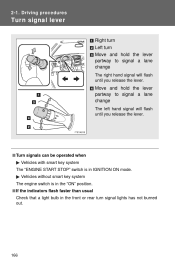
Driving proc e dure s Tur n signa l leve r Right turn Left turn Move and hold the lever partway to signal a lane change The left hand signal will flash until you release the lever. Move and hold the lever partway to signal a lane change The right hand signal will flash until you release the lever. 2 -1 .
Driving proc e dure s Tur n signa l leve r Right turn Left turn Move and hold the lever partway to signal a lane change The left hand signal will flash until you release the lever. Move and hold the lever partway to signal a lane change The right hand signal will flash until you release the lever. 2 -1 .
Owners Manual
Page 182
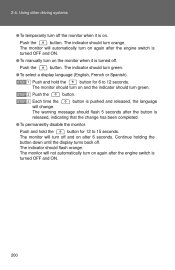
...indicator should turn off . Continue holding the button down until the display turns back off the monitor when it is released, indicating that the change . The indicator should turn on again after the engine switch is turned OFF and ON. ● To manually turn green. Push and... hold the STEP 2 Push the STEP 3 Each time the button for 12 to 12 seconds. The monitor will change has been completed. ● To permanently disable the monitor. button is pushed and released, the language will not automatically turn off . Using other ...
...indicator should turn off . Continue holding the button down until the display turns back off the monitor when it is released, indicating that the change . The indicator should turn on again after the engine switch is turned OFF and ON. ● To manually turn green. Push and... hold the STEP 2 Push the STEP 3 Each time the button for 12 to 12 seconds. The monitor will change has been completed. ● To permanently disable the monitor. button is pushed and released, the language will not automatically turn off . Using other ...
Owners Manual
Page 208
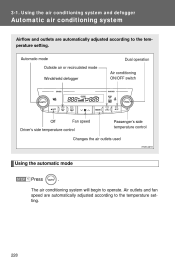
... Outside air or recirculated mode Windshield defogger Air conditioning ON/OFF switch Dual operation Off Fan speed Driver's side temperature control Passenger's side temperature control Changes the air outlets used Using the automatic mode STEP 1 Press . The air conditioning system will begin to operate.
... Outside air or recirculated mode Windshield defogger Air conditioning ON/OFF switch Dual operation Off Fan speed Driver's side temperature control Passenger's side temperature control Changes the air outlets used Using the automatic mode STEP 1 Press . The air conditioning system will begin to operate.
Owners Manual
Page 217
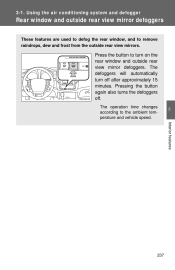
Pressing the button again also turns the defoggers off after approximately 15 minutes. The defoggers will automatically turn on the rear window and outside rear view mirrors. The operation time changes according to turn off . Press the button to the ambient temperature and vehicle speed. 3 Interior features 237 U sing t he a ir c ondit ioning syst e m a nd de fogge r Rear w indow and outside rear view mirror defoggers These features are used to defog the rear window, and to remove raindrops, dew and frost from the outside rear view mirror defoggers. 3 -1 .
Pressing the button again also turns the defoggers off after approximately 15 minutes. The defoggers will automatically turn on the rear window and outside rear view mirrors. The operation time changes according to turn off . Press the button to the ambient temperature and vehicle speed. 3 Interior features 237 U sing t he a ir c ondit ioning syst e m a nd de fogge r Rear w indow and outside rear view mirror defoggers These features are used to defog the rear window, and to remove raindrops, dew and frost from the outside rear view mirror defoggers. 3 -1 .

Owners Manual
Page 221
For vehicles sold in the U.S.A. that corresponds to "MORE". "ENG" (English) or "ESP" (Spanish) For vehicles sold in Canada "ENG" (English) or "FRAN" (French) Interior features 3 Using the audio system Language settings The language used for all voice guidance, voice recognition and messages may be changed. STEP 1 STEP 2 STEP 3 STEP 4 Press Press Press Press . that corresponds to "LANG". that corresponds to the desired language. 3-2.
For vehicles sold in the U.S.A. that corresponds to "MORE". "ENG" (English) or "ESP" (Spanish) For vehicles sold in Canada "ENG" (English) or "FRAN" (French) Interior features 3 Using the audio system Language settings The language used for all voice guidance, voice recognition and messages may be changed. STEP 1 STEP 2 STEP 3 STEP 4 Press Press Press Press . that corresponds to "LANG". that corresponds to the desired language. 3-2.
Owners Manual
Page 223
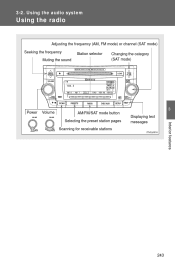
U sing t he a udio syst e m U sing t he ra dio Adjusting the frequency (AM, FM mode) or channel (SAT mode) Seeking the frequency Muting the sound Station selector Changing the category (SAT mode) Power Volume 3 AM/FM/SAT mode button Selecting the preset station pages Scanning for receivable stations Displaying text messages Interior features 243 3 -2 .
U sing t he a udio syst e m U sing t he ra dio Adjusting the frequency (AM, FM mode) or channel (SAT mode) Seeking the frequency Muting the sound Station selector Changing the category (SAT mode) Power Volume 3 AM/FM/SAT mode button Selecting the preset station pages Scanning for receivable stations Displaying text messages Interior features 243 3 -2 .
Owners Manual
Page 224
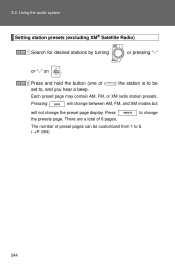
3-2. Pressing Each preset page may contain AM, FM, or XM radio station presets. Press the presets page. The number of 6 pages. will not change the preset page display. There are a total of preset pages can be Press and hold the button (one of set to, and you hear a beep. ...® Satellite Radio) STEP 1 Search for desired stations by turning or pressing "∧" or "∨" on STEP 2 . ) the station is to be customized from 1 to change will change between AM, FM, and XM modes but to 6. (→P. 284) 244
3-2. Pressing Each preset page may contain AM, FM, or XM radio station presets. Press the presets page. The number of 6 pages. will not change the preset page display. There are a total of preset pages can be Press and hold the button (one of set to, and you hear a beep. ...® Satellite Radio) STEP 1 Search for desired stations by turning or pressing "∧" or "∨" on STEP 2 . ) the station is to be customized from 1 to change will change between AM, FM, and XM modes but to 6. (→P. 284) 244
Owners Manual
Page 230
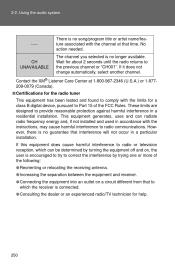
No action needed. Wait for about 2 seconds until the radio returns to the previous channel or "CH001". If it does not change automatically, select another channel. 3-2. Using the audio system ----- The channel you selected is no longer available. CH UNAVAILABLE Contact the XM® Listener Care Center at that time. There is no song/program title or artist name/feature associated with the channel at 1-800-967-2346 (U.S.A.) or 1-877209-0079 (Canada).
No action needed. Wait for about 2 seconds until the radio returns to the previous channel or "CH001". If it does not change automatically, select another channel. 3-2. Using the audio system ----- The channel you selected is no longer available. CH UNAVAILABLE Contact the XM® Listener Care Center at that time. There is no song/program title or artist name/feature associated with the channel at 1-800-967-2346 (U.S.A.) or 1-877209-0079 (Canada).
Owners Manual
Page 242
Using the audio system Switching the display Press . 3-2. Each time is pressed, the display changes in the order of Track title → Track title/Artist name → Track title/Album name → Track title/Elapsed time.
Using the audio system Switching the display Press . 3-2. Each time is pressed, the display changes in the order of Track title → Track title/Artist name → Track title/Album name → Track title/Elapsed time.
Owners Manual
Page 257
Using the audio system Switching the display Press . Each time the button is pressed, the display changes in the following order: Track title → Track title/Artist name → Track title/Album name → Track title/Elapsed time. 3-2.
Using the audio system Switching the display Press . Each time the button is pressed, the display changes in the following order: Track title → Track title/Artist name → Track title/Album name → Track title/Elapsed time. 3-2.
Owners Manual
Page 260
... create any unnecessary folders. • When the USB device is connected and the audio source is removed and reinserted (and the contents have not been changed to the speakers. ● Playback • To play from the same point in the U.S.A. 3-2. If the same device is... changed ), the USB device will be possible at the start playing the first file in the USB memory device are used . ● Extensions If the file ...
... create any unnecessary folders. • When the USB device is connected and the audio source is removed and reinserted (and the contents have not been changed to the speakers. ● Playback • To play from the same point in the U.S.A. 3-2. If the same device is... changed ), the USB device will be possible at the start playing the first file in the USB memory device are used . ● Extensions If the file ...
Owners Manual
Page 267
...→ AM Adjusting the volume Press "+" on the power Press when the audio system is not inserted, that mode will be turned off . Changing the audio source Press when the audio system is pressed. to increase the volume and "-" to continue increasing or decreasing the volume. Selecting a radio...If a CD is turned off by holding the switch down until you hear a beep. The audio system can be skipped. The audio source changes as follows each time the button is turned on To scan for receivable stations, press and hold the switch to decrease the 3 Interior features Press...
...→ AM Adjusting the volume Press "+" on the power Press when the audio system is not inserted, that mode will be turned off . Changing the audio source Press when the audio system is pressed. to increase the volume and "-" to continue increasing or decreasing the volume. Selecting a radio...If a CD is turned off by holding the switch down until you hear a beep. The audio system can be skipped. The audio source changes as follows each time the button is turned on To scan for receivable stations, press and hold the switch to decrease the 3 Interior features Press...
Owners Manual
Page 280
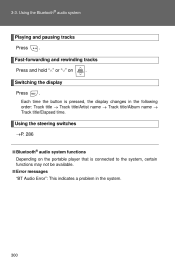
Fast-forwarding and rewinding tracks Press and hold "∧" or "∨" on Switching the display Press . . Using the steering switches →P. 286 Using the Bluetooth® audio system Playing and pausing tracks Press . 3-3. Each time the button is pressed, the display changes in the following order: Track title → Track title/Artist name → Track title/Album name → Track title/Elapsed time.
Fast-forwarding and rewinding tracks Press and hold "∧" or "∨" on Switching the display Press . . Using the steering switches →P. 286 Using the Bluetooth® audio system Playing and pausing tracks Press . 3-3. Each time the button is pressed, the display changes in the following order: Track title → Track title/Artist name → Track title/Album name → Track title/Elapsed time.
Owners Manual
Page 283
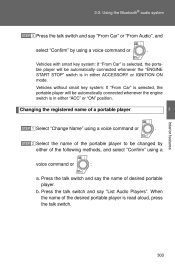
... portable player will be automatically connected whenever the "ENGINE START STOP" switch is in either of a portable player 3 Interior features STEP 1 Select "Change Name" using a voice command or . Changing the registered name of the following methods, and select "Confirm" using a voice command or : a. b. STEP 2 Select the name of the portable... talk switch. 303 Press the talk switch and say the name of the desired portable player is selected, the portable player will be changed by using a voice command or . Press the talk switch and say "List Audio Players". 3-3.
... portable player will be automatically connected whenever the "ENGINE START STOP" switch is in either of a portable player 3 Interior features STEP 1 Select "Change Name" using a voice command or . Changing the registered name of the following methods, and select "Confirm" using a voice command or : a. b. STEP 2 Select the name of the portable... talk switch. 303 Press the talk switch and say the name of the desired portable player is selected, the portable player will be changed by using a voice command or . Press the talk switch and say "List Audio Players". 3-3.
Owners Manual
Page 284
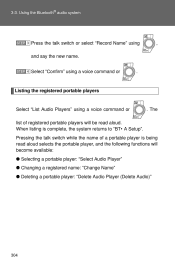
... aloud. The Pressing the talk switch while the name of registered portable players will become available: ● Selecting a portable player: "Select Audio Player" ● Changing a registered name: "Change Name" ● Deleting a portable player: "Delete Audio Player (Delete Audio)" 304 Listing the registered portable players Select "List Audio Players" using a voice command or...
... aloud. The Pressing the talk switch while the name of registered portable players will become available: ● Selecting a portable player: "Select Audio Player" ● Changing a registered name: "Change Name" ● Deleting a portable player: "Delete Audio Player (Delete Audio)" 304 Listing the registered portable players Select "List Audio Players" using a voice command or...


