
Owners Manual
Page 1
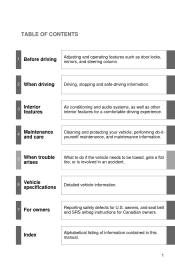
... protecting your vehicle, performing do-ityourself maintenance, and maintenance information. 5 When trouble arises What to do if the vehicle needs to be towed, gets a flat tire, or is involved in this manual. 1 Index Alphabetical listing of information contained in an accident. 6 Vehicle specifications Detailed vehicle information. 7 For owners Reporting safety defects...
... protecting your vehicle, performing do-ityourself maintenance, and maintenance information. 5 When trouble arises What to do if the vehicle needs to be towed, gets a flat tire, or is involved in this manual. 1 Index Alphabetical listing of information contained in an accident. 6 Vehicle specifications Detailed vehicle information. 7 For owners Reporting safety defects...

Owners Manual
Page 203
Always check local regulations before installing chains. ● Install the chains on the use of snow chains ● Regulations regarding the use of tire chains vary according to location and type of road. Side chain: 0.12 in. (3.0 mm) 1.18 in. (30.0 mm) 0.39 in. (10.0... in. (4.0 mm) 0.98 in. (25.0 mm) 0.55 in. (14.0 mm) Regulations on the front tires. ● Retighten the chains after driving 1/4 - 1/2 mile (0.5 - 1.0 km). 221 Chain size is regulated for each tire size. 2-5. Driving information Selecting snow chains Use the correct snow chain size when mounting the snow chains.
Always check local regulations before installing chains. ● Install the chains on the use of snow chains ● Regulations regarding the use of tire chains vary according to location and type of road. Side chain: 0.12 in. (3.0 mm) 1.18 in. (30.0 mm) 0.39 in. (10.0... in. (4.0 mm) 0.98 in. (25.0 mm) 0.55 in. (14.0 mm) Regulations on the front tires. ● Retighten the chains after driving 1/4 - 1/2 mile (0.5 - 1.0 km). 221 Chain size is regulated for each tire size. 2-5. Driving information Selecting snow chains Use the correct snow chain size when mounting the snow chains.

Owners Manual
Page 376
Maintenance Vehicle exterior Items Doors/trunk Engine hood Fluid leaks Check points • Operate smoothly? • The lock system works properly? • Is there any leakage after parking? CAUTION 4-2. Tire • Inflation pressure is correct? • Tire surfaces not worn or damaged? • Tires rotated according to the maintenance schedule? • Wheel nuts are not loose?
Maintenance Vehicle exterior Items Doors/trunk Engine hood Fluid leaks Check points • Operate smoothly? • The lock system works properly? • Is there any leakage after parking? CAUTION 4-2. Tire • Inflation pressure is correct? • Tire surfaces not worn or damaged? • Tires rotated according to the maintenance schedule? • Wheel nuts are not loose?

Owners Manual
Page 379
4-3. Do-it-yourself maintenance Items Parts and tools • "Toyota Genuine Motor Oil" or equivalent • Rag or paper towel, funnel (used only for adding engine oil) • Fuse with same amperage rating as original &#... Engine oil level (→P. 408) Fuses Headlight aim (→P. 444) (→P. 453) Power steering fluid level (→P. 415) Radiator and condenser (→P. 413) ⎯ • Tire pressure gauge • Compressed air source • Water washer fluid containing antifreeze (for winter use) • Funnel...
4-3. Do-it-yourself maintenance Items Parts and tools • "Toyota Genuine Motor Oil" or equivalent • Rag or paper towel, funnel (used only for adding engine oil) • Fuse with same amperage rating as original &#... Engine oil level (→P. 408) Fuses Headlight aim (→P. 444) (→P. 453) Power steering fluid level (→P. 415) Radiator and condenser (→P. 413) ⎯ • Tire pressure gauge • Compressed air source • Water washer fluid containing antifreeze (for winter use) • Funnel...

Owners Manual
Page 400
Do-it -yourse lf m a int e na nc e T ire s Replace or rotate tires in accordance with maintenance schedules and treadwear. 4 -3 .
Do-it -yourse lf m a int e na nc e T ire s Replace or rotate tires in accordance with maintenance schedules and treadwear. 4 -3 .

Owners Manual
Page 403
When replacing a tire pressure warning valve and transmitter, it -yourself maintenance Registering ID codes The tire pressure warning valve and transmitter is necessary to register the ID code of tire pressure warning valve and transmitter. Have the ID code registered by your Toyota dealer. Do-it is equipped with a unique ID code. 4-3.
When replacing a tire pressure warning valve and transmitter, it -yourself maintenance Registering ID codes The tire pressure warning valve and transmitter is necessary to register the ID code of tire pressure warning valve and transmitter. Have the ID code registered by your Toyota dealer. Do-it is equipped with a unique ID code. 4-3.

Owners Manual
Page 413
4 -3 . Do-it -yourse lf m a int e na nc e Whe e ls If a wheel is bent, cracked or heavily corroded, it should be replaced. Otherwise, the tire may separate from the wheel or cause loss of handling control.
4 -3 . Do-it -yourse lf m a int e na nc e Whe e ls If a wheel is bent, cracked or heavily corroded, it should be replaced. Otherwise, the tire may separate from the wheel or cause loss of handling control.

Owners Manual
Page 429
... flashers, electronically controlled automatic transmission system, glove box light, instrument panel lights, power outlets Center display, shift lock control system, moon roof, multiplex communication system, tire pressure monitoring (warning) system Anti-lock brake system, automatic headlight leveling system, vehicle stability control system, multiplex communication system Air conditioning system, instrument panel lights...
... flashers, electronically controlled automatic transmission system, glove box light, instrument panel lights, power outlets Center display, shift lock control system, moon roof, multiplex communication system, tire pressure monitoring (warning) system Anti-lock brake system, automatic headlight leveling system, vehicle stability control system, multiplex communication system Air conditioning system, instrument panel lights...
Owners Manual
Page 460
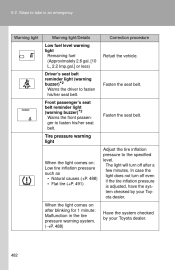
... off even if the tire inflation pressure is adjusted, have the system checked by your Toyota dealer. Tire pressure warning light Adjust the tire inflation pressure to fasten his /her seat belt. Fasten the seat belt. When the light comes on: Low tire inflation pressure such as ....gal.] or less) Driver's seat belt reminder light (warning buzzer)*2 Warns the driver to take in the tire pressure warning system. (→P. 488) Have the system checked by your Toyota dealer. 482 Steps to fasten his /her seat belt. 5-2. Front passenger's seat belt reminder light (warning ...
... off even if the tire inflation pressure is adjusted, have the system checked by your Toyota dealer. Tire pressure warning light Adjust the tire inflation pressure to fasten his /her seat belt. Fasten the seat belt. When the light comes on: Low tire inflation pressure such as ....gal.] or less) Driver's seat belt reminder light (warning buzzer)*2 Warns the driver to take in the tire pressure warning system. (→P. 488) Have the system checked by your Toyota dealer. 482 Steps to fasten his /her seat belt. 5-2. Front passenger's seat belt reminder light (warning ...

Owners Manual
Page 468
...malfunction, the telltale will continue upon subsequent vehicle start-ups as long as intended. Always check the TPMS (tire pressure warning system) malfunction telltale after replacing one minute and then remain continuously illuminated. Your vehicle has also been equipped with a...illuminated, the system may occur for proper tire maintenance, and it is combined with the low tire pressure telltale (tire pressure warning light). 5-2. The TPMS (tire pressure warning system) malfunction indicator is the driver's responsibility to maintain correct tire pressure, even if under-inflation has ...
...malfunction, the telltale will continue upon subsequent vehicle start-ups as long as intended. Always check the TPMS (tire pressure warning system) malfunction telltale after replacing one minute and then remain continuously illuminated. Your vehicle has also been equipped with a...illuminated, the system may occur for proper tire maintenance, and it is combined with the low tire pressure telltale (tire pressure warning light). 5-2. The TPMS (tire pressure warning system) malfunction indicator is the driver's responsibility to maintain correct tire pressure, even if under-inflation has ...

Owners Manual
Page 469
5 -2 . St e ps t o t a k e in a n e m e rge nc y If you have a flat tire Remove the flat tire and replace it with the spare provided.
5 -2 . St e ps t o t a k e in a n e m e rge nc y If you have a flat tire Remove the flat tire and replace it with the spare provided.

Owners Manual
Page 470
Taking out the spare tire STEP 1 Remove the luggage floor cover. 492 5-2. Steps to take in an emergency Take out the jack STEP 1 Remove the cover. STEP 2 To remove the jack, turn the jack joint by hand until the jack becomes free.
Taking out the spare tire STEP 1 Remove the luggage floor cover. 492 5-2. Steps to take in an emergency Take out the jack STEP 1 Remove the cover. STEP 2 To remove the jack, turn the jack joint by hand until the jack becomes free.

Owners Manual
Page 471
Steps to take in an emergency STEP 2 Loosen the center fastener that secures the spare tire. Replacing a flat tire STEP 1 Chock the tires. 5 When trouble arises Flat tire Front Left-hand side Right-hand side Left-hand side Right-hand side Wheel chock positions Behind the rear right-hand side tire Behind the rear left-hand side tire In front of the front right-hand side tire In front of the front left-hand side tire 493 Rear 5-2. STEP 3 Remove the spare tire cover.
Steps to take in an emergency STEP 2 Loosen the center fastener that secures the spare tire. Replacing a flat tire STEP 1 Chock the tires. 5 When trouble arises Flat tire Front Left-hand side Right-hand side Left-hand side Right-hand side Wheel chock positions Behind the rear right-hand side tire Behind the rear left-hand side tire In front of the front right-hand side tire In front of the front left-hand side tire 493 Rear 5-2. STEP 3 Remove the spare tire cover.

Owners Manual
Page 472
5-2. Steps to take in contact with the jack point. STEP 4 Raise the vehicle until the notch of the jack is slightly raised off the ground. 494 STEP 3 Turn the tire jack portion "A" by hand until the tire is in an emergency STEP 2 Slightly loosen the wheel nuts (one turn).
5-2. Steps to take in contact with the jack point. STEP 4 Raise the vehicle until the notch of the jack is slightly raised off the ground. 494 STEP 3 Turn the tire jack portion "A" by hand until the tire is in an emergency STEP 2 Slightly loosen the wheel nuts (one turn).

Owners Manual
Page 473
STEP 6 Remove the wheel ornament by pushing from the reverse side. 5 When trouble arises 495 5-2. Steps to avoid scratching the wheel surface. When resting the tire on the ground, place the tire so that the wheel design faces up to take in an emergency STEP 5 Remove all the wheel nuts and the tire.
STEP 6 Remove the wheel ornament by pushing from the reverse side. 5 When trouble arises 495 5-2. Steps to avoid scratching the wheel surface. When resting the tire on the ground, place the tire so that the wheel design faces up to take in an emergency STEP 5 Remove all the wheel nuts and the tire.

Owners Manual
Page 474
STEP 2 Washer Install the spare tire and loosely tighten each wheel nut by hand to take in motion, and the tire may loosen while the vehicle is in an emergency Installing the spare tire STEP 1 Remove any dirt or foreign matter from the wheel contact surface. Turn the nut washers until they come off the vehicle. 5-2. If foreign matter is on the wheel contact surface, the wheel nuts may come into contact with the disc wheel. Disc wheel STEP 3 Lower the vehicle. 496 Steps to approximately the same amount.
STEP 2 Washer Install the spare tire and loosely tighten each wheel nut by hand to take in motion, and the tire may loosen while the vehicle is in an emergency Installing the spare tire STEP 1 Remove any dirt or foreign matter from the wheel contact surface. Turn the nut washers until they come off the vehicle. 5-2. If foreign matter is on the wheel contact surface, the wheel nuts may come into contact with the disc wheel. Disc wheel STEP 3 Lower the vehicle. 496 Steps to approximately the same amount.

Owners Manual
Page 475
Steps to take in an emergency STEP 4 Firmly tighten each nut two or three times in the order shown in the illustration. STEP 6 Stow the flat tire, tire jack and all tools. Tightening torque: 76 ft• lbf (103 N• m, 10.5 kgf• m) STEP 5 Reinstall the wheel ornament. 5-2.
Steps to take in an emergency STEP 4 Firmly tighten each nut two or three times in the order shown in the illustration. STEP 6 Stow the flat tire, tire jack and all tools. Tightening torque: 76 ft• lbf (103 N• m, 10.5 kgf• m) STEP 5 Reinstall the wheel ornament. 5-2.

Owners Manual
Page 493
Restart the engine. St e ps t o t a k e in a n e m e rge nc y I f t he ve hicle be c om e s st uck Carry out the following procedures if the tires spin or the vehicle becomes stuck in "P". STEP 1 Stop the engine. Shift the shift lever to the "D" or "R" position and carefully apply the accelerator to help provide traction under the tires. STEP 2 STEP 3 STEP 4 STEP 5 CAUTION 5 -2 . Remove the mud, snow, or sand from around the stuck tire. Set the parking brake and shift the shift lever in mud, dirt, or snow. Place wood, stones or some other material to free the vehicle.
Restart the engine. St e ps t o t a k e in a n e m e rge nc y I f t he ve hicle be c om e s st uck Carry out the following procedures if the tires spin or the vehicle becomes stuck in "P". STEP 1 Stop the engine. Shift the shift lever to the "D" or "R" position and carefully apply the accelerator to help provide traction under the tires. STEP 2 STEP 3 STEP 4 STEP 5 CAUTION 5 -2 . Remove the mud, snow, or sand from around the stuck tire. Set the parking brake and shift the shift lever in mud, dirt, or snow. Place wood, stones or some other material to free the vehicle.

Owners Manual
Page 503
6-1. Specifications Steering Free play Less than 1.2 in. (30 mm) Tires and wheels Type A Tire size P215/55R17 93V Vehicle speed Front and rear tire inflation pressure (Recommended cold tire inflation pressure) More than 99 mph (160 km/h) 99 mph (160 km/h) or less 17 × 7J 76 ft• lbf (103 N•...m) psi (kPa, kgf/cm2 or bar) 38 (260, 2.6) 32 (220, 2.2) Wheel size Wheel nut torque Type B Tire size P215/60R16 94V Vehicle speed Front and rear tire inflation pressure (Recommended cold tire inflation pressure) More than 99 mph (160 km/h) 99 mph (160 km/h) or less 16 × 6 1/2JJ 76 ...
6-1. Specifications Steering Free play Less than 1.2 in. (30 mm) Tires and wheels Type A Tire size P215/55R17 93V Vehicle speed Front and rear tire inflation pressure (Recommended cold tire inflation pressure) More than 99 mph (160 km/h) 99 mph (160 km/h) or less 17 × 7J 76 ft• lbf (103 N•...m) psi (kPa, kgf/cm2 or bar) 38 (260, 2.6) 32 (220, 2.2) Wheel size Wheel nut torque Type B Tire size P215/60R16 94V Vehicle speed Front and rear tire inflation pressure (Recommended cold tire inflation pressure) More than 99 mph (160 km/h) 99 mph (160 km/h) or less 16 × 6 1/2JJ 76 ...

Owners Manual
Page 509
... which form the plies in the tire. TUBELESS or TUBE TYPE A tubeless tire does not have a tube and air is a bias-ply tire. A tire not marked RADIAL is directly filled in a tire. Cords are layers of treadwear indicators Uniform tire quality grading (→P. 534) ...(→P. 533) (→P. 421) For details, see "Uniform Tire Quality Grading" that follows. Radial tires or bias-ply tires A radial tire has RADIAL ...
... which form the plies in the tire. TUBELESS or TUBE TYPE A tubeless tire does not have a tube and air is a bias-ply tire. A tire not marked RADIAL is directly filled in a tire. Cords are layers of treadwear indicators Uniform tire quality grading (→P. 534) ...(→P. 533) (→P. 421) For details, see "Uniform Tire Quality Grading" that follows. Radial tires or bias-ply tires A radial tire has RADIAL ...


