

Owners Manual
Page 44
Adjust a ble c om pone nt s (se a t s, st e e ring w he e l, m irrors) Re a r se at s To adjust the seat back angle, pull the lock release lever. 1 Before driving 1 -3 .
Adjust a ble c om pone nt s (se a t s, st e e ring w he e l, m irrors) Re a r se at s To adjust the seat back angle, pull the lock release lever. 1 Before driving 1 -3 .

Owners Manual
Page 50
1 -3 . Adjust a ble c om pone nt s (se a t s, st e e ring w he e l, m irrors) H e a d re st ra int s Head restraints are provided for all seats. Lock release button 1 Before driving Rear seats Up Down Push and hold the lock release button when lowering the head restraint. Front seats Up Down Push and hold the lock release button when lowering the head restraint. 67
1 -3 . Adjust a ble c om pone nt s (se a t s, st e e ring w he e l, m irrors) H e a d re st ra int s Head restraints are provided for all seats. Lock release button 1 Before driving Rear seats Up Down Push and hold the lock release button when lowering the head restraint. Front seats Up Down Push and hold the lock release button when lowering the head restraint. 67

Owners Manual
Page 55
The pretensioner may not activate in the event of severe frontal collision. Seat belt pretensioners (front seats) The pretensioner helps the seat belt to quickly restrain the occupant by retracting the seat belt when the vehicle is subjected to certain types of a minor frontal impact, a side impact or a rear impact. 72 Adjustable components (seats, steering wheel, mirrors) STEP 3 Buckle, position and release the seat belt. 1-3.
The pretensioner may not activate in the event of severe frontal collision. Seat belt pretensioners (front seats) The pretensioner helps the seat belt to quickly restrain the occupant by retracting the seat belt when the vehicle is subjected to certain types of a minor frontal impact, a side impact or a rear impact. 72 Adjustable components (seats, steering wheel, mirrors) STEP 3 Buckle, position and release the seat belt. 1-3.

Owners Manual
Page 76
The cap will revolve slightly in the opposite direction once released. 1 Before driving Refueling Closing the fuel tank cap After refueling, turn the fuel tank cap clockwise until you hear a click. 1-5.
The cap will revolve slightly in the opposite direction once released. 1 Before driving Refueling Closing the fuel tank cap After refueling, turn the fuel tank cap clockwise until you hear a click. 1-5.

Owners Manual
Page 120
Make sure the top tether strap is securely latched. 137 STEP 2 Open the anchor bracket cover, latch the hook onto the anchor bracket and tighten the top tether strap. 1-7. Safety information Removing a child restraint installed with a seat belt Push the buckle release button and fully retract the seat belt. 1 Before driving Child restraint systems with a top tether strap STEP 1 Secure the child restraint using a seat belt or LATCH anchors, and lock the head restraint in place at the lowest position.
Make sure the top tether strap is securely latched. 137 STEP 2 Open the anchor bracket cover, latch the hook onto the anchor bracket and tighten the top tether strap. 1-7. Safety information Removing a child restraint installed with a seat belt Push the buckle release button and fully retract the seat belt. 1 Before driving Child restraint systems with a top tether strap STEP 1 Secure the child restraint using a seat belt or LATCH anchors, and lock the head restraint in place at the lowest position.

Owners Manual
Page 125
Gently depress the accelerator pedal. 2-1. Release the parking brake. Driving procedures Starting on a steep incline STEP 1 STEP 2 STEP 3 Firmly set the parking brake and shift the shift lever to "D".
Gently depress the accelerator pedal. 2-1. Release the parking brake. Driving procedures Starting on a steep incline STEP 1 STEP 2 STEP 3 Firmly set the parking brake and shift the shift lever to "D".
Owners Manual
Page 148
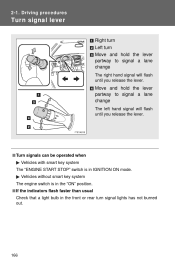
2 -1 . Driving proc e dure s Tur n signa l leve r Right turn Left turn Move and hold the lever partway to signal a lane change The left hand signal will flash until you release the lever. Move and hold the lever partway to signal a lane change The right hand signal will flash until you release the lever.
2 -1 . Driving proc e dure s Tur n signa l leve r Right turn Left turn Move and hold the lever partway to signal a lane change The left hand signal will flash until you release the lever. Move and hold the lever partway to signal a lane change The right hand signal will flash until you release the lever.
Owners Manual
Page 149
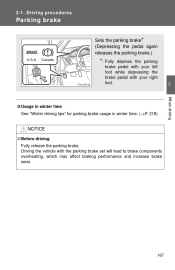
Driving proc e dure s Pa rk ing bra ke Sets the parking brake* (Depressing the pedal again releases the parking brake.) U.S.A. Canada *: Fully depress the parking brake pedal with your left foot while depressing the brake pedal with your right foot. 2 When driving 2 -1 .
Driving proc e dure s Pa rk ing bra ke Sets the parking brake* (Depressing the pedal again releases the parking brake.) U.S.A. Canada *: Fully depress the parking brake pedal with your left foot while depressing the brake pedal with your right foot. 2 When driving 2 -1 .

Owners Manual
Page 162
2-3. Operating the lights and windshield wipers Turning on the high beam headlights With the headlights on, push the lever forward to turn on the high beams. Pull the lever back to the center position to turn the high beams off. You can flash the high beams with the headlights on the high beams. Release to turn them off . Pull the lever toward you to turn on or off .
2-3. Operating the lights and windshield wipers Turning on the high beam headlights With the headlights on, push the lever forward to turn on the high beams. Pull the lever back to the center position to turn the high beams off. You can flash the high beams with the headlights on the high beams. Release to turn them off . Pull the lever toward you to turn on or off .
Owners Manual
Page 182
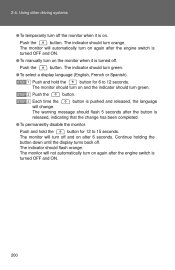
...indicator should flash 5 seconds after the engine switch is turned OFF and ON. ● To manually turn off the monitor when it is released, indicating that the change . Continue holding the button down until the display turns back off . 2-4. The warning message should turn orange. ...9679; To select a display language (English, French or Spanish). The indicator should turn on after the engine switch is pushed and released, the language will not automatically turn green. Push the button. button. button is turned OFF and ON. 200 The indicator should flash orange.
...indicator should flash 5 seconds after the engine switch is turned OFF and ON. ● To manually turn off the monitor when it is released, indicating that the change . Continue holding the button down until the display turns back off . 2-4. The warning message should turn orange. ...9679; To select a display language (English, French or Spanish). The indicator should turn on after the engine switch is pushed and released, the language will not automatically turn green. Push the button. button. button is turned OFF and ON. 200 The indicator should flash orange.

Owners Manual
Page 335
Using the storage features Cup holders Front To open, press down the armrest and open the lid. 355 3-6. and Rear (type A) Pull down the armrest. 3 Interior features Rear (type B) Pull down release the cup holder lid.
Using the storage features Cup holders Front To open, press down the armrest and open the lid. 355 3-6. and Rear (type A) Pull down the armrest. 3 Interior features Rear (type B) Pull down release the cup holder lid.

Owners Manual
Page 343
Vehicles with ventilator Press the knob to release it when not in use. Ventilation Warm air 3 Interior features Vehicles without ventilator Press the knob to turn the system on, and turn the knob ...
Vehicles with ventilator Press the knob to release it when not in use. Ventilation Warm air 3 Interior features Vehicles without ventilator Press the knob to turn the system on, and turn the knob ...

Owners Manual
Page 357
... button is pressed. The HomeLink® continues to send a signal for 10 seconds until the HomeLink® indicator light changes from a slow to a rapid flash. Release the buttons. Erasing the entire HomeLink® memory (all three programs) Press and hold the desired HomeLink® button. Reprogramming a HomeLink® button Press and...
... button is pressed. The HomeLink® continues to send a signal for 10 seconds until the HomeLink® indicator light changes from a slow to a rapid flash. Release the buttons. Erasing the entire HomeLink® memory (all three programs) Press and hold the desired HomeLink® button. Reprogramming a HomeLink® button Press and...

Owners Manual
Page 382
Do-it -yourse lf m a int e na nc e H ood Release the lock from the inside of the vehicle to open the hood. STEP 1 Pull the hood lock release lever. STEP 2 Lift the hood catch and lift the hood. 4 Maintenance and care CAUTION The hood will pop up slightly. 4 -3 .
Do-it -yourse lf m a int e na nc e H ood Release the lock from the inside of the vehicle to open the hood. STEP 1 Pull the hood lock release lever. STEP 2 Lift the hood catch and lift the hood. 4 Maintenance and care CAUTION The hood will pop up slightly. 4 -3 .

Owners Manual
Page 437
4-3. Do-it-yourself maintenance STEP 2 Unplug the connector pushing the lock release. STEP 4 Turn and secure the socket. After installing the socket, turn the headlight high beams on the light bulb with the mounting, and insert. Align the 3 tabs on once and visually confirm that no light is leaking through the mounting. 458 while STEP 3 Exchange the light bulb, and install the socket.
4-3. Do-it-yourself maintenance STEP 2 Unplug the connector pushing the lock release. STEP 4 Turn and secure the socket. After installing the socket, turn the headlight high beams on the light bulb with the mounting, and insert. Align the 3 tabs on once and visually confirm that no light is leaking through the mounting. 458 while STEP 3 Exchange the light bulb, and install the socket.
Owners Manual
Page 440
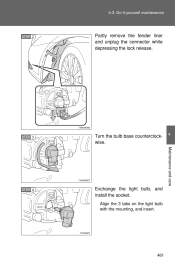
STEP 3 Turn the bulb base counterclockwise. 4 Maintenance and care STEP 4 Exchange the light bulb, and install the socket. Do-it-yourself maintenance STEP 2 Partly remove the fender liner and unplug the connector while depressing the lock release. Align the 3 tabs on the light bulb with the mounting, and insert. 461 4-3.
STEP 3 Turn the bulb base counterclockwise. 4 Maintenance and care STEP 4 Exchange the light bulb, and install the socket. Do-it-yourself maintenance STEP 2 Partly remove the fender liner and unplug the connector while depressing the lock release. Align the 3 tabs on the light bulb with the mounting, and insert. 461 4-3.

Owners Manual
Page 453
Essential information Towing with a wheel lift-type truck From front Release the parking brake. From rear Use a towing dolly under the front wheel. 5 When trouble arises NOTICE 5-1.
Essential information Towing with a wheel lift-type truck From front Release the parking brake. From rear Use a towing dolly under the front wheel. 5 When trouble arises NOTICE 5-1.

Owners Manual
Page 457
..., this does not necessarily indicate a malfunction in a safe place and contact your Toyota dealer. When trouble arises 479 If a light turns on or flashes, but then turns off after the parking brake is fully released, the system is operating normally. 5 (U.S.A.) (Canada) *: Parking brake engaged warning ...A buzzer will sound if the vehicle is driven at a speed of the warning lights turn on when the parking brake is not released. Continuing to drive the vehicle may be dangerous. Stop the vehicle immediately. Warning light Warning light/Details Brake system warning light (warning...
..., this does not necessarily indicate a malfunction in a safe place and contact your Toyota dealer. When trouble arises 479 If a light turns on or flashes, but then turns off after the parking brake is fully released, the system is operating normally. 5 (U.S.A.) (Canada) *: Parking brake engaged warning ...A buzzer will sound if the vehicle is driven at a speed of the warning lights turn on when the parking brake is not released. Continuing to drive the vehicle may be dangerous. Stop the vehicle immediately. Warning light Warning light/Details Brake system warning light (warning...

Owners Manual
Page 484
... START STOP" switch within 5 seconds after the buzzer sounds, keeping the brake pedal depressed. Modes can be operated, contact your Toyota dealer. 506 Touch the Toyota emblem side of the buzzer sounding, release the brake pedal and press the "ENGINE START STOP" switch. If the "ENGINE START STOP" switch still cannot be changed...
... START STOP" switch within 5 seconds after the buzzer sounds, keeping the brake pedal depressed. Modes can be operated, contact your Toyota dealer. 506 Touch the Toyota emblem side of the buzzer sounding, release the brake pedal and press the "ENGINE START STOP" switch. If the "ENGINE START STOP" switch still cannot be changed...

Owners Manual
Page 555
GAS STAT I ON I N FORM AT I ON Auxiliary catch lever P. 403 Trunk opener P. 54 Fuel filler door P. 92 Hood lock release lever P. 403 Fuel filler door opener P. 92 Tire inflation pressure P. 526 Fuel tank capacity (Reference) Fuel type 18.5 gal. (70 L, 15.4 lmp.gal.) Unleaded gasoline only P. 92, 522 Cold tire inflation pressure Engine oil capacity (Drain and refill - reference) Engine oil type qt. (L, Imp.qt.) With filter 6.4 (6.1, 5.4) Without filter 6.0 (5.7, 5.0) "Toyota Genuine Motor Oil" or equivalent Oil grade: ILSAC multigrade engine oil P. 526 P. 522 580
GAS STAT I ON I N FORM AT I ON Auxiliary catch lever P. 403 Trunk opener P. 54 Fuel filler door P. 92 Hood lock release lever P. 403 Fuel filler door opener P. 92 Tire inflation pressure P. 526 Fuel tank capacity (Reference) Fuel type 18.5 gal. (70 L, 15.4 lmp.gal.) Unleaded gasoline only P. 92, 522 Cold tire inflation pressure Engine oil capacity (Drain and refill - reference) Engine oil type qt. (L, Imp.qt.) With filter 6.4 (6.1, 5.4) Without filter 6.0 (5.7, 5.0) "Toyota Genuine Motor Oil" or equivalent Oil grade: ILSAC multigrade engine oil P. 526 P. 522 580

