
Owners Manual
Page 2
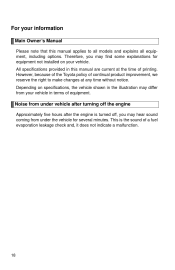
... find some explanations for several minutes. All specifications provided in this manual applies to make changes at the time of printing. However, because of the Toyota policy of continual product improvement, we reserve the right to all models and explains all equipment, including...
... find some explanations for several minutes. All specifications provided in this manual applies to make changes at the time of printing. However, because of the Toyota policy of continual product improvement, we reserve the right to all models and explains all equipment, including...

Owners Manual
Page 5
... use the data recorded in these computers to diagnose malfunctions, conduct research and development, and improve quality. Toyota will not disclose the recorded data to a third party except: • With the consent of the vehicle owner or with the consent of the lessee ...: • Engine speed • Accelerator status • Brake status • Vehicle speed • Shift position The data recorded varies according to the grade level and options the vehicle is not tied to a specific vehicle or vehicle owner 21 Vehicle control and operation data recording Your...
... use the data recorded in these computers to diagnose malfunctions, conduct research and development, and improve quality. Toyota will not disclose the recorded data to a third party except: • With the consent of the vehicle owner or with the consent of the lessee ...: • Engine speed • Accelerator status • Brake status • Vehicle speed • Shift position The data recorded varies according to the grade level and options the vehicle is not tied to a specific vehicle or vehicle owner 21 Vehicle control and operation data recording Your...

Owners Manual
Page 510
Typical DOT and tire identification number (TIN) DOT symbol* Tire Identification (TIN) Number Tire manufacturer's identification mark Tire size code Manufacturer's optional tire type code (3 or 4 letters) Manufacturing week Manufacturing year *: The DOT symbol certifies that the tire conforms to which a tire may be inflated. (→P. 538) (&#...
Typical DOT and tire identification number (TIN) DOT symbol* Tire Identification (TIN) Number Tire manufacturer's identification mark Tire size code Manufacturer's optional tire type code (3 or 4 letters) Manufacturing week Manufacturing year *: The DOT symbol certifies that the tire conforms to which a tire may be inflated. (→P. 538) (&#...

Owners Manual
Page 515
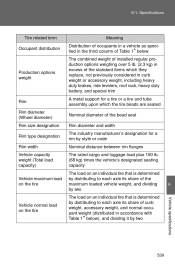
... equipment, including the maximum capacity of fuel, oil and coolant, and if so equipped, air conditioning and additional weight optional engine The sum of: (a) Curb weight (b) Accessory weight (c) Vehicle capacity weight (d) Production options weight 150 lb. (68 kg) times the number of occupants specified in excess of those standard items which may...
... equipment, including the maximum capacity of fuel, oil and coolant, and if so equipped, air conditioning and additional weight optional engine The sum of: (a) Curb weight (b) Accessory weight (c) Vehicle capacity weight (d) Production options weight 150 lb. (68 kg) times the number of occupants specified in excess of those standard items which may...
Owners Manual
Page 516
... Meaning Distribution of occupants in a vehicle as specified in the third column of Table 1* below The combined weight of installed regular production options weighing over 5 lb. (2.3 kg) in excess of the standard items which they replace, not previously considered in curb weight or accessory...of curb weight, accessory weight, and normal occupant weight (distributed in accordance with Table 1* below), and dividing it by two Production options weight Rim Rim diameter (Wheel diameter) Rim size designation Rim type designation Rim width Vehicle capacity weight (Total load capacity) Vehicle ...
... Meaning Distribution of occupants in a vehicle as specified in the third column of Table 1* below The combined weight of installed regular production options weighing over 5 lb. (2.3 kg) in excess of the standard items which they replace, not previously considered in curb weight or accessory...of curb weight, accessory weight, and normal occupant weight (distributed in accordance with Table 1* below), and dividing it by two Production options weight Rim Rim diameter (Wheel diameter) Rim size designation Rim type designation Rim width Vehicle capacity weight (Total load capacity) Vehicle ...
Navigation Manual
Page 16
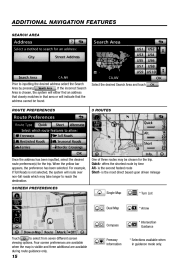
ADDITIONAL NAVIGATION FEATURES SEARCH AREA Prior to select from seven different screen Touch viewing options. Quick- is not selected, the system will indicate that the address cannot be chosen for the trip. For example, if Toll Roads is the second ...
ADDITIONAL NAVIGATION FEATURES SEARCH AREA Prior to select from seven different screen Touch viewing options. Quick- is not selected, the system will indicate that the address cannot be chosen for the trip. For example, if Toll Roads is the second ...
Navigation Manual
Page 17
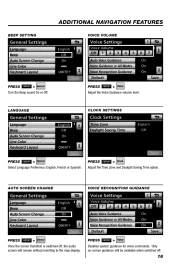
Only on-screen guidance will remain without reverting to the map display. Adjust the Time Zone and Daylight Saving Time option. AUTO SCREEN CHANGE VOICE RECOGNITION GUIDANCE PRESS SETUP > PRESS SETUP > Once the screen transition is switched off, the audio screen will be available when switched ...
Only on-screen guidance will remain without reverting to the map display. Adjust the Time Zone and Daylight Saving Time option. AUTO SCREEN CHANGE VOICE RECOGNITION GUIDANCE PRESS SETUP > PRESS SETUP > Once the screen transition is switched off, the audio screen will be available when switched ...
Navigation Manual
Page 20
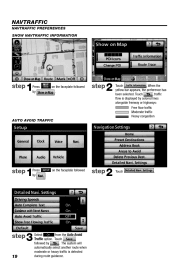
...;c Moderate traffic Heavy congestion AUTO AVOID TRAFFIC step 1 Press by SETUP on the faceplate followed . step 3 19 Select from the Auto Avoid Traffic option. NAVTRAFFIC NAVTRAFFIC PREFERENCES SHOW NAVTRAFFIC INFORMATION step 1 Press by MAP VOICE on the faceplate followed . Touch followed by .
...;c Moderate traffic Heavy congestion AUTO AVOID TRAFFIC step 1 Press by SETUP on the faceplate followed . step 3 19 Select from the Auto Avoid Traffic option. NAVTRAFFIC NAVTRAFFIC PREFERENCES SHOW NAVTRAFFIC INFORMATION step 1 Press by MAP VOICE on the faceplate followed . Touch followed by .

Navigation Manual
Page 21
Select to display Traffic Voice Touch Guidance option on the map. 20 Free flowing traffic is illustrated by . Touch followed by arrows on page 2. Touch followed by SETUP on the faceplate ... notification of traffic events within 20 miles along the current route. step 2 Touch . step 3 Select from the Show Free Flowing Traffic option. NAVTRAFFIC NAVTRAFFIC PREFERENCES TRAFFIC VOICE GUIDANCE step 1 Press by . SHOW FREE FLOWING TRAFFIC step 1 Press by SETUP on the faceplate followed .
Select to display Traffic Voice Touch Guidance option on the map. 20 Free flowing traffic is illustrated by . Touch followed by arrows on page 2. Touch followed by SETUP on the faceplate ... notification of traffic events within 20 miles along the current route. step 2 Touch . step 3 Select from the Show Free Flowing Traffic option. NAVTRAFFIC NAVTRAFFIC PREFERENCES TRAFFIC VOICE GUIDANCE step 1 Press by . SHOW FREE FLOWING TRAFFIC step 1 Press by SETUP on the faceplate followed .

Navigation Manual
Page 63
.... Destination search by "Address Book" 1. A list of the selected destination and the route preference. (See "Starting route guidance" on page 70.) 3. Push the "DEST" button. 2. "Options": To register or edit address book. (See page 106.) The screen changes and displays the map location of registered address book entries is displayed. - DESTINATION...
.... Destination search by "Address Book" 1. A list of the selected destination and the route preference. (See "Starting route guidance" on page 70.) 3. Push the "DEST" button. 2. "Options": To register or edit address book. (See page 106.) The screen changes and displays the map location of registered address book entries is displayed. - DESTINATION...
Navigation Manual
Page 154
... to change. How to subscribe: You must enter into a separate service agreement with a unique radio ID. Canada - Satellite tuner technology notice: Toyota's satellite radio tuners are subject to receive satellite broadcast programming in the vehicle. If you select another channel, display of the vehicle and... optional digital satellite tuner. If you select the "CH 000" using the "TUNE/FILE" knob, the ID code of the XMr Satellite ...
... to change. How to subscribe: You must enter into a separate service agreement with a unique radio ID. Canada - Satellite tuner technology notice: Toyota's satellite radio tuners are subject to receive satellite broadcast programming in the vehicle. If you select another channel, display of the vehicle and... optional digital satellite tuner. If you select the "CH 000" using the "TUNE/FILE" knob, the ID code of the XMr Satellite ...

Navigation Manual
Page 229
Touch "Manage Phone". 6. Touch "Phone". 3. Touch "(empty)" to register your cellular phone to the system. Touch "Options". 5. Push the "SETUP" button. 2. Touch "New Phone". 230 The following way. 1. SETUP You can also register a new Bluetoothr phone in the following operations are the same as the operation after you touch "(add new)". 4.
Touch "Manage Phone". 6. Touch "Phone". 3. Touch "(empty)" to register your cellular phone to the system. Touch "Options". 5. Push the "SETUP" button. 2. Touch "New Phone". 230 The following way. 1. SETUP You can also register a new Bluetoothr phone in the following operations are the same as the operation after you touch "(add new)". 4.

Navigation Manual
Page 232
If you want to it . "Device Address" ...The address peculiar to edit. 4. Select the phone to the system. Touch "Options". 2. You can see the information of Bluetoothr phone which is displayed on the system or edit. If you have registered two Bluetoothr phones with the ...
If you want to it . "Device Address" ...The address peculiar to edit. 4. Select the phone to the system. Touch "Options". 2. You can see the information of Bluetoothr phone which is displayed on the system or edit. If you have registered two Bluetoothr phones with the ...

Navigation Manual
Page 233
Confirm the device name and touch "OK". 2. SETUP D Deleting a Bluetoothr phone 5. Use the software keyboard to input the device name. 1. Touch "Remove Phones". 234 Touch "Options". 6.
Confirm the device name and touch "OK". 2. SETUP D Deleting a Bluetoothr phone 5. Use the software keyboard to input the device name. 1. Touch "Remove Phones". 234 Touch "Options". 6.

Navigation Manual
Page 236
... a phone number You can transfer the phone numbers in all. The data for 1000 contacts (up to the system. Touch "Phone". 3. Touch "Transfer Contacts". 5. Touch "Options". 1. In case that the phonebook contains phonebook data, this screen is running. 4. SETUP You can also display the "Contacts" screen in total of 4 phonebooks in...
... a phone number You can transfer the phone numbers in all. The data for 1000 contacts (up to the system. Touch "Phone". 3. Touch "Transfer Contacts". 5. Touch "Options". 1. In case that the phonebook contains phonebook data, this screen is running. 4. SETUP You can also display the "Contacts" screen in total of 4 phonebooks in...

Navigation Manual
Page 241
... ways. Touch "Contacts". 4. Touch "Call History". 4. Touch "Phone". 3. Touch "Edit Contact". 6. Select the desired data from the list. Touch "Add Contact" or "Update Contact". 5. Touch "Options". 6. Select the desired data from the list. 242 In case that you have touched "Update Contact", this screen is displayed. Touch "Phone". 3. Push the "INFO...
... ways. Touch "Contacts". 4. Touch "Call History". 4. Touch "Phone". 3. Touch "Edit Contact". 6. Select the desired data from the list. Touch "Add Contact" or "Update Contact". 5. Touch "Options". 6. Select the desired data from the list. 242 In case that you have touched "Update Contact", this screen is displayed. Touch "Phone". 3. Push the "INFO...

Navigation Manual
Page 243
INFORMATION When you delete a Bluetoothr phone, the phonebook data will be deleted at the same time. 5. Touch "Options". 6. Touch "Delete Contact". 244 Select the desired data from the list. 7. Touch "Phone". 3. Push the "INFO/PHONE" button. 2. Touch "Contacts". 4. SETUP You can also delete it in the following way. 1. Touch "Yes".
INFORMATION When you delete a Bluetoothr phone, the phonebook data will be deleted at the same time. 5. Touch "Options". 6. Touch "Delete Contact". 244 Select the desired data from the list. 7. Touch "Phone". 3. Push the "INFO/PHONE" button. 2. Touch "Contacts". 4. SETUP You can also delete it in the following way. 1. Touch "Yes".

Navigation Manual
Page 244
Touch "Phone". 3. Push the "SETUP" button. 2. Push the "INFO/PHONE" button. 2. You can also display the "Speed Dials" screen in the following pages for each setting. 245 Touch "Options". Touch "Manage Speed Dials". 4. Touch "Phonebook". Speed dials setting "Speed dials setting" is accessed from the "Speed Dials" screen. 1. Touch "Phone". 3. SETUP - Touch "Speed Dials". 4. Please refer to the following way. 1.
Touch "Phone". 3. Push the "SETUP" button. 2. Push the "INFO/PHONE" button. 2. You can also display the "Speed Dials" screen in the following pages for each setting. 245 Touch "Options". Touch "Manage Speed Dials". 4. Touch "Phonebook". Speed dials setting "Speed dials setting" is accessed from the "Speed Dials" screen. 1. Touch "Phone". 3. SETUP - Touch "Speed Dials". 4. Please refer to the following way. 1.

Navigation Manual
Page 247
Touch the desired phone number. 6. Touch "Contacts". 4. Touch "Options". 7. Push the "INFO/PHONE" button. 2. Select the desired data from the list. 6. Touch "Set Speed Dial". 248 Touch "Phone". 3. SETUP From "Contact Data" screen 1. Select the data you want to register. 5.
Touch the desired phone number. 6. Touch "Contacts". 4. Touch "Options". 7. Push the "INFO/PHONE" button. 2. Select the desired data from the list. 6. Touch "Set Speed Dial". 248 Touch "Phone". 3. SETUP From "Contact Data" screen 1. Select the data you want to register. 5.

Navigation Manual
Page 252
Touch "Phone". 3. Touch "Options". Touch "Manage Voice Tags". 253 Touch "Phonebook". Touch "Manage Voice Tags". 4. SETUP - Push the "SETUP" button. 2. Touch "Contacts". 4. Setting the voice tag "Setting the voice tag" is done by displaying "Voice Tags" screen. 1. Please refer to the following way. 1. Touch "Phone". 3. You can also display "Voice Tags" screen in the following pages for each setting. 5. Push the "INFO/PHONE" button. 2.
Touch "Phone". 3. Touch "Options". Touch "Manage Voice Tags". 253 Touch "Phonebook". Touch "Manage Voice Tags". 4. SETUP - Push the "SETUP" button. 2. Touch "Contacts". 4. Setting the voice tag "Setting the voice tag" is done by displaying "Voice Tags" screen. 1. Please refer to the following way. 1. Touch "Phone". 3. You can also display "Voice Tags" screen in the following pages for each setting. 5. Push the "INFO/PHONE" button. 2.