
Owners Manual
Page 1
... Adjusting and operating features such as door locks, mirrors, and steering column. 2 When driving Driving, stopping and safe-driving information. 3 Interior features Air conditioning and audio systems, as well as other interior features for a comfortable driving experience. 4 Maintenance and care Cleaning and protecting your vehicle, performing do-ityourself maintenance, and maintenance information...
... Adjusting and operating features such as door locks, mirrors, and steering column. 2 When driving Driving, stopping and safe-driving information. 3 Interior features Air conditioning and audio systems, as well as other interior features for a comfortable driving experience. 4 Maintenance and care Cleaning and protecting your vehicle, performing do-ityourself maintenance, and maintenance information...
Owners Manual
Page 22
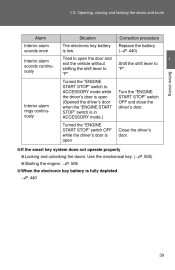
1-2. Before driving Interior alarm rings continuously Turn the "ENGINE START STOP" switch OFF and close the driver's door. Close the driver's door. Tried to open the door and ... is open Correction procedure Replace the battery. (→P. 440) 1 Shift the shift lever to "P". Opening, closing and locking the doors and trunk Alarm Interior alarm sounds once Interior alarm sounds continuously Situation The electronic key battery is open (Opened the driver's door when the "ENGINE START STOP" switch is in ACCESSORY mode...
1-2. Before driving Interior alarm rings continuously Turn the "ENGINE START STOP" switch OFF and close the driver's door. Close the driver's door. Tried to open the door and ... is open Correction procedure Replace the battery. (→P. 440) 1 Shift the shift lever to "P". Opening, closing and locking the doors and trunk Alarm Interior alarm sounds once Interior alarm sounds continuously Situation The electronic key battery is open (Opened the driver's door when the "ENGINE START STOP" switch is in ACCESSORY mode...
Owners Manual
Page 89
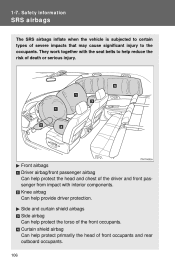
... Side airbag Can help provide driver protection. Curtain shield airbag Can help protect the head and chest of the front occupants. They work together with interior components. Front airbags Driver airbag/front passenger airbag Can help protect primarily the head of death or serious injury. Sa fe t y inform a t ion SRS a irba...
... Side airbag Can help provide driver protection. Curtain shield airbag Can help protect the head and chest of the front occupants. They work together with interior components. Front airbags Driver airbag/front passenger airbag Can help protect primarily the head of death or serious injury. Sa fe t y inform a t ion SRS a irba...

Owners Manual
Page 211
Using the air conditioning system and defogger Air flows to the feet and the windshield defogger operates. 3 Interior features 3-1. Air flows to the feet.
Using the air conditioning system and defogger Air flows to the feet and the windshield defogger operates. 3 Interior features 3-1. Air flows to the feet.

Owners Manual
Page 213
Using the air conditioning system and defogger Adjusting the position of and opening and closing the air outlets Center outlets Turn the knob to open or close the vent Direct air flow to the left or right, up or down Side outlets Direct air flow to the up or down Direct air flow to the left or right 3 Interior features Rear seat outlets Direct air flow to the up or down Direct air flow to the left or right 233 3-1.
Using the air conditioning system and defogger Adjusting the position of and opening and closing the air outlets Center outlets Turn the knob to open or close the vent Direct air flow to the left or right, up or down Side outlets Direct air flow to the up or down Direct air flow to the left or right 3 Interior features Rear seat outlets Direct air flow to the up or down Direct air flow to the left or right 233 3-1.
Owners Manual
Page 217
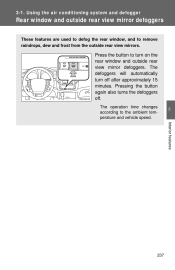
The defoggers will automatically turn on the rear window and outside rear view mirrors. Pressing the button again also turns the defoggers off after approximately 15 minutes. Press the button to the ambient temperature and vehicle speed. 3 Interior features 237 The operation time changes according to turn off . 3 -1 . U sing t he a ir c ondit ioning syst e m a nd de fogge r Rear w indow and outside rear view mirror defoggers These features are used to defog the rear window, and to remove raindrops, dew and frost from the outside rear view mirror defoggers.
The defoggers will automatically turn on the rear window and outside rear view mirrors. Pressing the button again also turns the defoggers off after approximately 15 minutes. Press the button to the ambient temperature and vehicle speed. 3 Interior features 237 The operation time changes according to turn off . 3 -1 . U sing t he a ir c ondit ioning syst e m a nd de fogge r Rear w indow and outside rear view mirror defoggers These features are used to defog the rear window, and to remove raindrops, dew and frost from the outside rear view mirror defoggers.

Owners Manual
Page 219
U sing t he a udio syst e m Audio syst e m t ype With navigation system Owners of models equipped with changer and AM/FM radio 3 Interior features 239 Without navigation system Type A: CD player with a navigation system should refer to the "Navigation System Owner's Manual". 3 -2 .
U sing t he a udio syst e m Audio syst e m t ype With navigation system Owners of models equipped with changer and AM/FM radio 3 Interior features 239 Without navigation system Type A: CD player with a navigation system should refer to the "Navigation System Owner's Manual". 3 -2 .

Owners Manual
Page 221
Using the audio system Language settings The language used for all voice guidance, voice recognition and messages may be changed. that corresponds to "LANG". For vehicles sold in the U.S.A. STEP 1 STEP 2 STEP 3 STEP 4 Press Press Press Press . that corresponds to the desired language. "ENG" (English) or "ESP" (Spanish) For vehicles sold in Canada "ENG" (English) or "FRAN" (French) Interior features 3 that corresponds to "MORE". 3-2.
Using the audio system Language settings The language used for all voice guidance, voice recognition and messages may be changed. that corresponds to "LANG". For vehicles sold in the U.S.A. STEP 1 STEP 2 STEP 3 STEP 4 Press Press Press Press . that corresponds to the desired language. "ENG" (English) or "ESP" (Spanish) For vehicles sold in Canada "ENG" (English) or "FRAN" (French) Interior features 3 that corresponds to "MORE". 3-2.
Owners Manual
Page 223
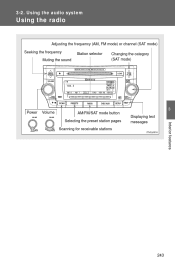
U sing t he a udio syst e m U sing t he ra dio Adjusting the frequency (AM, FM mode) or channel (SAT mode) Seeking the frequency Muting the sound Station selector Changing the category (SAT mode) Power Volume 3 AM/FM/SAT mode button Selecting the preset station pages Scanning for receivable stations Displaying text messages Interior features 243 3 -2 .
U sing t he a udio syst e m U sing t he ra dio Adjusting the frequency (AM, FM mode) or channel (SAT mode) Seeking the frequency Muting the sound Station selector Changing the category (SAT mode) Power Volume 3 AM/FM/SAT mode button Selecting the preset station pages Scanning for receivable stations Displaying text messages Interior features 243 3 -2 .

Owners Manual
Page 231
U sing t he a udio syst e m U sing t he CD pla ye r Fast-forwarding and reversing/Selecting a track Playback/pause CD eject Selector buttons CD load (type A only) Power Volume Playback Searching playback Displaying text messages 3 Interior features 251 3 -2 .
U sing t he a udio syst e m U sing t he CD pla ye r Fast-forwarding and reversing/Selecting a track Playback/pause CD eject Selector buttons CD load (type A only) Power Volume Playback Searching playback Displaying text messages 3 Interior features 251 3 -2 .

Owners Manual
Page 239
U sing t he a udio syst e m Pla ying ba ck M P3 a nd WM A disc s Fast-forwarding and reversing/Selecting a file Selecting a folder Playback/pause Selector buttons CD load (type A only) CD eject Power Volume Playback Selecting a file 3 Displaying text messages Searching playback Interior features Loading and ejecting MP3 and WMA discs →P. 251 Selecting a CD (type A only) →P. 251 259 3 -2 .
U sing t he a udio syst e m Pla ying ba ck M P3 a nd WM A disc s Fast-forwarding and reversing/Selecting a file Selecting a folder Playback/pause Selector buttons CD load (type A only) CD eject Power Volume Playback Selecting a file 3 Displaying text messages Searching playback Interior features Loading and ejecting MP3 and WMA discs →P. 251 Selecting a CD (type A only) →P. 251 259 3 -2 .
Owners Manual
Page 245
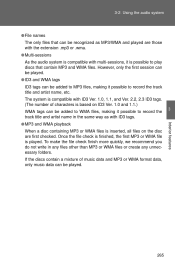
... compatible with ID3 Ver. 1.0, 1.1, and Ver. 2.2, 2.3 ID3 tags. (The number of music data and MP3 or WMA format data, only music data can be played. 3 Interior features 265 Using the audio system ● File names The only files that contain MP3 and WMA files. To make the file check finish more...
... compatible with ID3 Ver. 1.0, 1.1, and Ver. 2.2, 2.3 ID3 tags. (The number of music data and MP3 or WMA format data, only music data can be played. 3 Interior features 265 Using the audio system ● File names The only files that contain MP3 and WMA files. To make the file check finish more...

Owners Manual
Page 249
STEP 2 Turning to select the desired song. Playing and pausing songs Press . returns the screen from a song list STEP 1 Press that corresponds to "LIST". Press screen. Fast-forwarding and rewinding songs Press and hold "∧" or "∨" on to select the desired song. 3-2. The current playlist is displayed. Using the audio system Selecting songs from list display to the previous Selecting songs 3 Interior features Turn or press "∧" or "∨" on . 269
STEP 2 Turning to select the desired song. Playing and pausing songs Press . returns the screen from a song list STEP 1 Press that corresponds to "LIST". Press screen. Fast-forwarding and rewinding songs Press and hold "∧" or "∨" on to select the desired song. 3-2. The current playlist is displayed. Using the audio system Selecting songs from list display to the previous Selecting songs 3 Interior features Turn or press "∧" or "∨" on . 269
Owners Manual
Page 259
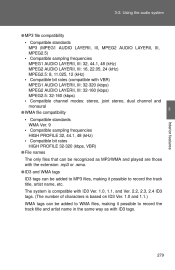
.... (The number of characters is based on ID3 Ver. 1.0 and 1.1.) WMA tags can be recognized as MP3/WMA and played are those with ID3 tags. 3 Interior features 279 Using the audio system ● MP3 file compatibility • Compatible standards MP3 (MPEG1 AUDIO LAYERII, III, MPEG2 AUDIO LAYERII, III, MPEG2.5) • Compatible...
.... (The number of characters is based on ID3 Ver. 1.0 and 1.1.) WMA tags can be recognized as MP3/WMA and played are those with ID3 tags. 3 Interior features 279 Using the audio system ● MP3 file compatibility • Compatible standards MP3 (MPEG1 AUDIO LAYERII, III, MPEG2 AUDIO LAYERII, III, MPEG2.5) • Compatible...

Owners Manual
Page 265
3 -2 . U sing t he a udio syst e m U sing t he AU X por t This port can be used to connect a portable audio device and listen to it using the vehicle's speakers. STEP 1 Open the cover and connect the portable audio device. 3 STEP 2 Press . Interior features
3 -2 . U sing t he a udio syst e m U sing t he AU X por t This port can be used to connect a portable audio device and listen to it using the vehicle's speakers. STEP 1 Open the cover and connect the portable audio device. 3 STEP 2 Press . Interior features
Owners Manual
Page 267
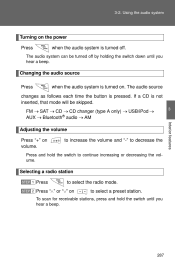
... volume Press "+" on To scan for receivable stations, press and hold the switch to select a preset station. to increase the volume and "-" to decrease the 3 Interior features Press and hold the switch until you hear a beep. 287 to continue increasing or decreasing the volume. Press "∧" or "∨" on volume. If...
... volume Press "+" on To scan for receivable stations, press and hold the switch to select a preset station. to increase the volume and "-" to decrease the 3 Interior features Press and hold the switch until you hear a beep. 287 to continue increasing or decreasing the volume. Press "∧" or "∨" on volume. If...
Owners Manual
Page 269
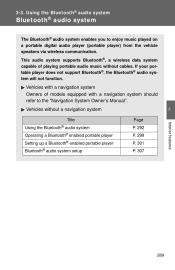
...; audio system Operating a Bluetooth® enabled portable player Setting up a Bluetooth enabled portable player Bluetooth® audio system setup ® 3 Page P. 292 P. 299 P. 301 P. 307 Interior features 289 Vehicles without cables. U sing t he Blue t oot h ® a udio syst e m Blue t oot h ® a udio syst e m The Bluetooth® audio system enables you to...
...; audio system Operating a Bluetooth® enabled portable player Setting up a Bluetooth enabled portable player Bluetooth® audio system setup ® 3 Page P. 292 P. 299 P. 301 P. 307 Interior features 289 Vehicles without cables. U sing t he Blue t oot h ® a udio syst e m Blue t oot h ® a udio syst e m The Bluetooth® audio system enables you to...
Owners Manual
Page 275
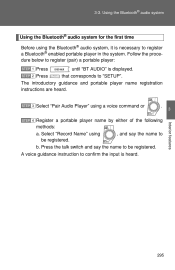
... by either of the following methods: a. Follow the procedure below to register (pair) a portable player: STEP 1 STEP 2 Press Press until "BT AUDIO" is necessary to Interior features b. A voice guidance instruction to "SETUP". Press the talk switch and say the name to be registered. , and say the name to register a Bluetooth®...
... by either of the following methods: a. Follow the procedure below to register (pair) a portable player: STEP 1 STEP 2 Press Press until "BT AUDIO" is necessary to Interior features b. A voice guidance instruction to "SETUP". Press the talk switch and say the name to be registered. , and say the name to register a Bluetooth®...
Owners Manual
Page 279
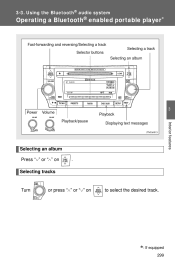
3 -3 . Turn or press "∧" or "∨" on Selecting tracks . U sing t he Blue t oot h ® a udio syst e m ® Operating a Bluetooth enabled portable player ∗ Fast-forwarding and reversing/Selecting a track Selecting a track Selector buttons Selecting an album Power Volume Playback/pause 3 Playback Displaying text messages Interior features Selecting an album Press "∨" or "∧" on to select the desired track. ∗: If equipped 299
3 -3 . Turn or press "∧" or "∨" on Selecting tracks . U sing t he Blue t oot h ® a udio syst e m ® Operating a Bluetooth enabled portable player ∗ Fast-forwarding and reversing/Selecting a track Selecting a track Selector buttons Selecting an album Power Volume Playback/pause 3 Playback Displaying text messages Interior features Selecting an album Press "∨" or "∧" on to select the desired track. ∗: If equipped 299
Owners Manual
Page 283
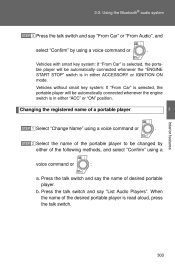
... the name of desired portable player. Press the talk switch and say "From Car" or "From Audio", and select "Confirm" by either of a portable player 3 Interior features STEP 1 Select "Change Name" using a voice command or . Changing the registered name of the following methods, and select "Confirm" using a voice command or : a. Press...
... the name of desired portable player. Press the talk switch and say "From Car" or "From Audio", and select "Confirm" by either of a portable player 3 Interior features STEP 1 Select "Change Name" using a voice command or . Changing the registered name of the following methods, and select "Confirm" using a voice command or : a. Press...
