
Owners Manual
Page 3
... Air Conditioning/Heating Audio Auto lock functions2 Automatic Transmission Auxiliary storage Clock Cruise control Cup holders Door locks-Power Light control-Instrument panel Lights & turn signals Moonroof Multi-information display Parking brake Power outlets Seat adjustments-Front Seat adjustments-Rear Seats-Head restraints ... 10 19 20 19 19 21 20 20 SAFETY AND EMERGENCY FEATURES SAFETY AND EMERGENCY FEATURES 1 2 Visit your Toyota dealer for instructions and more information. 1 Refer to the Owner's Manual for information on customizing this feature. Programmable by customer.
... Air Conditioning/Heating Audio Auto lock functions2 Automatic Transmission Auxiliary storage Clock Cruise control Cup holders Door locks-Power Light control-Instrument panel Lights & turn signals Moonroof Multi-information display Parking brake Power outlets Seat adjustments-Front Seat adjustments-Rear Seats-Head restraints ... 10 19 20 19 19 21 20 20 SAFETY AND EMERGENCY FEATURES SAFETY AND EMERGENCY FEATURES 1 2 Visit your Toyota dealer for instructions and more information. 1 Refer to the Owner's Manual for information on customizing this feature. Programmable by customer.

Owners Manual
Page 4
OVERVIEW Instrument panel Steering wheel controls Steering wheel audio controls1,2 Voice command button1 Telephone controls1 Ignition switch (mechanical key)1 Cruise control1 VSC/TRAC OFF switch Power rearview mirror control Auxiliary storage Headlight, turn signal and front fog light1 controls Wiper and washer controls Emergency flasher button Audio system2 Air Conditioning controls Outside rearview mirror1/Rear window defogger button 2
OVERVIEW Instrument panel Steering wheel controls Steering wheel audio controls1,2 Voice command button1 Telephone controls1 Ignition switch (mechanical key)1 Cruise control1 VSC/TRAC OFF switch Power rearview mirror control Auxiliary storage Headlight, turn signal and front fog light1 controls Wiper and washer controls Emergency flasher button Audio system2 Air Conditioning controls Outside rearview mirror1/Rear window defogger button 2
Owners Manual
Page 6
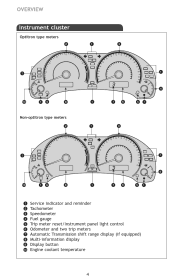
OVERVIEW Instrument cluster Optitron type meters Non-optitron type meters Service indicator and reminder Tachometer Speedometer Fuel gauge Trip meter reset/Instrument panel light control Odometer and two trip meters Automatic Transmission shift range display (if equipped) Multi-information display Display button Engine coolant temperature 4
OVERVIEW Instrument cluster Optitron type meters Non-optitron type meters Service indicator and reminder Tachometer Speedometer Fuel gauge Trip meter reset/Instrument panel light control Odometer and two trip meters Automatic Transmission shift range display (if equipped) Multi-information display Display button Engine coolant temperature 4

Owners Manual
Page 20
Cup holders Front Rear Auxiliary storage Instrument panel Type A Type B Type C Pull Pull Pull Overhead console Push 18 FEATURES/OPERATIONS Light control-Instrument panel + Brightness control -
Cup holders Front Rear Auxiliary storage Instrument panel Type A Type B Type C Pull Pull Pull Overhead console Push 18 FEATURES/OPERATIONS Light control-Instrument panel + Brightness control -

Owners Manual
Page 152
... the distance the vehicle has been driven since the meter was last reset. To adjust the brightness of the instrument panel light, turn the button. (→P. 146) Odometer and trip meter display Odometer: Displays the total distance the vehicle has been driven.... Instrument cluster Odometer/trip meter/instrument panel light control and trip meter reset button Switches between odometer and trip meter displays. Multi-information display →P. 151 Display button...
... the distance the vehicle has been driven since the meter was last reset. To adjust the brightness of the instrument panel light, turn the button. (→P. 146) Odometer and trip meter display Odometer: Displays the total distance the vehicle has been driven.... Instrument cluster Odometer/trip meter/instrument panel light control and trip meter reset button Switches between odometer and trip meter displays. Multi-information display →P. 151 Display button...

Owners Manual
Page 153
... meter when the trip meter is in "ON" position. Fuel gauge Displays the quantity of the instrument panel light, turn the button. (→P. 146) 145 2-2. Low fuel level warning light →P. 384 Odometer/trip meter/instrument panel light control and trip meter reset button Switches between odometer and trip meter displays. Tachometer Displays the...
... meter when the trip meter is in "ON" position. Fuel gauge Displays the quantity of the instrument panel light, turn the button. (→P. 146) 145 2-2. Low fuel level warning light →P. 384 Odometer/trip meter/instrument panel light control and trip meter reset button Switches between odometer and trip meter displays. Tachometer Displays the...

Owners Manual
Page 154
... driven since the meter was last reset. Engine coolant temperature gauge Displays the engine coolant temperature. Instrument panel light control The brightness of the instrument panel lights can be used to record and display different distances independently. NOTICE Instrument cluster Odometer and trip meter display Odometer: Displays the total distance the vehicle has been driven...
... driven since the meter was last reset. Engine coolant temperature gauge Displays the engine coolant temperature. Instrument panel light control The brightness of the instrument panel lights can be used to record and display different distances independently. NOTICE Instrument cluster Odometer and trip meter display Odometer: Displays the total distance the vehicle has been driven...

Owners Manual
Page 155
2 -2 . I nst rum e nt c lust e r I ndic at ors a nd w a r ning light s The indicator and warning lights on the instrument cluster and center panel inform the driver of the status of the vehicle's various systems.
2 -2 . I nst rum e nt c lust e r I ndic at ors a nd w a r ning light s The indicator and warning lights on the instrument cluster and center panel inform the driver of the status of the vehicle's various systems.

Owners Manual
Page 163
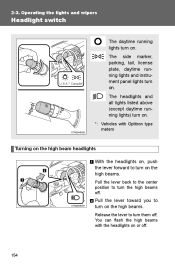
... toward you to turn on . 2 -3 . Ope ra t ing t he light s a nd w ipe rs H e a dlight sw it ch The side marker, parking, tail, license plate and instrument panel lights turn them off . 155 The headlights and all lights listed above turn on. *: Vehicles with the headlights on or off .
... toward you to turn on . 2 -3 . Ope ra t ing t he light s a nd w ipe rs H e a dlight sw it ch The side marker, parking, tail, license plate and instrument panel lights turn them off . 155 The headlights and all lights listed above turn on. *: Vehicles with the headlights on or off .

Owners Manual
Page 355
STEP 1 Vehicles with smart key system: Turn the "ENGINE START STOP" switch OFF. STEP 2 Engine compartment Under the driver's side instrument panel Remove the lid. 350 4 -3 . Do-it -yourse lf m a int e na nc e Che ck ing a nd re pla c ing fuse s If any of the electrical components do not operate, a fuse may have blown. If this happens, check and replace the fuses as necessary. Push the tab in and lift the lid off. Vehicles without smart key system: Turn the engine switch OFF. Open the fuse box cover.
STEP 1 Vehicles with smart key system: Turn the "ENGINE START STOP" switch OFF. STEP 2 Engine compartment Under the driver's side instrument panel Remove the lid. 350 4 -3 . Do-it -yourse lf m a int e na nc e Che ck ing a nd re pla c ing fuse s If any of the electrical components do not operate, a fuse may have blown. If this happens, check and replace the fuses as necessary. Push the tab in and lift the lid off. Vehicles without smart key system: Turn the engine switch OFF. Open the fuse box cover.

Owners Manual
Page 356
Only type A fuse can be removed using the pullout tool. 4 STEP 4 Maintenance and care STEP 5 For type A and B fuses: Remove the fuse. 351 Do-it-yourself maintenance Driver's side instrument panel Remove the instrument panel. Take out the pullout tool. STEP 3 After a system failure, see "Fuse layout and amperage ratings" (→P. 354) for details about which fuse to check. 4-3.
Only type A fuse can be removed using the pullout tool. 4 STEP 4 Maintenance and care STEP 5 For type A and B fuses: Remove the fuse. 351 Do-it-yourself maintenance Driver's side instrument panel Remove the instrument panel. Take out the pullout tool. STEP 3 After a system failure, see "Fuse layout and amperage ratings" (→P. 354) for details about which fuse to check. 4-3.

Owners Manual
Page 597
Trip meters A and B can be used to record and display different distances independently. Instrument cluster Odometer/trip meter/instrument panel light control and trip meter reset button Switches between odometer and trip meter displays. Pressing and holding the button will reset the... being displayed. Trip meter: Displays the distance the vehicle has been driven since the meter was last reset. To adjust the brightness of the instrument panel light, turn the button. (→P. 146) Odometer and trip meter display Odometer: Displays the total distance the vehicle has been driven. Engine ...
Trip meters A and B can be used to record and display different distances independently. Instrument cluster Odometer/trip meter/instrument panel light control and trip meter reset button Switches between odometer and trip meter displays. Pressing and holding the button will reset the... being displayed. Trip meter: Displays the distance the vehicle has been driven since the meter was last reset. To adjust the brightness of the instrument panel light, turn the button. (→P. 146) Odometer and trip meter display Odometer: Displays the total distance the vehicle has been driven. Engine ...

Owners Manual
Page 598
... type meters 2 When driving The following gauges, meters and displays illuminate when the engine switch is being displayed. Fuel gauge Displays the quantity of the instrument panel light, turn the button. (→P. 146) 145 To adjust the brightness of fuel remaining in revolutions per minute. Low fuel level warning light →P. 384...
... type meters 2 When driving The following gauges, meters and displays illuminate when the engine switch is being displayed. Fuel gauge Displays the quantity of the instrument panel light, turn the button. (→P. 146) 145 To adjust the brightness of fuel remaining in revolutions per minute. Low fuel level warning light →P. 384...

Owners Manual
Page 599
... has been driven since the meter was last reset. Trip meters A and B can be adjusted. 2-2. Instrument panel light control The brightness of the instrument panel lights can be reduced slightly unless the control button is turned fully clockwise. Instrument cluster Odometer and trip meter display Odometer: Displays the total distance the vehicle has been driven...
... has been driven since the meter was last reset. Trip meters A and B can be adjusted. 2-2. Instrument panel light control The brightness of the instrument panel lights can be reduced slightly unless the control button is turned fully clockwise. Instrument cluster Odometer and trip meter display Odometer: Displays the total distance the vehicle has been driven...

Owners Manual
Page 600
Instrument cluster Indicators and warning lights The indicator and warning lights on the instrument cluster and center panel inform the driver of the status of the vehicle's various systems. 2-2.
Instrument cluster Indicators and warning lights The indicator and warning lights on the instrument cluster and center panel inform the driver of the status of the vehicle's various systems. 2-2.
Owners Manual
Page 607
... the high beams. Pull the lever back to the center position to turn on. The side marker, parking, tail, license plate, daytime running lights and instrument panel lights turn them off . Operating the lights and wipers Headlight switch The daytime running lights) turn on. *: Vehicles with the headlights on . The headlights and...
... the high beams. Pull the lever back to the center position to turn on. The side marker, parking, tail, license plate, daytime running lights and instrument panel lights turn them off . Operating the lights and wipers Headlight switch The daytime running lights) turn on. *: Vehicles with the headlights on . The headlights and...

Owners Manual
Page 801
4-3. STEP 1 Vehicles with smart key system: Turn the "ENGINE START STOP" switch OFF. Open the fuse box cover. If this happens, check and replace the fuses as necessary. Do-it-yourself maintenance Checking and replacing fuses If any of the electrical components do not operate, a fuse may have blown. Vehicles without smart key system: Turn the engine switch OFF. STEP 2 Engine compartment Under the driver's side instrument panel Remove the lid. 350 Push the tab in and lift the lid off.
4-3. STEP 1 Vehicles with smart key system: Turn the "ENGINE START STOP" switch OFF. Open the fuse box cover. If this happens, check and replace the fuses as necessary. Do-it-yourself maintenance Checking and replacing fuses If any of the electrical components do not operate, a fuse may have blown. Vehicles without smart key system: Turn the engine switch OFF. STEP 2 Engine compartment Under the driver's side instrument panel Remove the lid. 350 Push the tab in and lift the lid off.

Owners Manual
Page 802
Only type A fuse can be removed using the pullout tool. 4 STEP 4 Maintenance and care STEP 5 For type A and B fuses: Remove the fuse. 351 4-3. STEP 3 After a system failure, see "Fuse layout and amperage ratings" (→P. 354) for details about which fuse to check. Do-it-yourself maintenance Driver's side instrument panel Remove the instrument panel. Take out the pullout tool.
Only type A fuse can be removed using the pullout tool. 4 STEP 4 Maintenance and care STEP 5 For type A and B fuses: Remove the fuse. 351 4-3. STEP 3 After a system failure, see "Fuse layout and amperage ratings" (→P. 354) for details about which fuse to check. Do-it-yourself maintenance Driver's side instrument panel Remove the instrument panel. Take out the pullout tool.

Navigation Manual
Page 173
... expected. Even when the navigation system is receiving signals from the satellites, the "GPS" mark appears at the top left of window tinting on the instrument panel may occur in the instrument panel. Tunnels, tall buildings, trucks, or even the placement of objects on vehicles equipped with GPS signal reception of inaccuracy.
... expected. Even when the navigation system is receiving signals from the satellites, the "GPS" mark appears at the top left of window tinting on the instrument panel may occur in the instrument panel. Tunnels, tall buildings, trucks, or even the placement of objects on vehicles equipped with GPS signal reception of inaccuracy.


