
Owners Manual
Page 6
Instrument panel overview 1. 2. 3. 4. 5. 6. 7. 8. 9. Side vent Instrument cluster Center vents Electronic moon roof switch and personal lights Glovebox Power door lock switch Power window switches Parking brake lever Automatic transmission selector lever or manual transmission gear shift lever Ashtray Hood lock release lever 10. 11. 2
Instrument panel overview 1. 2. 3. 4. 5. 6. 7. 8. 9. Side vent Instrument cluster Center vents Electronic moon roof switch and personal lights Glovebox Power door lock switch Power window switches Parking brake lever Automatic transmission selector lever or manual transmission gear shift lever Ashtray Hood lock release lever 10. 11. 2

Owners Manual
Page 9
Indicator symbols on the instrument panel Brake system warning light *1 Anti-lock brake system warning light *1 Seat belt reminder light*1 Discharge warning light*1 Low oil pressure warning light*1 Open door warning light*1 SRS airbag warning light*1 Automatic transmission fluid temperature warning light*1 Turn signal indicator lights Headlight high beam indicator light Malfunction indicator light*1 Low fuel level warning light *1 Over-drive indicator light 5
Indicator symbols on the instrument panel Brake system warning light *1 Anti-lock brake system warning light *1 Seat belt reminder light*1 Discharge warning light*1 Low oil pressure warning light*1 Open door warning light*1 SRS airbag warning light*1 Automatic transmission fluid temperature warning light*1 Turn signal indicator lights Headlight high beam indicator light Malfunction indicator light*1 Low fuel level warning light *1 Over-drive indicator light 5

Owners Manual
Page 11
...things locked in the glovebox when you accidentally lock your important papers. 7 If you need additional keys, duplicates can be made by a Toyota dealer using the key number. Master key- Your vehicle is shown on the plate. You should also put a copy of if you should...NUMBER PLATE Your key number is supplied with the attendant. Part 1 OPERATION OF INSTRUMENTS AND CONTROLS- Chapter 1-2 Keys and Doors S S S S S S S S S Keys Side doors Power windows Quarter window Back door Hood Fuel tank cap Electric moon roof Detachable sun roof Keys S carry a spare key in every lock. 2.
...things locked in the glovebox when you accidentally lock your important papers. 7 If you need additional keys, duplicates can be made by a Toyota dealer using the key number. Master key- Your vehicle is shown on the plate. You should also put a copy of if you should...NUMBER PLATE Your key number is supplied with the attendant. Part 1 OPERATION OF INSTRUMENTS AND CONTROLS- Chapter 1-2 Keys and Doors S S S S S S S S S Keys Side doors Power windows Quarter window Back door Hood Fuel tank cap Electric moon roof Detachable sun roof Keys S carry a spare key in every lock. 2.

Owners Manual
Page 12
...key into the keyhole and turn it. In the driver's door lock, turning the key once will unlock the driver's door and twice in will unlock all the side doors and back door simultaneously. Closing the door with either front door. LOCKING AND UNLOCKING WITH INSIDE LOCK BUTTON Move the lock... button. To unlock: Pull the button upward. Vehicles with power door lock system-All side doors and back door lock and unlock simultaneously with the lock button pushed in succession will also lock the door. Driver's side Passenger's side 8 To unlock: Turn the keyupward. To lock...
...key into the keyhole and turn it. In the driver's door lock, turning the key once will unlock the driver's door and twice in will unlock all the side doors and back door simultaneously. Closing the door with either front door. LOCKING AND UNLOCKING WITH INSIDE LOCK BUTTON Move the lock... button. To unlock: Pull the button upward. Vehicles with power door lock system-All side doors and back door lock and unlock simultaneously with the lock button pushed in succession will also lock the door. Driver's side Passenger's side 8 To unlock: Turn the keyupward. To lock...

Owners Manual
Page 13
... SWITCH Push the switch. Along with the proper use of seat belts, locking the doors helps prevent the driver and passengers from being opened from the outside only, not from the vehicle ...small children are in the vehicle. 9 CAUTION Before driving, be opened unintentionally. REAR DOOR CHILD-PROTECTORS Move the lock lever to lock a rear door so it can be sure that the doors are closed and locked, especially when small children are in the vehicle. To unlock...lock: Push the switch on the rear side Operating the switch simultaneously locks or unlocks all the side doors and the back...
... SWITCH Push the switch. Along with the proper use of seat belts, locking the doors helps prevent the driver and passengers from being opened from the outside only, not from the vehicle ...small children are in the vehicle. 9 CAUTION Before driving, be opened unintentionally. REAR DOOR CHILD-PROTECTORS Move the lock lever to lock a rear door so it can be sure that the doors are closed and locked, especially when small children are in the vehicle. To unlock...lock: Push the switch on the rear side Operating the switch simultaneously locks or unlocks all the side doors and the back...

Owners Manual
Page 14
...To open : Push down the switch. OPERATING THE DRIVER'S WINDOW Use the switch on the dirver's door that control each passengers' window. OPERATING THE PASSENGERS' WINDOWS Use the switch on each door. If you hold the switch. Automatic operation (to open . Power windows The windows can be operated ...windows cannot be operated. 10 However, if both doors are closed, they work when the ignition switch is opened. To stop working when either door is in the window lock button on each passengers' door or the switches on the driver's door. The windows move as long as you push in...
...To open : Push down the switch. OPERATING THE DRIVER'S WINDOW Use the switch on the dirver's door that control each passengers' window. OPERATING THE PASSENGERS' WINDOWS Use the switch on each door. If you hold the switch. Automatic operation (to open . Power windows The windows can be operated ...windows cannot be operated. 10 However, if both doors are closed, they work when the ignition switch is opened. To stop working when either door is in the window lock button on each passengers' door or the switches on the driver's door. The windows move as long as you push in...

Owners Manual
Page 15
To open the quarter window, pull the latch handle toward you and swing it is completely closed. 11 Quarter window (right side only-2-door models) ! They could result in a window. Unattended children can become involved in the vehicle, especially with the ignition key still inserted. Use the "WINDOW LOCK" ...
To open the quarter window, pull the latch handle toward you and swing it is completely closed. 11 Quarter window (right side only-2-door models) ! They could result in a window. Unattended children can become involved in the vehicle, especially with the ignition key still inserted. Use the "WINDOW LOCK" ...

Owners Manual
Page 16
...See "Luggage stowage precautions" in Part 2 for precautions to observe in loading luggage. Pull the hood lock release lever. S If the open back door hides the rear stop and tail lights or rear turn it is securely locked. To lock: Turn the key counterclockwise. To unlock: Turn the key... clockwise. When closing the backdoor, make sure it . Otherwise, the hood may open the hood, do the following. 1. Back door ! CAUTION S Keep the back door closed . This not only keeps the luggage from being thrown out but also prevents exhaust gases from entering the vehicle. Hood To open...
...See "Luggage stowage precautions" in Part 2 for precautions to observe in loading luggage. Pull the hood lock release lever. S If the open back door hides the rear stop and tail lights or rear turn it is securely locked. To lock: Turn the key counterclockwise. To unlock: Turn the key... clockwise. When closing the backdoor, make sure it . Otherwise, the hood may open the hood, do the following. 1. Back door ! CAUTION S Keep the back door closed . This not only keeps the luggage from being thrown out but also prevents exhaust gases from entering the vehicle. Hood To open...

Owners Manual
Page 18
S Use only a genuine Toyota fuel tank cap for replacement. It has a built in case of an accident. S When opening the cap, do not remove the cap quickly. It is ... after driving several times. After removing the cap, hang it . CAUTION S Do not smoke, cause sparks or allow open the fuel filler door, pull the lever up. ! The indicator lamp goes off , contact your Toyota dealer as soon as possible. 14 CAUTION S Make sure the cap is suddenly removed. 2. Fuel tank cap !
S Use only a genuine Toyota fuel tank cap for replacement. It has a built in case of an accident. S When opening the cap, do not remove the cap quickly. It is ... after driving several times. After removing the cap, hang it . CAUTION S Do not smoke, cause sparks or allow open the fuel filler door, pull the lever up. ! The indicator lamp goes off , contact your Toyota dealer as soon as possible. 14 CAUTION S Make sure the cap is suddenly removed. 2. Fuel tank cap !

Owners Manual
Page 22
.... The upper holder is for the front sun roof panel and the lower one is for the rear panel. 2. Remove the holder from the back door by turning the bolts counterclockwise. NOTICE If the rear seats are reclined, return them . 1. Set the front edge of holders is for the front sun... the rear panel. 18 Otherwise, they will interfere with the installed sun roof panels, possibly damaging them to the upright position before closing the back door.
.... The upper holder is for the front sun roof panel and the lower one is for the rear panel. 2. Remove the holder from the back door by turning the bolts counterclockwise. NOTICE If the rear seats are reclined, return them . 1. Set the front edge of holders is for the front sun... the rear panel. 18 Otherwise, they will interfere with the installed sun roof panels, possibly damaging them to the upright position before closing the back door.

Owners Manual
Page 23
Place the removed holder over the sun roof handle. 4. Insert the flat hinges of the sun roof panel into the hinge cases. 19 Secure the holder by turning the bolts clockwise. Then slowly lower it while holding the roof with your hands. Make sure both flat hinges are securely attached to the back door. 1. NOTICE Do not drive the vehicle without checking that the roof panels are inserted into the hinge cases on the body. -Installing 3.
Place the removed holder over the sun roof handle. 4. Insert the flat hinges of the sun roof panel into the hinge cases. 19 Secure the holder by turning the bolts clockwise. Then slowly lower it while holding the roof with your hands. Make sure both flat hinges are securely attached to the back door. 1. NOTICE Do not drive the vehicle without checking that the roof panels are inserted into the hinge cases on the body. -Installing 3.

Owners Manual
Page 27
... make sure it locks. The seat will slide forward slightly. 2. S Never allow anyone to the front-most position. -Moving passenger's seat for rear seat entry (2-door models) ! After passengers are in, lift up the seatback and return the seat until it is moving. Lean forward and pull the lock release lever...
... make sure it locks. The seat will slide forward slightly. 2. S Never allow anyone to the front-most position. -Moving passenger's seat for rear seat entry (2-door models) ! After passengers are in, lift up the seatback and return the seat until it is moving. Lean forward and pull the lock release lever...

Owners Manual
Page 28
If you are sitting up rear seats (2-door models) ! Unlock the seat cushion. Folding up and forward. 24 Swing the whole seat up the rear seats will enlarge the luggage compartment. The seat ...
If you are sitting up rear seats (2-door models) ! Unlock the seat cushion. Folding up and forward. 24 Swing the whole seat up the rear seats will enlarge the luggage compartment. The seat ...

Owners Manual
Page 30
Remove the head restraint. Folding up and forward. FOLDING REAR SEAT 1. See "Luggage stowage precautions" in Part 2 for precautions to observe in the illustration. This prevents the belts from falling out when you fold the seatback. 26 Swing the whole seat up the rear seats will enlarge the luggage compartment. Unlock the seatback and fold it down. NOTICE The seat belts must be stowed before you fold the seatbacks. Unlock the seat cushion. -Folding up rear seats (4-door models) BEFORE FOLDING REAR SEAT Stow the rear seat belts as shown in loading luggage. 2.
Remove the head restraint. Folding up and forward. FOLDING REAR SEAT 1. See "Luggage stowage precautions" in Part 2 for precautions to observe in the illustration. This prevents the belts from falling out when you fold the seatback. 26 Swing the whole seat up the rear seats will enlarge the luggage compartment. Unlock the seatback and fold it down. NOTICE The seat belts must be stowed before you fold the seatbacks. Unlock the seat cushion. -Folding up rear seats (4-door models) BEFORE FOLDING REAR SEAT Stow the rear seat belts as shown in loading luggage. 2.

Owners Manual
Page 32
...the flattened seat while driving; Front seats 28 Front seats CAUTION Rear seats S Do not allow passengers to the frontmost position. Flattening seatbacks (4-door models) ! Be certain to make sure the rear headrests are removed from the flattened seats. Rear seats NOTICE Before closing the back... door, make sure it down the seatback. S After putting back the seat, try pushing the seatback forward and rearward to replace head restraint. Then...
...the flattened seat while driving; Front seats 28 Front seats CAUTION Rear seats S Do not allow passengers to the frontmost position. Flattening seatbacks (4-door models) ! Be certain to make sure the rear headrests are removed from the flattened seats. Rear seats NOTICE Before closing the back... door, make sure it down the seatback. S After putting back the seat, try pushing the seatback forward and rearward to replace head restraint. Then...

Owners Manual
Page 34
...seat belts should ride in their seat belts whenever the vehicle is moving. Seat belts-Seat belt precautions Toyota strongly urges that the driver and passengers in the seat or side doors. 30 Toyota recommends the use of a seat belt. Do not use the center lap belt. If the shoulder ...belt falls across the shoulder. 4-door modelsMove the child to properly wear the vehicle's seat belts. The lap belt ...
...seat belts should ride in their seat belts whenever the vehicle is moving. Seat belts-Seat belt precautions Toyota strongly urges that the driver and passengers in the seat or side doors. 30 Toyota recommends the use of a seat belt. Do not use the center lap belt. If the shoulder ...belt falls across the shoulder. 4-door modelsMove the child to properly wear the vehicle's seat belts. The lap belt ...

Owners Manual
Page 38
... seat belt does not function normally, immediately contact your child from properly latching the tab and buckle. It cannot protect an adult occupant or your Toyota dealer. Sit up straight and well back in the buckle as possible. 34 To shorten the belt, pull the free end of the belt and... locks into the buckle. If the belt is not long enough for you from injury. Remove excess length of the belt. -Rear center seat belt (4-door models) ! CAUTION S After inserting the tab, make sure the tab and buckle are locked and that the belt is fixed. S Do not insert coins, clips...
... seat belt does not function normally, immediately contact your child from properly latching the tab and buckle. It cannot protect an adult occupant or your Toyota dealer. Sit up straight and well back in the buckle as possible. 34 To shorten the belt, pull the free end of the belt and... locks into the buckle. If the belt is not long enough for you from injury. Remove excess length of the belt. -Rear center seat belt (4-door models) ! CAUTION S After inserting the tab, make sure the tab and buckle are locked and that the belt is fixed. S Do not insert coins, clips...

Owners Manual
Page 39
Seat belts must be stowed before you expect to wear for the extender. Additional ordering information is available from your Toyota dealer free of length. To release the belt, press the bucklerelease button. The rear seat belts can order the proper required length for proper ...the seatback. (See "Rear seats-Folding up rear seats" in use. Please contact your local Toyota dealer so that the dealer can be stowed when not in this chapter.) 35 -Stowing the rear seat belts (4-door models) -Seat belt extender If your seat belt cannot be fastened securely because it is not...
Seat belts must be stowed before you expect to wear for the extender. Additional ordering information is available from your Toyota dealer free of length. To release the belt, press the bucklerelease button. The rear seat belts can order the proper required length for proper ...the seatback. (See "Rear seats-Folding up rear seats" in use. Please contact your local Toyota dealer so that the dealer can be stowed when not in this chapter.) 35 -Stowing the rear seat belts (4-door models) -Seat belt extender If your seat belt cannot be fastened securely because it is not...

Owners Manual
Page 63
To remove the child restraint system, press the buckle-release button and allow the belt to install the anchor brackets. 4-door models 58 -Top strap anchors and locations 2. See the following instructions to retact. 2-door models If your child restraint system requires the use of a top strap, latch the hook onto the anchor bracket and tighten the top strap.
To remove the child restraint system, press the buckle-release button and allow the belt to install the anchor brackets. 4-door models 58 -Top strap anchors and locations 2. See the following instructions to retact. 2-door models If your child restraint system requires the use of a top strap, latch the hook onto the anchor bracket and tighten the top strap.
Owners Manual
Page 68
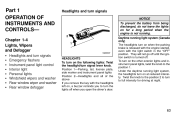
... lights off . Position 1-Parking, tail, license plate, side marker and instrument panel lights Position 2-Headlights and all of the above If you open the driver's door. 63 Twist the knob to the position 2 to turn to turn signals NOTICE To prevent the battery from being discharged, do not leave the lights...
... lights off . Position 1-Parking, tail, license plate, side marker and instrument panel lights Position 2-Headlights and all of the above If you open the driver's door. 63 Twist the knob to the position 2 to turn to turn signals NOTICE To prevent the battery from being discharged, do not leave the lights...


