Owners Manual
Page 5
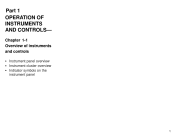
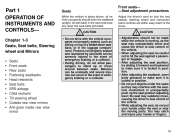
Chapter 1-1 Overview of instruments and controls S Instrument panel overview S Instrument cluster overview S Indicator symbols on the instrument panel 1 Part 1 OPERATION OF INSTRUMENTS AND CONTROLS-
Chapter 1-1 Overview of instruments and controls S Instrument panel overview S Instrument cluster overview S Indicator symbols on the instrument panel 1 Part 1 OPERATION OF INSTRUMENTS AND CONTROLS-

Owners Manual
Page 6
Instrument panel overview 1. 2. 3. 4. 5. 6. 7. 8. 9. Ashtray 11. Side vent Instrument cluster Center vents Personal lights Glovebox Power door lock switch Power window switches Parking brake lever Automatic transmission selector lever or manual transmission gear shift lever 10. Hood lock release lever 2
Instrument panel overview 1. 2. 3. 4. 5. 6. 7. 8. 9. Ashtray 11. Side vent Instrument cluster Center vents Personal lights Glovebox Power door lock switch Power window switches Parking brake lever Automatic transmission selector lever or manual transmission gear shift lever 10. Hood lock release lever 2
Owners Manual
Page 9
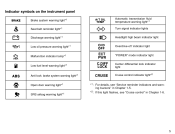
Indicator symbols on the instrument panel Brake system warning light*1 Seat belt reminder light*1 Discharge warning light*1 Low oil pressure warning light*1 Malfunction indicator lamp*1 Low fuel level warning light*1 Anti-...
Indicator symbols on the instrument panel Brake system warning light*1 Seat belt reminder light*1 Discharge warning light*1 Low oil pressure warning light*1 Malfunction indicator lamp*1 Low fuel level warning light*1 Anti-...
Owners Manual
Page 19
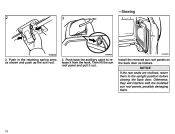
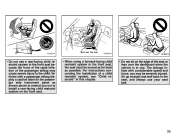
... Never put your hand. When closing the sun roof, slowly pull down the handle while supporting the roof with your hands between the sun roof panel and the surrounding roof. -Tilting up and closing the sun roof, make sure they are firmly secured by falling into or flying off the vehicle.... sun roof, make sure the handle is moving, always keep the head, hands and other parts of the body of the lock buttons. Otherwise, the panels may become a hazard by pushing up . S While the vehicle is securely in one of all occupants away from the roof opening . S After installing the...
... Never put your hand. When closing the sun roof, slowly pull down the handle while supporting the roof with your hands between the sun roof panel and the surrounding roof. -Tilting up and closing the sun roof, make sure they are firmly secured by falling into or flying off the vehicle.... sun roof, make sure the handle is moving, always keep the head, hands and other parts of the body of the lock buttons. Otherwise, the panels may become a hazard by pushing up . S While the vehicle is securely in one of all occupants away from the roof opening . S After installing the...
Owners Manual
Page 20
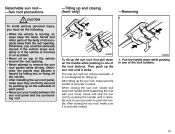
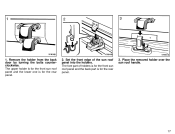
Push in the retaining spring arms as follows. Push back the auxiliary catch to the upright position before closing the back door. Then lift the sun roof panel and pull it from the hook. Install the removed sun roof panels on the back door as shown and push up the sun roof. 3. NOTICE If the rear seats are reclined, return them . 16 Otherwise, they will interfere with the installed sun roof panels, possibly damaging them to release it out. -Stowing 2.
Push in the retaining spring arms as follows. Push back the auxiliary catch to the upright position before closing the back door. Then lift the sun roof panel and pull it from the hook. Install the removed sun roof panels on the back door as shown and push up the sun roof. 3. NOTICE If the rear seats are reclined, return them . 16 Otherwise, they will interfere with the installed sun roof panels, possibly damaging them to release it out. -Stowing 2.
Owners Manual
Page 21
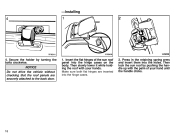
The fore part of the sun roof panel into the holders. 1. Remove the holder from the back door by turning the bolts counterclockwise. The upper holder is for the front sun roof panel and the lower one is for the rear panel. 2. Place the removed holder over the sun roof handle. 17 Set the front edge of holders is for the front sun roof panel and the back part is for the rear panel. 3.
The fore part of the sun roof panel into the holders. 1. Remove the holder from the back door by turning the bolts counterclockwise. The upper holder is for the front sun roof panel and the lower one is for the rear panel. 2. Place the removed holder over the sun roof handle. 17 Set the front edge of holders is for the front sun roof panel and the back part is for the rear panel. 3.
Owners Manual
Page 22
Press in the retaining spring arms and insert them into the hinge cases on the body. NOTICE Do not drive the vehicle without checking that the roof panels are inserted into the hinge cases. 2. Then slowly lower it while holding the roof with the palm of the sun roof panel into the holes. Make sure both flat hinges are securely attached to the back door. 1. Insert the flat hinges of your hands. -Installing 4. Then lock the sun roof by turning the bolts clockwise. Secure the holder by pushing the handle up with your hand until the handle clicks. 18
Press in the retaining spring arms and insert them into the hinge cases on the body. NOTICE Do not drive the vehicle without checking that the roof panels are inserted into the hinge cases. 2. Then slowly lower it while holding the roof with the palm of the sun roof panel into the holes. Make sure both flat hinges are securely attached to the back door. 1. Insert the flat hinges of your hands. -Installing 4. Then lock the sun roof by turning the bolts clockwise. Secure the holder by pushing the handle up with your hand until the handle clicks. 18
Owners Manual
Page 23
... driver. ! Part 1 OPERATION OF INSTRUMENTS AND CONTROLS- Front seats- -Seat adjustment precautions Adjust the driver's seat so that the foot pedals, steering wheel and instrument panel controls are within easy reach of the vehicle. CAUTION S Adjustments should have the seatback upright, sit well back in the event of emergency braking or...
... driver. ! Part 1 OPERATION OF INSTRUMENTS AND CONTROLS- Front seats- -Seat adjustment precautions Adjust the driver's seat so that the foot pedals, steering wheel and instrument panel controls are within easy reach of the vehicle. CAUTION S Adjustments should have the seatback upright, sit well back in the event of emergency braking or...
Owners Manual
Page 40
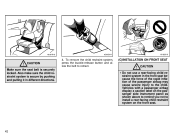
... system in this chapter. S Do not sit on the front seat. The airbags inflate with a passenger airbag display a caution label on the passenger side instrument panel as possible. Sit up straight and well back in use your seat belt. 35 Vehicles with considerable speed and force; S When using a forward-facing child...
... system in this chapter. S Do not sit on the front seat. The airbags inflate with a passenger airbag display a caution label on the passenger side instrument panel as possible. Sit up straight and well back in use your seat belt. 35 Vehicles with considerable speed and force; S When using a forward-facing child...
Owners Manual
Page 48
... injury to install a rear-facing child restraint system on the front seat. 42 Vehicles with a passenger airbag display a caution label on the passenger side instrument panel as shown above to remind you not to the child. Also make sure the child restraint system is securely locked. CAUTION S Do not use a rear...
... injury to install a rear-facing child restraint system on the front seat. 42 Vehicles with a passenger airbag display a caution label on the passenger side instrument panel as shown above to remind you not to the child. Also make sure the child restraint system is securely locked. CAUTION S Do not use a rear...

Owners Manual
Page 53
...the lights on for a long period when the engine is not running. Position 1-Parking, tail, license plate, side marker and instrument panel lights Position 2-Headlights and all of the above If you open the driver's door. 47 Part 1 OPERATION OF INSTRUMENTS AND CONTROLS-... Chapter 1-4 Lights, Wipers and Defogger S S S S S S S S Headlights and turn signals Emergency flashers Instrument panel light control Interior light Personal lights Windshield wipers and washer Rear window wiper and washer Rear window defogger Headlights and turn signal lever knob.
...the lights on for a long period when the engine is not running. Position 1-Parking, tail, license plate, side marker and instrument panel lights Position 2-Headlights and all of the above If you open the driver's door. 47 Part 1 OPERATION OF INSTRUMENTS AND CONTROLS-... Chapter 1-4 Lights, Wipers and Defogger S S S S S S S S Headlights and turn signals Emergency flashers Instrument panel light control Interior light Personal lights Windshield wipers and washer Rear window wiper and washer Rear window defogger Headlights and turn signal lever knob.

Owners Manual
Page 54
...the lever up or down to the pressure point (position 2) and hold it. If the turn signal indicator lights (green lights) on the instrument panel flash faster than normal, a front or rear turn off when you that the high beams are operating. 48 You can flash the high beam headlights...signal a turn, push the headlight/ turn , but you (position 2) for low beams. The headlight high beam indicator light (blue light) on the instrument panel will flash. All the turn them off the road as possible. To signal a lane change lanes. Turn on the emergency flashers to position 1. The lever...
...the lever up or down to the pressure point (position 2) and hold it. If the turn signal indicator lights (green lights) on the instrument panel flash faster than normal, a front or rear turn off when you that the high beams are operating. 48 You can flash the high beam headlights...signal a turn, push the headlight/ turn , but you (position 2) for low beams. The headlight high beam indicator light (blue light) on the instrument panel will flash. All the turn them off the road as possible. To signal a lane change lanes. Turn on the emergency flashers to position 1. The lever...
Owners Manual
Page 55
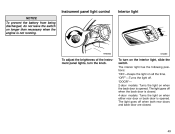
Interior light To adjust the brightness of the instrument panel lights, turn on the interior light, slide the switch. The interior light has the following positions: "ON"-Keeps the light on longer than necessary when ... door are closed . 4-door models: Turns the light on when the back door is closed . 49 To turn the knob. The light goes off . Instrument panel light control NOTICE To prevent the battery from being discharged, do not leave the switch on all the time.
Interior light To adjust the brightness of the instrument panel lights, turn on the interior light, slide the switch. The interior light has the following positions: "ON"-Keeps the light on longer than necessary when ... door are closed . 4-door models: Turns the light on when the back door is closed . 49 To turn the knob. The light goes off . Instrument panel light control NOTICE To prevent the battery from being discharged, do not leave the switch on all the time.

Owners Manual
Page 70
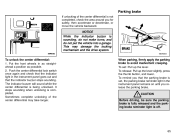
...have pushed the center differential lock switch to lock and moved the vehicle a short distance, the indicator light in the instrument panel stays on or goes out, ask your Toyota dealer to move itself out of the four wheels is off the ground or on a dry paved surface with manual transmission.... ! Press the brake pedal and stop the wheel spinning. 2. This may not lock or unlock smoothly. An indicator buzzer will result in the instrument panel comes on a slippery surface. If the light either fails to come on . Operating precautions S If the front wheels and rear wheels are off the ...
...have pushed the center differential lock switch to lock and moved the vehicle a short distance, the indicator light in the instrument panel stays on or goes out, ask your Toyota dealer to move itself out of the four wheels is off the ground or on a dry paved surface with manual transmission.... ! Press the brake pedal and stop the wheel spinning. 2. This may not lock or unlock smoothly. An indicator buzzer will result in the instrument panel comes on a slippery surface. If the light either fails to come on . Operating precautions S If the front wheels and rear wheels are off the ...
Owners Manual
Page 71
... the parking brake to avoid inadvertent creeping. To remind you that the indicator buzzer stops sounding. Put the front wheels in the instrument panel remains on until you for safety, then accelerate or decelerate, or move the vehicle backward. Push the center differential lock switch once again... and check that the indicator light in the instrument panel goes out and that the parking brake is not completed, check the area around you release the parking brake. ! Sometimes complete unlocking ...
... the parking brake to avoid inadvertent creeping. To remind you that the indicator buzzer stops sounding. Put the front wheels in the instrument panel remains on until you for safety, then accelerate or decelerate, or move the vehicle backward. Push the center differential lock switch once again... and check that the indicator light in the instrument panel goes out and that the parking brake is not completed, check the area around you release the parking brake. ! Sometimes complete unlocking ...
Owners Manual
Page 72
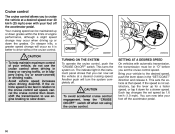
... speed, cancel the cruise control then downshift the transmission to use the cruise control when driving in heavy or varying traffic, or in the instrument panel shows that speed. If the speed is not satisfactory, tap the lever up for a slower speed. Your cruising speed can now take your vehicle to...
... speed, cancel the cruise control then downshift the transmission to use the cruise control when driving in heavy or varying traffic, or in the instrument panel shows that speed. If the speed is not satisfactory, tap the lever up for a slower speed. Your cruising speed can now take your vehicle to...
Owners Manual
Page 75
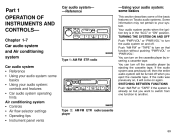
... Car audio system and Air conditioning system Car audio system S Reference S Using your audio system: some of the basic features on Toyota audio systems. Some information may not pertain to turn the audio system on and off. TURNING THE SYSTEM ON AND OFF Push ...your audio system: controls and features S Car audio system operating hints Air conditioning system S Controls S Air flow selector settings S Operating tips S Instrument panel vents Car audio system- -Reference -Using your system. If the audio system was previously on again. SWITCHING BETWEEN FUNCTIONS Push "AM⋅FM" or...
... Car audio system and Air conditioning system Car audio system S Reference S Using your audio system: some of the basic features on Toyota audio systems. Some information may not pertain to turn the audio system on and off. TURNING THE SYSTEM ON AND OFF Push ...your audio system: controls and features S Car audio system operating hints Air conditioning system S Controls S Air flow selector settings S Operating tips S Instrument panel vents Car audio system- -Reference -Using your system. If the audio system was previously on again. SWITCHING BETWEEN FUNCTIONS Push "AM⋅FM" or...
Owners Manual
Page 83
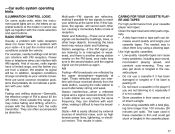
... there is peeling off. For example, nearby buildings and terrain can interfere with your antenna at night. Here are some audio-units, when the instrument panel lights are on, the letters on the FM band, your vehicle moves. S Store cassettes in the player if you are not listening to it, especially...
... there is peeling off. For example, nearby buildings and terrain can interfere with your antenna at night. Here are some audio-units, when the instrument panel lights are on, the letters on the FM band, your vehicle moves. S Store cassettes in the player if you are not listening to it, especially...
Owners Manual
Page 85
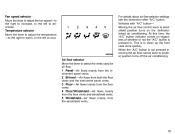
... the defrosterlinked air conditioning. When the "A/C" button is to select the vents used for air flow. 1 Panel-Air flows mainly from the instrument panel vents. 2 Bi-level -Air flows from both the floor vents and the instrument panel vents. 3 Floor -Air flows mainly from the floor vents. 4 Floor/Windshield -Air flows mainly from...
... the defrosterlinked air conditioning. When the "A/C" button is to select the vents used for air flow. 1 Panel-Air flows mainly from the instrument panel vents. 2 Bi-level -Air flows from both the floor vents and the instrument panel vents. 3 Floor -Air flows mainly from the floor vents. 4 Floor/Windshield -Air flows mainly from...
Owners Manual
Page 88
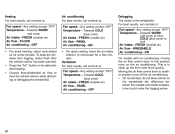
...defrosting or defogging the windshield. S On humid days, do not blow cold air on the windshield-the difference between the outside air) Air flow-PANEL Air conditioning-OFF Defogging The inside temperatures could make the fogging worse. S S 82 Towards COLD (blue zone) Air intake-FRESH (outside and...control lever to : Fan speed-Any setting except "OFF" Temperature- COLD (blue zone) to cool Air intake-FRESH (outside air) Air flow-PANEL Air conditioning-ON For quick cooling, move the air intake selector to : Fan speed-Any setting except "OFF" Temperature- Moving the air flow control...
...defrosting or defogging the windshield. S On humid days, do not blow cold air on the windshield-the difference between the outside air) Air flow-PANEL Air conditioning-OFF Defogging The inside temperatures could make the fogging worse. S S 82 Towards COLD (blue zone) Air intake-FRESH (outside and...control lever to : Fan speed-Any setting except "OFF" Temperature- COLD (blue zone) to cool Air intake-FRESH (outside air) Air flow-PANEL Air conditioning-ON For quick cooling, move the air intake selector to : Fan speed-Any setting except "OFF" Temperature- Moving the air flow control...


