
Owners Manual
Page 7
1. Headlight and turn signal switch 3. Wiper and washer switches 4. Car audio 10. Ignition switch 13. Power back window lock switch (without power windows) 17. Clock 7. Air conditioning controls 9. Rear differential lock switch 15. Back window defogger switch 5. Cruise control switch 14. Cigarette lighter 12. Instrument panel light control knob 16. Emergency flasher switch 6. Cup holder 8. Ashtray 11. Clutch start cancel switch 2. Power rear view mirror control switch (without power windows) 3
1. Headlight and turn signal switch 3. Wiper and washer switches 4. Car audio 10. Ignition switch 13. Power back window lock switch (without power windows) 17. Clock 7. Air conditioning controls 9. Rear differential lock switch 15. Back window defogger switch 5. Cruise control switch 14. Cigarette lighter 12. Instrument panel light control knob 16. Emergency flasher switch 6. Cup holder 8. Ashtray 11. Clutch start cancel switch 2. Power rear view mirror control switch (without power windows) 3

Owners Manual
Page 9
Indicator symbols on the instrument panel Brake system warning light*1 Open door warning light*1 SRS airbag warning light*1 Seat belt reminder Discharge warning light*1 Unengaged "Park" warning light*1 light*1 Automatic transmission fluid temperature warning light*1 Low windshield washer fluid level warning light*1 Turn signal indicator lights Low oil pressure warning light*1 Malfunction indicator lamp*1 Low fuel level warning light*1 Headlight high beam indicator light Anti-lock brake system warning light *1 Overdrive-of f indicator light 5
Indicator symbols on the instrument panel Brake system warning light*1 Open door warning light*1 SRS airbag warning light*1 Seat belt reminder Discharge warning light*1 Unengaged "Park" warning light*1 light*1 Automatic transmission fluid temperature warning light*1 Low windshield washer fluid level warning light*1 Turn signal indicator lights Low oil pressure warning light*1 Malfunction indicator lamp*1 Low fuel level warning light*1 Headlight high beam indicator light Anti-lock brake system warning light *1 Overdrive-of f indicator light 5
Owners Manual
Page 56
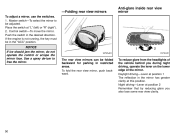
... position 2 Remember that by reducing glare you during night driving, operate the lever on the lower edge of the mirror. To reduce glare from the headlights of the vehicle behind you also lose some rear view clarity. 50 -Folding rear view mirrors To adjust a mirror, use the switches. 1. Daylight driving-Lever...
... position 2 Remember that by reducing glare you during night driving, operate the lever on the lower edge of the mirror. To reduce glare from the headlights of the vehicle behind you also lose some rear view clarity. 50 -Folding rear view mirrors To adjust a mirror, use the switches. 1. Daylight driving-Lever...

Owners Manual
Page 57
... off until the ignition switch is not running light system (Canada only) The headlights turn on for driving at reduced intensity. Chapter 1-4 Lights, Wipers and Defogger S S S S S S S S S S Headlights and turn signals Emergency flashers Instrument panel light control Interior light Personal lights Luggage... compartment light Ignition switch light Windshield wipers and washer Back window wiper and washer Back window defogger Headlights and turn to the "LOCK" position with the light switch in the "OFF" position. Part 1 OPERATION OF INSTRUMENTS...
... off until the ignition switch is not running light system (Canada only) The headlights turn on for driving at reduced intensity. Chapter 1-4 Lights, Wipers and Defogger S S S S S S S S S S Headlights and turn signals Emergency flashers Instrument panel light control Interior light Personal lights Luggage... compartment light Ignition switch light Windshield wipers and washer Back window wiper and washer Back window defogger Headlights and turn to the "LOCK" position with the light switch in the "OFF" position. Part 1 OPERATION OF INSTRUMENTS...

Owners Manual
Page 58
... flashers are on the instrument panel flash faster than normal, a front or rear turn signal bulb is burned out. You can flash the high beam headlights with the knob turned to return it . To signal a lane change lanes. To turn on the emergency flashers to warn other drivers if your vehicle... point (position 2) and hold it by hand after you make a turn them off when you (position 1). To turn , but you (position 2) for low beams. The headlight high beam indicator light (blue light) on the instrument panel will flash. Always pull as far off the road as possible.
... flashers are on the instrument panel flash faster than normal, a front or rear turn signal bulb is burned out. You can flash the high beam headlights with the knob turned to return it . To signal a lane change lanes. To turn on the emergency flashers to warn other drivers if your vehicle... point (position 2) and hold it by hand after you make a turn them off when you (position 1). To turn , but you (position 2) for low beams. The headlight high beam indicator light (blue light) on the instrument panel will flash. Always pull as far off the road as possible.

Owners Manual
Page 70
..." Warning Light (vehicles with the warning light on while you to "ACC". With the engine idling, wait until the light goes off , call a Toyota dealer or qualified repair shop for assistance. Add washer fluid at a safe place and put the selector lever in Chapter 7-3.) ! The open door warning.... 2. The open door warning light should come on . (j) Light Reminder Buzzer This buzzer will not stop the buzzer as long as the headlight switch is on . Turn ignition key to remove the key when you may damage the automatic transmission. (n) Low Windshield Washer Fluid Level Warning ...
..." Warning Light (vehicles with the warning light on while you to "ACC". With the engine idling, wait until the light goes off , call a Toyota dealer or qualified repair shop for assistance. Add washer fluid at a safe place and put the selector lever in Chapter 7-3.) ! The open door warning.... 2. The open door warning light should come on . (j) Light Reminder Buzzer This buzzer will not stop the buzzer as long as the headlight switch is on . Turn ignition key to remove the key when you may damage the automatic transmission. (n) Low Windshield Washer Fluid Level Warning ...

Owners Manual
Page 181
...pull to one side when applied. Clutch pedal Check the pedal for additional information. See Chapter 7-2 for smooth operation. Lights Make sure the headlights, stop lights, tail lights, turn signal lights, and other fluid after the vehicle has been parked for changes in steering condition, such as ... lock securely. Tire surface and wheel nuts Check the tires carefully for smooth operation and that the pedal has the proper clearance. Check headlight aim. Parking brake Check that the lever has the proper travel and that, on a safe incline, your vehicle is held securely with...
...pull to one side when applied. Clutch pedal Check the pedal for additional information. See Chapter 7-2 for smooth operation. Lights Make sure the headlights, stop lights, tail lights, turn signal lights, and other fluid after the vehicle has been parked for changes in steering condition, such as ... lock securely. Tire surface and wheel nuts Check the tires carefully for smooth operation and that the pedal has the proper clearance. Check headlight aim. Parking brake Check that the lever has the proper travel and that, on a safe incline, your vehicle is held securely with...

Owners Manual
Page 200
... loss of a different size or type may adversely affect handling, wheel and bearing life, brake cooling, speedometer/ odometer calibration, stopping ability, headlight aim, bumper height, vehicle ground clearance, and tire or snow chain clearance to ensure that the wheels are replaced by ones with the same... to replace damaged wheels, the tire may slip off the wheel or they may have been subjected to damage the aluminum wheels. Use only the Toyota wheel nuts and wrench designed for damage. S S S S S 194 WHEEL SELECTION When replacing wheels, care should be careful not to rough...
... loss of a different size or type may adversely affect handling, wheel and bearing life, brake cooling, speedometer/ odometer calibration, stopping ability, headlight aim, bumper height, vehicle ground clearance, and tire or snow chain clearance to ensure that the wheels are replaced by ones with the same... to replace damaged wheels, the tire may slip off the wheel or they may have been subjected to damage the aluminum wheels. Use only the Toyota wheel nuts and wrench designed for damage. S S S S S 194 WHEEL SELECTION When replacing wheels, care should be careful not to rough...

Owners Manual
Page 205
.... Pull a suspected fuse straight out and check it if its original clip. If the fuse has blown, push a new fuse into the clip. If the headlights or other electrical components do not have a spare fuse, in the illustration. See Part 8 of the pullout tool is the same. Checking and replacing fuses...
.... Pull a suspected fuse straight out and check it if its original clip. If the fuse has blown, push a new fuse into the clip. If the headlights or other electrical components do not have a spare fuse, in the illustration. See Part 8 of the pullout tool is the same. Checking and replacing fuses...

Owners Manual
Page 207
... retaining spring. Unplug the connector. To install a bulb, align the tabs of the bulb with the cutouts of the mounting hole. Open the hood. -Headlights Light bulbs Headlight Parking and front side marker lights Front turn signal lights Rear turn signal lights Stop and tail lights Back-up lights License plate light...
... retaining spring. Unplug the connector. To install a bulb, align the tabs of the bulb with the cutouts of the mounting hole. Open the hood. -Headlights Light bulbs Headlight Parking and front side marker lights Front turn signal lights Rear turn signal lights Stop and tail lights Back-up lights License plate light...

Owners Manual
Page 208
Aiming is necessary, contact your Toyota dealer. Use a Phillips-head screwdriver. 202 When aiming adjustment is not necessary after replacing the bulb. Install the rubber cover, and snuggle on the connector and the headlight body. Make sure the rubber cover fits snugly on the boss. -Parking and front side marker lights 3. Inset the connector.
Aiming is necessary, contact your Toyota dealer. Use a Phillips-head screwdriver. 202 When aiming adjustment is not necessary after replacing the bulb. Install the rubber cover, and snuggle on the connector and the headlight body. Make sure the rubber cover fits snugly on the boss. -Parking and front side marker lights 3. Inset the connector.

Owners Manual
Page 216
..., clock, power rear view mirror control 210 A.C 10 A: Air conditioning control system 10. HEAD (LH) 10 A: Left-hand headlight Instrument panel 13. HEAD (HI RH) 10 A: Right-hand headlight (high beam) 15. RR HTR 10 A: Rear air conditioning control system 11. HEAD (LO LH) 10 A: Left-hand... headlight (low beam) 18. ALT-S 7.5 A: Charging system 4. HEAD (LO RH) 10 A: Right-hand headlight (low beam) 17. DEFOG 15 A: Back window defogger 2. HEAD (RH) 10 A: Right-hand headlight 12. HEAD (HI LH) 10 A: Left-hand headlight (high beam) 16. EFI 15 A: Multiport...
..., clock, power rear view mirror control 210 A.C 10 A: Air conditioning control system 10. HEAD (LH) 10 A: Left-hand headlight Instrument panel 13. HEAD (HI RH) 10 A: Right-hand headlight (high beam) 15. RR HTR 10 A: Rear air conditioning control system 11. HEAD (LO LH) 10 A: Left-hand... headlight (low beam) 18. ALT-S 7.5 A: Charging system 4. HEAD (LO RH) 10 A: Right-hand headlight (low beam) 17. DEFOG 15 A: Back window defogger 2. HEAD (RH) 10 A: Right-hand headlight 12. HEAD (HI LH) 10 A: Left-hand headlight (high beam) 16. EFI 15 A: Multiport...


