Owner's Manual
Page 1
.... Please leave this manual are those in this manual carefully so that you purchased your vehicle. FUJI HEAVY INDUSTRIES LTD. reserves the right to change specifications and designs at any time without prior notice and without incurring any obligation to read this Owner's Manual, such as details concerning repairs or... will need the information found in effect at the time of FUJI HEAVY INDUSTRIES LTD. We urge you to make the same or similar changes on choosing a SUBARU vehicle. Foreword Congratulations on vehicles previously sold. For information not found herein.
.... Please leave this manual are those in this manual carefully so that you purchased your vehicle. FUJI HEAVY INDUSTRIES LTD. reserves the right to change specifications and designs at any time without prior notice and without incurring any obligation to read this Owner's Manual, such as details concerning repairs or... will need the information found in effect at the time of FUJI HEAVY INDUSTRIES LTD. We urge you to make the same or similar changes on choosing a SUBARU vehicle. Foreword Congratulations on vehicles previously sold. For information not found herein.
Owner's Manual
Page 18
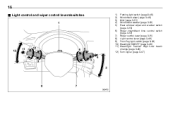
16 & Light control and wiper control levers/switches 1) 2) 3) 4) 5) Parking light switch (page 3-48) Windshield wiper (page 3-49) Mist (page 3-51) Windshield washer (page 3-52) Rear window wiper and washer switch (page 3-53) 6) Wiper intermittent time control switch (page 3-52) 7) Wiper control lever (page 3-51) 8) Light control lever (page 3-46) 9) Front fog light switch (page 3-49) 10) Headlight ON/OFF (page 3-46) 11) Headlight flasher High/Low beam change (page 3-46) 12) Turn signal (page 3-47)
16 & Light control and wiper control levers/switches 1) 2) 3) 4) 5) Parking light switch (page 3-48) Windshield wiper (page 3-49) Mist (page 3-51) Windshield washer (page 3-52) Rear window wiper and washer switch (page 3-53) 6) Wiper intermittent time control switch (page 3-52) 7) Wiper control lever (page 3-51) 8) Light control lever (page 3-46) 9) Front fog light switch (page 3-49) 10) Headlight ON/OFF (page 3-46) 11) Headlight flasher High/Low beam change (page 3-46) 12) Turn signal (page 3-47)
Owner's Manual
Page 25
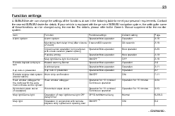
... ON/OFF *2 Rear window defogger for Rear window defogger the vehicle with remote keyless entry system and opening door Operation for details. 23 Function settings A SUBARU dealer can change the settings of the functions shown in the following table to the Owner's Manual supplement for the monitor system. Contact the nearest...
... ON/OFF *2 Rear window defogger for Rear window defogger the vehicle with remote keyless entry system and opening door Operation for details. 23 Function settings A SUBARU dealer can change the settings of the functions shown in the following table to the Owner's Manual supplement for the monitor system. Contact the nearest...

Owner's Manual
Page 41
... Emergency Locking Retractor (ELR) function by current safety standards. When the child restraint system is removed, make sure that position and the seatbelt cannot be changed over to the Automatic Locking & Seatbelt warning light and chime Your vehicle is restored to fasten their seatbelts by illuminating the warning lights in the...
... Emergency Locking Retractor (ELR) function by current safety standards. When the child restraint system is removed, make sure that position and the seatbelt cannot be changed over to the Automatic Locking & Seatbelt warning light and chime Your vehicle is restored to fasten their seatbelts by illuminating the warning lights in the...
Owner's Manual
Page 50
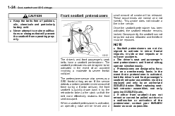
These occurrences are designed to make modifications or changes that the belt more effectively restrains the front seat occupant. Once the seatbelt pretensioner has been activated, the seatbelt retractor remains locked. ...be activated in the vehicle. The driver's seat and passenger's seat pretensioners and frontal airbag operate simultaneously. . When replacing seatbelt retractor assemblies, use only genuine SUBARU parts. . Seatbelt pretensioners are designed to be released. The driver's and front passenger's seatbelts have a seatbelt pretensioner. If the sensor detects a certain ...
These occurrences are designed to make modifications or changes that the belt more effectively restrains the front seat occupant. Once the seatbelt pretensioner has been activated, the seatbelt retractor remains locked. ...be activated in the vehicle. The driver's seat and passenger's seat pretensioners and frontal airbag operate simultaneously. . When replacing seatbelt retractor assemblies, use only genuine SUBARU parts. . Seatbelt pretensioners are designed to be released. The driver's and front passenger's seatbelts have a seatbelt pretensioner. If the sensor detects a certain ...

Owner's Manual
Page 57
... you install a child restraint system, follow the manufacturer's instructions supplied with it down into the retractor. Pull out the seatbelt fully from the retractor to change the retractor over from side to side to rewind into the seat cushion and then tightening the seatbelt. 7. Place the child restraint system in the...
... you install a child restraint system, follow the manufacturer's instructions supplied with it down into the retractor. Pull out the seatbelt fully from the retractor to change the retractor over from side to side to rewind into the seat cushion and then tightening the seatbelt. 7. Place the child restraint system in the...

Owner's Manual
Page 58
... OR DEATH TO THE CHILD BY PLACING THE CHILD'S HEAD TOO CLOSE TO THE SRS AIRBAG. 1. Pull out the seatbelt fully from the retractor to change the retractor over from the Emergency Locking Retractor (ELR) to the ELR mode. As the belt is rewinding, clicks will return to the Automatic Locking...
... OR DEATH TO THE CHILD BY PLACING THE CHILD'S HEAD TOO CLOSE TO THE SRS AIRBAG. 1. Pull out the seatbelt fully from the retractor to change the retractor over from the Emergency Locking Retractor (ELR) to the ELR mode. As the belt is rewinding, clicks will return to the Automatic Locking...

Owner's Manual
Page 77
... 11204, San Juan, Puerto Rico 00910 787-793-2828 There are in any other object trapped under the seat, at the rear of the SUBARU advanced air- only) Changing or moving the seat back and forth. (Models equipped with disabilities may have any parts of the front seats, seat belts, front bumper...
... 11204, San Juan, Puerto Rico 00910 787-793-2828 There are in any other object trapped under the seat, at the rear of the SUBARU advanced air- only) Changing or moving the seat back and forth. (Models equipped with disabilities may have any parts of the front seats, seat belts, front bumper...

Owner's Manual
Page 95
If the engine does not start, pull out the key once before trying again. Changes or modifications not expressly approved by the party responsible for replacement or repair of the engine control unit, integrated unit, and combination meter. - CONTINUED - Before ...
If the engine does not start, pull out the key once before trying again. Changes or modifications not expressly approved by the party responsible for replacement or repair of the engine control unit, integrated unit, and combination meter. - CONTINUED - Before ...

Owner's Manual
Page 99
... switch NOTE Make sure that all doors (including the rear gate of a Station wagon), push the switch to change the setting. The factory setting (default setting) for this function can be changed by the power door locking switches located at the driver's side and the front passenger's side doors. To unlock... the key is in the ignition switch. ! Driver's switch All doors and the rear gate (Station wagon) can be locked and unlocked by a SUBARU dealer. Power door locking switches NOTE . Contact the nearest SUBARU dealer if you would like to the front ("LOCK") position.
... switch NOTE Make sure that all doors (including the rear gate of a Station wagon), push the switch to change the setting. The factory setting (default setting) for this function can be changed by the power door locking switches located at the driver's side and the front passenger's side doors. To unlock... the key is in the ignition switch. ! Driver's switch All doors and the rear gate (Station wagon) can be locked and unlocked by a SUBARU dealer. Power door locking switches NOTE . Contact the nearest SUBARU dealer if you would like to the front ("LOCK") position.

Owner's Manual
Page 100
... a cloth immediately. When leaving the vehicle, make sure you are holding the key before locking the doors. The setting can be changed by a SUBARU dealer. If it gets wet, wipe it dry with key lock-in that may not cause harmful interference, and (2) this function ... lock lever in prevention function non-operational . 2-8 Keys and doors ("LOCK") position. ! Vehicle without genuine SUBARU navigation system: The setting can also be changed by a SUBARU dealer. If the lock lever is locked. Do not get the transmitter wet. The factory setting (default setting...
... a cloth immediately. When leaving the vehicle, make sure you are holding the key before locking the doors. The setting can be changed by a SUBARU dealer. If it gets wet, wipe it dry with key lock-in that may not cause harmful interference, and (2) this function ... lock lever in prevention function non-operational . 2-8 Keys and doors ("LOCK") position. ! Vehicle without genuine SUBARU navigation system: The setting can also be changed by a SUBARU dealer. If the lock lever is locked. Do not get the transmitter wet. The factory setting (default setting...

Owner's Manual
Page 108
..., do the following alarms when triggered: . The alarm is sounding, the horn will stop & Activating and deactivating the alarm system To change the setting of shipment from theft. Turn the ignition switch to 30 seconds. sounding with a delay of your vehicle. Contact your vehicle ... while the horn is triggered by your vehicle's alarm system for activation at the time of your SUBARU dealer. The starter motor is mentioned earlier in this manual. A SUBARU dealer can be armed and disarmed with shock sensors (dealer option)) NOTE The alarm system can activate...
..., do the following alarms when triggered: . The alarm is sounding, the horn will stop & Activating and deactivating the alarm system To change the setting of shipment from theft. Turn the ignition switch to 30 seconds. sounding with a delay of your vehicle. Contact your vehicle ... while the horn is triggered by your vehicle's alarm system for activation at the time of your SUBARU dealer. The starter motor is mentioned earlier in this manual. A SUBARU dealer can be armed and disarmed with shock sensors (dealer option)) NOTE The alarm system can activate...

Owner's Manual
Page 109
..., indicating that the engine hood (and the trunk lid on ", and for a vehicle with SI-DRIVE - CONTINUED - The setting will then be changed as follows: If the system was previously deactivated: For a vehicle without SI-DRIVE, the odometer/trip meter screen displays "AL on the Sedan) are...key in the door lock of the vehicle. 4. Make sure that the system is now activated. & If you have the above setting change done by your SUBARU dealer. If the system was previously activated: For a vehicle without releasing the switch. Turn the ignition switch to Disarm the system. NOTE...
..., indicating that the engine hood (and the trunk lid on ", and for a vehicle with SI-DRIVE - CONTINUED - The setting will then be changed as follows: If the system was previously deactivated: For a vehicle without SI-DRIVE, the odometer/trip meter screen displays "AL on the Sedan) are...key in the door lock of the vehicle. 4. Make sure that the system is now activated. & If you have the above setting change done by your SUBARU dealer. If the system was previously activated: For a vehicle without releasing the switch. Turn the ignition switch to Disarm the system. NOTE...

Owner's Manual
Page 111
... door lock of the doors and the rear gate) is used only for less than 2 seconds) on the remote transmitter. To exit valet mode, change the setting of the Failure to the unlock position. Insert the key in the valet mode. the transmitter is lost, broken or the transmitter battery... is in the door lock of your SUBARU dealer. ! To enter the valet mode, change the setting of your vehicle's alarm system for unlocking of all other doors and the rear gate (Station wagon), briefly press ...
... door lock of the doors and the rear gate) is used only for less than 2 seconds) on the remote transmitter. To exit valet mode, change the setting of the Failure to the unlock position. Insert the key in the valet mode. the transmitter is lost, broken or the transmitter battery... is in the door lock of your SUBARU dealer. ! To enter the valet mode, change the setting of your vehicle's alarm system for unlocking of all other doors and the rear gate (Station wagon), briefly press ...
Owner's Manual
Page 125
...40 3-40 3-40 3-40 Driving range on remaining fuel ...Journey time ... 3-44 3-45 Light control switch...Headlights ...High/low beam change (dimmer) ...Headlight flasher ...Daytime running light system... 3-46 3-46 3-46 3-47 3-47 Turn signal lever ...Illumination brightness control...... (Station wagon) ... 3-47 3-48 3-48 3-49 3-49 3-51 3-53 Clock (vehicle without genuine SUBARU navigation system)...Information display (2.5 L non-turbo model without genuine SUBARU navigation system) ...Outside temperature indicator ...Current fuel consumption ...Average fuel consumption ... 3-41 3-41 3-42 3-...
...40 3-40 3-40 3-40 Driving range on remaining fuel ...Journey time ... 3-44 3-45 Light control switch...Headlights ...High/low beam change (dimmer) ...Headlight flasher ...Daytime running light system... 3-46 3-46 3-46 3-47 3-47 Turn signal lever ...Illumination brightness control...... (Station wagon) ... 3-47 3-48 3-48 3-49 3-49 3-51 3-53 Clock (vehicle without genuine SUBARU navigation system)...Information display (2.5 L non-turbo model without genuine SUBARU navigation system) ...Outside temperature indicator ...Current fuel consumption ...Average fuel consumption ... 3-41 3-41 3-42 3-...

Owner's Manual
Page 131
... drive moderately until driving 0.6 mile (1 km). Refer to the "SIDRIVE (turbo and 3.0 L models)" section in chapter 9. Engine operation is not warmed up enough should be changed to the Sport Sharp (S#) mode. When the engine is optimum with the engine coolant at this indicator light is on . While this temperature range. When...
... drive moderately until driving 0.6 mile (1 km). Refer to the "SIDRIVE (turbo and 3.0 L models)" section in chapter 9. Engine operation is not warmed up enough should be changed to the Sport Sharp (S#) mode. When the engine is optimum with the engine coolant at this indicator light is on . While this temperature range. When...

Owner's Manual
Page 132
...setting menu. *: Only for vehicles equipped with SI-DRIVE) & Display & Operation switch CAUTION To ensure safety, do not attempt to change the function of the indicator during driving, as an accident could result. With the ignition switch in the "ON" position, each ...successive push of the operation switch changes the display in the following sequence: 1) 2) 3) Next (up) Information display Back (down) Use the " " and " " switches to change the display screen forward and backward. Instruments and controls 3-9 Multi-information display (...
...setting menu. *: Only for vehicles equipped with SI-DRIVE) & Display & Operation switch CAUTION To ensure safety, do not attempt to change the function of the indicator during driving, as an accident could result. With the ignition switch in the "ON" position, each ...successive push of the operation switch changes the display in the following sequence: 1) 2) 3) Next (up) Information display Back (down) Use the " " and " " switches to change the display screen forward and backward. Instruments and controls 3-9 Multi-information display (...

Owner's Manual
Page 134
... of fuel consumption since the trip meter was last reset. Also, the indicated values may differ slightly from the actual values and should thus be changed by depressing the trip knob. - CONTINUED - NOTE . Instruments and controls 3-11 off. The indicated values vary in accordance with "A" is the average fuel consumption corresponding... meter indications is reset, the corresponding average fuel consumption value is also reset. models 1) Current fuel consumption 2) Average fuel consumption U.S.-spec. The displayed number with changes in the vehicle's running conditions.
... of fuel consumption since the trip meter was last reset. Also, the indicated values may differ slightly from the actual values and should thus be changed by depressing the trip knob. - CONTINUED - NOTE . Instruments and controls 3-11 off. The indicated values vary in accordance with "A" is the average fuel consumption corresponding... meter indications is reset, the corresponding average fuel consumption value is also reset. models 1) Current fuel consumption 2) Average fuel consumption U.S.-spec. The displayed number with changes in the vehicle's running conditions.

Owner's Manual
Page 139
... turning on the ignition switch, press the " /SET" switch for deactivated initial movement by pressing the " " or " " switch. T h e d i s p l a y s h o w s " M E T E R SETTING", and then changes to the "LOCK" position, or open and close the driver's door during the setting procedure, the new setting will be canceled. . When the setting screen... switch to the "Acc" position, turn the ignition switch to the setting screen. 3. Cancel sequen- 3-16 Instruments and controls To change the previous setting, select " " and press the " /SET" switch. 5. And press the " /SET" switch to...
... turning on the ignition switch, press the " /SET" switch for deactivated initial movement by pressing the " " or " " switch. T h e d i s p l a y s h o w s " M E T E R SETTING", and then changes to the "LOCK" position, or open and close the driver's door during the setting procedure, the new setting will be canceled. . When the setting screen... switch to the "Acc" position, turn the ignition switch to the setting screen. 3. Cancel sequen- 3-16 Instruments and controls To change the previous setting, select " " and press the " /SET" switch. 5. And press the " /SET" switch to...

Owner's Manual
Page 140
... switched as shown below by pressing the " " or " " switch. Instruments and controls 3-17 tial illumination when regular illumination (for at least 2 seconds. T h e d i s p l a y s h o w s " M E T E R SETTING", and then changes to enter the "Date/Time" settings. To enter the "Date/Time" setting menu, take the following procedure for further steps. 3. And press the " /SET" switch...
... switched as shown below by pressing the " " or " " switch. Instruments and controls 3-17 tial illumination when regular illumination (for at least 2 seconds. T h e d i s p l a y s h o w s " M E T E R SETTING", and then changes to enter the "Date/Time" settings. To enter the "Date/Time" setting menu, take the following procedure for further steps. 3. And press the " /SET" switch...


