Owner's Manual
Page 16
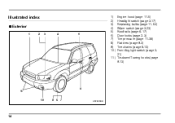
Illustrated index ! Exterior 1 2 3 4 5 1) 2) 3) 4) 5) 6) 7) 8) 9) 10) Engine hood (page 11-5) Headlight switch (page 3-17) Replacing bulbs (page 11-54) Wiper switch (page 3-23) Roof rails (page 8-17) Door locks (page 2-3) Tire pressure (page 11-38) Flat tires (page 9-3) Tire chains (page 8-13) Front fog light switch (page 321) 11) Tie-down/Towing hooks (page 9-13) 6 11 10 9 8 7 HSF020BB 14
Illustrated index ! Exterior 1 2 3 4 5 1) 2) 3) 4) 5) 6) 7) 8) 9) 10) Engine hood (page 11-5) Headlight switch (page 3-17) Replacing bulbs (page 11-54) Wiper switch (page 3-23) Roof rails (page 8-17) Door locks (page 2-3) Tire pressure (page 11-38) Flat tires (page 9-3) Tire chains (page 8-13) Front fog light switch (page 321) 11) Tie-down/Towing hooks (page 9-13) 6 11 10 9 8 7 HSF020BB 14
Owner's Manual
Page 21
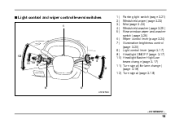
Light control and wiper control levers/switches 1 1) 2) 3) 4) 5) 12 11 10 4 3 9 7 5 2 Parking light switch (page 3-21) Windshield wiper (page 3-23) Mist (page 3-24) Windshield washer (page 3-25) Rear window wiper and washer switch (page 3-25) 6) Wiper control lever (page 3-24) 7) Illumination brightness control (page 3-20) 8) Light control lever (page 3-17) 9) Headlight ON/OFF (page 3-17) 10) Headlight flasher High/Low beam change (page 3-17) 11) Turn signal (for lane change) (page 3-19) 12) Turn signal (page 3-19) 8 6 HSF025BB - CONTINUED - 19 !
Light control and wiper control levers/switches 1 1) 2) 3) 4) 5) 12 11 10 4 3 9 7 5 2 Parking light switch (page 3-21) Windshield wiper (page 3-23) Mist (page 3-24) Windshield washer (page 3-25) Rear window wiper and washer switch (page 3-25) 6) Wiper control lever (page 3-24) 7) Illumination brightness control (page 3-20) 8) Light control lever (page 3-17) 9) Headlight ON/OFF (page 3-17) 10) Headlight flasher High/Low beam change (page 3-17) 11) Turn signal (for lane change) (page 3-19) 12) Turn signal (page 3-19) 8 6 HSF025BB - CONTINUED - 19 !
Owner's Manual
Page 118
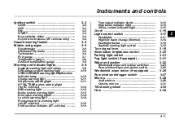
... (AT vehicles only) ... 3-2 3-2 3-3 3-3 3-3 3-3 3-4 Turn signal indicator lights ...High beam indicator light ...Cruise control indicator light ... 3-15 3-15 3-15 Clock ...Light control switch ...Headlights ...High/low beam change (dimmer) ...Headlight flasher ...Daytime running light system ... 3-16 3-17 3-17 3-18 3-18 3-19 3 Hazard warning flasher ...Meters and gauges ...Speedometer ...Odometer/Trip meter ...Tachometer ...Fuel...
... (AT vehicles only) ... 3-2 3-2 3-3 3-3 3-3 3-3 3-4 Turn signal indicator lights ...High beam indicator light ...Cruise control indicator light ... 3-15 3-15 3-15 Clock ...Light control switch ...Headlights ...High/low beam change (dimmer) ...Headlight flasher ...Daytime running light system ... 3-16 3-17 3-17 3-18 3-18 3-19 3 Hazard warning flasher ...Meters and gauges ...Speedometer ...Odometer/Trip meter ...Tachometer ...Fuel...

Owner's Manual
Page 132
... light This light comes on when the "CRUISE" main switch is operated. - CONTINUED - 3-15 High beam indicator light This light shows that the headlights are in chapter 11. ! Shift position indicator (AT vehicles) This indicator shows the position of the turn signal bulb may be burned out. If ... rapidly, the turn signal or lane change signal. gal.). ! Refer to Front Wheel Drive for AT vehicles) This light comes on when the headlight flasher is pressed. ! This indicator light also comes on when All Wheel Drive is disengaged and the drive mechanism is switched to the "Replacing ...
... light This light comes on when the "CRUISE" main switch is operated. - CONTINUED - 3-15 High beam indicator light This light shows that the headlights are in chapter 11. ! Shift position indicator (AT vehicles) This indicator shows the position of the turn signal bulb may be burned out. If ... rapidly, the turn signal or lane change signal. gal.). ! Refer to Front Wheel Drive for AT vehicles) This light comes on when the headlight flasher is pressed. ! This indicator light also comes on when All Wheel Drive is disengaged and the drive mechanism is switched to the "Replacing ...
Owner's Manual
Page 134
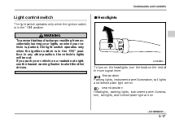
... If you park your vehicle is parked, the light switch operates only when the ignition switch is in the "ON" position. Headlights To prevent battery discharge resulting from accidentally leaving your lights on when your vehicle on . - CONTINUED - 3-17 HS3026BA To turn on the... headlights, turn the knob on . In any other drivers. second position Headlights, parking lights, instrument panel illumination, tail lights, and license plate light are on the end of the turn ...
... If you park your vehicle is parked, the light switch operates only when the ignition switch is in the "ON" position. Headlights To prevent battery discharge resulting from accidentally leaving your lights on when your vehicle on . - CONTINUED - 3-17 HS3026BA To turn on the... headlights, turn the knob on . In any other drivers. second position Headlights, parking lights, instrument panel illumination, tail lights, and license plate light are on the end of the turn ...

Owner's Manual
Page 135
... on high beam, the high beam indicator light " " on the instrument panel also comes on . To flash the headlights, pull the lever toward you hold the lever. When the headlights are on high beam, the high beam indicator light " " on the instrument panel is in the flashing position for as long as... will stay on for 3-18 To switch back to low beam, pull the lever back to high beam, push the turn signal lever forward. The headlight flasher works even though the lighting switch is also on . High/low beam change from low beam to the detent position. Instruments and controls...
... on high beam, the high beam indicator light " " on the instrument panel also comes on . To flash the headlights, pull the lever toward you hold the lever. When the headlights are on high beam, the high beam indicator light " " on the instrument panel is in the flashing position for as long as... will stay on for 3-18 To switch back to low beam, pull the lever back to high beam, push the turn signal lever forward. The headlight flasher works even though the lighting switch is also on . High/low beam change from low beam to the detent position. Instruments and controls...
Owner's Manual
Page 136
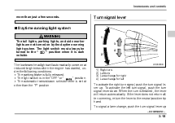
... running light system 1 The tail lights, parking lights, and side marker lights are not turned on at other than just a few seconds. The low beam headlights will return automatically. Turn signal lever ! Instruments and controls more than the "P" position. 3 4 2 HS3027BB 1) 2) 3) 4) Right turn Left turn Lane change for left turn signal, push...
... running light system 1 The tail lights, parking lights, and side marker lights are not turned on at other than just a few seconds. The low beam headlights will return automatically. Turn signal lever ! Instruments and controls more than the "P" position. 3 4 2 HS3027BB 1) 2) 3) 4) Right turn Left turn Lane change for left turn signal, push...
Owner's Manual
Page 138
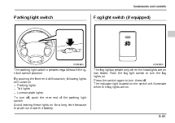
Press the switch again to turn off . The fog lights operate only when the headlights are on . - Parking lights - Tail lights - License plate lights To turn the fog lights on low beam. The indicator light located on the switch will ...
Press the switch again to turn off . The fog lights operate only when the headlights are on . - Parking lights - Tail lights - License plate lights To turn the fog lights on low beam. The indicator light located on the switch will ...
Owner's Manual
Page 146
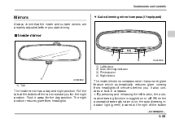
... the night position. It also contains a built-in compass. The inside electronic compass mirror has an anti-glare feature which automatically reduces glare coming from headlights. Instruments and controls Mirrors Always check that the inside and outside mirrors are properly adjusted before you for the day position. Pull the tab at...
... the night position. It also contains a built-in compass. The inside electronic compass mirror has an anti-glare feature which automatically reduces glare coming from headlights. Instruments and controls Mirrors Always check that the inside and outside mirrors are properly adjusted before you for the day position. Pull the tab at...

Owner's Manual
Page 147
... from this reason, use care not to ensure good rearward visibility during reversing. This is on, an illuminated compass reading will automatically calibrate from the headlights of the mirror dimmer to help prevent you strikes the mirror, these sensors 3-30 " Compass calibration 1. Drive to an open, level area away from large...
... from this reason, use care not to ensure good rearward visibility during reversing. This is on, an illuminated compass reading will automatically calibrate from the headlights of the mirror dimmer to help prevent you strikes the mirror, these sensors 3-30 " Compass calibration 1. Drive to an open, level area away from large...
Owner's Manual
Page 331
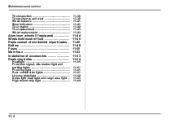
...-38 11-38 11-41 11-41 11-42 11-43 11-43 Aluminum wheels (If equipped) ...Windshield washer fluid ...Replacement of accessories ...Replacing bulbs ...Headlight ...Front turn signal, side marker light and parking lights ...Front fog light ...Rear combination lights ...License plate light ...Dome light, map light and cargo area...
...-38 11-38 11-41 11-41 11-42 11-43 11-43 Aluminum wheels (If equipped) ...Windshield washer fluid ...Replacement of accessories ...Replacing bulbs ...Headlight ...Front turn signal, side marker light and parking lights ...Front fog light ...Rear combination lights ...License plate light ...Dome light, map light and cargo area...

Owner's Manual
Page 383
Maintenance and service Replacing bulbs 1) 1 2 3 4 Wattage Headlight Parking light Map light Dome light Side marker light (Front) Front turn signal 12) Backup light 13) Tail/stop light 12V-60/ 55W 12V-5W 12V-8W 12V-8W 12V-5W 12V-21W (Amber) 12V-55W 12V-13W 12V-5W 12V-21/ 5W 12V-21W (Amber) 12V-16W 12V-21/ 5W 12V-5W Bulb No. HB2 (H4) 168 - - 168 1474 - 912 - 7443 1474 921 7443 168 2) 3) 4) 5) 6) 7) 8) 9) 10) 10 11 12 13 8 9 7 65 11) Rear turn signal Front fog light High mount stop light Cargo area light Tail/stop light 14) Licence plate light 14 HSB069BB 11-54
Maintenance and service Replacing bulbs 1) 1 2 3 4 Wattage Headlight Parking light Map light Dome light Side marker light (Front) Front turn signal 12) Backup light 13) Tail/stop light 12V-60/ 55W 12V-5W 12V-8W 12V-8W 12V-5W 12V-21W (Amber) 12V-55W 12V-13W 12V-5W 12V-21/ 5W 12V-21W (Amber) 12V-16W 12V-21/ 5W 12V-5W Bulb No. HB2 (H4) 168 - - 168 1474 - 912 - 7443 1474 921 7443 168 2) 3) 4) 5) 6) 7) 8) 9) 10) 10 11 12 13 8 9 7 65 11) Rear turn signal Front fog light High mount stop light Cargo area light Tail/stop light 14) Licence plate light 14 HSB069BB 11-54

Owner's Manual
Page 384
... electrical connector, then remove the rubber cover. - CONTINUED - 11-55 If you touch the bulb surface with alcohol. 2 HSB070BB NOTE If headlight aiming is required, consult your SUBARU dealer for proper adjustment of the headlight aim. 1) Rubber cover 2) Electrical connector 3) "Top" mark 1. Maintenance and service ! Headlight 0 3 1 Halogen headlight bulbs become very hot while in use.
... electrical connector, then remove the rubber cover. - CONTINUED - 11-55 If you touch the bulb surface with alcohol. 2 HSB070BB NOTE If headlight aiming is required, consult your SUBARU dealer for proper adjustment of the headlight aim. 1) Rubber cover 2) Electrical connector 3) "Top" mark 1. Maintenance and service ! Headlight 0 3 1 Halogen headlight bulbs become very hot while in use.

Owner's Manual
Page 385
Remove the bulb from the headlight assembly. 4. Install the rubber cover with the top mark facing up, then reconnect the electrical connector. 11-56 Maintenance and service 2 1 HSB071BB HSB072BA 1) Retainer spring 2) Bulb 2. Remove the retainer spring. Remove the bulb from the headlight assembly. 3. Install the new bulb, then set the retainer spring securely. 5.
Remove the bulb from the headlight assembly. 4. Install the rubber cover with the top mark facing up, then reconnect the electrical connector. 11-56 Maintenance and service 2 1 HSB071BB HSB072BA 1) Retainer spring 2) Bulb 2. Remove the retainer spring. Remove the bulb from the headlight assembly. 3. Install the new bulb, then set the retainer spring securely. 5.

Owner's Manual
Page 386
Have your SUBARU dealer replace the bulbs if necessary. - CONTINUED - 11-57 Front turn signal, side marker light and parking lights 2 3 1 HSB074BA HSB073BB #: Clip $: Hook 1) Front turn signal light 2) Parking light 3) Front side marker light The headlight assembly must be removed before the parking light and front turn signal light bulbs can be difficult to make a headlight aiming adjustment. It may become necessary to replace the bulbs. Maintenance and service ! When the headlight assembly has been removed and then reinstalled, it may be replaced.
Have your SUBARU dealer replace the bulbs if necessary. - CONTINUED - 11-57 Front turn signal, side marker light and parking lights 2 3 1 HSB074BA HSB073BB #: Clip $: Hook 1) Front turn signal light 2) Parking light 3) Front side marker light The headlight assembly must be removed before the parking light and front turn signal light bulbs can be difficult to make a headlight aiming adjustment. It may become necessary to replace the bulbs. Maintenance and service ! When the headlight assembly has been removed and then reinstalled, it may be replaced.

Owner's Manual
Page 387
Use a screwdriver to detach the four clips at the top and the three hooks on the left, right and center. 2. Maintenance and service 0 HSB075BA HSB076BA 1. Remove the front grille. Remove the grille side cover by undoing the two clips and sliding the grille side cover toward the headlight. 11-58
Use a screwdriver to detach the four clips at the top and the three hooks on the left, right and center. 2. Maintenance and service 0 HSB075BA HSB076BA 1. Remove the front grille. Remove the grille side cover by undoing the two clips and sliding the grille side cover toward the headlight. 11-58

Owner's Manual
Page 388
Disconnect the connectors from the headlight assembly. - CONTINUED - 11-59 Maintenance and service 3 1 2 HSB078BA HSB070BB 3. Remove three bolts. 1) Rubber cover 2) Electrical connector 3) "Top" mark 4.
Disconnect the connectors from the headlight assembly. - CONTINUED - 11-59 Maintenance and service 3 1 2 HSB078BA HSB070BB 3. Remove three bolts. 1) Rubber cover 2) Electrical connector 3) "Top" mark 4.

Owner's Manual
Page 389
Pull the headlight assembly slightly toward you, then hold down the lock release tabs on the connectors for the front turn signal light, parking light, and front side marker light and pull out the headlight assembly completely. 6. Remove the bulb socket from the headlight assembly by turning it counterclockwise. 11-60 Maintenance and service HSB079BA HSB073CA 5.
Pull the headlight assembly slightly toward you, then hold down the lock release tabs on the connectors for the front turn signal light, parking light, and front side marker light and pull out the headlight assembly completely. 6. Remove the bulb socket from the headlight assembly by turning it counterclockwise. 11-60 Maintenance and service HSB079BA HSB073CA 5.

Owner's Manual
Page 390
Maintenance and service remove it locks. 9. Reinstall all the removed parts by following the removal sequence in reverse. ! Remove the upper and lower screws. Pull the bulb out of the socket. Rear combination lights 1. Install a new bulb. 8. Set the bulb socket into the headlight assembly and turn it clockwise until it from the vehicle. Front fog light It may be difficult to the rear and - CONTINUED - 11-61 Have your SUBARU dealer replace the bulbs if necessary. ! Then, slide the rear combination lamp assembly to replace the bulbs. HSB080BA HSB085BA 7.
Maintenance and service remove it locks. 9. Reinstall all the removed parts by following the removal sequence in reverse. ! Remove the upper and lower screws. Pull the bulb out of the socket. Rear combination lights 1. Install a new bulb. 8. Set the bulb socket into the headlight assembly and turn it clockwise until it from the vehicle. Front fog light It may be difficult to the rear and - CONTINUED - 11-61 Have your SUBARU dealer replace the bulbs if necessary. ! Then, slide the rear combination lamp assembly to replace the bulbs. HSB080BA HSB085BA 7.
Owner's Manual
Page 401
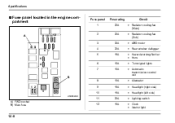
Specifications ! Fuse panel located in the engine compartment Fuse panel 1 2 3 Fuse rating 20A 20A 30A 20A 15A 15A 10A Circuit " Radiator cooling fan (Main) A 9 10 11 12 " Radiator cooling fan (Sub) " ABS motor " Rear window defogger " Hazard warning flasher " Horn " Turn signal lights " Automatic transmission control unit 6 5 4 7 8 4 5 6 7 B 8 10A 15A 15A 20A 15A " Alternator " Headlight (right side) " Headlight (left side) " Lighting switch " Clock " Interior light 1 2 3 HSC002BB 9 10 11 12 A) FWD socket B) Main fuse 12-8
Specifications ! Fuse panel located in the engine compartment Fuse panel 1 2 3 Fuse rating 20A 20A 30A 20A 15A 15A 10A Circuit " Radiator cooling fan (Main) A 9 10 11 12 " Radiator cooling fan (Sub) " ABS motor " Rear window defogger " Hazard warning flasher " Horn " Turn signal lights " Automatic transmission control unit 6 5 4 7 8 4 5 6 7 B 8 10A 15A 15A 20A 15A " Alternator " Headlight (right side) " Headlight (left side) " Lighting switch " Clock " Interior light 1 2 3 HSC002BB 9 10 11 12 A) FWD socket B) Main fuse 12-8


