Owner's Manual
Page 4
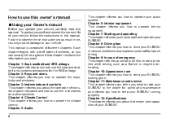
...climate control. Chapter 7: Starting and operating This chapter informs you how to drive your SUBARU. Chapter 8: Driving tips This chapter informs you how to start and operate your SUBARU in various conditions and explains some safety tips on driving. Failure to observe these ..., locks and windows. Chapter 6: Interior equipment This chapter informs you how to keep your SUBARU looking good. Chapter 2: Keys and doors This chapter informs you how to operate your SUBARU. Chapter 10: Appearance care This chapter informs you how to operate interior equipment. Each chapter...
...climate control. Chapter 7: Starting and operating This chapter informs you how to drive your SUBARU. Chapter 8: Driving tips This chapter informs you how to start and operate your SUBARU in various conditions and explains some safety tips on driving. Failure to observe these ..., locks and windows. Chapter 6: Interior equipment This chapter informs you how to keep your SUBARU looking good. Chapter 2: Keys and doors This chapter informs you how to operate your SUBARU. Chapter 10: Appearance care This chapter informs you how to operate interior equipment. Each chapter...
Owner's Manual
Page 6
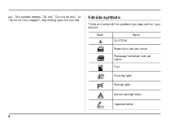
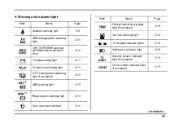
ual. Mark CAUTION Power door lock and unlock Passenger's windows lock and unlock Fuel Front fog lights Parking lights Name Hazard warning flasher Cigarette lighter 4 This symbol means "Do not", "Do not do this", or "Do not let this happen", depending upon the context. Vehicle symbols There are some of the symbols you may see on your vehicle.
ual. Mark CAUTION Power door lock and unlock Passenger's windows lock and unlock Fuel Front fog lights Parking lights Name Hazard warning flasher Cigarette lighter 4 This symbol means "Do not", "Do not do this", or "Do not let this happen", depending upon the context. Vehicle symbols There are some of the symbols you may see on your vehicle.
Owner's Manual
Page 9
... of this owner's manual for instructions and precautions concerning the seatbelt system and SRS airbag system. ! Serious injury could result if a child accidentally opened the door and fell out. If a child is moving. Refer to stand up or kneel on your arms while the vehicle is too big for the child...
... of this owner's manual for instructions and precautions concerning the seatbelt system and SRS airbag system. ! Serious injury could result if a child accidentally opened the door and fell out. If a child is moving. Refer to stand up or kneel on your arms while the vehicle is too big for the child...
Owner's Manual
Page 15
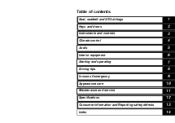
Table of contents Seat, seatbelt and SRS airbags Keys and doors Instruments and controls Climate control Audio Interior equipment Starting and operating Driving tips In case of emergency Appearance care Maintenance and service Specifications Consumer information and Reporting safety defects Index 1 2 3 4 5 6 7 8 9 10 11 12 13 14
Table of contents Seat, seatbelt and SRS airbags Keys and doors Instruments and controls Climate control Audio Interior equipment Starting and operating Driving tips In case of emergency Appearance care Maintenance and service Specifications Consumer information and Reporting safety defects Index 1 2 3 4 5 6 7 8 9 10 11 12 13 14
Owner's Manual
Page 16
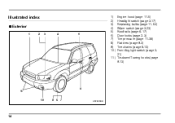
Illustrated index ! Exterior 1 2 3 4 5 1) 2) 3) 4) 5) 6) 7) 8) 9) 10) Engine hood (page 11-5) Headlight switch (page 3-17) Replacing bulbs (page 11-54) Wiper switch (page 3-23) Roof rails (page 8-17) Door locks (page 2-3) Tire pressure (page 11-38) Flat tires (page 9-3) Tire chains (page 8-13) Front fog light switch (page 321) 11) Tie-down/Towing hooks (page 9-13) 6 11 10 9 8 7 HSF020BB 14
Illustrated index ! Exterior 1 2 3 4 5 1) 2) 3) 4) 5) 6) 7) 8) 9) 10) Engine hood (page 11-5) Headlight switch (page 3-17) Replacing bulbs (page 11-54) Wiper switch (page 3-23) Roof rails (page 8-17) Door locks (page 2-3) Tire pressure (page 11-38) Flat tires (page 9-3) Tire chains (page 8-13) Front fog light switch (page 321) 11) Tie-down/Towing hooks (page 9-13) 6 11 10 9 8 7 HSF020BB 14
Owner's Manual
Page 20
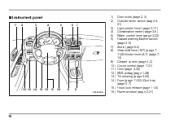
Instrument panel 1 2 3 4 5 6 7 1) 2) 3) 4) 5) 6) 7) 8) 9) 10) 11) 12) 13) 14) 16 15 14 13 12 11 10 9 8 HSF024BB 15) 16) Door locks (page 2-3) Outside mirror switch (page 331) Light control lever (page 3-17) Combination meter (page 3-5) Wiper control lever (page 3-22) Hazard warning flasher switch (page 3-5) ...
Instrument panel 1 2 3 4 5 6 7 1) 2) 3) 4) 5) 6) 7) 8) 9) 10) 11) 12) 13) 14) 16 15 14 13 12 11 10 9 8 HSF024BB 15) 16) Door locks (page 2-3) Outside mirror switch (page 331) Light control lever (page 3-17) Combination meter (page 3-5) Wiper control lever (page 3-22) Hazard warning flasher switch (page 3-5) ...
Owner's Manual
Page 22
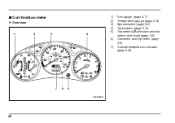
! Combination meter ! Overview 1 2 3 4 1) 2) 3) 4) 5) 6) 7) Fuel gauge (page 3-7) Temperature gauge (page 3-8) Speedometer (page 3-5) Tachometer (page 3-6) Trip meter A/B selection and trip meter reset knob (page 3-5) Odometer and trip meter (page 3-5) Outside temperature indicator (page 3-8) km/h F P R N D 3 2 1 H x1000r/min MPH E FUEL DOOR C 7 6 5 HSF026BB 20
! Combination meter ! Overview 1 2 3 4 1) 2) 3) 4) 5) 6) 7) Fuel gauge (page 3-7) Temperature gauge (page 3-8) Speedometer (page 3-5) Tachometer (page 3-6) Trip meter A/B selection and trip meter reset knob (page 3-5) Odometer and trip meter (page 3-5) Outside temperature indicator (page 3-8) km/h F P R N D 3 2 1 H x1000r/min MPH E FUEL DOOR C 7 6 5 HSF026BB 20
Owner's Manual
Page 23
... 3-10 Turn signal indicator lights 3-10 High beam indicator light Security system indicator light (if equipped) Cruise control indicator light (if equipped) 3-11 3-11 3-12 Door open warning light 3-14 - CONTINUED - 21
... 3-10 Turn signal indicator lights 3-10 High beam indicator light Security system indicator light (if equipped) Cruise control indicator light (if equipped) 3-11 3-11 3-12 Door open warning light 3-14 - CONTINUED - 21
Owner's Manual
Page 43
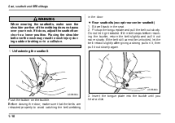
Sit well back in the door. If the belt still cannot be unlocked, let the belt retract slightly after giving a strong pull on the buckle. Seat, seatbelt and SRS airbags in ... anchor to avoid catching the belt webbing 1-18 3. Insert the tongue plate into the buckle until you hear a click. " Unfastening the seatbelt ! Before closing the door, make sure the shoulder portion of the webbing does not pass over the neck may result in neck injury during sudden braking or in a collision...
Sit well back in the door. If the belt still cannot be unlocked, let the belt retract slightly after giving a strong pull on the buckle. Seat, seatbelt and SRS airbags in ... anchor to avoid catching the belt webbing 1-18 3. Insert the tongue plate into the buckle until you hear a click. " Unfastening the seatbelt ! Before closing the door, make sure the shoulder portion of the webbing does not pass over the neck may result in neck injury during sudden braking or in a collision...
Owner's Manual
Page 45
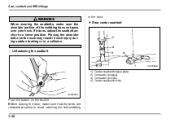
... on the buckle. When wearing the seatbelts, make sure that the belts are retracted properly to a lower position. " Unfastening the seatbelt ! Before closing the door, make sure the shoulder portion of the webbing does not pass over the neck may result in neck injury during sudden braking or in the... door. Seat, seatbelt and SRS airbags in a collision. If it does, adjust the seatbelt anchor to avoid catching the belt webbing 1-20 Placing the shoulder ...
... on the buckle. When wearing the seatbelts, make sure that the belts are retracted properly to a lower position. " Unfastening the seatbelt ! Before closing the door, make sure the shoulder portion of the webbing does not pass over the neck may result in neck injury during sudden braking or in the... door. Seat, seatbelt and SRS airbags in a collision. If it does, adjust the seatbelt anchor to avoid catching the belt webbing 1-20 Placing the shoulder ...
Owner's Manual
Page 55
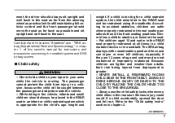
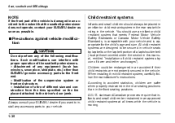
...and construction from the tires specified on the tire placard attached to the front end. All U.S. Such modifications can interfere with your SUBARU dealer as soon as possible. " Installation of a tire of the seatbelt pretensioners. All child restraint systems are designed to be...restraints are safer when properly restrained in the rear seating positions than SUBARU genuine accessory parts to the driver's door jamb. Precautions against vehicle modification Do not perform any accessory parts to your SUBARU dealer if you want to accident statistics, children are not properly...
...and construction from the tires specified on the tire placard attached to the front end. All U.S. Such modifications can interfere with your SUBARU dealer as soon as possible. " Installation of a tire of the seatbelt pretensioners. All child restraint systems are designed to be...restraints are safer when properly restrained in the rear seating positions than SUBARU genuine accessory parts to the driver's door jamb. Precautions against vehicle modification Do not perform any accessory parts to your SUBARU dealer if you want to accident statistics, children are not properly...

Owner's Manual
Page 76
...) The SRS side airbag is involved in immediate succession, once the SRS frontal airbag is activated on the first impact, it is stored in the door side of a double collision, first with another vehicle, then against a concrete wall in a lowspeed frontal collision. !
...) The SRS side airbag is involved in immediate succession, once the SRS frontal airbag is activated on the first impact, it is stored in the door side of a double collision, first with another vehicle, then against a concrete wall in a lowspeed frontal collision. !

Owner's Manual
Page 77
..., which bears an "SRS AIRBAG" label. The SRS side airbag is not seated in the event of the vehicle deploys between the occupant and the door panel and supplements the seatbelt by the seatbelt. In a moderate to the primary protection provided by reducing the impact on the impacted side of a side... sit or lean unnecessarily close to help avoid injuries that can result when an occupant is stored in both front seat seatbacks next to the door, and it provides protection by deploying rapidly (faster than the blink of an eye) in a proper upright position. It does not do away with ...
..., which bears an "SRS AIRBAG" label. The SRS side airbag is not seated in the event of the vehicle deploys between the occupant and the door panel and supplements the seatbelt by the seatbelt. In a moderate to the primary protection provided by reducing the impact on the impacted side of a side... sit or lean unnecessarily close to help avoid injuries that can result when an occupant is stored in both front seat seatbacks next to the door, and it provides protection by deploying rapidly (faster than the blink of an eye) in a proper upright position. It does not do away with ...

Owner's Manual
Page 78
Seat, seatbelt and SRS airbags HS1093BA HS1094BA Do not rest your arm on either front door or its internal trim. It could be injured in the event of SRS side airbag deployment. HS1095BA - CONTINUED - 1-53
Seat, seatbelt and SRS airbags HS1093BA HS1094BA Do not rest your arm on either front door or its internal trim. It could be injured in the event of SRS side airbag deployment. HS1095BA - CONTINUED - 1-53

Owner's Manual
Page 79
HS1096BA Do not attach accessories to the door trim or near either SRS side airbags and do not place objects near the SRS side airbags. In the event of the SRS side airbag ...
HS1096BA Do not attach accessories to the door trim or near either SRS side airbags and do not place objects near the SRS side airbags. In the event of the SRS side airbag ...

Owner's Manual
Page 87
...on the front seat (for vehicles with SRS side airbags, contact your SUBARU dealer as soon as possible. " The fabric or leather of the system should be inspected by an authorized SUBARU dealer. Precautions against vehicle modification NOTE In the following modifications: " ...Installation of custom steering wheels " Attachment of additional trim materials to the driver's door jamb. To ensure their long-term reliability, the SRS...
...on the front seat (for vehicles with SRS side airbags, contact your SUBARU dealer as soon as possible. " The fabric or leather of the system should be inspected by an authorized SUBARU dealer. Precautions against vehicle modification NOTE In the following modifications: " ...Installation of custom steering wheels " Attachment of additional trim materials to the driver's door jamb. To ensure their long-term reliability, the SRS...

Owner's Manual
Page 88
... if you want to install any equipment (side steps or side sill protectors, etc.) other than SUBARU genuine accessory parts to the driver's door jamb. " Attachment of the following modifications. vehicles with proper operation of the SRS airbag system. " Modification of additional electrical/electronic equipment such as a mobile two-...
... if you want to install any equipment (side steps or side sill protectors, etc.) other than SUBARU genuine accessory parts to the driver's door jamb. " Attachment of the following modifications. vehicles with proper operation of the SRS airbag system. " Modification of additional electrical/electronic equipment such as a mobile two-...
Owner's Manual
Page 90
... ...Locking and unlocking from the outside ...Locking and unlocking from the inside ... 2-3 2-3 2-4 2 Power door locking switches ...Remote keyless entry system (if equipped) Locking the doors ...Unlocking the doors ...Illuminated entry ...Vehicle finder function ...Sounding a panic alarm ...Selecting audible signal operation ...Replacing the battery ...Replacing lost transmitters ... 2-5 2-6 2-7 2-7 2-8 2-8 2-8 2-8 2-9 2-10 Security system (if equipped) ...System operation...
... ...Locking and unlocking from the outside ...Locking and unlocking from the inside ... 2-3 2-3 2-4 2 Power door locking switches ...Remote keyless entry system (if equipped) Locking the doors ...Unlocking the doors ...Illuminated entry ...Vehicle finder function ...Sounding a panic alarm ...Selecting audible signal operation ...Replacing the battery ...Replacing lost transmitters ... 2-5 2-6 2-7 2-7 2-8 2-8 2-8 2-8 2-9 2-10 Security system (if equipped) ...System operation...

Owner's Manual
Page 91
Key number The key number is needed to the key set. " Ignition switch " Driver's door " Glove box 2-2 Write down the key number and keep the glove box locked when you lose your vehicle. The master key and submaster key fit ... number is stamped on your key or lock it in another safe place, not in the vehicle. Keys and doors Keys Keys and doors 1 2 3 The valet key fits only the ignition switch and driver's door lock. You can keep it inside the vehicle. 4 HS2011BA 1) 2) 3) 4) Master key Submaster key Valet key Key number plate...
Key number The key number is needed to the key set. " Ignition switch " Driver's door " Glove box 2-2 Write down the key number and keep the glove box locked when you lose your vehicle. The master key and submaster key fit ... number is stamped on your key or lock it in another safe place, not in the vehicle. Keys and doors Keys Keys and doors 1 2 3 The valet key fits only the ignition switch and driver's door lock. You can keep it inside the vehicle. 4 HS2011BA 1) 2) 3) 4) Master key Submaster key Valet key Key number plate...
Owner's Manual
Page 92
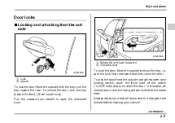
... from the outside without the key, rotate the lock lever rearward and then close the door. In this case, all doors and the rear gate are locked at the same time. To unlock the door, turn the key toward the front (Driver's side only). Always make sure that all... locked before leaving your vehicle. - CONTINUED - 1) Lock 2) Unlock To lock the door from the outside 1 2 1) Rotate the lock lever rearward. 2) Close the door. HS2013BB 2 1 HS2012BB To lock the door from the outside using the power door locking switch, push the front side of the switch ("LOCK" side) and then close...
... from the outside without the key, rotate the lock lever rearward and then close the door. In this case, all doors and the rear gate are locked at the same time. To unlock the door, turn the key toward the front (Driver's side only). Always make sure that all... locked before leaving your vehicle. - CONTINUED - 1) Lock 2) Unlock To lock the door from the outside 1 2 1) Rotate the lock lever rearward. 2) Close the door. HS2013BB 2 1 HS2012BB To lock the door from the outside using the power door locking switch, push the front side of the switch ("LOCK" side) and then close...


