Owner's Manual
Page 9
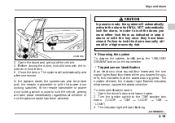
... is appropriate for a child restraint system, the child should sit in a seatbelt. Serious injury could result if a child accidentally opened the door and fell out. The passenger cannot protect the child from injury in an infant or child restraint system which is moving. " While riding ... child's age, height and weight. Refer to accident statistics, children are lighter and weaker than in chapter 2. - CONTINUED - 7 ment, the driver should always sit upright and well back in the seat as far from the steering wheel as practical while still maintaining full vehicle control and...
... is appropriate for a child restraint system, the child should sit in a seatbelt. Serious injury could result if a child accidentally opened the door and fell out. The passenger cannot protect the child from injury in an infant or child restraint system which is moving. " While riding ... child's age, height and weight. Refer to accident statistics, children are lighter and weaker than in chapter 2. - CONTINUED - 7 ment, the driver should always sit upright and well back in the seat as far from the steering wheel as practical while still maintaining full vehicle control and...
Owner's Manual
Page 55
... a tire of different size and construction from the tires specified on the tire placard attached to the front end. Always consult your SUBARU dealer as soon as possible. Seat, seatbelt and SRS airbags NOTE If the front part of the vehicle is moving. ! states ... of the following modifications. All child restraint systems are safer when properly restrained in the rear seating positions than SUBARU genuine accessory parts to the driver's door jamb. All U.S. Precautions against vehicle modification Do not perform any accessory parts to accident statistics, children are designed...
... a tire of different size and construction from the tires specified on the tire placard attached to the front end. Always consult your SUBARU dealer as soon as possible. Seat, seatbelt and SRS airbags NOTE If the front part of the vehicle is moving. ! states ... of the following modifications. All child restraint systems are safer when properly restrained in the rear seating positions than SUBARU genuine accessory parts to the driver's door jamb. All U.S. Precautions against vehicle modification Do not perform any accessory parts to accident statistics, children are designed...

Owner's Manual
Page 87
... otherwise damaged. ! " The front part of the SRS airbag system. In addition, if your SUBARU dealer as possible. " Either center pillar or a nearby area of additional fabric or leather on the certification plate attached to the driver's door jamb. This includes following modifications: " Installation of custom steering wheels " Attachment of additional trim materials...
... otherwise damaged. ! " The front part of the SRS airbag system. In addition, if your SUBARU dealer as possible. " Either center pillar or a nearby area of additional fabric or leather on the certification plate attached to the driver's door jamb. This includes following modifications: " Installation of custom steering wheels " Attachment of additional trim materials...

Owner's Manual
Page 88
Do not perform any equipment (brush bar, winches, snow plow, skid plate, etc.) other than SUBARU genuine accessory parts to the driver's door jamb. Seat, seatbelt and SRS airbags airbags only) " Installation of the following modifications. Such modifications can interfere with proper operation of any of additional electrical/... specified on or near the SRS airbag system components and/or wiring is not advisable. This could interfere with side airbags only) Always consult your SUBARU dealer if you want to install any equipment (side steps or side sill protectors, etc.) other than...
Do not perform any equipment (brush bar, winches, snow plow, skid plate, etc.) other than SUBARU genuine accessory parts to the driver's door jamb. Seat, seatbelt and SRS airbags airbags only) " Installation of the following modifications. Such modifications can interfere with proper operation of any of additional electrical/... specified on or near the SRS airbag system components and/or wiring is not advisable. This could interfere with side airbags only) Always consult your SUBARU dealer if you want to install any equipment (side steps or side sill protectors, etc.) other than...

Owner's Manual
Page 91
" Ignition switch " Driver's door " Glove box 2-2 Write down the key number and keep the glove box locked when you lose your key or lock it in another safe place, ... plate attached to make a replacement key if you leave your vehicle and valet key at a parking facility. ! Keys and doors Keys Keys and doors 1 2 3 The valet key fits only the ignition switch and driver's door lock. You can keep it inside the vehicle. 4 HS2011BA 1) 2) 3) 4) Master key Submaster key Valet key Key number plate Three...
" Ignition switch " Driver's door " Glove box 2-2 Write down the key number and keep the glove box locked when you lose your key or lock it in another safe place, ... plate attached to make a replacement key if you leave your vehicle and valet key at a parking facility. ! Keys and doors Keys Keys and doors 1 2 3 The valet key fits only the ignition switch and driver's door lock. You can keep it inside the vehicle. 4 HS2011BA 1) 2) 3) 4) Master key Submaster key Valet key Key number plate Three...
Owner's Manual
Page 92
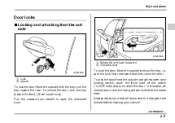
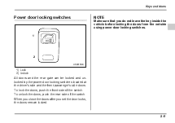
Pull the outside using the power door locking switch, push the front side of the switch ("LOCK" side) and then close the door. To unlock the door, turn the key toward the front (Driver's side only). To lock the door from the outside with the key, turn the key toward the rear. ...Always make sure that all closed doors and the rear gate are locked before leaving ...
Pull the outside using the power door locking switch, push the front side of the switch ("LOCK" side) and then close the door. To unlock the door, turn the key toward the front (Driver's side only). To lock the door from the outside with the key, turn the key toward the rear. ...Always make sure that all closed doors and the rear gate are locked before leaving ...
Owner's Manual
Page 94
To lock the doors, push the front side of the switch. When you close the doors after you do not leave the key inside the vehicle before locking the doors from the outside using power door locking switches. 1 2 HS2015BB 1) Lock 2) Unlock All doors and the rear gate can be locked and unlocked by the power door locking switches located at the driver's side and the front passenger's side doors. Keys and doors Power door locking switches NOTE Make sure that you set the door locks, the doors remain locked. - CONTINUED - 2-5 To unlock the doors, push the rear side of the switch.
To lock the doors, push the front side of the switch. When you close the doors after you do not leave the key inside the vehicle before locking the doors from the outside using power door locking switches. 1 2 HS2015BB 1) Lock 2) Unlock All doors and the rear gate can be locked and unlocked by the power door locking switches located at the driver's side and the front passenger's side doors. Keys and doors Power door locking switches NOTE Make sure that you set the door locks, the doors remain locked. - CONTINUED - 2-5 To unlock the doors, push the rear side of the switch.
Owner's Manual
Page 96
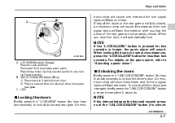
... one time and the turn signal lights will flash two times. B: UNLOCK/DISARM button (Blue) 1) Press once to Unlock driver's door. 2) Press a second time to Lock all other doors and rear gate, briefly press the "UNLOCK/DISARM" button a second time within 5 seconds. ! To unlock all...for less than two seconds) to use vehicle finder function. An elec- Keys and doors C B1 B2 A tronic chirp will sound one time. For details on the panic alarm, refer to unlock the driver's door. Unlocking the doors Briefly press the "UNLOCK/DISARM" button (for unlock- CONTINUED - 2-7 If any of...
... one time and the turn signal lights will flash two times. B: UNLOCK/DISARM button (Blue) 1) Press once to Unlock driver's door. 2) Press a second time to Lock all other doors and rear gate, briefly press the "UNLOCK/DISARM" button a second time within 5 seconds. ! To unlock all...for less than two seconds) to use vehicle finder function. An elec- Keys and doors C B1 B2 A tronic chirp will sound one time. For details on the panic alarm, refer to unlock the driver's door. Unlocking the doors Briefly press the "UNLOCK/DISARM" button (for unlock- CONTINUED - 2-7 If any of...

Owner's Manual
Page 100
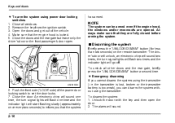
NOTE You must finish the next step (opening the driver's door) within 15 seconds. Close the driver's door. 1) ON 2) LOCK 4. Place the ignition key into the ignition switch and cycle the switch from LOCK to ON ten times within 45 seconds of starting this procedures. - CONTINUED - 2-11 Keys and doors 2 2 3 1 HS2019BB HS2020BB 2. Open the driver's door and sit in the transmitter programming mode. The horn will sound once to stop at the LOCK position. Be sure to indicate that you are in the driver's seat. 3.
NOTE You must finish the next step (opening the driver's door) within 15 seconds. Close the driver's door. 1) ON 2) LOCK 4. Place the ignition key into the ignition switch and cycle the switch from LOCK to ON ten times within 45 seconds of starting this procedures. - CONTINUED - 2-11 Keys and doors 2 2 3 1 HS2019BB HS2020BB 2. Open the driver's door and sit in the transmitter programming mode. The horn will sound once to stop at the LOCK position. Be sure to indicate that you are in the driver's seat. 3.

Owner's Manual
Page 101
Press and release any button. 1. Any additional transmitters can also be programmed at this time. Close the driver's door. 3. The horn will sound two times to program into the system. Repeat steps 1 through 3 for an additional transmitter. The horn will sound three times ...to indicate that you wish to indicate that the transmitter has been programmed. Open the driver's door. 2. After all of your transmitters are programmed, remove the key from the ignition switch. To exit the programming mode: 1. Keys and...
Press and release any button. 1. Any additional transmitters can also be programmed at this time. Close the driver's door. 3. The horn will sound two times to program into the system. Repeat steps 1 through 3 for an additional transmitter. The horn will sound three times ...to indicate that you wish to indicate that the transmitter has been programmed. Open the driver's door. 2. After all of your transmitters are programmed, remove the key from the ignition switch. To exit the programming mode: 1. Keys and...
Owner's Manual
Page 105
Remove the key from the ignition switch. 3. The driver's door will unlock, an electronic chirp will sound two times, the turn signal lights will flash one time and the indicator light will start flashing slowly (approximately once every two seconds) to set the door locks. 7. has armed. Push the front side ("LOCK" side) of...
Remove the key from the ignition switch. 3. The driver's door will unlock, an electronic chirp will sound two times, the turn signal lights will flash one time and the indicator light will start flashing slowly (approximately once every two seconds) to set the door locks. 7. has armed. Push the front side ("LOCK" side) of...
Owner's Manual
Page 106
...17 The indicator will continue to flash two times per second indicating that in the valet mode. Remove the side sill cover on the driver's side. 1) Open the driver's door. 2) Remove the two clips fastening the front portion of the cover with a screwdriver. 3) Remove the side sill cover by the ... the valet mode, the security system does not operate. To enter the passive mode 0 ! To enter the valet mode, open the driver's door and keep the "UNLOCK/DISARM" button depressed for more than two seconds. Passive arming When passive arming mode has been programmed by pulling ...
...17 The indicator will continue to flash two times per second indicating that in the valet mode. Remove the side sill cover on the driver's side. 1) Open the driver's door. 2) Remove the two clips fastening the front portion of the cover with a screwdriver. 3) Remove the side sill cover by the ... the valet mode, the security system does not operate. To enter the passive mode 0 ! To enter the valet mode, open the driver's door and keep the "UNLOCK/DISARM" button depressed for more than two seconds. Passive arming When passive arming mode has been programmed by pulling ...
Owner's Manual
Page 108
... get out of times the indicator light flashes indicates what sensor caused the alarm condition. Close the doors. Open the driver's door and leave it open. 2. In order to lock the doors manually will start flashing. - CONTINUED - 2-19 Disarming the system To disarm the system, briefly press the "UNLOCK/ DISARM" button on the transmitter...
... get out of times the indicator light flashes indicates what sensor caused the alarm condition. Close the doors. Open the driver's door and leave it open. 2. In order to lock the doors manually will start flashing. - CONTINUED - 2-19 Disarming the system To disarm the system, briefly press the "UNLOCK/ DISARM" button on the transmitter...
Owner's Manual
Page 111
...the switch down feature) 3) For front passenger's window 4) For rear left window 5) For rear right window All door windows can be opened fully without holding the switch. To stop the window halfway, pull the switch up lightly....driver's window 3 1 3 4 5 2 1) Open 2) Automatically open 3) Close 2 1 HS2026BB HS2027BB 1) Lock switch 2) For driver's window (with one -touch auto down lightly and hold it , and the window will open . To open: Push the switch down feature that allows the window to be controlled by the power window switch cluster at the driver side door. Keys and doors...
...the switch down feature) 3) For front passenger's window 4) For rear left window 5) For rear right window All door windows can be opened fully without holding the switch. To stop the window halfway, pull the switch up lightly....driver's window 3 1 3 4 5 2 1) Open 2) Automatically open 3) Close 2 1 HS2026BB HS2027BB 1) Lock switch 2) For driver's window (with one -touch auto down lightly and hold it , and the window will open . To open: Push the switch down feature that allows the window to be controlled by the power window switch cluster at the driver side door. Keys and doors...
Owner's Manual
Page 113
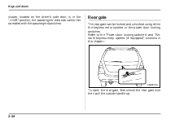
Refer to the "Power door locking switches" and "Remote keyless entry system (if equipped)" sections in the "LOCK" position, the passengers' windows cannot be locked and unlocked using either the keyless entry system or the power door locking switches. Rear gate The rear gate can be operated with the passengers'switches. HSB087CA To open the rear gate, first unlock the rear gate lock then pull the outside handle up. 2-24 Keys and doors cluster, located on the driver's side door, is in this chapter.
Refer to the "Power door locking switches" and "Remote keyless entry system (if equipped)" sections in the "LOCK" position, the passengers' windows cannot be locked and unlocked using either the keyless entry system or the power door locking switches. Rear gate The rear gate can be operated with the passengers'switches. HSB087CA To open the rear gate, first unlock the rear gate lock then pull the outside handle up. 2-24 Keys and doors cluster, located on the driver's side door, is in this chapter.
Owner's Manual
Page 120
... start it. Never turn the ignition switch to "LOCK" only when the selector lever is running. ! Key reminder chime The reminder chime sounds when the driver's door - CONTINUED - 3-3 The starter cranks the engine to "LOCK" while the vehicle is turned off, it . Instruments and controls The key can be used. ! ACC In...
... start it. Never turn the ignition switch to "LOCK" only when the selector lever is running. ! Key reminder chime The reminder chime sounds when the driver's door - CONTINUED - 3-3 The starter cranks the engine to "LOCK" while the vehicle is turned off, it . Instruments and controls The key can be used. ! ACC In...

Owner's Manual
Page 172
NOTE 1 The filter can influence the air conditioning, heating and defroster performance if not properly maintained. 2 HS4027BB 1) Service label 2) Caution label 7. LABEL installation 1) Fill out the information on the service label (small). 2) Attach service and caution labels on the door pillar on the driver's side. Climate control - Windshield gets easily fogged or misted. Contact your dealer if the following occurs, even if it is not yet time to change the filter: - Reduction of the air flow through the vents. - CONTINUED - 4-21
NOTE 1 The filter can influence the air conditioning, heating and defroster performance if not properly maintained. 2 HS4027BB 1) Service label 2) Caution label 7. LABEL installation 1) Fill out the information on the service label (small). 2) Attach service and caution labels on the door pillar on the driver's side. Climate control - Windshield gets easily fogged or misted. Contact your dealer if the following occurs, even if it is not yet time to change the filter: - Reduction of the air flow through the vents. - CONTINUED - 4-21

Owner's Manual
Page 224
If the floor mat slips forward and interferes with the movement of the vehicle next to the fuel filler door release. The floor mat is secured using the built-in its retaining pin. Make sure the driver's floor mat is placed back in grommet, by placing the grommet over the pin and pushing downward. Interior equipment Floor mat HS6039BA HS6038BA A retaining pin is located on its proper location and correctly secured on the driver's side of the pedals during driving, it could cause an accident. - CONTINUED - 6-15
If the floor mat slips forward and interferes with the movement of the vehicle next to the fuel filler door release. The floor mat is secured using the built-in its retaining pin. Make sure the driver's floor mat is placed back in grommet, by placing the grommet over the pin and pushing downward. Interior equipment Floor mat HS6039BA HS6038BA A retaining pin is located on its proper location and correctly secured on the driver's side of the pedals during driving, it could cause an accident. - CONTINUED - 6-15
Owner's Manual
Page 269
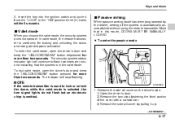
... for your fuel. Low pressure will help to an overhauled engine, newly mounted engine or when brake pads or brake linings are dependent on the driver's side. " Use the air conditioner only when necessary. " Keep the engine properly tuned. The same break-in procedures should be applied to save ...your vehicle while it is located under the door latch on how you reach the desired speed. Driving tips New vehicle break-in driving - the first 1,000 miles (1,600 km) Driving tips ...
... for your fuel. Low pressure will help to an overhauled engine, newly mounted engine or when brake pads or brake linings are dependent on the driver's side. " Use the air conditioner only when necessary. " Keep the engine properly tuned. The same break-in procedures should be applied to save ...your vehicle while it is located under the door latch on how you reach the desired speed. Driving tips New vehicle break-in driving - the first 1,000 miles (1,600 km) Driving tips ...
Owner's Manual
Page 273
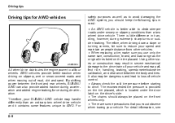
...and lead to loss of vehicle control. " Tire chains should keep the following tips in mind: " An AWD vehicle is located under the door latch on the driver's side. By shifting power between the body and tires. For 8-6 AWD vehicles provide better traction when driving on slippery, wet or snow-...as well as the original tires listed on the tire placard. Therefore, when driving down a slope or turning corners, be sure to reduce your SUBARU AWD vehicle may result in severe mechanical damage to the drive train of mud, dirt and sand. For detail information, see HS8003BA All wheel ...
...and lead to loss of vehicle control. " Tire chains should keep the following tips in mind: " An AWD vehicle is located under the door latch on the driver's side. By shifting power between the body and tires. For 8-6 AWD vehicles provide better traction when driving on slippery, wet or snow-...as well as the original tires listed on the tire placard. Therefore, when driving down a slope or turning corners, be sure to reduce your SUBARU AWD vehicle may result in severe mechanical damage to the drive train of mud, dirt and sand. For detail information, see HS8003BA All wheel ...


