Owner's Manual
Page 25
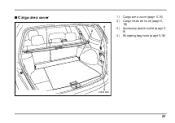
Cargo area cover 4 1 2 1) 2) 3) 4) Cargo area cover (page 6-16) Cargo tie-down hook (page 618) Accessory power outlet (page 69) Shopping bag hook (page 6-18) 3 HSF018BB - CONTINUED - 23 !
Cargo area cover 4 1 2 1) 2) 3) 4) Cargo area cover (page 6-16) Cargo tie-down hook (page 618) Accessory power outlet (page 69) Shopping bag hook (page 6-18) 3 HSF018BB - CONTINUED - 23 !

Owner's Manual
Page 63
... seating position where the child restraint system has been installed with the seatbelt or lower anchorages; Open the cover flaps to prevent it from being thrown around in the passenger compartment in the cargo area. To hook the top tether 3 2 1 HS1081BA HS1080BB 1) For left positions, are already installed on the rear edge...
... seating position where the child restraint system has been installed with the seatbelt or lower anchorages; Open the cover flaps to prevent it from being thrown around in the passenger compartment in the cargo area. To hook the top tether 3 2 1 HS1081BA HS1080BB 1) For left positions, are already installed on the rear edge...

Owner's Manual
Page 210
... light ... 6-2 6-2 6-2 Map lights ...Sun visors ...Vanity mirror ... 6-3 6-3 6-4 Shopping bag hook ...Cargo tie-down hooks ...Under-floor storage compartment ... 6-18 6-18 6-19 Storage compartments ...Glove box ...Center console ...Overhead console ...Dashboard storage compartment ...Convenience net ...Coin tray ...... outlet ... 6-9 6-11 6-12 6-13 Ashtray ...Front ashtray ...Rear ashtray (if equipped) ... 6-14 6-14 6-14 Floor mat ...Coat hook ...Cargo area cover (if equipped) ...Using the cover ...To remove the cover ...To install the cover housing ... 6-15 6-16 6-16 6-16 6-17 6-17 6-1
... light ... 6-2 6-2 6-2 Map lights ...Sun visors ...Vanity mirror ... 6-3 6-3 6-4 Shopping bag hook ...Cargo tie-down hooks ...Under-floor storage compartment ... 6-18 6-18 6-19 Storage compartments ...Glove box ...Center console ...Overhead console ...Dashboard storage compartment ...Convenience net ...Coin tray ...... outlet ... 6-9 6-11 6-12 6-13 Ashtray ...Front ashtray ...Rear ashtray (if equipped) ... 6-14 6-14 6-14 Floor mat ...Coat hook ...Cargo area cover (if equipped) ...Using the cover ...To remove the cover ...To install the cover housing ... 6-15 6-16 6-16 6-16 6-17 6-17 6-1

Owner's Manual
Page 225
... The coat hook is attached to the cover and guide it back into the catches as shown. To rewind it, unhook it from direct sunlight. Never hang anything on the coat hook that ... its hooks into the cover housing while it will rewind automatically. HS6042BA To extend the cover, pull the end of the cover out of the housing, then insert its contents from the catches and it 6-16 Interior equipment Coat hook Cargo area cover (if equipped) The cargo area cover is provided for covering the cargo area and to make...
... The coat hook is attached to the cover and guide it back into the catches as shown. To rewind it, unhook it from direct sunlight. Never hang anything on the coat hook that ... its hooks into the cover housing while it will rewind automatically. HS6042BA To extend the cover, pull the end of the cover out of the housing, then insert its contents from the catches and it 6-16 Interior equipment Coat hook Cargo area cover (if equipped) The cargo area cover is provided for covering the cargo area and to make...

Owner's Manual
Page 226
Take it off the retainer, lift it and an object on the extended cover. Store the cover housing in the event of the cover housing into the retainers. ! Putting excessive weight on the extended cover can break it out. 3. Rewind the cover. - CONTINUED - 6-17 To remove the cover HS6043BA 1. To install the cover housing To install the cover, insert both ends of a sudden stop or collision. Do not place anything on the cover could cause serious injury. ! This could tumble forward in the cargo area. Interior equipment is rewinding. 2.
Take it off the retainer, lift it and an object on the extended cover. Store the cover housing in the event of the cover housing into the retainers. ! Putting excessive weight on the extended cover can break it out. 3. Rewind the cover. - CONTINUED - 6-17 To remove the cover HS6043BA 1. To install the cover housing To install the cover, insert both ends of a sudden stop or collision. Do not place anything on the cover could cause serious injury. ! This could tumble forward in the cargo area. Interior equipment is rewinding. 2.

Owner's Manual
Page 282
... - CONTINUED - 8-15 This could tumble forward in loss of your vehicle handles. " Do not place anything on the extended cargo area cover. HS8006BA NOTE For better fuel economy, do not carry unneeded cargo. Driving tips can shorten the life of control and cause personal injury. Such items could result in the event of...
... - CONTINUED - 8-15 This could tumble forward in loss of your vehicle handles. " Do not place anything on the extended cargo area cover. HS8006BA NOTE For better fuel economy, do not carry unneeded cargo. Driving tips can shorten the life of control and cause personal injury. Such items could result in the event of...

Owner's Manual
Page 320
Unlock the rear gate by raising the rear gate handle. HS9025BA 1. Open the rear gate from inside the trim upward. 4. Remove the access cover at the bottom-center of emergency Rear gate - if the rear gate cannot be unlocked In the event that you cannot unlock the rear gate by operating the power door locking switches or the remote keyless entry system, you can unlock it from outside by pressing the lever inside the cargo area. 0 HS9026BA 2. Locate the rear gate lock release lever behind the rear gate trim panel. 3. In case of the rear gate trim. - CONTINUED - 9-17
Unlock the rear gate by raising the rear gate handle. HS9025BA 1. Open the rear gate from inside the trim upward. 4. Remove the access cover at the bottom-center of emergency Rear gate - if the rear gate cannot be unlocked In the event that you cannot unlock the rear gate by operating the power door locking switches or the remote keyless entry system, you can unlock it from outside by pressing the lever inside the cargo area. 0 HS9026BA 2. Locate the rear gate lock release lever behind the rear gate trim panel. 3. In case of the rear gate trim. - CONTINUED - 9-17
Owner's Manual
Page 409
... light ...Braking ...Braking tips ...Brake pedal ...Free play ...Reserve distance ...Breaking-in of new brake pads and linings ...Bulb Chart ...Replacing ...C Capacities ...Cargo area cover (if equipped) ...Cargo area light ...Cargo tie-down hooks ... 11-49 9-9 2-9 11-32 11-30 11-36 11-37 11-33 7-21 3-13 7-21 7-21 11-33 11-33...
... light ...Braking ...Braking tips ...Brake pedal ...Free play ...Reserve distance ...Breaking-in of new brake pads and linings ...Bulb Chart ...Replacing ...C Capacities ...Cargo area cover (if equipped) ...Cargo area light ...Cargo tie-down hooks ... 11-49 9-9 2-9 11-32 11-30 11-36 11-37 11-33 7-21 3-13 7-21 7-21 11-33 11-33...


