Owner's Manual
Page 15
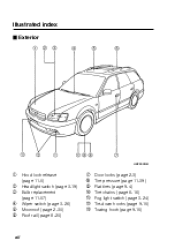
Illustrated index J Exterior HBF003BB 1 Hood lock release 2 3 4 5 6 (page 11-5) Headlight switch (page 3-19) Bulb replacement (page 11-57) Wiper switch (page 3-26) Moonroof (page 2-30) Roof rail (page 8-20) 7 8 9 Q W E R Door locks (page 2-3) Tire pressure (page 11-39) Flat tires (page 9-4) Tire chains (page 8-16) Fog light switch (page 3-24) Tie-down hooks (page 9-15) Towing hook (page 9-15) xii
Illustrated index J Exterior HBF003BB 1 Hood lock release 2 3 4 5 6 (page 11-5) Headlight switch (page 3-19) Bulb replacement (page 11-57) Wiper switch (page 3-26) Moonroof (page 2-30) Roof rail (page 8-20) 7 8 9 Q W E R Door locks (page 2-3) Tire pressure (page 11-39) Flat tires (page 9-4) Tire chains (page 8-16) Fog light switch (page 3-24) Tie-down hooks (page 9-15) Towing hook (page 9-15) xii
Owner's Manual
Page 22
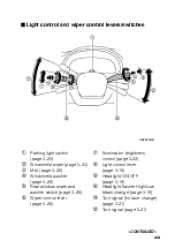
J Light control and wiper control levers/switches HBF023BB 1 Parking light switch 2 3 4 5 6 (page 3-23) Windshield wiper (page 3-24) Mist (page 3-26) Windshield washer (page 3-26) Rear window wiper and washer switch (page 3-28) Wiper control lever (page 3-26) 7 Illumination brightness 8 Light control lever (page 3-19) (page 3-19) control (page 3-22) 9 Headlight ON/OFF Q Headlight flasher High/Low W Turn signal (for lane change) E Turn signal (page 3-21) (page 3-21) beam change (page 3-19) - CONTINUED - xix
J Light control and wiper control levers/switches HBF023BB 1 Parking light switch 2 3 4 5 6 (page 3-23) Windshield wiper (page 3-24) Mist (page 3-26) Windshield washer (page 3-26) Rear window wiper and washer switch (page 3-28) Wiper control lever (page 3-26) 7 Illumination brightness 8 Light control lever (page 3-19) (page 3-19) control (page 3-22) 9 Headlight ON/OFF Q Headlight flasher High/Low W Turn signal (for lane change) E Turn signal (page 3-21) (page 3-21) beam change (page 3-19) - CONTINUED - xix
Owner's Manual
Page 142
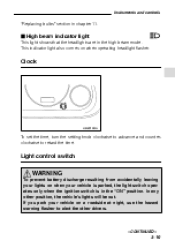
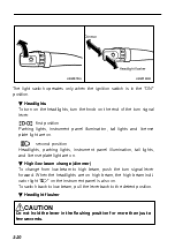
J High beam indicator light This light shows that the headlights are in the "ON" position. In any other drivers. - CONTINUED - 3-19 Clock HB2013BA To set the time, turn the setting knob clockwise to advance and ...'s lights will be out. Light control switch WARNING To prevent battery discharge resulting from accidentally leaving your lights on when your vehicle on when operating headlight flasher. Instruments and controls "Replacing bulbs" section in chapter 11. This indicator light also comes on a roadside at night, use the hazard warning flasher to...
J High beam indicator light This light shows that the headlights are in the "ON" position. In any other drivers. - CONTINUED - 3-19 Clock HB2013BA To set the time, turn the setting knob clockwise to advance and ...'s lights will be out. Light control switch WARNING To prevent battery discharge resulting from accidentally leaving your lights on when your vehicle on when operating headlight flasher. Instruments and controls "Replacing bulbs" section in chapter 11. This indicator light also comes on a roadside at night, use the hazard warning flasher to...
Owner's Manual
Page 143
When the headlights are on high beam, the high beam indicator light "a" on the instrument panel is in the flashing position for more than just a few seconds. 3-20 .../low beam change (dimmer) To change from low beam to the detent position. B Headlights To turn on the headlights, turn the knob on . second position Headlights, parking lights, instrument panel illumination, tail lights, and license plate light are on. B Headlight flasher CAUTION Do not hold the lever in the "ON" position. first position Parking...
When the headlights are on high beam, the high beam indicator light "a" on the instrument panel is in the flashing position for more than just a few seconds. 3-20 .../low beam change (dimmer) To change from low beam to the detent position. B Headlights To turn on the headlights, turn the knob on . second position Headlights, parking lights, instrument panel illumination, tail lights, and license plate light are on. B Headlight flasher CAUTION Do not hold the lever in the "ON" position. first position Parking...
Owner's Manual
Page 144
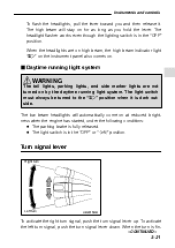
... signal lever Right turn Left turn HB2015BB To activate the right turn signal, push the turn is fin- CONTINUED - 3-21 The low beam headlights will stay on at reduced brightness when the engine has started, under the following conditions: D The parking brake is dark outside. D The light... switch is in the "OFF" or "p" position. The headlight flasher works even though the lighting switch is in the "OFF" position. The light switch must always be turned to the "a" position when it ....
... signal lever Right turn Left turn HB2015BB To activate the right turn signal, push the turn is fin- CONTINUED - 3-21 The low beam headlights will stay on at reduced brightness when the engine has started, under the following conditions: D The parking brake is dark outside. D The light... switch is in the "OFF" or "p" position. The headlight flasher works even though the lighting switch is in the "OFF" position. The light switch must always be turned to the "a" position when it ....

Owner's Manual
Page 147
... the defroster. Check the washer fluid level frequently, such as at fuel stops. Fog light switch (if equipped) The fog lights operate only when the headlights are on. This may cause overheating of the washer motor. Otherwise the washer fluid can freeze on the windshield, blocking your view. Press the switch...
... the defroster. Check the washer fluid level frequently, such as at fuel stops. Fog light switch (if equipped) The fog lights operate only when the headlights are on. This may cause overheating of the washer motor. Otherwise the washer fluid can freeze on the windshield, blocking your view. Press the switch...
Owner's Manual
Page 154
... lights up while the windshield wiper deicer is in the "ON" position. The indicator light located on the windshield wiper deicer, remove any snow from headlights. - CONTINUED - 3-31
... lights up while the windshield wiper deicer is in the "ON" position. The indicator light located on the windshield wiper deicer, remove any snow from headlights. - CONTINUED - 3-31

Owner's Manual
Page 155
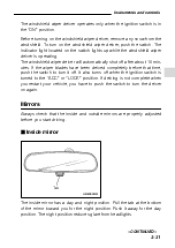
... is on or off . B Compass mirror (if equipped) HB6019BB The inside electronic compass mirror has an anti-glare feature which automatically reduces glare coming from headlights of the mirror.
... is on or off . B Compass mirror (if equipped) HB6019BB The inside electronic compass mirror has an anti-glare feature which automatically reduces glare coming from headlights of the mirror.
Owner's Manual
Page 156
... the glare from being blinded. Further calibration is in a circle until "CAL" disappears from this reason, use care not to help prevent you from the headlights of dry soft cotton cloth or an applicator. n Compass calibration 1. Drive slowly in the "ON" position. 3. Instruments and controls n Photosensors HB6020BA The mirror has a photosensor...
... the glare from being blinded. Further calibration is in a circle until "CAL" disappears from this reason, use care not to help prevent you from the headlights of dry soft cotton cloth or an applicator. n Compass calibration 1. Drive slowly in the "ON" position. 3. Instruments and controls n Photosensors HB6020BA The mirror has a photosensor...
Owner's Manual
Page 363
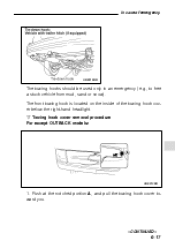
n Towing hook cover removal procedure For except OUTBACK models: HB9013BB 1. The front towing hook is located on the inside of emergency HB9010BB The towing hooks should be used only in an emergency (e.g., to free a stuck vehicle from mud, sand or snow). Push at the notched portion A, and pull the towing hook cover toward you. - CONTINUED - 9-17 In case of the towing hook cover below the right-hand headlight.
n Towing hook cover removal procedure For except OUTBACK models: HB9013BB 1. The front towing hook is located on the inside of emergency HB9010BB The towing hooks should be used only in an emergency (e.g., to free a stuck vehicle from mud, sand or snow). Push at the notched portion A, and pull the towing hook cover toward you. - CONTINUED - 9-17 In case of the towing hook cover below the right-hand headlight.

Owner's Manual
Page 382
Battery ...Fuses ...Main fuse ...Installation of accessories ...Replacing bulbs ...Headlight ...Front fog light (if equipped) ...Front turn signal light, parking light and marker light ...Rear combination lights ...License plate light ...Spot light, dome light, luggage compartment light and door step light ...Trunk light ...High mount stop light ... 11-51 11-52 11-54 11-54 11-55 11-57 11-59 11-59 11-61 11-64 11-65 11-66 11-67 11-2
Battery ...Fuses ...Main fuse ...Installation of accessories ...Replacing bulbs ...Headlight ...Front fog light (if equipped) ...Front turn signal light, parking light and marker light ...Rear combination lights ...License plate light ...Spot light, dome light, luggage compartment light and door step light ...Trunk light ...High mount stop light ... 11-51 11-52 11-54 11-54 11-55 11-57 11-59 11-59 11-61 11-64 11-65 11-66 11-67 11-2
Owner's Manual
Page 435
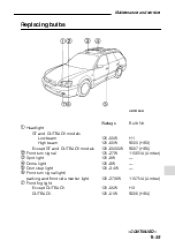
Maintenance and service Replacing bulbs HB5019EB 1 Headlight GT and OUTBACK models Low beam High beam Except GT and OUTBACK models Front turn signal Spot light Dome light Door step light Front turn signal light/ parking and front side marker light Front fog light Except OUTBACK OUTBACK Wattage Bulb No. 2 3 4 5 6 7 12V-55W 12V-60W 12V-65/55W 12V-27W 12V-8W 12V-8W 12V-3.4W 12V-27/8W 12V-55W 12V-51W H1 9005 (HB3) 9007 (HB5) 1156NA (Amber 1157NA (Amber) H3 9006 (HB4) - CONTINUED - 11-55
Maintenance and service Replacing bulbs HB5019EB 1 Headlight GT and OUTBACK models Low beam High beam Except GT and OUTBACK models Front turn signal Spot light Dome light Door step light Front turn signal light/ parking and front side marker light Front fog light Except OUTBACK OUTBACK Wattage Bulb No. 2 3 4 5 6 7 12V-55W 12V-60W 12V-65/55W 12V-27W 12V-8W 12V-8W 12V-3.4W 12V-27/8W 12V-55W 12V-51W H1 9005 (HB3) 9007 (HB5) 1156NA (Amber 1157NA (Amber) H3 9006 (HB4) - CONTINUED - 11-55
Owner's Manual
Page 437
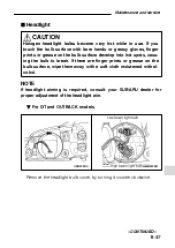
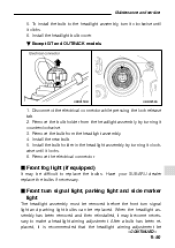
If you touch the bulb surface with alcohol. B For GT and OUTBACK models HBB039BA HBB040BB Remove the headlight bulb cover, by turning it counterclockwise. - CONTINUED - 11-57 If there are finger prints or grease on the bulb surface, wipe them away with ... hands or greasy gloves, finger prints or grease on the bulb surface develop into hot spots, causing the bulb to break. NOTE If headlight aiming is required, consult your SUBARU dealer for proper adjustment of the headlight aim. Maintenance and service J Headlight CAUTION Halogen headlight bulbs become very hot while in use.
If you touch the bulb surface with alcohol. B For GT and OUTBACK models HBB039BA HBB040BB Remove the headlight bulb cover, by turning it counterclockwise. - CONTINUED - 11-57 If there are finger prints or grease on the bulb surface, wipe them away with ... hands or greasy gloves, finger prints or grease on the bulb surface develop into hot spots, causing the bulb to break. NOTE If headlight aiming is required, consult your SUBARU dealer for proper adjustment of the headlight aim. Maintenance and service J Headlight CAUTION Halogen headlight bulbs become very hot while in use.
Owner's Manual
Page 438
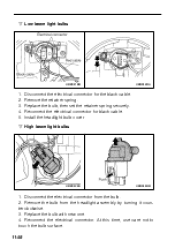
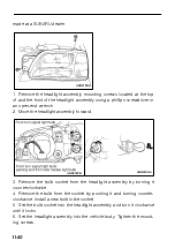
Remove the retainer spring. Disconnect the electrical connector from the headlight assembly by turning it counterclockwise. 3. Reconnect the electrical connector. At this time, use care not to touch the bulb surface. 11-58 Disconnect the electrical .... Reconnect the electrical connector for the black cable. Remove the bulb from the bulb. 2. Replace the bulb, then set the retainer spring securely. Install the headlight bulb cover. n Low beam light bulbs HBB041BB HBB042BA 1. 2. 3. 4. 5. n High beam light bulbs HBB043BA HBB044BB 1. Replace the bulb with new one...
Remove the retainer spring. Disconnect the electrical connector from the headlight assembly by turning it counterclockwise. 3. Reconnect the electrical connector. At this time, use care not to touch the bulb surface. 11-58 Disconnect the electrical .... Reconnect the electrical connector for the black cable. Remove the bulb from the bulb. 2. Replace the bulb, then set the retainer spring securely. Install the headlight bulb cover. n Low beam light bulbs HBB041BB HBB042BA 1. 2. 3. 4. 5. n High beam light bulbs HBB043BA HBB044BB 1. Replace the bulb with new one...
Owner's Manual
Page 439
...-59 Remove the bulb from the headlight assembly by turning it clockwise until it may be replaced. Install the new bulb. 5. Have your SUBARU dealer replace the bulbs if necessary. Disconnect the electrical connector while pressing the lock release tab. 2. Maintenance and service 5. B Except GT and OUTBACK models HBB045BB HBB046BA 1. J Front fog light...
...-59 Remove the bulb from the headlight assembly by turning it clockwise until it may be replaced. Install the new bulb. 5. Have your SUBARU dealer replace the bulbs if necessary. Disconnect the electrical connector while pressing the lock release tab. 2. Maintenance and service 5. B Except GT and OUTBACK models HBB045BB HBB046BA 1. J Front fog light...
Owner's Manual
Page 440
... by pushing it and turning counterclockwise. Set the bulb socket into the vehicle body. Remove the headlight assembly mounting screws located at a SUBARU dealer. Move the headlight assembly forward. Remove the bulb socket from the socket by turning it locks. 6. HBB039CB HBB020BA 3. Tighten the mounting screws. 11-60 Install a new bulb in ...
... by pushing it and turning counterclockwise. Set the bulb socket into the vehicle body. Remove the headlight assembly mounting screws located at a SUBARU dealer. Move the headlight assembly forward. Remove the bulb socket from the socket by turning it locks. 6. HBB039CB HBB020BA 3. Tighten the mounting screws. 11-60 Install a new bulb in ...
Owner's Manual
Page 458
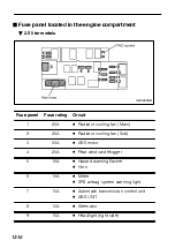
J Fuse panel located in the engine compartment B 2.5 liter models HBC003BB Fuse panel 1 2 3 4 5 Fuse rating 20A 20A 50A 20A 15A Circuit D Radiator cooling fan (Main) D Radiator cooling fan (Sub) D ABS motor D Rear window defogger D Hazard warning flasher D Horn D Meter D SRS airbag system warning light D Automatic transmission control unit D ABS UNIT D Alternator D Headlight (right side) 6 15A 7 10A 8 9 10A 15A 12-10
J Fuse panel located in the engine compartment B 2.5 liter models HBC003BB Fuse panel 1 2 3 4 5 Fuse rating 20A 20A 50A 20A 15A Circuit D Radiator cooling fan (Main) D Radiator cooling fan (Sub) D ABS motor D Rear window defogger D Hazard warning flasher D Horn D Meter D SRS airbag system warning light D Automatic transmission control unit D ABS UNIT D Alternator D Headlight (right side) 6 15A 7 10A 8 9 10A 15A 12-10

Owner's Manual
Page 459
Specifications Fuse panel 10 11 12 Fuse rating 15A 20A 15A Circuit D Headlight (left side) D Lighting switch D Clock D Interior light - CONTINUED - 12-11
Specifications Fuse panel 10 11 12 Fuse rating 15A 20A 15A Circuit D Headlight (left side) D Lighting switch D Clock D Interior light - CONTINUED - 12-11

Owner's Manual
Page 460
B 3.0 liter models HBC004BC Fuse panel 1 2 3 4 5 6 Fuse rating 30A 30A 50A 30A 20A 15A Circuit D Radiator cooling fan (Main) D Radiator cooling fan (Sub) D ABS (VDC) motor D McIntosh audio amp (if equipped) D Rear window defogger D Hazard warning flasher D Horn D Meter D SRS airbag system warning light D Automatic transmission control unit D ABS UNIT D Alternator D Headlight (right side) 7 15A 8 10A 9 10 10A 15A 12-12
B 3.0 liter models HBC004BC Fuse panel 1 2 3 4 5 6 Fuse rating 30A 30A 50A 30A 20A 15A Circuit D Radiator cooling fan (Main) D Radiator cooling fan (Sub) D ABS (VDC) motor D McIntosh audio amp (if equipped) D Rear window defogger D Hazard warning flasher D Horn D Meter D SRS airbag system warning light D Automatic transmission control unit D ABS UNIT D Alternator D Headlight (right side) 7 15A 8 10A 9 10 10A 15A 12-12

Owner's Manual
Page 461
Specifications Fuse panel 11 12 13 Fuse rating 15A 20A 15A Circuit D Headlight (left side) D Lighting switch D Clock D Interior light - CONTINUED - 12-13
Specifications Fuse panel 11 12 13 Fuse rating 15A 20A 15A Circuit D Headlight (left side) D Lighting switch D Clock D Interior light - CONTINUED - 12-13


