Owner's Manual
Page 3
Chapter 6: Interior equipment This chapter informs you how to keep your SUBARU looking good. Chapter 10: Appearance care This chapter informs you how to operate interior equipment. Each chapter begins with a brief table of thirteen chapters. Chapter 2: Doors and Locks This chapter informs you how to operate your audio system. Chapter 5: Audio This...
Chapter 6: Interior equipment This chapter informs you how to keep your SUBARU looking good. Chapter 10: Appearance care This chapter informs you how to operate interior equipment. Each chapter begins with a brief table of thirteen chapters. Chapter 2: Doors and Locks This chapter informs you how to operate your audio system. Chapter 5: Audio This...
Owner's Manual
Page 7
... cause severe or possibly fatal injuries to drive the vehicle in or out of the vehicle. Refer to the "Door locks" section in a closed vehicle could result if a child accidentally opened the door and fell out. Engine exhaust gas contains carbon monoxide, a colorless and odorless gas which is running. D Never run the...
... cause severe or possibly fatal injuries to drive the vehicle in or out of the vehicle. Refer to the "Door locks" section in a closed vehicle could result if a child accidentally opened the door and fell out. Engine exhaust gas contains carbon monoxide, a colorless and odorless gas which is running. D Never run the...

Owner's Manual
Page 11
Table of contents Seat, seatbelt and SRS airbag Doors and locks Instruments and controls Climate control Audio Interior equipment Starting and operating Driving tips In case of emergency Appearance care Maintenance and service Specifications Consumer information and Reporting safety defects Index 1 2 3 4 5 6 7 8 9 10 11 12 13 14 - CONTINUED - xi
Table of contents Seat, seatbelt and SRS airbag Doors and locks Instruments and controls Climate control Audio Interior equipment Starting and operating Driving tips In case of emergency Appearance care Maintenance and service Specifications Consumer information and Reporting safety defects Index 1 2 3 4 5 6 7 8 9 10 11 12 13 14 - CONTINUED - xi
Owner's Manual
Page 13
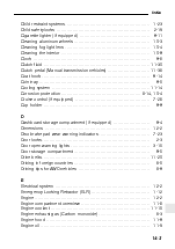
..., 10-4 Cruise control (if equipped) ...7-28 Cup holder ...6-6 D Dashboard storage compartment (if equipped) ...6-4 Dimensions ...12-2 Disc brake pad wear warning indicators ...7-23 Door locks ...2-3 Door open warning lights ...3-15 Door storage compartment ...6-5 Drive belts ...11-20 Driving in foreign countries ...8-5 Driving tips for AWD vehicles ...8-6 E Electrical system ...12-2 Emergency Locking Retractor (ELR) ...1-12...
..., 10-4 Cruise control (if equipped) ...7-28 Cup holder ...6-6 D Dashboard storage compartment (if equipped) ...6-4 Dimensions ...12-2 Disc brake pad wear warning indicators ...7-23 Door locks ...2-3 Door open warning lights ...3-15 Door storage compartment ...6-5 Drive belts ...11-20 Driving in foreign countries ...8-5 Driving tips for AWD vehicles ...8-6 E Electrical system ...12-2 Emergency Locking Retractor (ELR) ...1-12...
Owner's Manual
Page 16
... temperature indicator (if equipped) ...Overhead console ... 3-6 8-7 3-12 4-11 3-31 3-7 6-4 P Parking brake stroke ...11-40 Parking light switch ...3-19 Parking your vehicle ...7-26 Periodic inspections ...8-5 Power door locking switches ...2-5 Power steering ...7-21 Power steering fluid ...11-27 Power windows ...2-20 Precautions against vehicle modification ...1-49 Precautions to observe when handling a compact disc...
... temperature indicator (if equipped) ...Overhead console ... 3-6 8-7 3-12 4-11 3-31 3-7 6-4 P Parking brake stroke ...11-40 Parking light switch ...3-19 Parking your vehicle ...7-26 Periodic inspections ...8-5 Power door locking switches ...2-5 Power steering ...7-21 Power steering fluid ...11-27 Power windows ...2-20 Precautions against vehicle modification ...1-49 Precautions to observe when handling a compact disc...
Owner's Manual
Page 36
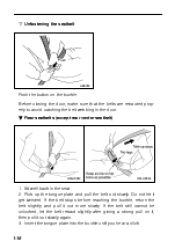
Sit well back in the door. Do not let it out more slowly. Insert the tongue plate into the buckle until you hear a click. 1-16 If the belt still cannot be ... again. 3. B Rear seatbelts (except rear center seatbelt) OM-H0043 OM-H0044 1. Pick up the tongue plate and pull the belt out slowly. Before closing the door, make sure that the belts are retracted properly to avoid catching the belt webbing in the seat. 2. If the belt stops before reaching the buckle...
Sit well back in the door. Do not let it out more slowly. Insert the tongue plate into the buckle until you hear a click. 1-16 If the belt still cannot be ... again. 3. B Rear seatbelts (except rear center seatbelt) OM-H0043 OM-H0044 1. Pick up the tongue plate and pull the belt out slowly. Before closing the door, make sure that the belts are retracted properly to avoid catching the belt webbing in the seat. 2. If the belt stops before reaching the buckle...

Owner's Manual
Page 38
... neck injuries during sudden braking or in an accident. D Be sure to fasten both tongue plates to avoid catching the belt webbing in the door. If the seatbelt is not twisted. n Unfastening the seatbelt Push HB0303 Push the button on the right-hand side), it cannot properly restrain ...the wearer in position in an accident, possibly resulting in serious injury or death. Before closing the door, make sure that the seatbelt is pulled out from the retractor, especially when inserting the connector's tongue plate into the mating buckle (on your...
... neck injuries during sudden braking or in an accident. D Be sure to fasten both tongue plates to avoid catching the belt webbing in the door. If the seatbelt is not twisted. n Unfastening the seatbelt Push HB0303 Push the button on the right-hand side), it cannot properly restrain ...the wearer in position in an accident, possibly resulting in serious injury or death. Before closing the door, make sure that the seatbelt is pulled out from the retractor, especially when inserting the connector's tongue plate into the mating buckle (on your...
Owner's Manual
Page 60
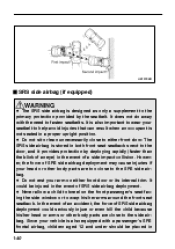
... to the side airbag. It is also important to wear your arm on the front passenger's seat facing the side window or to either front door or its internal trim. The SRS side airbag is not seated in a proper upright position. However, the force of SRS side airbag deployment. It does... the event of SRS side airbag deployment could be placed in 1-40 WARNING Since your head or other body parts are too close to the door, and it provides protection by the seatbelt. HB1070BB J SRS side airbag (if equipped) D The SRS side airbag is also equipped with the need to kneel...
... to the side airbag. It is also important to wear your arm on the front passenger's seat facing the side window or to either front door or its internal trim. The SRS side airbag is not seated in a proper upright position. However, the force of SRS side airbag deployment. It does... the event of SRS side airbag deployment could be placed in 1-40 WARNING Since your head or other body parts are too close to the door, and it provides protection by the seatbelt. HB1070BB J SRS side airbag (if equipped) D The SRS side airbag is also equipped with the need to kneel...
Owner's Manual
Page 61
HB0354 HB0355 D Do not attach accessories to the door trim or near either SRS side airbags and do not attach labels ...the front seatback. D Do not put any kind of the SRS side airbag, reducing protection available to the front door. HS0349 HS0351 Never allow a child to kneel on either front seatback and do not place objects near the SRS ...the SRS side airbag deployment, they could prevent proper deployment of cover or clothes or other objects over either front door or its internal trim. They could be properly restrained at all times. Do not rest your arm on the...
HB0354 HB0355 D Do not attach accessories to the door trim or near either SRS side airbags and do not attach labels ...the front seatback. D Do not put any kind of the SRS side airbag, reducing protection available to the front door. HS0349 HS0351 Never allow a child to kneel on either front seatback and do not place objects near the SRS ...the SRS side airbag deployment, they could prevent proper deployment of cover or clothes or other objects over either front door or its internal trim. They could be properly restrained at all times. Do not rest your arm on the...

Owner's Manual
Page 62
... a result of each front seatback, which bears an "SRS AIRBAG" label. HS0347 HS0353 The SRS side airbag is stored in the door side of deployment. 1-42 In a moderate to the door trim or near either side airbag and do not place objects near either seatback. B Operation CAUTION Do not touch the SRS... components around the front seatback with bare hands right after deployment. Do not put any kind of the vehicle deploys between the occupant and the door panel and supplements the seatbelt by reducing the impact on the impacted side of cover over either side airbag.
... a result of each front seatback, which bears an "SRS AIRBAG" label. HS0347 HS0353 The SRS side airbag is stored in the door side of deployment. 1-42 In a moderate to the door trim or near either side airbag and do not place objects near either seatback. B Operation CAUTION Do not touch the SRS... components around the front seatback with bare hands right after deployment. Do not put any kind of the vehicle deploys between the occupant and the door panel and supplements the seatbelt by reducing the impact on the impacted side of cover over either side airbag.
Owner's Manual
Page 69
... the SRS airbag system. To ensure their long-term reliability, the SRS airbags must be made to the driver's door. Seat, seatbelt and SRS airbags tem should be performed only by a SUBARU dealer ten years after the date of manufacture, which may result in serious injury, no modifications should be inspected by...
... the SRS airbag system. To ensure their long-term reliability, the SRS airbags must be made to the driver's door. Seat, seatbelt and SRS airbags tem should be performed only by a SUBARU dealer ten years after the date of manufacture, which may result in serious injury, no modifications should be inspected by...
Owner's Manual
Page 70
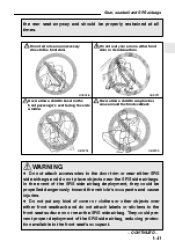
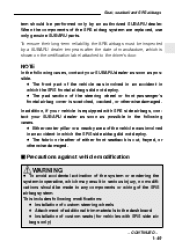
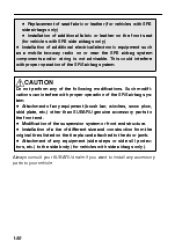
...the SRS airbag system components and/or wiring is not advisable. Always consult your SUBARU dealer if you want to install any equipment (brush bar, winches, snow plow, skid plate, etc.) other than SUBARU genuine accessory parts to the side body (for vehicles with SRS side airbags only... system. This could interfere with proper operation of the suspension system or front end structure. D Attachment of any accessory parts to the door jamb. Such modifications can interfere with proper operation of the SRS airbag system. D Replacement of seat fabric or leather (for vehicles with...
...the SRS airbag system components and/or wiring is not advisable. Always consult your SUBARU dealer if you want to install any equipment (brush bar, winches, snow plow, skid plate, etc.) other than SUBARU genuine accessory parts to the side body (for vehicles with SRS side airbags only... system. This could interfere with proper operation of the suspension system or front end structure. D Attachment of any accessory parts to the door jamb. Such modifications can interfere with proper operation of the SRS airbag system. D Replacement of seat fabric or leather (for vehicles with...

Owner's Manual
Page 71
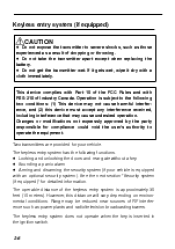
Doors and locks Keys ...Master, submaster and valet key ...Key number ... 2-2 2-2 2-2 Door locks ...Power door locking switches ... 2-3 2-5 2 Keyless entry system (if equipped) ...Security system (if equipped) ...Child safety locks ...Power windows ...Rear gate ...Moonroof (if equipped) ... 2-6 2-12 2-19 2-20 2-23 2-24
Doors and locks Keys ...Master, submaster and valet key ...Key number ... 2-2 2-2 2-2 Door locks ...Power door locking switches ... 2-3 2-5 2 Keyless entry system (if equipped) ...Security system (if equipped) ...Child safety locks ...Power windows ...Rear gate ...Moonroof (if equipped) ... 2-6 2-12 2-19 2-20 2-23 2-24
Owner's Manual
Page 72
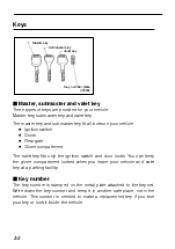
... gate D Glove compartment The valet key fits only the ignition switch and door locks. J Key number The key number is needed to the key set. You can keep it inside the vehicle. 2-2 Keys Master key Submaster key Valet ...
... gate D Glove compartment The valet key fits only the ignition switch and door locks. J Key number The key number is needed to the key set. You can keep it inside the vehicle. 2-2 Keys Master key Submaster key Valet ...

Owner's Manual
Page 73
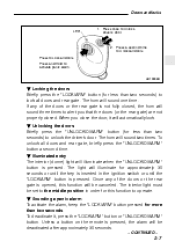
... front. Close the door. In this case, all closed doors and the rear gate are locked at the same time. - CONTINUED - 2-3 To lock the door from the outside door handle to open an unlocked door. HS0011 HB2024CB To lock the door from the outside using the power door locking switch, push ...the switch forward ("LOCK" side) and then close the door. Locking without the key, press the end of ...
... front. Close the door. In this case, all closed doors and the rear gate are locked at the same time. - CONTINUED - 2-3 To lock the door from the outside door handle to open an unlocked door. HS0011 HB2024CB To lock the door from the outside using the power door locking switch, push ...the switch forward ("LOCK" side) and then close the door. Locking without the key, press the end of ...

Owner's Manual
Page 74
...Make sure that you do not leave the key inside door handle to drive. 2-4 Always make sure that all doors and the rear gate are closed before starting to open an unlocked door. The red mark on the lock lever appears when the door is unlocked. Pull the inside the vehicle before locking the... doors from the outside without the key. Always make sure that all doors and the rear gate are locked before leaving your...
...Make sure that you do not leave the key inside door handle to drive. 2-4 Always make sure that all doors and the rear gate are closed before starting to open an unlocked door. The red mark on the lock lever appears when the door is unlocked. Pull the inside the vehicle before locking the... doors from the outside without the key. Always make sure that all doors and the rear gate are locked before leaving your...

Owner's Manual
Page 75
NOTE Make sure that you set the door locks, the doors remain locked. To lock the doors, push the switch forward. To unlock the doors, push the switch rearward. When you close the doors after you do not leave the key inside the vehicle before locking the doors from the outside using power door locking switches. - CONTINUED - 2-5 Doors and locks J Power door locking switches HB2008CB HB2009BB All doors and the rear gate can be locked and unlocked by the power door locking switches located at the driver's side and the front passenger's side doors.
NOTE Make sure that you set the door locks, the doors remain locked. To lock the doors, push the switch forward. To unlock the doors, push the switch rearward. When you close the doors after you do not leave the key inside the vehicle before locking the doors from the outside using power door locking switches. - CONTINUED - 2-5 Doors and locks J Power door locking switches HB2008CB HB2009BB All doors and the rear gate can be locked and unlocked by the power door locking switches located at the driver's side and the front passenger's side doors.
Owner's Manual
Page 76
... gets wet, wipe it dry with an optional security system). The operable distance of Industry Canada. Range may cause undesired operation. D Locking and unlocking the doors and rear gate without a key D Sounding a panic alarm D Arming and disarming the security system (if your vehicle. Two transmitters are provided for detailed information. The...
... gets wet, wipe it dry with an optional security system). The operable distance of Industry Canada. Range may cause undesired operation. D Locking and unlocking the doors and rear gate without a key D Sounding a panic alarm D Arming and disarming the security system (if your vehicle. Two transmitters are provided for detailed information. The...
Owner's Manual
Page 77
...to the middle position in the ignition switch or until the "LOCK/ARM" button is not fully closed . Press and Hold to Unlock driver's door. 2. B Illuminated entry The interior (dome) light will illuminate when the "UNLOCK/DISARM" button is inserted in order for this function will ...illuminate for less than two seconds) to Unlockall doors. B Sounding a panic alarm To activate the alarm, keep the "LOCK/ARM" button pressed for less than two seconds. Press once to activate...
...to the middle position in the ignition switch or until the "LOCK/ARM" button is not fully closed . Press and Hold to Unlock driver's door. 2. B Illuminated entry The interior (dome) light will illuminate when the "UNLOCK/DISARM" button is inserted in order for this function will ...illuminate for less than two seconds) to Unlockall doors. B Sounding a panic alarm To activate the alarm, keep the "LOCK/ARM" button pressed for less than two seconds. Press once to activate...
Owner's Manual
Page 78
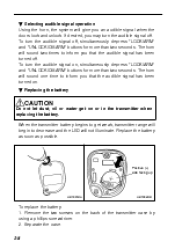
... for more than two seconds. To turn the audible signal off . The horn will sound two times to inform you an audible signal when the doors lock and unlock. Positive (+) side facing up HB1001BA HB1002BB To replace the battery: 1.
... for more than two seconds. To turn the audible signal off . The horn will sound two times to inform you an audible signal when the doors lock and unlock. Positive (+) side facing up HB1001BA HB1002BB To replace the battery: 1.


