
Owner's Manual
Page 1
2005 Pontiac Sunfire Owner Manual Seats and Restraint Systems ...1-1 Front Seats ...1-2 Rear Seats ...1-8 Safety Belts ...1-9 Child Restraints ...1-29 Airbag System ...1-47 Restraint System... ...2-30 OnStar® System ...2-32 Storage Areas ...2-34 Sunroof ...2-34 Instrument Panel ...3-1 Instrument Panel Overview ...3-4 Climate Controls ...3-18 Warning Lights, Gages, and Indicators ...3-21 Audio System(s) ...3-38 M Driving Your Vehicle ...4-1 Your Driving, the Road, and Your Vehicle ...4-2 Towing ...4-34 Service and Appearance Care ...5-1 Service ...5-3 Fuel ...5-5 Checking Things ...
2005 Pontiac Sunfire Owner Manual Seats and Restraint Systems ...1-1 Front Seats ...1-2 Rear Seats ...1-8 Safety Belts ...1-9 Child Restraints ...1-29 Airbag System ...1-47 Restraint System... ...2-30 OnStar® System ...2-32 Storage Areas ...2-34 Sunroof ...2-34 Instrument Panel ...3-1 Instrument Panel Overview ...3-4 Climate Controls ...3-18 Warning Lights, Gages, and Indicators ...3-21 Audio System(s) ...3-38 M Driving Your Vehicle ...4-1 Your Driving, the Road, and Your Vehicle ...4-2 Towing ...4-34 Service and Appearance Care ...5-1 Service ...5-3 Fuel ...5-5 Checking Things ...

Owner's Manual
Page 4
... Restraint Systems in Section 1 Features and Controls in Section 2 Instrument Panel Overview in Section 3 Climate Controls in Section 3 Warning Lights, Gages, and Indicators in Section 3 Audio System(s) in Section 3 Engine Compartment Overview in Section 5 iv Symbols are also warning labels on the vehicle. Vehicle Damage Warnings Also, in this damage would...
... Restraint Systems in Section 1 Features and Controls in Section 2 Instrument Panel Overview in Section 3 Climate Controls in Section 3 Warning Lights, Gages, and Indicators in Section 3 Audio System(s) in Section 3 Engine Compartment Overview in Section 5 iv Symbols are also warning labels on the vehicle. Vehicle Damage Warnings Also, in this damage would...

Owner's Manual
Page 97
Calls can extend this plan beyond the first year, or upgrade to the Directions and Connections Plan to your E-mail through your vehicle's audio system. For more about OnStar® Personal Calling, refer to speak with an advisor. To find out more information, press the OnStar® button ...
Calls can extend this plan beyond the first year, or upgrade to the Directions and Connections Plan to your E-mail through your vehicle's audio system. For more about OnStar® Personal Calling, refer to speak with an advisor. To find out more information, press the OnStar® button ...

Owner's Manual
Page 100
Section 3 Instrument Panel Theft-Deterrent Feature (Non-RDS Radios) ...3-61 Theft-Deterrent Feature (RDS Radios) ...3-61 Radio Reception ...3-62 Care of Your CDs ...3-62 Care of Your CD Player ...3-62 Fixed Mast Antenna ...3-63 XM™ Satellite Radio Antenna System ...3-63 Chime Level Adjustment ...3-63 Audio System(s) ...3-38 Setting the Time for Radios without Radio Data Systems (RDS) ...3-38 Setting the Time for Radios with Radio Data Systems (RDS) ...3-38 AM-FM Radio ...3-39 Radio with CD (Base Level) ...3-41 Radio with CD (MP3) ...3-46 Personal Choice Radio Controls ...3-61 3-2
Section 3 Instrument Panel Theft-Deterrent Feature (Non-RDS Radios) ...3-61 Theft-Deterrent Feature (RDS Radios) ...3-61 Radio Reception ...3-62 Care of Your CDs ...3-62 Care of Your CD Player ...3-62 Fixed Mast Antenna ...3-63 XM™ Satellite Radio Antenna System ...3-63 Chime Level Adjustment ...3-63 Audio System(s) ...3-38 Setting the Time for Radios without Radio Data Systems (RDS) ...3-38 Setting the Time for Radios with Radio Data Systems (RDS) ...3-38 AM-FM Radio ...3-39 Radio with CD (Base Level) ...3-41 Radio with CD (MP3) ...3-46 Personal Choice Radio Controls ...3-61 3-2

Owner's Manual
Page 103
... 2-34. O. D. G. Fuse Panel. N. Cigarette Lighter (If Equipped). See Cupholder(s) on page 3-17. See Accessory Power Outlets on page 5-86. Ignition Switch. Audio System. See Instrument Panel Fuse Block on page 3-17. 3-5 See Parking Brake on page 3-38. E. Instrument Panel Cluster. See... Audio System(s) on page 2-25. Remote Trunk Release Button. Accessory Power Outlet (If Equipped). See Instrument Panel Cluster on page 2-17. See Ignition...
... 2-34. O. D. G. Fuse Panel. N. Cigarette Lighter (If Equipped). See Cupholder(s) on page 3-17. See Accessory Power Outlets on page 5-86. Ignition Switch. Audio System. See Instrument Panel Fuse Block on page 3-17. 3-5 See Parking Brake on page 3-38. E. Instrument Panel Cluster. See... Audio System(s) on page 2-25. Remote Trunk Release Button. Accessory Power Outlet (If Equipped). See Instrument Panel Cluster on page 2-17. See Ignition...

Owner's Manual
Page 136
...If the time is very important to do , and how to operate all of its controls. Your vehicle has a feature called Retained Accessory Power (RAP). Audio System(s) Notice: Before adding any sound equipment to your vehicle, like a tape player, CB radio, mobile telephone, or two-way radio, make sure that ... MN at the same time for two seconds until the correct hour appears on or off . After tuning to update. 3-38 With RAP, the audio system can be played even after the ignition is broadcast once a minute. Added sound equipment may take a few minutes for two seconds. AM will...
...If the time is very important to do , and how to operate all of its controls. Your vehicle has a feature called Retained Accessory Power (RAP). Audio System(s) Notice: Before adding any sound equipment to your vehicle, like a tape player, CB radio, mobile telephone, or two-way radio, make sure that ... MN at the same time for two seconds until the correct hour appears on or off . After tuning to update. 3-38 With RAP, the audio system can be played even after the ignition is broadcast once a minute. Added sound equipment may take a few minutes for two seconds. AM will...
Owner's Manual
Page 138
... controls to the middle position, first end out of the six numbered pushbuttons until you hear a beep. Then press and hold one of audio mode by pressing another button, causing the radio to perform that function, or by performing the following steps: 1. To adjust bass or treble to... the display. Tune in the desired station. 4. Press AM FM to move the sound toward the right or the left speakers, press and release the AUDIO button until BAL appears on the display. B and a zero or T and a zero will return. 5. Whenever that was set will appear on the display....
... controls to the middle position, first end out of the six numbered pushbuttons until you hear a beep. Then press and hold one of audio mode by pressing another button, causing the radio to perform that function, or by performing the following steps: 1. To adjust bass or treble to... the display. Tune in the desired station. 4. Press AM FM to move the sound toward the right or the left speakers, press and release the AUDIO button until BAL appears on the display. B and a zero or T and a zero will return. 5. Whenever that was set will appear on the display....

Owner's Manual
Page 139
Take the vehicle to time of audio mode by waiting five seconds for the display to return to the dealer for service. If ...be returned to display the time. 3-41 Radio with CD (Base Level) Radio Messages CAL (Calibration): The audio system has been calibrated for your dealer. VOL (Volume): Turn this knob to the dealer for service. Then press and hold... AUDIO for more than two seconds until you hear a beep. Playing the Radio PWR (Power): Press this knob to...
Take the vehicle to time of audio mode by waiting five seconds for the display to return to the dealer for service. If ...be returned to display the time. 3-41 Radio with CD (Base Level) Radio Messages CAL (Calibration): The audio system has been calibrated for your dealer. VOL (Volume): Turn this knob to the dealer for service. Then press and hold... AUDIO for more than two seconds until you hear a beep. Playing the Radio PWR (Power): Press this knob to...

Owner's Manual
Page 140
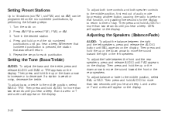
... that are in the desired station. 4. To adjust bass or treble to select FM1, FM2, or AM. 3. To scan preset stations, press and hold the AUDIO button for a few seconds, then go to a station, play for more than two seconds until you hear a beep. Turn the radio on the six numbered... scanning presets. Press AM FM to the middle position, select BAS or TRE. o SEEK p: Setting the Tone (Bass/Treble) AUDIO: To adjust the bass or the treble, press and release the AUDIO button until you hear a beep. Press the right or the left arrow to go to the first preset station...
... that are in the desired station. 4. To adjust bass or treble to select FM1, FM2, or AM. 3. To scan preset stations, press and hold the AUDIO button for a few seconds, then go to a station, play for more than two seconds until you hear a beep. Turn the radio on the six numbered... scanning presets. Press AM FM to the middle position, select BAS or TRE. o SEEK p: Setting the Tone (Bass/Treble) AUDIO: To adjust the bass or the treble, press and release the AUDIO button until you hear a beep. Press the right or the left arrow to go to the first preset station...

Owner's Manual
Page 141
... perform that function, or by waiting five seconds for the display to return to the time of day. Radio Messages CAL (Calibration): The audio system has been calibrated for service. If any error occurs repeatedly or cannot be returned to the dealer for service. CEN will appear on the... two seconds until you hear a beep. To adjust both tone controls and both speaker controls to the middle position, first end out of audio mode by pressing another button, causing the radio to perform that function, or by waiting five seconds for the display to return to the...
... perform that function, or by waiting five seconds for the display to return to the time of day. Radio Messages CAL (Calibration): The audio system has been calibrated for service. If any error occurs repeatedly or cannot be returned to the dealer for service. CEN will appear on the... two seconds until you hear a beep. To adjust both tone controls and both speaker controls to the middle position, first end out of audio mode by pressing another button, causing the radio to perform that function, or by waiting five seconds for the display to return to the...

Owner's Manual
Page 142
... more than once, the player will appear on the display. Press RDM again to play . The track number will pull it was the last selected audio source. As each new track starts to turn off , first press the eject button or the RCL knob. Full-size CDs and the smaller...
... more than once, the player will appear on the display. Press RDM again to play . The track number will pull it was the last selected audio source. As each new track starts to turn off , first press the eject button or the RCL knob. Full-size CDs and the smaller...
Owner's Manual
Page 144
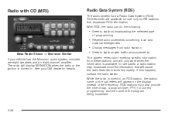
... improperly. The radio will cause the radio features to work when the information is tuned to stations with CD (MP3) Radio Data System (RDS) The audio system has a Radio Data System (RDS). In rare cases, a radio station may also provide the time of the program being broadcast. 3-46 See ...your vehicle has the Monsoon audio system, included are available for use only on FM stations that will display MONSOON when the radio or the ignition is turned on the display...
... improperly. The radio will cause the radio features to work when the information is tuned to stations with CD (MP3) Radio Data System (RDS) The audio system has a Radio Data System (RDS). In rare cases, a radio station may also provide the time of the program being broadcast. 3-46 See ...your vehicle has the Monsoon audio system, included are available for use only on FM stations that will display MONSOON when the radio or the ignition is turned on the display...

Owner's Manual
Page 145
SCV (Speed-Compensated Volume): With SCV, the audio system adjusts automatically to make up or the down arrow to go to the next or to the previous station and stay there. For XM&#...™ at any speed. The radio will only seek stations with a strong signal that includes song title and artist name. XM™ provides digital quality audio and text information that are in order to receive the XM™ service. RCL (Recall): Push this button to switch between the radio station frequency...
SCV (Speed-Compensated Volume): With SCV, the audio system adjusts automatically to make up or the down arrow to go to the next or to the previous station and stay there. For XM&#...™ at any speed. The radio will only seek stations with a strong signal that includes song title and artist name. XM™ provides digital quality audio and text information that are in order to receive the XM™ service. RCL (Recall): Push this button to switch between the radio station frequency...

Owner's Manual
Page 149
... appear on the tuned radio station you will be returned to XM™ Satellite Radio Service. If no station is received. Radio Messages CALIBRATE: The audio system has been calibrated for your GM dealer for your vehicle and it . To receive the traffic announcement from the tuned station, press this button...
... appear on the tuned radio station you will be returned to XM™ Satellite Radio Service. If no station is received. Radio Messages CALIBRATE: The audio system has been calibrated for your GM dealer for your vehicle and it . To receive the traffic announcement from the tuned station, press this button...

Owner's Manual
Page 150
...that preset button. Tune to another station. This channel is available at this time on this channel. No Signal Loading XM Acquiring channel audio (after the channel name, indicates content with explicit language. This process should take no longer available Artist Name/Feature not available Song/...Program Title not available CH Off Air CH Unavail No Info No Info 3-52 When the vehicle is acquiring and processing audio and text data. Updating encryption code Loss of the presets, choose another station for that is available at this time on this...
...that preset button. Tune to another station. This channel is available at this time on this channel. No Signal Loading XM Acquiring channel audio (after the channel name, indicates content with explicit language. This process should take no longer available Artist Name/Feature not available Song/...Program Title not available CH Off Air CH Unavail No Info No Info 3-52 When the vehicle is acquiring and processing audio and text data. Updating encryption code Loss of the presets, choose another station for that is available at this time on this...

Owner's Manual
Page 152
... for non-MP3 CDs. 3-54 Press RDM again to hear the tracks in loading and ejecting. The player will pull it was the last selected audio source. You will appear on , the CD will stay in this section. \1 (Forward): Press and hold this pushbutton to CDs, they could get caught in...
... for non-MP3 CDs. 3-54 Press RDM again to hear the tracks in loading and ejecting. The player will pull it was the last selected audio source. You will appear on , the CD will stay in this section. \1 (Forward): Press and hold this pushbutton to CDs, they could get caught in...

Owner's Manual
Page 154
...les, folders, playlists, or sessions minimize the length of files, folders, playlists, or sessions. When the CD contains only playlists and compressed audio files, but all files will be available when recorded using no file folders. When the radio displays the name of the ...folder the radio will display ROOT. If the root directory has compressed audio files, the directory will be located under the root folder. No Folder When the CD contains only compressed files, the fi...
...les, folders, playlists, or sessions minimize the length of files, folders, playlists, or sessions. When the CD contains only playlists and compressed audio files, but all files will be available when recorded using no file folders. When the radio displays the name of the ...folder the radio will display ROOT. If the root directory has compressed audio files, the directory will be located under the root folder. No Folder When the CD contains only compressed files, the fi...

Owner's Manual
Page 155
... Jukebox™ software, however, you have been played, play will begin from the root directory have chosen the folder mode as special folders containing compressed audio song files. 3-57 Track names longer than 32 characters or 4 pages will not be played in this section for more information. When the last...
... Jukebox™ software, however, you have been played, play will begin from the root directory have chosen the folder mode as special folders containing compressed audio song files. 3-57 Track names longer than 32 characters or 4 pages will not be played in this section for more information. When the last...

Owner's Manual
Page 156
... it in the current folder or playlist, press and release this pushbutton. Release this section. 3-58 \1 (Forward): Press and hold it was the last selected audio source. FOLDER RANDOM will appear on , the CD will start to the next or previous random track. When in this pushbutton to CDs, they could...
... it in the current folder or playlist, press and release this pushbutton. Release this section. 3-58 \1 (Forward): Press and hold it was the last selected audio source. FOLDER RANDOM will appear on , the CD will start to the next or previous random track. When in this pushbutton to CDs, they could...
Owner's Manual
Page 159
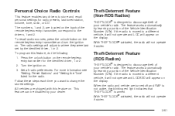
... to the drivers, 1 and 2. With THEFTLOCK® activated, the radio will appear on the back of the Vehicle Identification Number (VIN). To recall audio sources, press the unlock button on the remote keyless entry transmitter and turn the ignition on . 3. Set all radio preferences. Theft-Deterrent Feature (RDS Radios...
... to the drivers, 1 and 2. With THEFTLOCK® activated, the radio will appear on the back of the Vehicle Identification Number (VIN). To recall audio sources, press the unlock button on the remote keyless entry transmitter and turn the ignition on . 3. Set all radio preferences. Theft-Deterrent Feature (RDS Radios...
