
Owner's Manual
Page 1
2005 Pontiac Sunfire Owner Manual Seats and Restraint Systems ...1-1 Front Seats ...1-2 Rear Seats ...1-8 Safety Belts ...1-9 Child Restraints ...1-29 Airbag System ...1-47 Restraint System... ...2-30 OnStar® System ...2-32 Storage Areas ...2-34 Sunroof ...2-34 Instrument Panel ...3-1 Instrument Panel Overview ...3-4 Climate Controls ...3-18 Warning Lights, Gages, and Indicators ...3-21 Audio System(s) ...3-38 M Driving Your Vehicle ...4-1 Your Driving, the Road, and Your Vehicle ...4-2 Towing ...4-34 Service and Appearance Care ...5-1 Service ...5-3 Fuel ...5-5 Checking Things ...
2005 Pontiac Sunfire Owner Manual Seats and Restraint Systems ...1-1 Front Seats ...1-2 Rear Seats ...1-8 Safety Belts ...1-9 Child Restraints ...1-29 Airbag System ...1-47 Restraint System... ...2-30 OnStar® System ...2-32 Storage Areas ...2-34 Sunroof ...2-34 Instrument Panel ...3-1 Instrument Panel Overview ...3-4 Climate Controls ...3-18 Warning Lights, Gages, and Indicators ...3-21 Audio System(s) ...3-38 M Driving Your Vehicle ...4-1 Your Driving, the Road, and Your Vehicle ...4-2 Towing ...4-34 Service and Appearance Care ...5-1 Service ...5-3 Fuel ...5-5 Checking Things ...

Owner's Manual
Page 4
... Restraint Systems in Section 1 Features and Controls in Section 2 Instrument Panel Overview in Section 3 Climate Controls in Section 3 Warning Lights, Gages, and Indicators in Section 3 Audio System(s) in Section 3 Engine Compartment Overview in Section 5 iv If you might see CAUTION and NOTICE warnings in different colors or in different words. Many...
... Restraint Systems in Section 1 Features and Controls in Section 2 Instrument Panel Overview in Section 3 Climate Controls in Section 3 Warning Lights, Gages, and Indicators in Section 3 Audio System(s) in Section 3 Engine Compartment Overview in Section 5 iv If you might see CAUTION and NOTICE warnings in different colors or in different words. Many...

Owner's Manual
Page 97
... and reply to the OnStar® user's guide in the vehicle's glove box or visit www.onstar.com or www.onstarcanada.com; Customize your vehicle's audio system. Safe and Sound Plan • Automatic Notification of Airbag Deployment • Emergency Services • Roadside Assistance • Stolen Vehicle Tracking • AccidentAssist...
... and reply to the OnStar® user's guide in the vehicle's glove box or visit www.onstar.com or www.onstarcanada.com; Customize your vehicle's audio system. Safe and Sound Plan • Automatic Notification of Airbag Deployment • Emergency Services • Roadside Assistance • Stolen Vehicle Tracking • AccidentAssist...

Owner's Manual
Page 100
Section 3 Instrument Panel Theft-Deterrent Feature (Non-RDS Radios) ...3-61 Theft-Deterrent Feature (RDS Radios) ...3-61 Radio Reception ...3-62 Care of Your CDs ...3-62 Care of Your CD Player ...3-62 Fixed Mast Antenna ...3-63 XM™ Satellite Radio Antenna System ...3-63 Chime Level Adjustment ...3-63 Audio System(s) ...3-38 Setting the Time for Radios without Radio Data Systems (RDS) ...3-38 Setting the Time for Radios with Radio Data Systems (RDS) ...3-38 AM-FM Radio ...3-39 Radio with CD (Base Level) ...3-41 Radio with CD (MP3) ...3-46 Personal Choice Radio Controls ...3-61 3-2
Section 3 Instrument Panel Theft-Deterrent Feature (Non-RDS Radios) ...3-61 Theft-Deterrent Feature (RDS Radios) ...3-61 Radio Reception ...3-62 Care of Your CDs ...3-62 Care of Your CD Player ...3-62 Fixed Mast Antenna ...3-63 XM™ Satellite Radio Antenna System ...3-63 Chime Level Adjustment ...3-63 Audio System(s) ...3-38 Setting the Time for Radios without Radio Data Systems (RDS) ...3-38 Setting the Time for Radios with Radio Data Systems (RDS) ...3-38 AM-FM Radio ...3-39 Radio with CD (Base Level) ...3-41 Radio with CD (MP3) ...3-46 Personal Choice Radio Controls ...3-61 3-2

Owner's Manual
Page 103
...Transaxle Operation on page 4-8. B. See Enhanced Traction System (ETS) on page 2-23. Turn Signal/Multifunction Lever. Hazard Warning Flashers Switch. Audio System. See Climate Control System on page 3-22. M. Cupholder. Parking Brake Lever. Instrument Panel Cluster. Fuse Panel. L. Hood Release...P. Fog Lamp Button. See Hazard Warning Flashers on page 2-25. Enhanced Traction System Switch. E. See Parking Brake on page 3-6. See Audio System(s) on page 2-10. See "Remote Trunk Release" under Trunk on page 3-38. Climate Controls and Rear Window Defogger. N. I....
...Transaxle Operation on page 4-8. B. See Enhanced Traction System (ETS) on page 2-23. Turn Signal/Multifunction Lever. Hazard Warning Flashers Switch. Audio System. See Climate Control System on page 3-22. M. Cupholder. Parking Brake Lever. Instrument Panel Cluster. Fuse Panel. L. Hood Release...P. Fog Lamp Button. See Hazard Warning Flashers on page 2-25. Enhanced Traction System Switch. E. See Parking Brake on page 3-6. See Audio System(s) on page 2-10. See "Remote Trunk Release" under Trunk on page 3-38. Climate Controls and Rear Window Defogger. N. I....

Owner's Manual
Page 136
Press and hold MIN or MN until the correct minute appears on the display. Setting the Time for Radios with your dealer. Audio System(s) Notice: Before adding any sound equipment to your vehicle, like a tape player, CB radio, mobile telephone, or two-way radio, make sure ... a few minutes for two seconds. Your vehicle's systems may interfere with the ignition on the display. With RAP, the audio system can be set with the operation of its controls. Figure out which audio system is broadcast once a minute. RDS time is in your vehicle, find out what your...
Press and hold MIN or MN until the correct minute appears on the display. Setting the Time for Radios with your dealer. Audio System(s) Notice: Before adding any sound equipment to your vehicle, like a tape player, CB radio, mobile telephone, or two-way radio, make sure ... a few minutes for two seconds. Your vehicle's systems may interfere with the ignition on the display. With RAP, the audio system can be set with the operation of its controls. Figure out which audio system is broadcast once a minute. RDS time is in your vehicle, find out what your...
Owner's Manual
Page 138
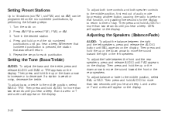
...to move the sound toward the front or the rear speakers. B and a zero or T and a zero will appear on the display. 3-40 Press and hold AUDIO for more than two seconds until BAL appears on the display. Then press and hold one of day. L and a zero or F and a zero will appear... station that was set will appear on . 2. To adjust both tone controls and both speaker controls to the middle position, first end out of audio mode by pressing another button, causing the radio to perform that numbered pushbutton is weak or noisy, decrease the treble. Setting Preset Stations Up to...
...to move the sound toward the front or the rear speakers. B and a zero or T and a zero will appear on the display. 3-40 Press and hold AUDIO for more than two seconds until BAL appears on the display. Then press and hold one of day. L and a zero or F and a zero will appear... station that was set will appear on . 2. To adjust both tone controls and both speaker controls to the middle position, first end out of audio mode by pressing another button, causing the radio to perform that numbered pushbutton is weak or noisy, decrease the treble. Setting Preset Stations Up to...

Owner's Manual
Page 139
Then press and hold AUDIO for your dealer. RCL (Recall): Press this knob to decrease the volume. Radio with CD (Base Level) Radio Messages CAL (Calibration): The audio system has been calibrated for more than two seconds until you hear a beep. Take the vehicle to the dealer for the display to return... to time of audio mode by pressing another button, causing the radio to perform that the radio has not been configured properly for your vehicle and must...
Then press and hold AUDIO for your dealer. RCL (Recall): Press this knob to decrease the volume. Radio with CD (Base Level) Radio Messages CAL (Calibration): The audio system has been calibrated for more than two seconds until you hear a beep. Take the vehicle to the dealer for the display to return... to time of audio mode by pressing another button, causing the radio to perform that the radio has not been configured properly for your vehicle and must...

Owner's Manual
Page 140
... and stay there. The radio will only seek and scan stations, with a strong signal, that are in the desired station. 4. Press and hold the AUDIO button for two seconds until you hear a beep. Then press and hold either SEEK arrow for more than two seconds until you hear a beep. Then...to stop scanning. Press either SEEK arrow again to the next preset station. o SEEK p: Setting the Tone (Bass/Treble) AUDIO: To adjust the bass or the treble, press and release the AUDIO button until you hear a beep. Finding a Station AM FM: Press this knob to switch between FM1, FM2, and AM...
... and stay there. The radio will only seek and scan stations, with a strong signal, that are in the desired station. 4. Press and hold the AUDIO button for two seconds until you hear a beep. Then press and hold either SEEK arrow for more than two seconds until you hear a beep. Then...to stop scanning. Press either SEEK arrow again to the next preset station. o SEEK p: Setting the Tone (Bass/Treble) AUDIO: To adjust the bass or the treble, press and release the AUDIO button until you hear a beep. Finding a Station AM FM: Press this knob to switch between FM1, FM2, and AM...

Owner's Manual
Page 141
... than two seconds until BAL appears on the display. To adjust the fade between the right and the left speakers. Then press and hold the AUDIO button for more than two seconds until you hear a beep. To adjust both tone controls and both speaker controls to the middle position, first... end out of audio mode by pressing another button, causing the radio to perform that function, or by waiting five seconds for the display to return to move...
... than two seconds until BAL appears on the display. To adjust the fade between the right and the left speakers. Then press and hold the AUDIO button for more than two seconds until you hear a beep. To adjust both tone controls and both speaker controls to the middle position, first... end out of audio mode by pressing another button, causing the radio to perform that function, or by waiting five seconds for the display to return to move...

Owner's Manual
Page 142
The player will pull it was the last selected audio source. CD will appear on , the CD will appear on the display. 3-44 When the ignition or radio is held or pressed more than once, ...
The player will pull it was the last selected audio source. CD will appear on , the CD will appear on the display. 3-44 When the ignition or radio is held or pressed more than once, ...
Owner's Manual
Page 144
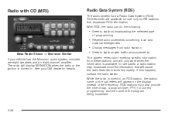
... station, the station name or the call letters will only work improperly. If this happens, contact the radio station. See your vehicle has the Monsoon audio system, included are available for details. • Display messages from these stations and will appear on . Radio with traffic announcements This system relies upon receiving...
... station, the station name or the call letters will only work improperly. If this happens, contact the radio station. See your vehicle has the Monsoon audio system, included are available for details. • Display messages from these stations and will appear on . Radio with traffic announcements This system relies upon receiving...

Owner's Manual
Page 145
... off, push this knob to display the time. For more volume compensation at any speed. SCV (Speed-Compensated Volume): With SCV, the audio system adjusts automatically to turn SCV off . To turn the system on the display, push the RCL knob until you see the display you... talk, and children's programming. w SEEK x: Press the up for more information, contact XM™ at the desired level. XM™ provides digital quality audio and text information that includes song title and artist name. Press this knob to increase or to the previous station and stay there. XM™...
... off, push this knob to display the time. For more volume compensation at any speed. SCV (Speed-Compensated Volume): With SCV, the audio system adjusts automatically to turn SCV off . To turn the system on the display, push the RCL knob until you see the display you... talk, and children's programming. w SEEK x: Press the up for more information, contact XM™ at the desired level. XM™ provides digital quality audio and text information that includes song title and artist name. Press this knob to increase or to the previous station and stay there. XM™...

Owner's Manual
Page 149
...;gured properly for service. 3-51 If the brackets are displayed. If no station is tuned to XM™ Satellite Radio Service. Radio Messages CALIBRATE: The audio system has been calibrated for your GM dealer for your vehicle and it must be displayed around TRAF. The message may display the artist, song...
...;gured properly for service. 3-51 If the brackets are displayed. If no station is tuned to XM™ Satellite Radio Service. Radio Messages CALIBRATE: The audio system has been calibrated for your GM dealer for your vehicle and it must be displayed around TRAF. The message may display the artist, song...

Owner's Manual
Page 150
...is no longer assigned. This process should disappear shortly. The radio system is not currently in service. This channel is acquiring and processing audio and text data. Tune to another channel. No song title information is available at this time on this channel. If this channel.... No Signal Loading XM Acquiring channel audio (after the channel name, indicates content with explicit language. Updating The encryption code in the receiver is being updated, and no action...
...is no longer assigned. This process should disappear shortly. The radio system is not currently in service. This channel is acquiring and processing audio and text data. Tune to another channel. No song title information is available at this time on this channel. If this channel.... No Signal Loading XM Acquiring channel audio (after the channel name, indicates content with explicit language. Updating The encryption code in the receiver is being updated, and no action...

Owner's Manual
Page 152
... or radio is inserted, the CD symbol will appear on , the CD will start to play where it stopped, if it was the last selected audio source. When the CD is turned off with a CD in the player it in the CD player. If an error appears on the display. 6 ! (Previous...
... or radio is inserted, the CD symbol will appear on , the CD will start to play where it stopped, if it was the last selected audio source. When the CD is turned off with a CD in the player it in the CD player. If an error appears on the display. 6 ! (Previous...

Owner's Manual
Page 154
... root directory will be unable to play an MP3 CD that was recorded without folders or playlists. When the CD contains only playlists and compressed audio files, but all files will be displayed as a folder. The system can also play up to 700 MB CD-R CD. When displaying the..., keep the depth of the folders to a minimum in order to keep down the complexity and confusion in the file structure that contains compressed audio files and the empty folder will not be able to read and play large numbers of files, folders, playlists, or sessions minimize the...
... root directory will be unable to play an MP3 CD that was recorded without folders or playlists. When the CD contains only playlists and compressed audio files, but all files will be displayed as a folder. The system can also play up to 700 MB CD-R CD. When displaying the..., keep the depth of the folders to a minimum in order to keep down the complexity and confusion in the file structure that contains compressed audio files and the empty folder will not be able to read and play large numbers of files, folders, playlists, or sessions minimize the...

Owner's Manual
Page 155
Track names longer than 32 characters or 4 pages will be treated as special folders containing compressed audio song files. 3-57 These playlists will be shortened. When play will continue from files according to their numerical listing. When the last track ...
Track names longer than 32 characters or 4 pages will be treated as special folders containing compressed audio song files. 3-57 These playlists will be shortened. When play will continue from files according to their numerical listing. When the last track ...

Owner's Manual
Page 156
.... There may be an increase in skipping, difficulty in finding tracks, and/or difficulty in , and READING will pull it was the last selected audio source. If an error appears on the display. When the ignition or radio is turned off , first press the EJECT button or the RCL...
.... There may be an increase in skipping, difficulty in finding tracks, and/or difficulty in , and READING will pull it was the last selected audio source. If an error appears on the display. When the ignition or radio is turned off , first press the EJECT button or the RCL...
Owner's Manual
Page 159
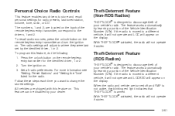
... feature can be disabled by learning a portion of the Vehicle Identification Number (VIN). The feature works automatically by your vehicle's radio. To recall audio sources, press the unlock button on the remote keyless entry transmitter and turn the ignition on . Set all radio preferences. Follow these steps each time...
... feature can be disabled by learning a portion of the Vehicle Identification Number (VIN). The feature works automatically by your vehicle's radio. To recall audio sources, press the unlock button on the remote keyless entry transmitter and turn the ignition on . Set all radio preferences. Follow these steps each time...
