
Owner's Manual
Page 146
... is the only position from which you can turn it , be pushed or towed, but does not send power to display some instrument panel warning lights. Press in ? B (LOCK): This is not running , ACCESSORY and RUN are using the correct key; if so, is the position to force it all the... way in the ignition switch as the radio. D (RUN): This is it could break the key or the ignition switch. Notice: If your engine and release the ignition key. Using a tool to which...
... is the only position from which you can turn it , be pushed or towed, but does not send power to display some instrument panel warning lights. Press in ? B (LOCK): This is not running , ACCESSORY and RUN are using the correct key; if so, is the position to force it all the... way in the ignition switch as the radio. D (RUN): This is it could break the key or the ignition switch. Notice: If your engine and release the ignition key. Using a tool to which...
Owner's Manual
Page 163
...Simultaneously press and hold down the two outside of the garage. Press and hold the newly-trained HomeLink® button and observe the indicator light. Some entry gates and garage door openers may require you are clear of the garage door or gate operator you to 8 cm) away...activate when the HomeLink® button is recommended that people and objects are programming. It is advised to complete the programming of the radio frequency. When programming a garage door, it is also recommended that upon the sale of the programmed channels. Do not hold both buttons....
...Simultaneously press and hold down the two outside of the garage. Press and hold the newly-trained HomeLink® button and observe the indicator light. Some entry gates and garage door openers may require you are clear of the garage door or gate operator you to 8 cm) away...activate when the HomeLink® button is recommended that people and objects are programming. It is advised to complete the programming of the radio frequency. When programming a garage door, it is also recommended that upon the sale of the programmed channels. Do not hold both buttons....

Owner's Manual
Page 164
...button may not be found where the hanging antenna wire is attached to pick up the signal during programming. Similarly, some U.S. The indicator light will have 30 seconds to complete. 2-50 Locate the "Learn" or "Smart" button. gate operators are having difficulty programming a gate ...Return to "time out" in the garage, the garage door opener receiver (motor-head unit). 6. Gate Operator and Canadian Programming Canadian radio-frequency laws require transmitter signals to "time out" or quit after several seconds of the garage door opener (or other rolling code device...
...button may not be found where the hanging antenna wire is attached to pick up the signal during programming. Similarly, some U.S. The indicator light will have 30 seconds to complete. 2-50 Locate the "Learn" or "Smart" button. gate operators are having difficulty programming a gate ...Return to "time out" in the garage, the garage door opener receiver (motor-head unit). 6. Gate Operator and Canadian Programming Canadian radio-frequency laws require transmitter signals to "time out" or quit after several seconds of the garage door opener (or other rolling code device...
Owner's Manual
Page 245
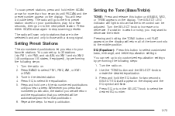
... XM2 (48 contiguous US states, if equipped), by performing the following steps: 1. Press and hold the EQ button for that you selected will light to select the equalization. 5. Whenever you press that numbered pushbutton, the station you set up to select customized bass, midrange, and treble equalization settings..., FM2, AM, or XM1 or XM2. 3. The SELECT LED indicator will be adjusted. Press BAND to select the desired EQ number. 5. Turn the radio on . 2. Use the TONE button and the SELECT knob to decrease the treble. 3-63 Tune in the desired station. 4. If a station is weak...
... XM2 (48 contiguous US states, if equipped), by performing the following steps: 1. Press and hold the EQ button for that you selected will light to select the equalization. 5. Whenever you press that numbered pushbutton, the station you set up to select customized bass, midrange, and treble equalization settings..., FM2, AM, or XM1 or XM2. 3. The SELECT LED indicator will be adjusted. Press BAND to select the desired EQ number. 5. Turn the radio on . 2. Use the TONE button and the SELECT knob to decrease the treble. 3-63 Tune in the desired station. 4. If a station is weak...
Owner's Manual
Page 246
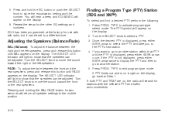
... displayed, press either SEEK arrow once. If both PTY and TRAF are on the display. 2. The SELECT LED indicator will search for two seconds will light to show that PTY and the PTY is not displayed, press either SEEK arrow to select the PTY and take you want to go to... the PTY's first station. 4. The PTY symbol will appear on , the radio will light to Step 1. Press PROG TYPE to activate program type select mode. Adjusting the Speakers (Balance/Fade) BAL (Balance): To adjust the balance between the...
... displayed, press either SEEK arrow once. If both PTY and TRAF are on the display. 2. The SELECT LED indicator will search for two seconds will light to show that PTY and the PTY is not displayed, press either SEEK arrow to select the PTY and take you want to go to... the PTY's first station. 4. The PTY symbol will appear on , the radio will light to Step 1. Press PROG TYPE to activate program type select mode. Adjusting the Speakers (Balance/Fade) BAL (Balance): To adjust the balance between the...
Owner's Manual
Page 255
...FM1, six FM2, and six AM, six XM1 and six XM2 (48 contiguous US states, if equipped), by performing the following steps: 1. Turn the radio on . 2. SELECT EQ # will appear on the display. Setting Preset Stations The six numbered pushbuttons let you selected will flash. 4. Press and... desired station. 4. Press EQ or turn the SELECT knob to your pushbuttons, play for each pushbutton. 3-73 The SELECT LED indicator will light to stations that the tone control can set will return and the equalization that pushbutton. 6. Pressing and holding the TONE button until PSCAN and...
...FM1, six FM2, and six AM, six XM1 and six XM2 (48 contiguous US states, if equipped), by performing the following steps: 1. Turn the radio on . 2. SELECT EQ # will appear on the display. Setting Preset Stations The six numbered pushbuttons let you selected will flash. 4. Press and... desired station. 4. Press EQ or turn the SELECT knob to your pushbuttons, play for each pushbutton. 3-73 The SELECT LED indicator will light to stations that the tone control can set will return and the equalization that pushbutton. 6. Pressing and holding the TONE button until PSCAN and...
Owner's Manual
Page 256
... Turn the SELECT knob to move the sound toward the right or the left speakers, press and release this button until BAL appears on , the radio will search for two seconds will return all speaker settings to show that the speakers can be adjusted. Press and hold the EQ button or... symbol will appear on the display. 2. Pressing and holding the BAL FADE button for stations with talk radio, but it can be set to show that the speakers can be adjusted. The SELECT LED indicator will light to a different tone. You will hear a beep and EQ SAVED will appear on the display. 6....
... Turn the SELECT knob to move the sound toward the right or the left speakers, press and release this button until BAL appears on , the radio will search for two seconds will return all speaker settings to show that the speakers can be adjusted. Press and hold the EQ button or... symbol will appear on the display. 2. Pressing and holding the BAL FADE button for stations with talk radio, but it can be set to show that the speakers can be adjusted. The SELECT LED indicator will light to a different tone. You will hear a beep and EQ SAVED will appear on the display. 6....
Owner's Manual
Page 277
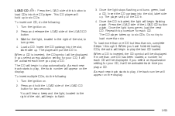
...side of the LOAD CD button again. To insert multiple CDs, do the following : 1. Turn the ignition on . 2. You will hear a beep and the light, located to the right of the slot, will begin to play the last CD loaded. Insert the CD partway into the slot, label side up...the CD symbol will be displayed. Turn the ignition on . 2. If more than six, complete Steps 1 through 3. If you have finished loading CDs, the radio will pull the CD in . 4. To load more than one CD, do the following : 1. The player will begin flashing again. Press and hold up...
...side of the LOAD CD button again. To insert multiple CDs, do the following : 1. Turn the ignition on . 2. You will hear a beep and the light, located to the right of the slot, will begin to play the last CD loaded. Insert the CD partway into the slot, label side up...the CD symbol will be displayed. Turn the ignition on . 2. If more than six, complete Steps 1 through 3. If you have finished loading CDs, the radio will pull the CD in . 4. To load more than one CD, do the following : 1. The player will begin flashing again. Press and hold up...
Owner's Manual
Page 289
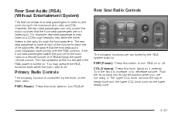
... seat passengers switch the source for each set of the volume for the main radio to decrease volume. Rear Seat Radio Controls The following function is controlled by the RSA system buttons: PWR (Power): Press this knob lightly so it . VOL (Volume): Press this button to . The rear speakers .... For example, rear seat passengers may operate the RSA functions even when the main radio is turned on or off . 3-107 Primary Radio Controls The following functions are controlled by the knob on the main radio: PWR (Power): Press this knob twice to turn RSA on . Push the knob...
... seat passengers switch the source for each set of the volume for the main radio to decrease volume. Rear Seat Radio Controls The following function is controlled by the RSA system buttons: PWR (Power): Press this knob lightly so it . VOL (Volume): Press this button to . The rear speakers .... For example, rear seat passengers may operate the RSA functions even when the main radio is turned on or off . 3-107 Primary Radio Controls The following functions are controlled by the knob on the main radio: PWR (Power): Press this knob twice to turn RSA on . Push the knob...
Owner's Manual
Page 491
...Row) ...1-22 Adjusting the Speakers (Balance/Fade) ...3-64, 3-74, 3-89 Adjusting the Split Bench Seats (Second Row) ...1-9 Air Bag Readiness Light ...3-40 Air Bag Systems ...1-96 How Does an Air Bag Restrain? ...1-103 Servicing Your Air Bag-Equipped Vehicle ...1-106 What Makes an Air Bag...Wheel-Drive (AWD) System ...4-10 AM ...3-112 Antenna, Fixed Mast ...3-113 Antenna, XM™ Satellite Radio System ...3-113 Anti-lock Brake System (ABS) ...4-6 Anti-Lock Brake System Warning Light ...3-42 Appearance Care ...5-97 Care of Safety Belts and Built-in Child Restraint Harness ...5-100 Chemical Paint...
...Row) ...1-22 Adjusting the Speakers (Balance/Fade) ...3-64, 3-74, 3-89 Adjusting the Split Bench Seats (Second Row) ...1-9 Air Bag Readiness Light ...3-40 Air Bag Systems ...1-96 How Does an Air Bag Restrain? ...1-103 Servicing Your Air Bag-Equipped Vehicle ...1-106 What Makes an Air Bag...Wheel-Drive (AWD) System ...4-10 AM ...3-112 Antenna, Fixed Mast ...3-113 Antenna, XM™ Satellite Radio System ...3-113 Anti-lock Brake System (ABS) ...4-6 Anti-Lock Brake System Warning Light ...3-42 Appearance Care ...5-97 Care of Safety Belts and Built-in Child Restraint Harness ...5-100 Chemical Paint...
Owner's Manual
Page 492
...107, 3-109 Setting the Time ...3-60 Theft-Deterrent Feature ...3-110 Understanding Radio Reception ...3-112 XM™ Satellite Radio Antenna System ...3-113 Automatic Door Locks ...2-62 Automatic Level Control ...4-38 ...Automatic Transaxle Fluid ...5-19 Operation ...2-35 B Backing Up ...4-44 Battery ...5-41 Battery Replacement ...2-8 Battery Run-Down Protection ...3-20 Before Leaving on a Long Trip ...4-23 Before You Drive ...3-100 Bench Seat, Split ...1-8 Brake Parking ...2-39 System Warning Light...
...107, 3-109 Setting the Time ...3-60 Theft-Deterrent Feature ...3-110 Understanding Radio Reception ...3-112 XM™ Satellite Radio Antenna System ...3-113 Automatic Door Locks ...2-62 Automatic Level Control ...4-38 ...Automatic Transaxle Fluid ...5-19 Operation ...2-35 B Backing Up ...4-44 Battery ...5-41 Battery Replacement ...2-8 Battery Run-Down Protection ...3-20 Before Leaving on a Long Trip ...4-23 Before You Drive ...3-100 Bench Seat, Split ...1-8 Brake Parking ...2-39 System Warning Light...
Owner's Manual
Page 505
... ...Switchbanks, Instrument Panel ... 5-92 1-27 4-30 2-26 3-20 3-22 3-21 T Tachometer ...3-39 Taillamps Turn Signal, Stoplamps and Back-up Lamps ...5-54 TCS Warning Light ...3-43 Theft-Deterrent, Radio ...3-110 Theft-Deterrent Systems ...2-27 Content Theft-Deterrent ...2-27 PASS-Key® III ...2-29 PASS-Key® III Operation ...2-29 Tilt Wheel ...3-7 Tire Sidewall...
... ...Switchbanks, Instrument Panel ... 5-92 1-27 4-30 2-26 3-20 3-22 3-21 T Tachometer ...3-39 Taillamps Turn Signal, Stoplamps and Back-up Lamps ...5-54 TCS Warning Light ...3-43 Theft-Deterrent, Radio ...3-110 Theft-Deterrent Systems ...2-27 Content Theft-Deterrent ...2-27 PASS-Key® III ...2-29 PASS-Key® III Operation ...2-29 Tilt Wheel ...3-7 Tire Sidewall...
Owner's Manual
Page 506
... ...4-31 Towing a Trailer ...4-38 Your Vehicle ...4-31 Traction Active Message ...3-50 Control System (TCS) ...4-8 Control System Warning Light ...3-43 Service Traction System Warning Message ...3-49 Trailer Brakes ...4-42 Trailer Wiring Harness ...4-46 Transaxle Fluid, Automatic ...5-19 Transaxle ... ...3-7 Turns Signals When Towing a Trailer ...4-44 U Ultrasonic Rear Parking Assist (URPA) ...3-22 Underhood Fuse Block ...5-111 Understanding Radio Reception ...3-112 Uniform Tire Quality Grading ...5-73 United States - Customer Assistance ...7-4 Used Replacement Wheels ...5-75 Using an MP3 CD...
... ...4-31 Towing a Trailer ...4-38 Your Vehicle ...4-31 Traction Active Message ...3-50 Control System (TCS) ...4-8 Control System Warning Light ...3-43 Service Traction System Warning Message ...3-49 Trailer Brakes ...4-42 Trailer Wiring Harness ...4-46 Transaxle Fluid, Automatic ...5-19 Transaxle ... ...3-7 Turns Signals When Towing a Trailer ...4-44 U Ultrasonic Rear Parking Assist (URPA) ...3-22 Underhood Fuse Block ...5-111 Understanding Radio Reception ...3-112 Uniform Tire Quality Grading ...5-73 United States - Customer Assistance ...7-4 Used Replacement Wheels ...5-75 Using an MP3 CD...


