Owner's Manual
Page 1
2004 Pontiac Grand Prix Owner Manual Seats and Restraint Systems ...1-1 Front Seats ...1-2 Rear Seats ...1-8 Safety Belts ...1-10 Child Restraints ...1-29 Air Bag Systems ...1-48 Restraint System Check ... ...3-88 M Driving Your Vehicle ...4-1 Your Driving, the Road, and Your Vehicle ...4-2 Towing ...4-33 Service and Appearance Care ...5-1 Service ...5-3 Fuel ...5-4 Checking Things Under the Hood ...5-10 Headlamp Aiming ...5-56 Bulb Replacement ...5-59 Windshield Wiper Blade Replacement ...5-67 Tires ...5-68 Appearance Care ...5-90 Vehicle Identification ...5-98 Electrical System ...5-99...
2004 Pontiac Grand Prix Owner Manual Seats and Restraint Systems ...1-1 Front Seats ...1-2 Rear Seats ...1-8 Safety Belts ...1-10 Child Restraints ...1-29 Air Bag Systems ...1-48 Restraint System Check ... ...3-88 M Driving Your Vehicle ...4-1 Your Driving, the Road, and Your Vehicle ...4-2 Towing ...4-33 Service and Appearance Care ...5-1 Service ...5-3 Fuel ...5-4 Checking Things Under the Hood ...5-10 Headlamp Aiming ...5-56 Bulb Replacement ...5-59 Windshield Wiper Blade Replacement ...5-67 Tires ...5-68 Appearance Care ...5-90 Vehicle Identification ...5-98 Electrical System ...5-99...

Owner's Manual
Page 85
... seriously injured. Turn off the engine. 2. Plug it could overheat and cause a fire. How long should you have, and some other things. Open the hood and unwrap the electrical cord. To Use the Engine Coolant Heater 1. The cord is located above the engine air cleaner/filter. Before starting the...
... seriously injured. Turn off the engine. 2. Plug it could overheat and cause a fire. How long should you have, and some other things. Open the hood and unwrap the electrical cord. To Use the Engine Coolant Heater 1. The cord is located above the engine air cleaner/filter. Before starting the...
Owner's Manual
Page 107
... on page 3-5.) O. Tilt Steering Wheel Lever (on Steering Column). (See Tilt Wheel on page 2-22.) E. Cruise Control. (See Cruise Control Lever on page 5-11.) N. Hood Release. (See Hood Release on page 3-8.) P. Instrument Panel Outlets. (See Outlet Adjustment on page 3-6.) H. Windshield Wiper Lever. (See Windshield Washer Lever on page 3-29.) C. Interior Lamps Brightness...
... on page 3-5.) O. Tilt Steering Wheel Lever (on Steering Column). (See Tilt Wheel on page 2-22.) E. Cruise Control. (See Cruise Control Lever on page 5-11.) N. Hood Release. (See Hood Release on page 3-8.) P. Instrument Panel Outlets. (See Outlet Adjustment on page 3-6.) H. Windshield Wiper Lever. (See Windshield Washer Lever on page 3-29.) C. Interior Lamps Brightness...
Owner's Manual
Page 133
... fan is located under the front seats clear of objects to help circulate the air inside of your vehicle. • Use of non-GM approved hood deflectors may adversely affect the performance of the system. • Keep the path under the passenger side windshield wiper arm. Operation Tips •...
... fan is located under the front seats clear of objects to help circulate the air inside of your vehicle. • Use of non-GM approved hood deflectors may adversely affect the performance of the system. • Keep the path under the passenger side windshield wiper arm. Operation Tips •...
Owner's Manual
Page 134
Raise the hood. 4. Remove the air inlet grille. 3-30 Turn the ignition to the center. 8. Disconnect the windshield washer pump hose from the passenger's side of the vehicle, ... wipers are in ACCESSORY and turn the windshield wipers on the tab. 9. To change the passenger compartment air filter, do the following: 1. Remove the hood weather-strip from the fender rail and the air inlet grille. 5. Reverse steps 1 through 7. 6. Install a new passenger compartment air filter. Remove the passenger compartment...
Raise the hood. 4. Remove the air inlet grille. 3-30 Turn the ignition to the center. 8. Disconnect the windshield washer pump hose from the passenger's side of the vehicle, ... wipers are in ACCESSORY and turn the windshield wipers on the tab. 9. To change the passenger compartment air filter, do the following: 1. Remove the hood weather-strip from the fender rail and the air inlet grille. 5. Reverse steps 1 through 7. 6. Install a new passenger compartment air filter. Remove the passenger compartment...

Owner's Manual
Page 170
...will continue to clear it has not been acknowledged when the engine is turned off . This warning message appears when a door, the trunk or the hood of PARK (P). See "Engine Oil Monitor System" in options under the options menu on page 5-16 for three seconds if the message has been ... ignition is not closed . This message will continue to show which door or doors are not properly closed. This warning message will highlight the hood or trunk if either one is in RUN. AJAR This symbol appears with the CHANGE OIL SOON warning message. The graphic will re-appear when...
...will continue to clear it has not been acknowledged when the engine is turned off . This warning message appears when a door, the trunk or the hood of PARK (P). See "Engine Oil Monitor System" in options under the options menu on page 5-16 for three seconds if the message has been ... ignition is not closed . This message will continue to show which door or doors are not properly closed. This warning message will highlight the hood or trunk if either one is in RUN. AJAR This symbol appears with the CHANGE OIL SOON warning message. The graphic will re-appear when...
Owner's Manual
Page 281
... Octane ...5-4 Gasoline Specifications ...5-5 California Fuel ...5-5 Additives ...5-6 Fuels in Foreign Countries ...5-7 Filling Your Tank ...5-7 Filling a Portable Fuel Container ...5-10 Checking Things Under the Hood ...5-10 Hood Release ...5-11 Engine Compartment Overview ...5-12 Engine Oil ...5-16 Supercharger Oil ...5-21 Engine Air Cleaner/Filter ...5-22 Automatic Transaxle Fluid ...5-24 Engine Coolant ...5-26 Radiator...
... Octane ...5-4 Gasoline Specifications ...5-5 California Fuel ...5-5 Additives ...5-6 Fuels in Foreign Countries ...5-7 Filling Your Tank ...5-7 Filling a Portable Fuel Container ...5-10 Checking Things Under the Hood ...5-10 Hood Release ...5-11 Engine Compartment Overview ...5-12 Engine Oil ...5-16 Supercharger Oil ...5-21 Engine Air Cleaner/Filter ...5-22 Automatic Transaxle Fluid ...5-24 Engine Coolant ...5-26 Radiator...

Owner's Manual
Page 290
... and your vehicle. Contact should be maintained until the filling is complete. • Don't smoke while pumping gasoline. {CAUTION: An electric fan under the hood can start a fire. Keep hands, clothing and tools away from the container can ignite the gasoline vapor.You can get on any underhood electric... to you even when the engine is inside of the fill opening before operating the nozzle. Filling a Portable Fuel Container Checking Things Under the Hood {CAUTION: Never fill a portable fuel container while it is not running.
... and your vehicle. Contact should be maintained until the filling is complete. • Don't smoke while pumping gasoline. {CAUTION: An electric fan under the hood can start a fire. Keep hands, clothing and tools away from the container can ignite the gasoline vapor.You can get on any underhood electric... to you even when the engine is inside of the fill opening before operating the nozzle. Filling a Portable Fuel Container Checking Things Under the Hood {CAUTION: Never fill a portable fuel container while it is not running.
Owner's Manual
Page 291
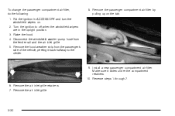
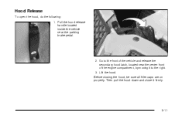
Before closing the hood, be sure all filler caps are on properly. Then pull the hood down and close it to the front of the engine compartment, by moving it firmly. 5-11 Hood Release To open the hood, do the following: 1. Pull the hood release handle located inside the vehicle near the center front of the vehicle and release the secondary hood latch, located near the parking brake pedal. 2. Lift the hood. Go to the right. 3.
Before closing the hood, be sure all filler caps are on properly. Then pull the hood down and close it to the front of the engine compartment, by moving it firmly. 5-11 Hood Release To open the hood, do the following: 1. Pull the hood release handle located inside the vehicle near the center front of the vehicle and release the secondary hood latch, located near the parking brake pedal. 2. Lift the hood. Go to the right. 3.

Owner's Manual
Page 292
Engine Compartment Overview 3800 V6 Engine When you open the hood on a vehicle equipped with the 3800 V6 engine, you'll see: 3800 V6 Engine 5-12
Engine Compartment Overview 3800 V6 Engine When you open the hood on a vehicle equipped with the 3800 V6 engine, you'll see: 3800 V6 Engine 5-12

Owner's Manual
Page 294
3800 V6 Supercharged Engine When you open the hood on a vehicle equipped with the 3800 V6 Supercharged engine, you'll see: 3800 V6 Supercharged Engine 5-14
3800 V6 Supercharged Engine When you open the hood on a vehicle equipped with the 3800 V6 Supercharged engine, you'll see: 3800 V6 Supercharged Engine 5-14

Owner's Manual
Page 310
... damage. The engine coolant temperature gage will be avoided. The engine oil will indicate an overheat condition exists. In this mode, you just open the hood. Overheated Engine Protection Operating Mode This emergency operating mode allows your vehicle to be driven to cool before attempting any repair.
... damage. The engine coolant temperature gage will be avoided. The engine oil will indicate an overheat condition exists. In this mode, you just open the hood. Overheated Engine Protection Operating Mode This emergency operating mode allows your vehicle to be driven to cool before attempting any repair.

Owner's Manual
Page 311
... you get a little too hot when you: • Climb a long hill on your heater to full hot at the highest fan speed and open the hood. In heavy traffic let the engine idle in an emergency. Turn on a hot day. • Stop after high-speed driving. • Idle for a minute or...
... you get a little too hot when you: • Climb a long hill on your heater to full hot at the highest fan speed and open the hood. In heavy traffic let the engine idle in an emergency. Turn on a hot day. • Stop after high-speed driving. • Idle for a minute or...

Owner's Manual
Page 312
Just to lift the hood, here's what you'll see "Overheated Engine Protection Operating Mode" listed previously in this section. If you still have the warning, turn off the engine ... on, you have the overheat warning, you can drive normally. If the warning continues, and you can drive. You may decide not to lift the hood but to get everyone out of steam, you can idle the engine for about 10 minutes. If there's still no longer have not stopped, pull...
Just to lift the hood, here's what you'll see "Overheated Engine Protection Operating Mode" listed previously in this section. If you still have the warning, turn off the engine ... on, you have the overheat warning, you can drive normally. If the warning continues, and you can drive. You may decide not to lift the hood but to get everyone out of steam, you can idle the engine for about 10 minutes. If there's still no longer have not stopped, pull...

Owner's Manual
Page 313
If the coolant inside the coolant recovery tank is not running and can start up even when the engine is boiling, don't do anything else until it cools down. Coolant Recovery Tank B. Electric Engine Cooling Fan C. Keep hands, clothing and tools away from any underhood electric fan. Radiator Pressure Cap 5-33 The vehicle should be parked on a level surface. 3800 V6 Supercharged A. {CAUTION: An electric engine cooling fan under the hood can injure you.
If the coolant inside the coolant recovery tank is not running and can start up even when the engine is boiling, don't do anything else until it cools down. Coolant Recovery Tank B. Electric Engine Cooling Fan C. Keep hands, clothing and tools away from any underhood electric fan. Radiator Pressure Cap 5-33 The vehicle should be parked on a level surface. 3800 V6 Supercharged A. {CAUTION: An electric engine cooling fan under the hood can injure you.
Owner's Manual
Page 330
... all lamps that purpose located under the underhood fuse block. Turn off . The underhood fuse block is located in the accessory power outlet. Open the hoods and locate the batteries.
... all lamps that purpose located under the underhood fuse block. Turn off . The underhood fuse block is located in the accessory power outlet. Open the hoods and locate the batteries.

Owner's Manual
Page 337
Headlamp aiming is done with an E8 Torx® socket or T15 Torx® screwdriver. 2. The high-beam lamps will be turned with the vehicle's low-beam lamps. Adjustment screws can be correctly aimed if the low-beam lamps are under the hood near the headlamps. Measure the distance from the ground to the aim dot on the lens of the low beam lamp. The vertical headlamp aiming screws are aimed properly. Find the aim dot on the lamp. Headlamp Vertical Aiming 1. Record the distance. 5-57
Headlamp aiming is done with an E8 Torx® socket or T15 Torx® screwdriver. 2. The high-beam lamps will be turned with the vehicle's low-beam lamps. Adjustment screws can be correctly aimed if the low-beam lamps are under the hood near the headlamps. Measure the distance from the ground to the aim dot on the lens of the low beam lamp. The vertical headlamp aiming screws are aimed properly. Find the aim dot on the lamp. Headlamp Vertical Aiming 1. Record the distance. 5-57

Owner's Manual
Page 340
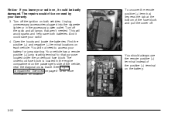
Open the hood and replace the bulb for the appropriate lamp listed below. A. Pull up half-way on the plastic retaining clip on the electrical connector. 5-60 Low-Beam Headlamp C. High-Beam Headlamp B. Headlamps and Sidemarker Lamps 1. Sidemarker Lamp 2.
Open the hood and replace the bulb for the appropriate lamp listed below. A. Pull up half-way on the plastic retaining clip on the electrical connector. 5-60 Low-Beam Headlamp C. High-Beam Headlamp B. Headlamps and Sidemarker Lamps 1. Sidemarker Lamp 2.

Owner's Manual
Page 342
Front Turn Signal, Parking and Fog Lamps The front turn signal, parking and fog lamps are located below . A. Front Turn Signal, Parking Lamp B. Pull up half-way on the plastic retaining clip on the electrical connector. 2. Remove the headlamps. 5-62 Fog Lamp 3. Open the hood. Replace the bulb for the appropriate lamp listed below the high, low-beam and sidemarker lamps 1.
Front Turn Signal, Parking and Fog Lamps The front turn signal, parking and fog lamps are located below . A. Front Turn Signal, Parking Lamp B. Pull up half-way on the plastic retaining clip on the electrical connector. 2. Remove the headlamps. 5-62 Fog Lamp 3. Open the hood. Replace the bulb for the appropriate lamp listed below the high, low-beam and sidemarker lamps 1.

Owner's Manual
Page 397
... last longer, seal better, and not stick or squeak. At Least Twice a Year Restraint System Check Make sure the safety belt reminder light and all hood hinges, hood latch assembly, secondary latch, pivots, spring anchor, release pawl, door hinges, rear compartment, glove box door, console door and any other loose or damaged...
... last longer, seal better, and not stick or squeak. At Least Twice a Year Restraint System Check Make sure the safety belt reminder light and all hood hinges, hood latch assembly, secondary latch, pivots, spring anchor, release pawl, door hinges, rear compartment, glove box door, console door and any other loose or damaged...


