Owner's Manual
Page 1
2004 Pontiac Grand Prix Owner Manual Seats and Restraint Systems ...1-1 Front Seats ...1-2 Rear Seats ...1-8 Safety Belts ...1-10 Child Restraints ...1-29 Air Bag Systems ...1-48 Restraint System Check ...1-56 Features and Controls ...2-1 Keys ...2-2 Doors and Locks ...2-7 Windows ...2-12 Theft-Deterrent Systems ...2-14 Starting and Operating Your Vehicle ...2-18 Mirrors ...2-33 OnStar® System ...2-35 Storage Areas ...2-36 Sunroof ...2-39 Instrument Panel ...3-1 Instrument Panel Overview ...3-2 Climate Controls ...3-25 Warning Lights, Gages and Indicators ...3-31 Driver Information Center...
2004 Pontiac Grand Prix Owner Manual Seats and Restraint Systems ...1-1 Front Seats ...1-2 Rear Seats ...1-8 Safety Belts ...1-10 Child Restraints ...1-29 Air Bag Systems ...1-48 Restraint System Check ...1-56 Features and Controls ...2-1 Keys ...2-2 Doors and Locks ...2-7 Windows ...2-12 Theft-Deterrent Systems ...2-14 Starting and Operating Your Vehicle ...2-18 Mirrors ...2-33 OnStar® System ...2-35 Storage Areas ...2-36 Sunroof ...2-39 Instrument Panel ...3-1 Instrument Panel Overview ...3-2 Climate Controls ...3-25 Warning Lights, Gages and Indicators ...3-31 Driver Information Center...
Owner's Manual
Page 11
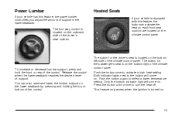
... for the driver's seat is turned on the climate control panel. Only the bottom indicator light will come on the bottom right of the driver's seat cushion. Push the button again to turn the heat off. The four-way control is on . The button for the passenger's seat is located on the bottom left side of the control. This feature only works when the ignition is located...
... for the driver's seat is turned on the climate control panel. Only the bottom indicator light will come on the bottom right of the driver's seat cushion. Push the button again to turn the heat off. The four-way control is on . The button for the passenger's seat is located on the bottom left side of the control. This feature only works when the ignition is located...
Owner's Manual
Page 44
... meets federal motor vehicle safety standards. This is because the back of personal injury. Be sure to properly secure any child restraint in the rear rather than the front seat. When securing an add-on the restraint itself or in a vehicle. Always secure a rear-facing child restraint in the front passenger seat. Never put a rear-facing child restraint in a rear seat. Then...
... meets federal motor vehicle safety standards. This is because the back of personal injury. Be sure to properly secure any child restraint in the rear rather than the front seat. When securing an add-on the restraint itself or in a vehicle. Always secure a rear-facing child restraint in the front passenger seat. Never put a rear-facing child restraint in a rear seat. Then...
Owner's Manual
Page 54
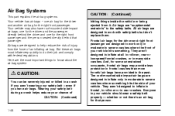
... roof-mounted side impact air bags are designed to work with federal regulations. Frontal air bags for the right front passenger. Everyone in your vehicle should wear a safety belt properly - whether or not there's an air bag for the right front passenger and the person seated directly behind the driver and one for that passenger. Air bags are designed to work only in moderate to severe crashes where...
... roof-mounted side impact air bags are designed to work with federal regulations. Frontal air bags for the right front passenger. Everyone in your vehicle should wear a safety belt properly - whether or not there's an air bag for the right front passenger and the person seated directly behind the driver and one for that passenger. Air bags are designed to work only in moderate to severe crashes where...
Owner's Manual
Page 65
... Controls Engine Coolant Heater ...2-20 Automatic Transaxle Operation ...2-22 Parking Brake ...2-27 Shifting Into Park (P) ...2-28 Shifting Out of Park (P) ...2-30 Parking Over Things That Burn ...2-30 Engine Exhaust ...2-31 Running Your Engine While You Are Parked ...2-32 Mirrors ...2-33 Manual Rearview Mirror ...2-33 Manual Rearview Mirror with OnStar® ...2-33 Outside Power Mirrors ...2-34 Outside Convex Mirror ...2-34 OnStar® System ...2-35 Storage Areas ...2-36 Glove Box ...2-36 Overhead Console ...2-36 Front Seat Storage Net ...2-37 Center Console...
... Controls Engine Coolant Heater ...2-20 Automatic Transaxle Operation ...2-22 Parking Brake ...2-27 Shifting Into Park (P) ...2-28 Shifting Out of Park (P) ...2-30 Parking Over Things That Burn ...2-30 Engine Exhaust ...2-31 Running Your Engine While You Are Parked ...2-32 Mirrors ...2-33 Manual Rearview Mirror ...2-33 Manual Rearview Mirror with OnStar® ...2-33 Outside Power Mirrors ...2-34 Outside Convex Mirror ...2-34 OnStar® System ...2-35 Storage Areas ...2-36 Glove Box ...2-36 Overhead Console ...2-36 Front Seat Storage Net ...2-37 Center Console...

Owner's Manual
Page 73
... power door lock switch to take the key with you could still lock the key inside manual door lock pin. If you will lock automatically when the shift lever is in the ignition, you have been automatically locked, place the shift lever into PARK (P), then the doors will unlock automatically when the ignition is turned off see DIC Controls and Displays on or off while the shift lever is moved out of PARK (P). If the driver's door...
... power door lock switch to take the key with you could still lock the key inside manual door lock pin. If you will lock automatically when the shift lever is in the ignition, you have been automatically locked, place the shift lever into PARK (P), then the doors will unlock automatically when the ignition is turned off see DIC Controls and Displays on or off while the shift lever is moved out of PARK (P). If the driver's door...
Owner's Manual
Page 77
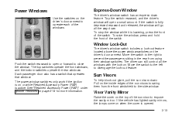
... the rear windows. Window Lock-Out The driver's window switch includes a lock-out feature located above the power window switches on when the cover is fully depressed rearward and released, the window will open or forward to operate each of the windows. Visor Vanity Mirror Raise the cover on the top of the sun visors to swing them from using their window switches. The power window switches only work if the ignition is on or while Retained Accessory Power...
... the rear windows. Window Lock-Out The driver's window switch includes a lock-out feature located above the power window switches on when the cover is fully depressed rearward and released, the window will open or forward to operate each of the windows. Visor Vanity Mirror Raise the cover on the top of the sun visors to swing them from using their window switches. The power window switches only work if the ignition is on or while Retained Accessory Power...
Owner's Manual
Page 80
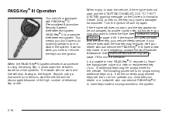
... fuel systems. The starter will not work and fuel will be undamaged, try again. Turn the ignition off and try another ignition key. See your vehicle needs service. Up to "learn" the transponder value of electrical key codes. 2-16 At this time, you insert or remove the key from the ignition. If the engine still does not start and the STARTING DISABLED DUE TO THEFT SYSTEM warning message on the Driver's Information Center...
... fuel systems. The starter will not work and fuel will be undamaged, try again. Turn the ignition off and try another ignition key. See your vehicle needs service. Up to "learn" the transponder value of electrical key codes. 2-16 At this time, you insert or remove the key from the ignition. If the engine still does not start and the STARTING DISABLED DUE TO THEFT SYSTEM warning message on the Driver's Information Center...
Owner's Manual
Page 83
... moving . Retained Accessory Power (RAP) With Retained Accessory Power (RAP), the power windows, audio system and sunroof will go down as your starter motor. Move your shift lever to after the ignition key is where the key returns to PARK (P) or NEUTRAL (N). R (RUN): This position is turned to the RUN position. Turn the key only with your vehicle needs service. With the engine off . If none of the key when the engine starts. If you do...
... moving . Retained Accessory Power (RAP) With Retained Accessory Power (RAP), the power windows, audio system and sunroof will go down as your starter motor. Move your shift lever to after the ignition key is where the key returns to PARK (P) or NEUTRAL (N). R (RUN): This position is turned to the RUN position. Turn the key only with your vehicle needs service. With the engine off . If none of the key when the engine starts. If you do...

Owner's Manual
Page 91
... foot and push the parking brake pedal with your vehicle. Parking Brake The parking brake is located to the left foot. Notice: Driving with your parking brake doesn't release fully. It will sound if the parking brake is on if your right foot. A warning chime will stay on and the shift lever is not in the Driver Information Center (DIC) when the parking brake is set , the ignition is set .
... foot and push the parking brake pedal with your vehicle. Parking Brake The parking brake is located to the left foot. Notice: Driving with your parking brake doesn't release fully. It will sound if the parking brake is on if your right foot. A warning chime will stay on and the shift lever is not in the Driver Information Center (DIC) when the parking brake is set , the ignition is set .
Owner's Manual
Page 105
... ...3-5 Horn ...3-5 Tilt Wheel ...3-5 Windshield Washer Lever ...3-6 Cruise Control Lever ...3-8 Exterior Lamps ...3-12 Interior Lamps ...3-16 Head-Up Display (HUD) ...3-19 Accessory Power Outlets ...3-23 Ashtrays and Cigarette Lighter ...3-24 Climate Controls ...3-25 Climate Control System ...3-25 Outlet Adjustment ...3-29 Warning Lights, Gages and Indicators ...3-31 Instrument Panel Cluster ...3-32 Speedometer and Odometer ...3-33 Tachometer ...3-33 Safety Belt Reminder Light ...3-34 Air Bag Readiness Light ...3-34 Up-Shift Light ...3-35 Brake System Warning Light ...3-36 Anti-Lock Brake...
... ...3-5 Horn ...3-5 Tilt Wheel ...3-5 Windshield Washer Lever ...3-6 Cruise Control Lever ...3-8 Exterior Lamps ...3-12 Interior Lamps ...3-16 Head-Up Display (HUD) ...3-19 Accessory Power Outlets ...3-23 Ashtrays and Cigarette Lighter ...3-24 Climate Controls ...3-25 Climate Control System ...3-25 Outlet Adjustment ...3-29 Warning Lights, Gages and Indicators ...3-31 Instrument Panel Cluster ...3-32 Speedometer and Odometer ...3-33 Tachometer ...3-33 Safety Belt Reminder Light ...3-34 Air Bag Readiness Light ...3-34 Up-Shift Light ...3-35 Brake System Warning Light ...3-36 Anti-Lock Brake...

Owner's Manual
Page 130
... The air conditioning compressor will automatically use outside temperature is a result of high humidity (moisture) condensing on the climate control panel can be engaged unless the outside air. In this mode, the system will be selected when in these modes. .(Floor/Defog): Use the floor/defog mode to clear the windows of fog or moisture and warm the passengers. Defogging...
... The air conditioning compressor will automatically use outside temperature is a result of high humidity (moisture) condensing on the climate control panel can be engaged unless the outside air. In this mode, the system will be selected when in these modes. .(Floor/Defog): Use the floor/defog mode to clear the windows of fog or moisture and warm the passengers. Defogging...
Owner's Manual
Page 164
... to turn on (for the time selected), when the key is removed from the ignition, or the key is removed from the ignition or when the vehicle is unlocked using the remote keyless entry transmitter. INTERIOR LIGHTS WHEN DOOR CLOSED: This screen lets you select this mode use the following procedure: 1. This feature enables the interior lamps in the vehicle to be turned OFF or ON. AUTO DOOR LOCK: This...
... to turn on (for the time selected), when the key is removed from the ignition, or the key is removed from the ignition or when the vehicle is unlocked using the remote keyless entry transmitter. INTERIOR LIGHTS WHEN DOOR CLOSED: This screen lets you select this mode use the following procedure: 1. This feature enables the interior lamps in the vehicle to be turned OFF or ON. AUTO DOOR LOCK: This...
Owner's Manual
Page 383
... A/C Clutch Oxygen Sensor Power Control Module Power Control Module/Electronic Throttle Control Electronic Throttle Control Display Anti-Lock Brake Solenoid Fuel Injection Transmission Solenoid Fuel Pump Anti-Lock Brakes Electronic Ignition Battery Main 1 Battery Main 2 Battery Main 3 Fan 1 Battery Main 4 Anti-Lock Brake Motor Fan 2 Starter Relays 34 35 36 37 38 39 40 41 42 43 44 45 46 48 49 50 51 52 53 54 55 § Usage Hghi-Beam Headlamps Low-Beam Headlamps Fog Lamps Iginition 1 Air Conditioner Compressor Horn Powertrain Fuel Pump Fan 1 Fan 3 Windshield Wiper/High Windshield Wiper Fan...
... A/C Clutch Oxygen Sensor Power Control Module Power Control Module/Electronic Throttle Control Electronic Throttle Control Display Anti-Lock Brake Solenoid Fuel Injection Transmission Solenoid Fuel Pump Anti-Lock Brakes Electronic Ignition Battery Main 1 Battery Main 2 Battery Main 3 Fan 1 Battery Main 4 Anti-Lock Brake Motor Fan 2 Starter Relays 34 35 36 37 38 39 40 41 42 43 44 45 46 48 49 50 51 52 53 54 55 § Usage Hghi-Beam Headlamps Low-Beam Headlamps Fog Lamps Iginition 1 Air Conditioner Compressor Horn Powertrain Fuel Pump Fan 1 Fan 3 Windshield Wiper/High Windshield Wiper Fan...

Owner's Manual
Page 414
... 1908 Colonel Sam Drive Oshawa, Ontario L1H 8P7 7-10 Transmission, Transaxle, Transfer Case Unit Repair Manual This manual provides information on engines, transmission, axle, suspension, brakes, electrical, steering, body, etc. Please call us at 1-800-762-2737, or write: Pontiac-GMC Customer Assistance Center P.O. Each bulletin contains instructions to assist in the diagnosis and service of your General Motors dealer or by contacting your vehicle. In Canada, information...
... 1908 Colonel Sam Drive Oshawa, Ontario L1H 8P7 7-10 Transmission, Transaxle, Transfer Case Unit Repair Manual This manual provides information on engines, transmission, axle, suspension, brakes, electrical, steering, body, etc. Please call us at 1-800-762-2737, or write: Pontiac-GMC Customer Assistance Center P.O. Each bulletin contains instructions to assist in the diagnosis and service of your General Motors dealer or by contacting your vehicle. In Canada, information...
Owner's Manual
Page 421
... ...Starting ...Supercharger Oil ...Engine Coolant Level Check ...Engine Cooling When Trailer Towing ...Engine Oil Additives ...5-99 5-99 5-99 5-99 5-99 2-11 3-42 5-22 5-48 3-40 2-20 3-39 3-39 5-26 6-15 5-12 2-31 5-16 5-29 2-19 5-21 6-10 4-44 5-19 Engine Oil Level Check ...6-10 Engine Oil Scheduled Maintenance ...6-5 Enhanced Traction System (ETS) ...4-11 Warning Light ...3-38 Entry Lighting ...3-17 Express-Down Window ...2-13 Extender, Safety Belt ...1-28 Exterior Lamp Control Lever ...3-12 Exterior Lamps ...3-12 Exterior Lighting Battery Saver ...3-16 F Fan ...3-25 Filter Engine Air...
... ...Starting ...Supercharger Oil ...Engine Coolant Level Check ...Engine Cooling When Trailer Towing ...Engine Oil Additives ...5-99 5-99 5-99 5-99 5-99 2-11 3-42 5-22 5-48 3-40 2-20 3-39 3-39 5-26 6-15 5-12 2-31 5-16 5-29 2-19 5-21 6-10 4-44 5-19 Engine Oil Level Check ...6-10 Engine Oil Scheduled Maintenance ...6-5 Enhanced Traction System (ETS) ...4-11 Warning Light ...3-38 Entry Lighting ...3-17 Express-Down Window ...2-13 Extender, Safety Belt ...1-28 Exterior Lamp Control Lever ...3-12 Exterior Lamps ...3-12 Exterior Lighting Battery Saver ...3-16 F Fan ...3-25 Filter Engine Air...
Owner's Manual
Page 423
... -- Tire Pressure ...5-31 5-30 3-22 3-41 3-41 4-32 3-22 4-38 4-30 2-18 6-13 1-32 5-69 Inspection Brake System ...6-15 Engine Cooling System ...6-15 Exhaust System ...6-14 Fuel System ...6-14 Part C - Periodic Maintenance ...6-14 Steering, Suspension and Front Drive Axle Boot and Seal ...6-14 Throttle System ...6-15 Instrument Panel Cluster ...3-32 Overview ...3-2 Interior Lamps ...3-16 Instrument Panel Brightness ...3-16 Instrument Panel Fuse Block ...5-100 J Jump Starting ...5-49 K KEY FOB BATTERY LOW ...3-73 KEY IN IGNITION ...3-73 Key Lock Cylinders Service ...6-11 Keyless Entry System...
... -- Tire Pressure ...5-31 5-30 3-22 3-41 3-41 4-32 3-22 4-38 4-30 2-18 6-13 1-32 5-69 Inspection Brake System ...6-15 Engine Cooling System ...6-15 Exhaust System ...6-14 Fuel System ...6-14 Part C - Periodic Maintenance ...6-14 Steering, Suspension and Front Drive Axle Boot and Seal ...6-14 Throttle System ...6-15 Instrument Panel Cluster ...3-32 Overview ...3-2 Interior Lamps ...3-16 Instrument Panel Brightness ...3-16 Instrument Panel Fuse Block ...5-100 J Jump Starting ...5-49 K KEY FOB BATTERY LOW ...3-73 KEY IN IGNITION ...3-73 Key Lock Cylinders Service ...6-11 Keyless Entry System...

Owner's Manual
Page 425
... Oil Engine ...5-16 Pressure Light ...3-43 Supercharger, Engine ...5-21 Older Children, Restraints ...1-29 Online Owner Center ...7-3 OnStar® Personal Calling ...2-36 OnStar® Services ...2-35 9 Recommended Fluids and Lubricants ...6-16 Part E - Maintenance Record ...6-17 Scheduled Maintenance ...6-5 Steering, Suspension and Front Drive Axle Boot and Seal Inspection ...6-14 Throttle System Inspection ...6-15 Using Your ...6-4 Your Vehicle and the Environment ...6-2 Maintenance When Trailer Towing ...4-44 Making Turns ...4-42 Malfunction Indicator Light ...3-40 Manual Climate Control...
... Oil Engine ...5-16 Pressure Light ...3-43 Supercharger, Engine ...5-21 Older Children, Restraints ...1-29 Online Owner Center ...7-3 OnStar® Personal Calling ...2-36 OnStar® Services ...2-35 9 Recommended Fluids and Lubricants ...6-16 Part E - Maintenance Record ...6-17 Scheduled Maintenance ...6-5 Steering, Suspension and Front Drive Axle Boot and Seal Inspection ...6-14 Throttle System Inspection ...6-15 Using Your ...6-4 Your Vehicle and the Environment ...6-2 Maintenance When Trailer Towing ...4-44 Making Turns ...4-42 Malfunction Indicator Light ...3-40 Manual Climate Control...
Owner's Manual
Page 426
... Accessory Outlets ...3-23 Door Locks ...2-8 Electrical System ...5-99 Lumbar Controls ...1-5 Seat ...1-4 Steering Fluid ...5-42 Windows ...2-13 Power Steering ...4-14 Pretensioners, Safety Belt ...1-28 Programmable Automatic Door Locks ...2-9 10 Owner Checks and Services ...6-10 Part C - Periodic Maintenance Inspections ...6-14 Part D - OnStar® System ...2-35 OnStar® Virtual Advisor ...2-36 Other Warning Devices ...3-5 Outlet Adjustment ...3-29 Outside Convex Mirror ...2-34 Power Mirrors ...2-34 Overhead Console Reading Lamps ...3-18 Overhead Console ...2-36 Overheated Engine...
... Accessory Outlets ...3-23 Door Locks ...2-8 Electrical System ...5-99 Lumbar Controls ...1-5 Seat ...1-4 Steering Fluid ...5-42 Windows ...2-13 Power Steering ...4-14 Pretensioners, Safety Belt ...1-28 Programmable Automatic Door Locks ...2-9 10 Owner Checks and Services ...6-10 Part C - Periodic Maintenance Inspections ...6-14 Part D - OnStar® System ...2-35 OnStar® Virtual Advisor ...2-36 Other Warning Devices ...3-5 Outlet Adjustment ...3-29 Outside Convex Mirror ...2-34 Power Mirrors ...2-34 Overhead Console Reading Lamps ...3-18 Overhead Console ...2-36 Overheated Engine...
Owner's Manual
Page 427
...18 Rear Safety Belt Comfort Guides ...1-26 Rear Seat Passenger Positions ...1-23 Rear Seat Passengers, Safety Belts ...1-23 Rearview Mirror with OnStar® ...2-33 Rearview Mirrors ...2-33 Recirculation ...3-28 Reclining Seatbacks ...1-6 Recreational Vehicle Towing ...4-33 REDUCED ENGINE POWER ...3-79 Remote Keyless Entry System ...2-4 Remote Keyless Entry System, Operation ...2-5 Remote Trunk Release ...2-10 Removing the Flat Tire and Installing the Spare Tire ...5-82 Removing the Spare Tire and Tools ...5-80 Removing Wheel Nut Caps ...5-82 Replacement Bulbs ...5-66 Replacing Brake System...
...18 Rear Safety Belt Comfort Guides ...1-26 Rear Seat Passenger Positions ...1-23 Rear Seat Passengers, Safety Belts ...1-23 Rearview Mirror with OnStar® ...2-33 Rearview Mirrors ...2-33 Recirculation ...3-28 Reclining Seatbacks ...1-6 Recreational Vehicle Towing ...4-33 REDUCED ENGINE POWER ...3-79 Remote Keyless Entry System ...2-4 Remote Keyless Entry System, Operation ...2-5 Remote Trunk Release ...2-10 Removing the Flat Tire and Installing the Spare Tire ...5-82 Removing the Spare Tire and Tools ...5-80 Removing Wheel Nut Caps ...5-82 Replacement Bulbs ...5-66 Replacing Brake System...


