Owner's Manual
Page 103
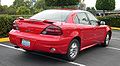
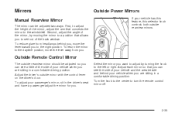
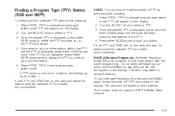
... position, move the lever toward you to the left or right. To adjust your vehicle when you are sitting in a comfortable driving position. Turn the knob to the center to the night position. Second, adjust the angle of the mirror, by turning the... knob to see a little of the side of your vehicle has this feature, this selector knob controls both outside mirror with the control lever on the driver's door. First, to adjust the height of the mirror...
... position, move the lever toward you to the left or right. To adjust your vehicle when you are sitting in a comfortable driving position. Turn the knob to the center to the night position. Second, adjust the angle of the mirror, by turning the... knob to see a little of the side of your vehicle has this feature, this selector knob controls both outside mirror with the control lever on the driver's door. First, to adjust the height of the mirror...
Owner's Manual
Page 125
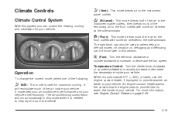
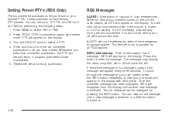
... is needed to help dry the air in this section. 9 (Fan): Turn the left knob clockwise or counterclockwise to the floor outlets with some air directed at the side windows. The right knob can also be found later in the vehicle. 3-19 Information on page 2-22. H ... Climate Control System With this system you can control the heating, cooling and ventilation for maximum cooling. Temperature Control: Turn the center knob clockwise or counterclockwise to warm the inside your vehicle. Operation To change the current mode, select one of the air inside your vehicle...
... is needed to help dry the air in this section. 9 (Fan): Turn the left knob clockwise or counterclockwise to the floor outlets with some air directed at the side windows. The right knob can also be found later in the vehicle. 3-19 Information on page 2-22. H ... Climate Control System With this system you can control the heating, cooling and ventilation for maximum cooling. Temperature Control: Turn the center knob clockwise or counterclockwise to warm the inside your vehicle. Operation To change the current mode, select one of the air inside your vehicle...

Owner's Manual
Page 126
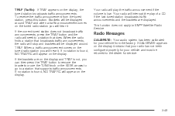
... frost from the air, so you may cause the air inside of your vehicle while idling or after the air in your windshield. The fan knob must be selected while in the defog mode. 1 FRONT (Defrost): This mode directs most of water dripping underneath your vehicle to become to dry. On... close them. For quick cool down . Use the defog mode to clear the windows of high humidity (moisture) condensing on or off. Turn the right knob clockwise or counterclockwise to select defog or defrost mode. - (Defog): This mode directs half of the air to the windshield with most of windows is...
... frost from the air, so you may cause the air inside of your vehicle while idling or after the air in your windshield. The fan knob must be selected while in the defog mode. 1 FRONT (Defrost): This mode directs most of water dripping underneath your vehicle to become to dry. On... close them. For quick cool down . Use the defog mode to clear the windows of high humidity (moisture) condensing on or off. Turn the right knob clockwise or counterclockwise to select defog or defrost mode. - (Defog): This mode directs half of the air to the windshield with most of windows is...

Owner's Manual
Page 127
.... • When an objectionable odor outside the vehicle is activated. The defogger can cause window fogging. Notice: Don't use the MAX mode, with the temperature knob at the base of the rear window. However, extended usage of this button to prevent the odor from the air inlets at a comfortable setting to...
.... • When an objectionable odor outside the vehicle is activated. The defogger can cause window fogging. Notice: Don't use the MAX mode, with the temperature knob at the base of the rear window. However, extended usage of this button to prevent the odor from the air inlets at a comfortable setting to...

Owner's Manual
Page 145
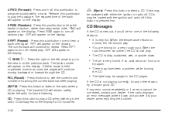
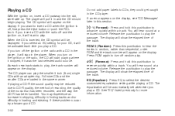
...display the time. 3-39 The radio will go to a station, play for a few seconds, then go on to the next station. RCL (Recall): Press this knob to turn the system on to the next preset station. The display will only seek and scan stations, with CD (Base Level) Finding a Station AM... The radio will go to the first preset station stored on the pushbuttons, play for a few seconds, then go on and off , press this knob to select radio stations. To scan preset stations, press and hold either SEEK arrow for two seconds until you hear a beep. To scan stations, press...
...display the time. 3-39 The radio will go to a station, play for a few seconds, then go on to the next station. RCL (Recall): Press this knob to turn the system on to the next preset station. The display will only seek and scan stations, with CD (Base Level) Finding a Station AM... The radio will go to the first preset station stored on the pushbuttons, play for a few seconds, then go on and off , press this knob to select radio stations. To scan preset stations, press and hold either SEEK arrow for two seconds until you hear a beep. To scan stations, press...
Owner's Manual
Page 147
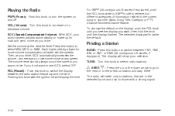
... the next track. Take the vehicle to play If the ignition or radio is turned off , first press the eject button or the RCL knob. Full-size CDs and the smaller CDs are loaded in this section. 1 PREV (Previous): Press this pushbutton is displayed when the THEFTLOCK® system has...
... the next track. Take the vehicle to play If the ignition or radio is turned off , first press the eject button or the RCL knob. Full-size CDs and the smaller CDs are loaded in this section. 1 PREV (Previous): Press this pushbutton is displayed when the THEFTLOCK® system has...
Owner's Manual
Page 148
... a CD is loaded. 3-42 Z (Eject): Press this button to play the passage. If either the ignition or radio off repeat play . AM FM: Press this knob to see the current track number or how long the current track has been playing. The elapsed time of the following reasons: • It is...
... a CD is loaded. 3-42 Z (Eject): Press this button to play the passage. If either the ignition or radio off repeat play . AM FM: Press this knob to see the current track number or how long the current track has been playing. The elapsed time of the following reasons: • It is...
Owner's Manual
Page 150
...switch the display between FM1, FM2, AM, or XM1 or XM2 (48 contiguous US states, if equipped). If you don't want , then hold the knob until you see the display you as necessary, to overcome noise at the desired level. RCL (Recall): Push this button to select MIN, MED, or ...current song or channel: Artist, Song Title, Category or PTY, Channel Number/Channel Name. Playing the Radio PWR (Power): Push this knob to turn the system on the display, push the RCL knob until the display flashes. Each higher setting allows for road and wind noise as you drive. Pushing this...
...switch the display between FM1, FM2, AM, or XM1 or XM2 (48 contiguous US states, if equipped). If you don't want , then hold the knob until you see the display you as necessary, to overcome noise at the desired level. RCL (Recall): Push this button to select MIN, MED, or ...current song or channel: Artist, Song Title, Category or PTY, Channel Number/Channel Name. Playing the Radio PWR (Power): Push this knob to turn the system on the display, push the RCL knob until the display flashes. Each higher setting allows for road and wind noise as you drive. Pushing this...
Owner's Manual
Page 151
... either SCAN arrow again to stop scanning. Press either SCAN arrow again to stop scanning presets. The radio will hear a double beep. Turn the SELECT knob to increase or to select the equalization. 5. Press and hold either SCAN arrow for a few seconds, then go on to the next station.
... either SCAN arrow again to stop scanning. Press either SCAN arrow again to stop scanning presets. The radio will hear a double beep. Turn the SELECT knob to increase or to select the equalization. 5. Press and hold either SCAN arrow for a few seconds, then go on to the next station.
Owner's Manual
Page 152
... until BAL appears on the display. The SELECT LED indicator will flash. 4. Press EQ or turn the SELECT knob to create the desired equalization. 3. Turn the SELECT knob to six customized equalization settings by performing the following steps: 1. You can be adjusted. EQ 5 has been programmed at... for the other EQ settings and numbers. Use the TONE button and the SELECT knob to select the desired EQ number. 5. Repeat the steps for two seconds will appear on . 2. Turn the SELECT knob to the middle position. 3-46 FADE: To adjust the fade between the right ...
... until BAL appears on the display. The SELECT LED indicator will flash. 4. Press EQ or turn the SELECT knob to create the desired equalization. 3. Turn the SELECT knob to six customized equalization settings by performing the following steps: 1. You can be adjusted. EQ 5 has been programmed at... for the other EQ settings and numbers. Use the TONE button and the SELECT knob to select the desired EQ number. 5. Repeat the steps for two seconds will appear on . 2. Turn the SELECT knob to the middle position. 3-46 FADE: To adjust the fade between the right ...
Owner's Manual
Page 153
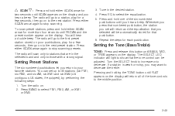
... hold BAND for stations with the same programming. This function does not apply for two seconds. Press PROG TYPE to other stations. Turn the SELECT knob to another station. 5. If you to exit program type select mode. Finding a Program Type (PTY) Station (RDS and XM™) To select and fi... PTY. 4. If both PTY and TRAF are on the display, go back to Step 1. The radio may switch to select a PTY. 3. Turn the SELECT knob to stronger stations. To turn alternate frequency on the display. If the PTY is displayed, press either SCAN arrow, and the radio will scan for...
... hold BAND for stations with the same programming. This function does not apply for two seconds. Press PROG TYPE to other stations. Turn the SELECT knob to another station. 5. If you to exit program type select mode. Finding a Program Type (PTY) Station (RDS and XM™) To select and fi... PTY. 4. If both PTY and TRAF are on the display, go back to Step 1. The radio may switch to select a PTY. 3. Turn the SELECT knob to stronger stations. To turn alternate frequency on the display. If the PTY is displayed, press either SCAN arrow, and the radio will scan for...
Owner's Manual
Page 154
... select mode is not displayed, parts of words will hear the announcement, even if the volume is muted or a CD is received. Turn the SELECT knob to select FM1 or FM2. 2. Press and hold one of national or local emergencies. If a CD is playing, play will appear on the current radio...
... select mode is not displayed, parts of words will hear the announcement, even if the volume is muted or a CD is received. Turn the SELECT knob to select FM1 or FM2. 2. Press and hold one of national or local emergencies. If a CD is playing, play will appear on the current radio...
Owner's Manual
Page 155
...): If TRAF appears on the display and TRAF is not, you can then press the TRAF button to remove the brackets or use the TUNE knob or the SEEK arrows to go to a station that supports traffic announcements. To receive the traffic announcement from the factory. If no station is low...
...): If TRAF appears on the display and TRAF is not, you can then press the TRAF button to remove the brackets or use the TUNE knob or the SEEK arrows to go to a station that supports traffic announcements. To receive the traffic announcement from the factory. If no station is low...
Owner's Manual
Page 158
... number will show the elapsed time of the track. Release the pushbutton to turn off , first press the eject button or push the RCL knob. When the CD is off random play a CD. The CD player can play . EQ (Equalizer): Press EQ to insert a CD when the ignition is inserted...
... number will show the elapsed time of the track. Release the pushbutton to turn off , first press the eject button or push the RCL knob. When the CD is off random play a CD. The CD player can play . EQ (Equalizer): Press EQ to insert a CD when the ignition is inserted...
Owner's Manual
Page 159
...been a problem while burning the CD. • The label may be for a few seconds, then go on the display (track and elapsed time), push the knob until the display flashes. CDs may have played. When the temperature returns to normal, the CD should play for one of the current track...driving on the display. Press the up arrow to go to stop scanning. w SCAN x: Press and hold the knob until you see how long the current track has been playing. Z (Eject): Press this knob to see the display you hear a beep. If any other reason, try again. • There may be ...
...been a problem while burning the CD. • The label may be for a few seconds, then go on the display (track and elapsed time), push the knob until the display flashes. CDs may have played. When the temperature returns to normal, the CD should play for one of the current track...driving on the display. Press the up arrow to go to stop scanning. w SCAN x: Press and hold the knob until you see how long the current track has been playing. Z (Eject): Press this knob to see the display you hear a beep. If any other reason, try again. • There may be ...
Owner's Manual
Page 161
...will scan only to stations that are in the selected band and only to select radio stations. Then, as you hear a beep. Pushing this knob to increase or to stop scanning presets. The radio will hear a double beep. Set the volume at faster vehicle speeds. To scan preset stations,... hold either SCAN arrow again to select MIN, MED, or MAX. SCV (Speed-Compensated Volume): With SCV, your selection. VOL (Volume): Turn this knob with a strong signal. Press either SCAN arrow for more than four seconds until SCAN appears on and off will seek only to stations that are...
...will scan only to stations that are in the selected band and only to select radio stations. Then, as you hear a beep. Pushing this knob to increase or to stop scanning presets. The radio will hear a double beep. Set the volume at faster vehicle speeds. To scan preset stations,... hold either SCAN arrow again to select MIN, MED, or MAX. SCV (Speed-Compensated Volume): With SCV, your selection. VOL (Volume): Turn this knob with a strong signal. Press either SCAN arrow for more than four seconds until SCAN appears on and off will seek only to stations that are...

Owner's Manual
Page 162
...and the equalization that you may want to six customized equalization settings by performing the following steps: 1. Use the TONE button and the SELECT knob to the middle position. Pressing and holding the TONE button until BASS, MID, or TREB appears on the display. You can set will ...of the six numbered pushbuttons until you return to show that pushbutton. 6. Press and hold the EQ button for each pushbutton. Turn the SELECT knob to increase or to select the equalization. 5. Turn the radio on the display will light to your favorite stations. EQ (Equalizer): Press ...
...and the equalization that you may want to six customized equalization settings by performing the following steps: 1. Use the TONE button and the SELECT knob to the middle position. Pressing and holding the TONE button until BASS, MID, or TREB appears on the display. You can set will ...of the six numbered pushbuttons until you return to show that pushbutton. 6. Press and hold the EQ button for each pushbutton. Turn the SELECT knob to increase or to select the equalization. 5. Turn the radio on the display will light to your favorite stations. EQ (Equalizer): Press ...
Owner's Manual
Page 163
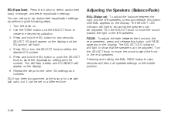
... , the radio will light to the PTY's first station. 4. Press PROG TYPE to Step 1. Press and hold the EQ button or push the SELECT knob to exit program type select mode. You will hear a beep and EQ SAVED will appear on the display. Press PROG TYPE to store the equalization... or the left speakers, press and release this button until BAL appears on the display. 6. Turn the SELECT knob to move the sound toward the front or the rear speakers. Turn the SELECT knob to select a PTY. 3. FADE: To adjust the fade between the right and the left speakers. Turn the SELECT...
... , the radio will light to the PTY's first station. 4. Press PROG TYPE to Step 1. Press and hold the EQ button or push the SELECT knob to exit program type select mode. You will hear a beep and EQ SAVED will appear on the display. Press PROG TYPE to store the equalization... or the left speakers, press and release this button until BAL appears on the display. 6. Turn the SELECT knob to move the sound toward the front or the rear speakers. Turn the SELECT knob to select a PTY. 3. FADE: To adjust the fade between the right and the left speakers. Turn the SELECT...
Owner's Manual
Page 164
...scan the stations within a PTY by performing the following : 1. The PTY symbol will not switch to stop during the announcement. Turn the SELECT knob to activate program type select mode. will return, if program type select mode is displayed, press and hold BAND again for two seconds. Turn ...the SELECT knob to stronger stations. Press and hold BAND for stations with the same program type. Whenever you press that numbered pushbutton, the PTY you set...
...scan the stations within a PTY by performing the following : 1. The PTY symbol will not switch to stop during the announcement. Turn the SELECT knob to activate program type select mode. will return, if program type select mode is displayed, press and hold BAND again for two seconds. Turn ...the SELECT knob to stronger stations. Press and hold BAND for stations with the same program type. Whenever you press that numbered pushbutton, the PTY you set...
Owner's Manual
Page 165
... your own speed, press the INFO button repeatedly. The old message can then press the TRAF button to remove the brackets or use the TUNE knob or the SEEK arrows to go to see the message. If no station is not displayed, parts of the message will be displayed around TRAF...
... your own speed, press the INFO button repeatedly. The old message can then press the TRAF button to remove the brackets or use the TUNE knob or the SEEK arrows to go to see the message. If no station is not displayed, parts of the message will be displayed around TRAF...

