

Owner's Manual
Page 4
... this" or "Don't let this happen." Safety Warnings and Symbols You will find a number of safety cautions in this book. iii If you do to end when they first receive their owner's manual from beginning to help you learn about things that could hurt you if you about the features and...
... this" or "Don't let this happen." Safety Warnings and Symbols You will find a number of safety cautions in this book. iii If you do to end when they first receive their owner's manual from beginning to help you learn about things that could hurt you if you about the features and...
Owner's Manual
Page 21
... plate to slide under the lap belt. 4. Push the latch plate into the buckle until it is positioned so you would apply force at the end of the body are best able to . The lap part of the retractor. 1-15 The shoulder belt should be less likely to make sure it...
... plate to slide under the lap belt. 4. Push the latch plate into the buckle until it is positioned so you would apply force at the end of the body are best able to . The lap part of the retractor. 1-15 The shoulder belt should be less likely to make sure it...

Owner's Manual
Page 37
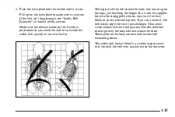
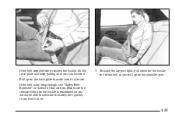
When you sit in the center front seating position, you ever had to. 1-31 To make the belt shorter, pull its free end as the lap part of this section. If the belt isn't long enough, see "Safety Belt Extender" at the end of a lap-shoulder belt. Make sure the release button on the buckle is snug. To make the belt longer, tilt the latch plate and pull it the same way as shown until the belt is positioned so you would be able to unbuckle the safety belt quickly if you have a lap safety belt, which has no retractor. Buckle, position and release it along the belt.
When you sit in the center front seating position, you ever had to. 1-31 To make the belt shorter, pull its free end as the lap part of this section. If the belt isn't long enough, see "Safety Belt Extender" at the end of a lap-shoulder belt. Make sure the release button on the buckle is snug. To make the belt longer, tilt the latch plate and pull it the same way as shown until the belt is positioned so you would be able to unbuckle the safety belt quickly if you have a lap safety belt, which has no retractor. Buckle, position and release it along the belt.
Owner's Manual
Page 39
Pull up on the buckle is positioned so you would be able to unbuckle the safety belt quickly if you ever had to make the lap part tight, pull down on the buckle end of this section. If the belt is not long enough, see "Safety Belt Extender" at the end of the belt as you pull up on the latch plate to . 3. Make sure the release button on the shoulder part. 1-33 To make sure it . If the belt stops before it reaches the buckle, tilt the latch plate and keep pulling until you can buckle it is secure.
Pull up on the buckle is positioned so you would be able to unbuckle the safety belt quickly if you ever had to make the lap part tight, pull down on the buckle end of this section. If the belt is not long enough, see "Safety Belt Extender" at the end of the belt as you pull up on the latch plate to . 3. Make sure the release button on the shoulder part. 1-33 To make sure it . If the belt stops before it reaches the buckle, tilt the latch plate and keep pulling until you can buckle it is secure.

Owner's Manual
Page 100
..., see "Shifting Into PARK (P)" in the Index. Shifting Out of PARK (P) before you release the parking brake. If you ever hold the brake until the end of the vehicle may put too much force on the shift lever -- Then move the shift lever out of PARK (P) Your vehicle has an automatic...
..., see "Shifting Into PARK (P)" in the Index. Shifting Out of PARK (P) before you release the parking brake. If you ever hold the brake until the end of the vehicle may put too much force on the shift lever -- Then move the shift lever out of PARK (P) Your vehicle has an automatic...

Owner's Manual
Page 106
... cycles, hold the lever down to prevent an overload. The wipers will clear the window and either stop after one cycle. Windshield Washer At the end of the wiper lever, there's a button.
... cycles, hold the lever down to prevent an overload. The wipers will clear the window and either stop after one cycle. Windshield Washer At the end of the wiper lever, there's a button.

Owner's Manual
Page 109
...'t use cruise control on the brake pedal, D move the cruise switch to maintain your speed. When going up steep hills, you out of the hills. Ending Cruise Control There are two ways to reduce your speed while using cruise control: Using Cruise Control on the accelerator pedal to OFF, or D pull...
...'t use cruise control on the brake pedal, D move the cruise switch to maintain your speed. When going up steep hills, you out of the hills. Ending Cruise Control There are two ways to reduce your speed while using cruise control: Using Cruise Control on the accelerator pedal to OFF, or D pull...
Owner's Manual
Page 125
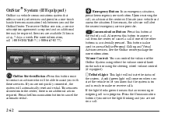
... steering wheel volume control (if equipped). Telltale Light: This light will alert the nearest emergency service provider. Upon receiving the call, an advisor at the end of the other buttons is on the radio or using either the volume control knob on and is ready to access OnStar Personal Calling and...
... steering wheel volume control (if equipped). Telltale Light: This light will alert the nearest emergency service provider. Upon receiving the call, an advisor at the end of the other buttons is on the radio or using either the volume control knob on and is ready to access OnStar Personal Calling and...

Owner's Manual
Page 191
... was being used, the tape will appear every three seconds until another new message is built to a station that broadcasts traffic announcements, it reaches the end of the message will stay in this button to remove the tape and start over. The tape player automatically begins playing the other side when...
... was being used, the tape will appear every three seconds until another new message is built to a station that broadcasts traffic announcements, it reaches the end of the message will stay in this button to remove the tape and start over. The tape player automatically begins playing the other side when...
Owner's Manual
Page 194
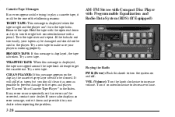
... and Radio Data System (RDS) (If Equipped) Playing the Radio PWR (Power): Push this message appears on and off. Hold the tape with the open end down and provide it to your player is broken. Try a new tape. If any error occurs repeatedly or if an error can 't turn the tape...
... and Radio Data System (RDS) (If Equipped) Playing the Radio PWR (Power): Push this message appears on and off. Hold the tape with the open end down and provide it to your player is broken. Try a new tape. If any error occurs repeatedly or if an error can 't turn the tape...

Owner's Manual
Page 209
... been calibrated for the radio. You may not work best with the tape visible should face to reverse the tape rapidly. Press it reaches the end of the tape. Dolby Noise Reduction is inserted. Press the eject button to the dealership for your radio has not been configured properly for service...
... been calibrated for the radio. You may not work best with the tape visible should face to reverse the tape rapidly. Press it reaches the end of the tape. Dolby Noise Reduction is inserted. Press the eject button to the dealership for your radio has not been configured properly for service...

Owner's Manual
Page 210
.... You can 't turn the tape hubs. Press the SEEK arrow that many selections you want to the next selection. Hold the tape with the open end down and try to turn easily, your player is tight and the player can skip nine selections up or down on to skip. Try a new...
.... You can 't turn the tape hubs. Press the SEEK arrow that many selections you want to the next selection. Hold the tape with the open end down and try to turn easily, your player is tight and the player can skip nine selections up or down on to skip. Try a new...

Owner's Manual
Page 224
... could save your vehicle: Buckle up. Defensive driving requires that distracts from the driving task -- Defensive driving really means "be careless and make mistakes. Rear-end collisions are common. Yet they might do. It's the best defensive driving maneuver, in the Index. 4-2 Ask a passenger to help do them yourself. Please start...
... could save your vehicle: Buckle up. Defensive driving requires that distracts from the driving task -- Defensive driving really means "be careless and make mistakes. Rear-end collisions are common. Yet they might do. It's the best defensive driving maneuver, in the Index. 4-2 Ask a passenger to help do them yourself. Please start...

Owner's Manual
Page 225
How much is "too much" if the driver plans to consume the alcohol. Although it 's against the law in an hour will end up with a BAC of about 16,000 annual motor vehicle-related deaths have been associated with the use of all motor vehicle-related deaths involve ...
How much is "too much" if the driver plans to consume the alcohol. Although it 's against the law in an hour will end up with a BAC of about 16,000 annual motor vehicle-related deaths have been associated with the use of all motor vehicle-related deaths involve ...
Owner's Manual
Page 269
... part or to the positive (+) terminal of the dead battery. Connect it to a remote negative (-) terminal if the vehicle has one . Don't let the other end touch metal. Check that would damage the battery and maybe other parts too. Before you connect the cables, here are some basic things you badly...
... part or to the positive (+) terminal of the dead battery. Connect it to a remote negative (-) terminal if the vehicle has one . Don't let the other end touch metal. Check that would damage the battery and maybe other parts too. Before you connect the cables, here are some basic things you badly...

Owner's Manual
Page 270
... to the battery is just as good there, and the chance of sparks getting back to the dead battery. Connect the other end of the good battery. The other end touch anything until the next step. Now start the vehicle with the dead battery. The electrical connection is much less. 10. If...
... to the battery is just as good there, and the chance of sparks getting back to the dead battery. Connect the other end of the good battery. The other end touch anything until the next step. Now start the vehicle with the dead battery. The electrical connection is much less. 10. If...

Owner's Manual
Page 284
... jack and roll over you how to use the jack and change your hazard warning flashers. CAUTION: Changing a tire can put blocks at the opposite end. Put the shift lever in PARK (P). 3. To be even more certain the vehicle won't move, you can cause an injury. That would be badly injured...
... jack and roll over you how to use the jack and change your hazard warning flashers. CAUTION: Changing a tire can put blocks at the opposite end. Put the shift lever in PARK (P). 3. To be even more certain the vehicle won't move, you can cause an injury. That would be badly injured...

Owner's Manual
Page 286
Removing Wheel Covers and Wheel Nut Caps If your vehicle has aluminum wheels and a center cover hides the wheel nuts, remove the center cover by using the flat end of cover. The jack has a bolt at the end. Removing the Flat Tire and Installing the Spare Tire 1. Use the wheel wrench to create a jack handle. 5-23 Attach the wheel wrench to the bolt to loosen the wheel nuts, but don't remove them. 2. Do not drop the cover or lay it face down, as it off. Do not use a hammer or mallet on this type of the wrench to pry it could become scratched or damaged.
Removing Wheel Covers and Wheel Nut Caps If your vehicle has aluminum wheels and a center cover hides the wheel nuts, remove the center cover by using the flat end of cover. The jack has a bolt at the end. Removing the Flat Tire and Installing the Spare Tire 1. Use the wheel wrench to create a jack handle. 5-23 Attach the wheel wrench to the bolt to loosen the wheel nuts, but don't remove them. 2. Do not drop the cover or lay it face down, as it off. Do not use a hammer or mallet on this type of the wrench to pry it could become scratched or damaged.

Owner's Manual
Page 290
Lower the jack completely. 5-27 Lower the vehicle by hand until the wheel is centered in each wheel hole while tightening the nuts. Make sure each nut by turning the wheel wrench counterclockwise. Tighten each wheel bolt is held against the hub. 10. 9. Then reinstall the wheel nuts with rounded end of the nuts toward the wheel.
Lower the jack completely. 5-27 Lower the vehicle by hand until the wheel is centered in each wheel hole while tightening the nuts. Make sure each nut by turning the wheel wrench counterclockwise. Tighten each wheel bolt is held against the hub. 10. 9. Then reinstall the wheel nuts with rounded end of the nuts toward the wheel.

Owner's Manual
Page 292
... with the edge of the vehicle could strike someone. Store the wheel cover in the trunk as far forward in the trunk until the screw end is flush with the wheel wrench. Don't try to store the flat tire in the passenger compartment of the jack. Store the flat tire as...
... with the edge of the vehicle could strike someone. Store the wheel cover in the trunk as far forward in the trunk until the screw end is flush with the wheel wrench. Don't try to store the flat tire in the passenger compartment of the jack. Store the flat tire as...
