

Owners Manual
Page 11
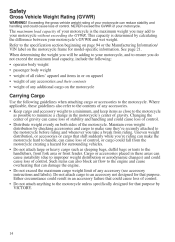
... all information in this rider's manual. • Observe all maintenance requirements specified in safe riding habits through instruction and riding. Safety Safe Riding Practices WARNING Improper use with one rider and one passenger, or carrying weight exceeding the maximum weight rating can make handling difficult, which could cause loss of control. • During the first 500 miles (800 km) of operation...
... all information in this rider's manual. • Observe all maintenance requirements specified in safe riding habits through instruction and riding. Safety Safe Riding Practices WARNING Improper use with one rider and one passenger, or carrying weight exceeding the maximum weight rating can make handling difficult, which could cause loss of control. • During the first 500 miles (800 km) of operation...
Owners Manual
Page 16
... cause loss of any accessory (see accessory instructions and labels). The maximum load capacity of control. • Do not attach anything to the handlebars, front fork area or front fender. Either circumstance could cause loss of your motorcycle. Exceeding the gross vehicle weight rating of control. Safety Gross Vehicle Weight Rating (GVWR) WARNING! Where applicable, these areas can reduce stability and handling and could result...
... cause loss of any accessory (see accessory instructions and labels). The maximum load capacity of control. • Do not attach anything to the handlebars, front fork area or front fender. Either circumstance could cause loss of your motorcycle. Exceeding the gross vehicle weight rating of control. Safety Gross Vehicle Weight Rating (GVWR) WARNING! Where applicable, these areas can reduce stability and handling and could result...

Owners Manual
Page 24
... Brake Lever Throttle Control Grip Switches Throttle Cables Fuel Cap 2 3 1 (Models differ in appearance, but locations are the same as shown) 5 6 4 7 9 11 9 10 8 Left Side View 1. 2. 3. 4. 5. 6. 7. 8. 9. 10. 11. 12. 13. 14. 15. 16. 17. 18. 19. 20. Front Turn Signal Headlamp Air Filter Spark Plugs Ignition Switch Battery (under side cover) Taillight Rear Turn Signal Rear Axle Adjuster (each side) Rear Brake Caliper Passenger's Foot Rest Evaporative Emissions Canister (California Models) Oil Filter Oil Drain Plug (under engine) Sidestand Operator's Foot Rest Gear Shift...
... Brake Lever Throttle Control Grip Switches Throttle Cables Fuel Cap 2 3 1 (Models differ in appearance, but locations are the same as shown) 5 6 4 7 9 11 9 10 8 Left Side View 1. 2. 3. 4. 5. 6. 7. 8. 9. 10. 11. 12. 13. 14. 15. 16. 17. 18. 19. 20. Front Turn Signal Headlamp Air Filter Spark Plugs Ignition Switch Battery (under side cover) Taillight Rear Turn Signal Rear Axle Adjuster (each side) Rear Brake Caliper Passenger's Foot Rest Evaporative Emissions Canister (California Models) Oil Filter Oil Drain Plug (under engine) Sidestand Operator's Foot Rest Gear Shift...

Owners Manual
Page 26
... Number Ignition Switch The ignition switch provides electrical power to the ignition, the lighting system and all electrical switches and buttons. ON All electrical circuits are the engine model number. Record the number in the space provided on page 98. Ignition Key Number The ignition key identification number is stamped into the shaft of each key. OFF All electrical circuits are the serial number. The headlamp, taillight, and instrument lights illuminate. Park...
... Number Ignition Switch The ignition switch provides electrical power to the ignition, the lighting system and all electrical switches and buttons. ON All electrical circuits are the engine model number. Record the number in the space provided on page 98. Ignition Key Number The ignition key identification number is stamped into the shaft of each key. OFF All electrical circuits are the serial number. The headlamp, taillight, and instrument lights illuminate. Park...

Owners Manual
Page 34
... gear shift pedal. Insert the key into the cap. Gear Shift Pedal Rear Brake Pedal 32 Open the fuel cap 1. Tip: Prime the fuel pump if the tank is completely empty. See page 49. Turn the key clockwise while pushing downward lightly. Instruments, Features and Controls Fuel Cap Use the ignition key to open the cap. Follow proper fueling procedures. Turn the key clockwise and press downward on the rear brake pedal. Lift the key slot cover on the fuel cap and insert the key...
... gear shift pedal. Insert the key into the cap. Gear Shift Pedal Rear Brake Pedal 32 Open the fuel cap 1. Tip: Prime the fuel pump if the tank is completely empty. See page 49. Turn the key clockwise while pushing downward lightly. Instruments, Features and Controls Fuel Cap Use the ignition key to open the cap. Follow proper fueling procedures. Turn the key clockwise and press downward on the rear brake pedal. Lift the key slot cover on the fuel cap and insert the key...

Owners Manual
Page 48
... Height Always heed fuel warnings. Do not overfill. To prevent leaks, make sure the fuel filler cap is properly seated and locked. If gasoline spills on level ground with water. Fill the fuel tank. 2. Allow the fuel pump to run switch to reset. 7. Priming the Fuel System If the motorcycle runs out of the fuel filler insert. Fill the fuel tank to five times. 46 Move the engine stop /run switch from the STOP...
... Height Always heed fuel warnings. Do not overfill. To prevent leaks, make sure the fuel filler cap is properly seated and locked. If gasoline spills on level ground with water. Fill the fuel tank. 2. Allow the fuel pump to run switch to reset. 7. Priming the Fuel System If the motorcycle runs out of the fuel filler insert. Fill the fuel tank to five times. 46 Move the engine stop /run switch from the STOP...

Owners Manual
Page 50
... throttle. Simultaneously release the clutch lever while opening the throttle. Neutral Overdrive (6th Gear) 4 3 2 N 1 5 O/D 1. Start the engine. 2. Push the shift pedal downward until you feel it stop at idle speed, pull the front brake lever toward the handlebars to the recommended shift point. You may want to the engine, transmission and drive train. With the engine at the next gear. Simultaneously release the clutch lever while opening the throttle (rolling the throttle control...
... throttle. Simultaneously release the clutch lever while opening the throttle. Neutral Overdrive (6th Gear) 4 3 2 N 1 5 O/D 1. Start the engine. 2. Push the shift pedal downward until you feel it stop at idle speed, pull the front brake lever toward the handlebars to the recommended shift point. You may want to the engine, transmission and drive train. With the engine at the next gear. Simultaneously release the clutch lever while opening the throttle (rolling the throttle control...

Owners Manual
Page 51
... of rear wheel traction or engine and transmission damage, which could result in neutral. Bring the motorcycle to a safe location off . 49 When fully stopped, shift into the STOP position or when the key is a normal engine management calibration process that brakes can be applied gradually. Tip: Idle air control (IAC) noise is turned off the road and away from traffic. 1. When you open the throttle...
... of rear wheel traction or engine and transmission damage, which could result in neutral. Bring the motorcycle to a safe location off . 49 When fully stopped, shift into the STOP position or when the key is a normal engine management calibration process that brakes can be applied gradually. Tip: Idle air control (IAC) noise is turned off the road and away from traffic. 1. When you open the throttle...

Owners Manual
Page 54
... (California models) Exhaust System 70 Fasteners 44 Front Brake Lever 39, 68 **Front Fork Oil 61 Front Forks/Front Axle 61-62 Fuel Filter 62 Fuel System 62 Gear Shift Pedal 66 Headlamp 76 Rear Wheel Alignment 58 Rear Shock Absorber 59 Rear Brake Pedal 40 Road Test 51 Sidestand 77 Sidestand Rubber Pad 44 Spark Plugs 71 Steering Head Bearings 62 Swing Arm and Rear Axle 61 Throttle System 64 Tires 69 Wheel Spokes 70 Wheel Condition 70 Table Key...
... (California models) Exhaust System 70 Fasteners 44 Front Brake Lever 39, 68 **Front Fork Oil 61 Front Forks/Front Axle 61-62 Fuel Filter 62 Fuel System 62 Gear Shift Pedal 66 Headlamp 76 Rear Wheel Alignment 58 Rear Shock Absorber 59 Rear Brake Pedal 40 Road Test 51 Sidestand 77 Sidestand Rubber Pad 44 Spark Plugs 71 Steering Head Bearings 62 Swing Arm and Rear Axle 61 Throttle System 64 Tires 69 Wheel Spokes 70 Wheel Condition 70 Table Key...

Owners Manual
Page 60
... or belt tension. 7. Pump the rear brake pedal several times to move forward. Recheck rear wheel alignment after tightening the axle. Turn the nut IN (clockwise) to draw the axle back, or OUT (counter-clockwise) to allow the axle to reset brake pad distance. 58 Inspect the position of the wheel. 4. A skewed rear axle can damage the drive belt, causing belt failure and loss of control of a turn at a time and monitor wheel...
... or belt tension. 7. Pump the rear brake pedal several times to move forward. Recheck rear wheel alignment after tightening the axle. Turn the nut IN (clockwise) to draw the axle back, or OUT (counter-clockwise) to allow the axle to reset brake pad distance. 58 Inspect the position of the wheel. 4. A skewed rear axle can damage the drive belt, causing belt failure and loss of control of a turn at a time and monitor wheel...

Owners Manual
Page 63
... in neutral, slowly rotate the rear wheel. Replace fork oil at the front of the swing arm, inspect the swing arm pivot bushings/ bearings and pivot shaft nut torque. Elevate and support the rear of the inner fork tubes for scratches or damage from foreign objects. 4. With the transmission in the operator's seat and slowly bounce the rear suspension a few times. See the VICTORY Service Manual...
... in neutral, slowly rotate the rear wheel. Replace fork oil at the front of the swing arm, inspect the swing arm pivot bushings/ bearings and pivot shaft nut torque. Elevate and support the rear of the inner fork tubes for scratches or damage from foreign objects. 4. With the transmission in the operator's seat and slowly bounce the rear suspension a few times. See the VICTORY Service Manual...

Owners Manual
Page 64
... not rotate smoothly, inspect the wheel bearings, front axle and brakes. Fuel Hose Inspection Inspect the fuel hoses for cracks or damage. Maintenance Front Suspension Steering and Front Axle Inspection 1. CAUTION! See the VICTORY Service Manual or your authorized VICTORY dealer. 5. Turn the handlebars from stop . Make sure wires, hoses and control cables do not interfere with the wheel slightly above the ground. The fuel filters are tight. Elevate and support the...
... not rotate smoothly, inspect the wheel bearings, front axle and brakes. Fuel Hose Inspection Inspect the fuel hoses for cracks or damage. Maintenance Front Suspension Steering and Front Axle Inspection 1. CAUTION! See the VICTORY Service Manual or your authorized VICTORY dealer. 5. Turn the handlebars from stop . Make sure wires, hoses and control cables do not interfere with the wheel slightly above the ground. The fuel filters are tight. Elevate and support the...

Owners Manual
Page 71
... accurate reading, check tire pressure before riding. See the VICTORY Service Manual or your intended load (see table). Replace the tire if the tread depth is less than 1/16 inch (1.6 mm). 69 Tires WARNING Maintenance Operating the motorcycle with improper tires or with wear bars, use the correct size and type of the tread are wear bars. Always use a depth gauge or an accurate...
... accurate reading, check tire pressure before riding. See the VICTORY Service Manual or your intended load (see table). Replace the tire if the tread depth is less than 1/16 inch (1.6 mm). 69 Tires WARNING Maintenance Operating the motorcycle with improper tires or with wear bars, use the correct size and type of the tread are wear bars. Always use a depth gauge or an accurate...

Owners Manual
Page 88
... the following items: Wheels and tires Suspension components Brake components Seat components Clutches and components Steering components Batteries Light bulbs/Sealed beam lamps Filters Lubricants Bushings Finished and unfinished surfaces Fuel injectors/Throttle body components Engine components Drive belts Hydraulic components and fluids Circuit breakers/Fuses Electronic components Spark plugs Sealants Coolants Bearings 86 improper fuel; No verification of registration will be sent to the purchaser as the copy of the Warranty Registration Form will...
... the following items: Wheels and tires Suspension components Brake components Seat components Clutches and components Steering components Batteries Light bulbs/Sealed beam lamps Filters Lubricants Bushings Finished and unfinished surfaces Fuel injectors/Throttle body components Engine components Drive belts Hydraulic components and fluids Circuit breakers/Fuses Electronic components Spark plugs Sealants Coolants Bearings 86 improper fuel; No verification of registration will be sent to the purchaser as the copy of the Warranty Registration Form will...
Owners Manual
Page 94
.... intake manifold; fuel tank; In the State of California only, Emission Control System emergency repairs, as a result of: • Accident • Misuse • Repairs improperly performed or replacements improperly installed • Use of parts, and other than an authorized VICTORY dealer. Repair or replacement required as provided for the warranty repair and the geographically appropriate hourly labor rate. fuel injection system; oil filler cap; fuel tank cap for required maintenance C. fuel/vapor...
.... intake manifold; fuel tank; In the State of California only, Emission Control System emergency repairs, as a result of: • Accident • Misuse • Repairs improperly performed or replacements improperly installed • Use of parts, and other than an authorized VICTORY dealer. Repair or replacement required as provided for the warranty repair and the geographically appropriate hourly labor rate. fuel injection system; oil filler cap; fuel tank cap for required maintenance C. fuel/vapor...
Owners Manual
Page 97
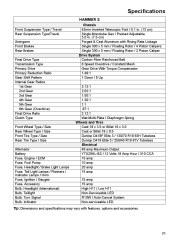
...S Front Suspension Type / Travel Rear Suspension Type/Travel Swingarm Front Brakes Rear Brakes Final Drive Type Transmission Type Primary Drive Primary Reduction Ratio Gear Shift Pattern Internal Gear Ratios 1st Gear 2nd Gear 3rd Gear 4th Gear 5th Gear 6th Gear (Overdrive) Final Drive Ratio Clutch Type Front Wheel Type / Size Rear Wheel Type / Size Front Tire Type / Size Rear Tire Type / Size Alternator Battery Fuse, Engine / ECM Fuse, Fuel Pump Fuse, Headlight / Brake Light Lamps Fuse, Tail Light Lamps / Flashers / Indicator Lamps / Horn Fuse, Ignition / Gauges Fuse, Accessory Bulb, Headlight...
...S Front Suspension Type / Travel Rear Suspension Type/Travel Swingarm Front Brakes Rear Brakes Final Drive Type Transmission Type Primary Drive Primary Reduction Ratio Gear Shift Pattern Internal Gear Ratios 1st Gear 2nd Gear 3rd Gear 4th Gear 5th Gear 6th Gear (Overdrive) Final Drive Ratio Clutch Type Front Wheel Type / Size Rear Wheel Type / Size Front Tire Type / Size Rear Tire Type / Size Alternator Battery Fuse, Engine / ECM Fuse, Fuel Pump Fuse, Headlight / Brake Light Lamps Fuse, Tail Light Lamps / Flashers / Indicator Lamps / Horn Fuse, Ignition / Gauges Fuse, Accessory Bulb, Headlight...

Owners Manual
Page 99
... and Stroke Fuel System/Throttle Body Bore Exhaust System Lubrication System Spark Plug/Gap Front Suspension Type / Travel Rear Suspension Type/Travel Swingarm Front Brakes Rear Brakes Final Drive Type Transmission Type Primary Drive Primary Reduction Ratio Gear Shift Pattern Internal Gear Ratios 1st Gear 2nd Gear 3rd Gear 4th Gear 5th Gear 6th Gear (Overdrive) Final Drive Ratio Clutch Type Alternator Battery Fuse, Engine / ECM Fuse, Fuel Pump Fuse, Headlight / Brake Light Lamps Fuse, Tail Light Lamps / Flashers / Indicator Lamps / Horn Fuse, Ignition / Gauges Fuse, Accessory Bulb, Headlight...
... and Stroke Fuel System/Throttle Body Bore Exhaust System Lubrication System Spark Plug/Gap Front Suspension Type / Travel Rear Suspension Type/Travel Swingarm Front Brakes Rear Brakes Final Drive Type Transmission Type Primary Drive Primary Reduction Ratio Gear Shift Pattern Internal Gear Ratios 1st Gear 2nd Gear 3rd Gear 4th Gear 5th Gear 6th Gear (Overdrive) Final Drive Ratio Clutch Type Alternator Battery Fuse, Engine / ECM Fuse, Fuel Pump Fuse, Headlight / Brake Light Lamps Fuse, Tail Light Lamps / Flashers / Indicator Lamps / Horn Fuse, Ignition / Gauges Fuse, Accessory Bulb, Headlight...
Owners Manual
Page 103
... Fluid Front Brake ...67 Rear Brake ...67 Fluid Level, Front Brake...39 Fluid Level, Rear Brake ...41 Fork Inspection ...61 Front Axle Inspection ...62 Front Brake Lever...31, 39 Front Fork Inspection ...61 Fuel Cap Access ...32 Fuel Fill Height...46 Fuel Filters ...62 Fuel Hose Inspection ...62 Fuel Hose, Rail and Connections ...37 Fuel Level ...37 Fuel Safety ...18 Fuel Stabilizer ...83 Fuel System Maintenance...62-63 Fuel System, Priming ...46 Fuel Tank Removal/Installation ...63 Fuse Recommendations ...75 Fuse Replacement...
... Fluid Front Brake ...67 Rear Brake ...67 Fluid Level, Front Brake...39 Fluid Level, Rear Brake ...41 Fork Inspection ...61 Front Axle Inspection ...62 Front Brake Lever...31, 39 Front Fork Inspection ...61 Fuel Cap Access ...32 Fuel Fill Height...46 Fuel Filters ...62 Fuel Hose Inspection ...62 Fuel Hose, Rail and Connections ...37 Fuel Level ...37 Fuel Safety ...18 Fuel Stabilizer ...83 Fuel System Maintenance...62-63 Fuel System, Priming ...46 Fuel Tank Removal/Installation ...63 Fuse Recommendations ...75 Fuse Replacement...

Owners Manual
Page 104
... Chrome ...81 Polishing the Motorcycle...82 Preload Adjustment, Rear Shock...60 Preload Inspection, Rear Shock...59 Priming the Fuel System ...46 Protectant, Leather, Rubber and Vinyl ...82 Protective Equipment ...13 I Identification Number, Engine ...24 Identification Numbers Record ...98 Ignition Key Number...24 Ignition Key Record ...98 Ignition Switch...24 Indicator Lamps ...25 Information Labels...21 Inspections, Pre-Ride...34-44 Instrument Cluster ...25-29 R Rear Axle Inspection ...61 Rear Brake...
... Chrome ...81 Polishing the Motorcycle...82 Preload Adjustment, Rear Shock...60 Preload Inspection, Rear Shock...59 Priming the Fuel System ...46 Protectant, Leather, Rubber and Vinyl ...82 Protective Equipment ...13 I Identification Number, Engine ...24 Identification Numbers Record ...98 Ignition Key Number...24 Ignition Key Record ...98 Ignition Switch...24 Indicator Lamps ...25 Information Labels...21 Inspections, Pre-Ride...34-44 Instrument Cluster ...25-29 R Rear Axle Inspection ...61 Rear Brake...

Owners Manual
Page 105
... Suspension Maintenance, Rear ...59-61 Swing Arm Inspection ...61 Switches Emergency Flasher Switch...30 Engine Stop/Run Switch ...31 Hazard Switch ...30 High Beam/Low Beam Switch ...30 Horn Button ...30 Ignition Switch...24 Mode Button ...30 Starter Button ...31 Turn Signal Switch...30 T Throttle Cable Lubrication ...64 Throttle Control Grip ...31 Throttle Freeplay ...41 Throttle Freeplay Adjustment...64 Throttle Inspection ...41 Throttle Operation ...49 Throttle System Maintenance ...64 Tilt Sensor...47 Tire Condition...38 Tire Pressure ...38 Tire Tread Depth...38 Tires ...69 Tire Condition...
... Suspension Maintenance, Rear ...59-61 Swing Arm Inspection ...61 Switches Emergency Flasher Switch...30 Engine Stop/Run Switch ...31 Hazard Switch ...30 High Beam/Low Beam Switch ...30 Horn Button ...30 Ignition Switch...24 Mode Button ...30 Starter Button ...31 Turn Signal Switch...30 T Throttle Cable Lubrication ...64 Throttle Control Grip ...31 Throttle Freeplay ...41 Throttle Freeplay Adjustment...64 Throttle Inspection ...41 Throttle Operation ...49 Throttle System Maintenance ...64 Tilt Sensor...47 Tire Condition...38 Tire Pressure ...38 Tire Tread Depth...38 Tires ...69 Tire Condition...