Owner's Manual
Page 177
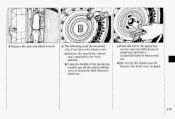
Remove the wheel cover by hand. 1 75 The following (a-d) are necessary I only if you have wire wheelcovers: a) Remove the special key wrench that's attached to remove the nut. Remove the jack and wheel wrench. 5. 4. c ) Push the end of the special key wrench, pry off . d) Do not pry the wheel cover off the center emblem cover to reveal the theft-deterrent wheel nut. b)Using the handle of the special key wrench onto the theft-deterrent wheel nut and twist it counterclockwise to the trunk sidewall.
Remove the wheel cover by hand. 1 75 The following (a-d) are necessary I only if you have wire wheelcovers: a) Remove the special key wrench that's attached to remove the nut. Remove the jack and wheel wrench. 5. 4. c ) Push the end of the special key wrench, pry off . d) Do not pry the wheel cover off the center emblem cover to reveal the theft-deterrent wheel nut. b)Using the handle of the special key wrench onto the theft-deterrent wheel nut and twist it counterclockwise to the trunk sidewall.

Owner's Manual
Page 178
... the wheel cover. Do not drop the cover or lay it face down, as it whileusing your temporary spare tire.) 17 6 needed to It's anchor wire wheel covers the to install the cover. b) When replacingthe cover after the wheel is on wheels with a center cover that conceals the wheel nuts. Remove... the cover by using the end of the wheel cover until it comes loose.If you have wire wheels, do not use a hammer or mallet to wheel. Non-wire 7. Problems on thevehicle, do not pry the cover off the pry center cover. The followingis necessary if you have 8. an...
... the wheel cover. Do not drop the cover or lay it face down, as it whileusing your temporary spare tire.) 17 6 needed to It's anchor wire wheel covers the to install the cover. b) When replacingthe cover after the wheel is on wheels with a center cover that conceals the wheel nuts. Remove... the cover by using the end of the wheel cover until it comes loose.If you have wire wheels, do not use a hammer or mallet to wheel. Non-wire 7. Problems on thevehicle, do not pry the cover off the pry center cover. The followingis necessary if you have 8. an...
Owner's Manual
Page 200
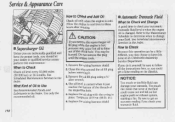
...fire. using a%" allen wrench. $.The oil level is changed. When to 10 Nom (88 lb. Torque to Check Check oil level every 30,000 miles (50 000 km)or 36...months. Refex to the Maintenanc Schedule to get a false readingon the dipstick. Remove the wiring harness shield. 2. See Scheduled Maintenance Services in place. Replace the oil plugwith theO-... canbe a little difficult, you should let your dealeror qualified servicecenter perform this done at an Oldsmobile dealership Service Department. in the Index. See Scheduled Maintenancc Services in .). 6. before removingit. ...
...fire. using a%" allen wrench. $.The oil level is changed. When to 10 Nom (88 lb. Torque to Check Check oil level every 30,000 miles (50 000 km)or 36...months. Refex to the Maintenanc Schedule to get a false readingon the dipstick. Remove the wiring harness shield. 2. See Scheduled Maintenance Services in place. Replace the oil plugwith theO-... canbe a little difficult, you should let your dealeror qualified servicecenter perform this done at an Oldsmobile dealership Service Department. in the Index. See Scheduled Maintenancc Services in .). 6. before removingit. ...
Owner's Manual
Page 209
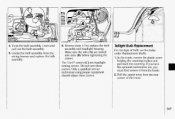
... bulb assembly. 5. Do not turn and 6. If you have the optionalconvenience net, you must first remove it from thehooks. 2 Pull the carpet away from the wiring harness and replace the bulb assembly. assembly and headlight housing. I. ' . . ...1- . 4. Make sure thetabs (A) are aiming screws. The Torxs screws (C) headlight are locked into slots (B) before...
... bulb assembly. 5. Do not turn and 6. If you have the optionalconvenience net, you must first remove it from thehooks. 2 Pull the carpet away from the wiring harness and replace the bulb assembly. assembly and headlight housing. I. ' . . ...1- . 4. Make sure thetabs (A) are aiming screws. The Torxs screws (C) headlight are locked into slots (B) before...
Owner's Manual
Page 223
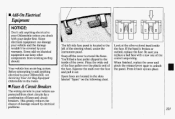
...wouldn't be coveredby your vehicle are protected from working as they should. Ad=OnEkcb-ical Equipment NOTICE: Don't add anythingelectrical to your Oldsmobile unless you replace a bad fuse with your dealer first.Some electrical equipment can keep other components from short circuits by electrical problems. ... a combination of the Snap off the cover to reveal the fuses. Some add-on the following chart. 1Fuses & Circuit Breakers The wiring circuits in the Index. Before attempting to add anything electrical to the When finished, replace the cover and inside of pinch the release...
...wouldn't be coveredby your vehicle are protected from working as they should. Ad=OnEkcb-ical Equipment NOTICE: Don't add anythingelectrical to your Oldsmobile unless you replace a bad fuse with your dealer first.Some electrical equipment can keep other components from short circuits by electrical problems. ... a combination of the Snap off the cover to reveal the fuses. Some add-on the following chart. 1Fuses & Circuit Breakers The wiring circuits in the Index. Before attempting to add anything electrical to the When finished, replace the cover and inside of pinch the release...
Owner's Manual
Page 227
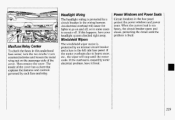
... cases to go on the passenger side of the cover has a chart that explains the featuresand controls governed by each fuse and relay. Headlight Wiring The headlight wiring isprotected by a circuit breaker in this happens, have it fixed. 225 Windshield Wipers MaxifuselRelay Center To check the fuses in the... wiring harness. The inside of the cover. The windshield wiper motor is fixed. Then remove the cover. When the current load is too heavy, the ...
... cases to go on the passenger side of the cover has a chart that explains the featuresand controls governed by each fuse and relay. Headlight Wiring The headlight wiring isprotected by a circuit breaker in this happens, have it fixed. 225 Windshield Wipers MaxifuselRelay Center To check the fuses in the... wiring harness. The inside of the cover. The windshield wiper motor is fixed. Then remove the cover. When the current load is too heavy, the ...

Owner's Manual
Page 238
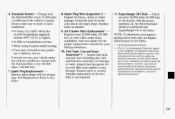
When most trips include extended idling and/or frequent low-speed operation, as in dusty areas. Engine Accessory Drive Belt Inspection" Transaxle Service Spark PIua Wire 1nspection':'t I Every 30,000 Miles (50 000 ltm) or 24 Months See of following Schedules I and 11. Cap andLines1nspection"'t 1 Every 30,000 Miles (50 000 ...
When most trips include extended idling and/or frequent low-speed operation, as in dusty areas. Engine Accessory Drive Belt Inspection" Transaxle Service Spark PIua Wire 1nspection':'t I Every 30,000 Miles (50 000 ltm) or 24 Months See of following Schedules I and 11. Cap andLines1nspection"'t 1 Every 30,000 Miles (50 000 ...

Owner's Manual
Page 240
Maintenance Schedule Schedule /I Follow Schedule TI ONLY if none of Scheduled Maintenance No' Sentices following Schedules I and 11. WHEN TO PERFORM Miles (kilometers) or Months (whichever occurs first). I Evew 7.500 Miles (12 500 am)or 12 Months. 1 1 8 I apply. Spark Plug Wire 1nspection"'t 1 Every 311,000 Miles (50000 ltm). 238 TO BE SERVICED ITEM See Explanation of the driving conditions specified in Schedule I -
Maintenance Schedule Schedule /I Follow Schedule TI ONLY if none of Scheduled Maintenance No' Sentices following Schedules I and 11. WHEN TO PERFORM Miles (kilometers) or Months (whichever occurs first). I Evew 7.500 Miles (12 500 am)or 12 Months. 1 1 8 I apply. Spark Plug Wire 1nspection"'t 1 Every 311,000 Miles (50000 ltm). 238 TO BE SERVICED ITEM See Explanation of the driving conditions specified in Schedule I -
Owner's Manual
Page 243
Uses such as needed . Replace wires as found in taxi, police car or delivery service. Lubricants and Supercharger Oil in the Index. 8. NOTE: To determine your vehicle under any damage. Environnlental ... 1nspection':t - If you do not use your engine's displacement andcode, see Engine Identification in "SectionE: Maintenance Record." IO. Ask your driving conditions. 11. Spark Plug Wire Inspection':?Inspect for your dealerfor the proper replacement intervals for burns, cracks or other damage. Transaxle Service- t = The US. 6.
Uses such as needed . Replace wires as found in taxi, police car or delivery service. Lubricants and Supercharger Oil in the Index. 8. NOTE: To determine your vehicle under any damage. Environnlental ... 1nspection':t - If you do not use your engine's displacement andcode, see Engine Identification in "SectionE: Maintenance Record." IO. Ask your driving conditions. 11. Spark Plug Wire Inspection':?Inspect for your dealerfor the proper replacement intervals for burns, cracks or other damage. Transaxle Service- t = The US. 6.
Owner's Manual
Page 268
..., Removing and Replacing ...206, 207 Headlights ...72 * . Gage Cluster...Gages 86, 87 Coolant Temperature ...93 Fuel ...91, 92 Speedometer...88, 89 Tachometer ...91 Gasoline...185 Gasoline Tank, Filling Your ...187 Gear Positions (see Shifting the Transaxle ) Gearshift Lever (see Warning Lights)...Aiming...207 High-Low Beam Changer...67 ...Instrument Panel Intensity Control74 On" Reminder ...72 Operation ...67 ...229 Replacement Bulb Torx* Screws ...207 Wiring ...225 Head Restraint ...14 Heater (see Comfort Controls) (( 266 Manual Day/Night ...75 Heater. Engine Coolant ...54 High Beams ...67...
..., Removing and Replacing ...206, 207 Headlights ...72 * . Gage Cluster...Gages 86, 87 Coolant Temperature ...93 Fuel ...91, 92 Speedometer...88, 89 Tachometer ...91 Gasoline...185 Gasoline Tank, Filling Your ...187 Gear Positions (see Shifting the Transaxle ) Gearshift Lever (see Warning Lights)...Aiming...207 High-Low Beam Changer...67 ...Instrument Panel Intensity Control74 On" Reminder ...72 Operation ...67 ...229 Replacement Bulb Torx* Screws ...207 Wiring ...225 Head Restraint ...14 Heater (see Comfort Controls) (( 266 Manual Day/Night ...75 Heater. Engine Coolant ...54 High Beams ...67...


