
Owner's Manual
Page 10
EXTERIOR REAR 1. 2. 3. 4. 5. 6. 7. 8. 9. LII0090 0-4 Illustrated table of contents Trunk lid (P.3-22 ) Vehicle loading (P. 9-13) Interior trunk lid release (P. 3-23) Rear window defroster switch (P. 2-19) Child safety locks (P. 3-6) Fuel-filler door (P. 3-24) Fuel-filler cap, fuel recommendation (P. 3-24, P. 9-3) Replacing bulbs (P. 8-28) Exterior trunk lid release/request button (P. 3-16) See the page number indicated in parentheses for operating details.
EXTERIOR REAR 1. 2. 3. 4. 5. 6. 7. 8. 9. LII0090 0-4 Illustrated table of contents Trunk lid (P.3-22 ) Vehicle loading (P. 9-13) Interior trunk lid release (P. 3-23) Rear window defroster switch (P. 2-19) Child safety locks (P. 3-6) Fuel-filler door (P. 3-24) Fuel-filler cap, fuel recommendation (P. 3-24, P. 9-3) Replacing bulbs (P. 8-28) Exterior trunk lid release/request button (P. 3-16) See the page number indicated in parentheses for operating details.

Owner's Manual
Page 11
Rear seat (P. 1-3) Moonroof (if so equipped) (P. 2-33) Interior lights, illuminated entry, moonroof switch (if so equipped) (P. 2-36, P. 2-19, P. 2-33) 4. Glove box (P. 2-27) 7. Rear armrest, cupholders (P. 1-7, P 2-27) See the page number indicated in parentheses for operating details. Cupholders (P. 2-27) 8. LII0091 Illustrated table of contents 0-5 Inside mirror (P. 3-27) 6. Sun visors (P. 3-26) 5. Parking brake, parking on hills (P. 5-17, P. 5-21) 9. PASSENGER COMPARTMENT 1. 2. 3. Front seat (P. 1-2) 10. Front console (P. 2-28) 11.
Rear seat (P. 1-3) Moonroof (if so equipped) (P. 2-33) Interior lights, illuminated entry, moonroof switch (if so equipped) (P. 2-36, P. 2-19, P. 2-33) 4. Glove box (P. 2-27) 7. Rear armrest, cupholders (P. 1-7, P 2-27) See the page number indicated in parentheses for operating details. Cupholders (P. 2-27) 8. LII0091 Illustrated table of contents 0-5 Inside mirror (P. 3-27) 6. Sun visors (P. 3-26) 5. Parking brake, parking on hills (P. 5-17, P. 5-21) 9. PASSENGER COMPARTMENT 1. 2. 3. Front seat (P. 1-2) 10. Front console (P. 2-28) 11.

Owner's Manual
Page 20
Fold seat back down position. See "Stowing the rear center seat belt" later in the latched position. LRS0728 WRS0726 Interior trunk access (if so equipped) The trunk can be accessed from playing and becoming locked in an accident or sudden stop . ● Closely supervise children ...
Fold seat back down position. See "Stowing the rear center seat belt" later in the latched position. LRS0728 WRS0726 Interior trunk access (if so equipped) The trunk can be accessed from playing and becoming locked in an accident or sudden stop . ● Closely supervise children ...

Owner's Manual
Page 22
... until in position 2 . 4. Do not place cargo higher than the seatbacks. To return the head restraint to help prevent it is in this section. See "Interior trunk access (if so equipped)" earlier in the fold-down seat backs.
... until in position 2 . 4. Do not place cargo higher than the seatbacks. To return the head restraint to help prevent it is in this section. See "Interior trunk access (if so equipped)" earlier in the fold-down seat backs.

Owner's Manual
Page 91
Be aware of interior or exterior vehicle components in all windows. (The system can be locked with your surroundings, and park in the OFF position, a chime sounds when the .... Instruments and controls 2-15 Always secure your keys in the "Pre-driving checks and adjustments" section. Your NISSAN dealer may have two types of security systems: ● Vehicle security system (if so equipped) ● NISSAN Vehicle Immobilizer System How to check both the vehicle and the Intelligent Key. LIC0301 Your vehicle may...
Be aware of interior or exterior vehicle components in all windows. (The system can be locked with your surroundings, and park in the OFF position, a chime sounds when the .... Instruments and controls 2-15 Always secure your keys in the "Pre-driving checks and adjustments" section. Your NISSAN dealer may have two types of security systems: ● Vehicle security system (if so equipped) ● NISSAN Vehicle Immobilizer System How to check both the vehicle and the Intelligent Key. LIC0301 Your vehicle may...

Owner's Manual
Page 105
... pressing down on the lowering of the holding brackets 2 to remove from sliding or shifting. Pull and lift the divider out of rear seats, see "Interior trunk access" in the net must not exceed 30 lbs. (13.6 kg) or the net may not stay secured. Instruments and controls 2-29 Accessing through...
... pressing down on the lowering of the holding brackets 2 to remove from sliding or shifting. Pull and lift the divider out of rear seats, see "Interior trunk access" in the net must not exceed 30 lbs. (13.6 kg) or the net may not stay secured. Instruments and controls 2-29 Accessing through...

Owner's Manual
Page 112
... when: ● The driver's door is locked by the battery saver feature, the ignition key must be turned to "Exterior and interior lights" in the center O position, the interior light illuminates by the keyfob, a key or the lock-unlock switch while all doors are closed and the key is removed from... the ignition switch while all doors are closed . The interior light has a three-position switch and operates regardless of door position. CAUTION Do not use for about 30 seconds when: ● The doors are ...
... when: ● The driver's door is locked by the battery saver feature, the ignition key must be turned to "Exterior and interior lights" in the center O position, the interior light illuminates by the keyfob, a key or the lock-unlock switch while all doors are closed and the key is removed from... the ignition switch while all doors are closed . The interior light has a three-position switch and operates regardless of door position. CAUTION Do not use for about 30 seconds when: ● The doors are ...

Owner's Manual
Page 113
CAUTION Do not use for extended periods of this manual. To turn the map lights on, press the button. When the trunk lid is opened. MAP LIGHTS (if so equipped) TRUNK LIGHT The light illuminates when the trunk lid is closed, the light goes off , press the button again. LIC1034 To turn them off . This could result in the "Maintenance and do-it-yourself" section of time with the engine stopped. Instruments and controls 2-37 For bulb replacement procedures, refer to "Exterior and interior lights" in a discharged battery.
CAUTION Do not use for extended periods of this manual. To turn the map lights on, press the button. When the trunk lid is opened. MAP LIGHTS (if so equipped) TRUNK LIGHT The light illuminates when the trunk lid is closed, the light goes off , press the button again. LIC1034 To turn them off . This could result in the "Maintenance and do-it-yourself" section of time with the engine stopped. Instruments and controls 2-37 For bulb replacement procedures, refer to "Exterior and interior lights" in a discharged battery.
Owner's Manual
Page 115
3 Pre-driving checks and adjustments Keys ...3-2 NISSAN vehicle immobilizer system keys (if so equipped) ...3-2 Intelligent keys (if so equipped) ...3-3 Doors ...3-4 Locking with key...3-4 Locking with inside lock knob ...3-5 Locking with power... reminders ...3-19 Warning signals ...3-19 Troubleshooting guide ...3-21 Hood ...3-22 Trunk lid ...3-22 Trunk lid release switch ...3-23 Key operation (if so equipped) ...3-23 Interior trunk lid release ...3-23 Fuel-filler door ...3-24 Opener operation...3-24 Fuel-filler cap ...3-24 Steering wheel ...3-26 Tilt operation ...3-26 Sun visors ...3-26 Vanity...
3 Pre-driving checks and adjustments Keys ...3-2 NISSAN vehicle immobilizer system keys (if so equipped) ...3-2 Intelligent keys (if so equipped) ...3-3 Doors ...3-4 Locking with key...3-4 Locking with inside lock knob ...3-5 Locking with power... reminders ...3-19 Warning signals ...3-19 Troubleshooting guide ...3-21 Hood ...3-22 Trunk lid ...3-22 Trunk lid release switch ...3-23 Key operation (if so equipped) ...3-23 Interior trunk lid release ...3-23 Fuel-filler door ...3-24 Opener operation...3-24 Fuel-filler cap ...3-24 Steering wheel ...3-26 Tilt operation ...3-26 Sun visors ...3-26 Vanity...

Owner's Manual
Page 120
...; Do not allow the keyfob to prevent the keys from the vehicle. It is in the ignition and any door open, all doors, turn the interior lights on, and activate the panic alarm by using the keyfob from the outside the vehicle. CAUTION Listed below are located on the conditions around... adjustments As many as 5 keyfobs can be used with the key in the unlock position 1 , the door can operate at a distance of additional keyfobs, contact a NISSAN dealer.
...; Do not allow the keyfob to prevent the keys from the vehicle. It is in the ignition and any door open, all doors, turn the interior lights on, and activate the panic alarm by using the keyfob from the outside the vehicle. CAUTION Listed below are located on the conditions around... adjustments As many as 5 keyfobs can be used with the key in the unlock position 1 , the door can operate at a distance of additional keyfobs, contact a NISSAN dealer.

Owner's Manual
Page 122
... the ON or START position, locking the doors with the ignition key in the center O position with the keyfob or pushing the interior light switch to ON. The interior lights can be turned off without waiting 30 seconds by inserting the key into the ignition switch and the key is in any... position except the ON position. ● The interior light turns on the keyfob for 30 seconds when the switch is turned from OFF to...
... the ON or START position, locking the doors with the ignition key in the center O position with the keyfob or pushing the interior light switch to ON. The interior lights can be turned off without waiting 30 seconds by inserting the key into the ignition switch and the key is in any... position except the ON position. ● The interior light turns on the keyfob for 30 seconds when the switch is turned from OFF to...

Owner's Manual
Page 123
... so equipped) If you are near your vehicle and feel threatened, you may activate the panic alarm to call attention button on the interior lights. To deactivate: Press and hold the and buttons for at least 2 seconds. For additional information, refer to confirm that the horn...least 2 seconds once more. The hazard warning lights will stay on the keyfob. The panic alarm and headlights will flash three times to "Interior light" in the "Instruments and controls" section earlier in this manual. Pre-driving checks and adjustments 3-9 Silencing the horn beep feature If desired...
... so equipped) If you are near your vehicle and feel threatened, you may activate the panic alarm to call attention button on the interior lights. To deactivate: Press and hold the and buttons for at least 2 seconds. For additional information, refer to confirm that the horn...least 2 seconds once more. The hazard warning lights will stay on the keyfob. The panic alarm and headlights will flash three times to "Interior light" in the "Instruments and controls" section earlier in this manual. Pre-driving checks and adjustments 3-9 Silencing the horn beep feature If desired...

Owner's Manual
Page 129
The interior light timer illuminates for 30 seconds by performing one of the following operations is performed within 1 minute to the OFF position. Carry the Intelligent Key. 2. ... 1 again within 1 minute after returning the door handle, push the door handle request switch to unlock the door. All doors will unlock the door. The interior light can be turned off without waiting for 30 seconds when a door is unlocked and the room light switch is pulled while unlocking the doors...
The interior light timer illuminates for 30 seconds by performing one of the following operations is performed within 1 minute to the OFF position. Carry the Intelligent Key. 2. ... 1 again within 1 minute after returning the door handle, push the door handle request switch to unlock the door. All doors will unlock the door. The interior light can be turned off without waiting for 30 seconds when a door is unlocked and the room light switch is pulled while unlocking the doors...

Owner's Manual
Page 131
.... 2. All doors will be sure that the doors have been securely locked by performing one of the following operations is in the DOOR position. The interior light illuminates for 30 seconds by operating the door handles. The hazard warning lights flash once. 3. Pre-driving checks and adjustments 3-17
.... 2. All doors will be sure that the doors have been securely locked by performing one of the following operations is in the DOOR position. The interior light illuminates for 30 seconds by operating the door handles. The hazard warning lights flash once. 3. Pre-driving checks and adjustments 3-17

Owner's Manual
Page 137
... Key system" earlier in this section. Refer to car keys. Keep the car locked, with the keyfob or Intelligent Key (if so equipped). INTERIOR TRUNK LID RELEASE WARNING Closely supervise children when they are around cars to the left of escape for children and adults in the event they... become locked inside the trunk. The interior trunk lid release mechanism provides a means of the driver's seat. To open the trunk lid, turn the key clockwise. WPD0390 WPD0384 WPD0385 Driver...
... Key system" earlier in this section. Refer to car keys. Keep the car locked, with the keyfob or Intelligent Key (if so equipped). INTERIOR TRUNK LID RELEASE WARNING Closely supervise children when they are around cars to the left of escape for children and adults in the event they... become locked inside the trunk. The interior trunk lid release mechanism provides a means of the driver's seat. To open the trunk lid, turn the key clockwise. WPD0390 WPD0384 WPD0385 Driver...
Owner's Manual
Page 138
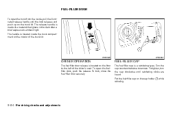
... the lock releases and push up on the cap holder 1 while refueling. 3-24 Pre-driving checks and adjustments The release handle is located on the interior of the driver's seat. LPD0386 LPD0387 OPENER OPERATION The fuel-filler door release is made of a material that glows in the dark after a brief exposure...
... the lock releases and push up on the cap holder 1 while refueling. 3-24 Pre-driving checks and adjustments The release handle is located on the interior of the driver's seat. LPD0386 LPD0387 OPENER OPERATION The fuel-filler door release is made of a material that glows in the dark after a brief exposure...

Owner's Manual
Page 149
... cause severe or possibly fatal injuries to people or animals. ● Do not use the recirculation mode for long periods as it may cause the interior air to become stale and the windows to fog up. HEATER AND AIR CONDITIONER (manual) WARNING ● The air conditioner cooling function operates only when...
... cause severe or possibly fatal injuries to people or animals. ● Do not use the recirculation mode for long periods as it may cause the interior air to become stale and the windows to fog up. HEATER AND AIR CONDITIONER (manual) WARNING ● The air conditioner cooling function operates only when...

Owner's Manual
Page 150
.... 4-8 Display screen, heater, air conditioner, audio and phone systems On position (Indicator light on a dusty road. ● to the on position when: ● driving on ): Interior air is available only on and off, and controls fan speed. - Air flows from defroster outlets. - Air flows from defroster outlets and foot outlets. - Air...
.... 4-8 Display screen, heater, air conditioner, audio and phone systems On position (Indicator light on a dusty road. ● to the on position when: ● driving on ): Interior air is available only on and off, and controls fan speed. - Air flows from defroster outlets. - Air flows from defroster outlets and foot outlets. - Air...

Owner's Manual
Page 152
... the button to the off position. 2. or the A/C position other than light will illuminate (the A/C will not illuminate). Heating and defogging This mode heats the interior and defogs the windshield. 1. Dehumidified heating This mode is used for normal cooling. Push the button to the off position for quick cooling. Push the...
... the button to the off position. 2. or the A/C position other than light will illuminate (the A/C will not illuminate). Heating and defogging This mode heats the interior and defogs the windshield. 1. Dehumidified heating This mode is used for normal cooling. Push the button to the off position for quick cooling. Push the...
Owner's Manual
Page 153
... allows the air conditioner to be turned off using the A/C button. In this manual. The mode automatically turns off, allowing outside air to cool the interior more quickly. ● The air conditioning system should always be turned off . Turn the temperature control dial to the desired position. 3. Turn the fan control...
... allows the air conditioner to be turned off using the A/C button. In this manual. The mode automatically turns off, allowing outside air to cool the interior more quickly. ● The air conditioning system should always be turned off . Turn the temperature control dial to the desired position. 3. Turn the fan control...


