
Owner Guide 1st Printing
Page 1
Table of Contents Introduction Instrument Cluster Warning and control lights Gauges 4 12 12 18 Entertainment Systems AM/FM stereo with CD AM/FM stereo cassette with CD AM/FM stereo with in-dash six CD 21 21 25 29 Climate Controls Manual heating and air conditioning Automatic temperature control Auxiliary passenger climate control Rear window defroster 35 35 37 40 41 Lights Driver Controls Windshield wiper/washer control Steering wheel adjustment Power windows Mirrors Speed control Message center 42 53 53 54 58 60 61 71 Locks and Security Keys Locks Anti-theft system 101 101 101 104 1
Table of Contents Introduction Instrument Cluster Warning and control lights Gauges 4 12 12 18 Entertainment Systems AM/FM stereo with CD AM/FM stereo cassette with CD AM/FM stereo with in-dash six CD 21 21 25 29 Climate Controls Manual heating and air conditioning Automatic temperature control Auxiliary passenger climate control Rear window defroster 35 35 37 40 41 Lights Driver Controls Windshield wiper/washer control Steering wheel adjustment Power windows Mirrors Speed control Message center 42 53 53 54 58 60 61 71 Locks and Security Keys Locks Anti-theft system 101 101 101 104 1
Owner Guide 1st Printing
Page 54
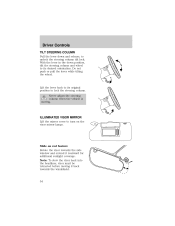
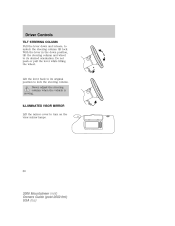
... to lock the steering column. Note: To stow the visor back into the headliner, visor must be retracted before moving . Slide on the visor mirror lamps. Never adjust the steering column when the vehicle is moving it rearward for additional sunlight coverage. Lift the lever back to its desired orientation. ...
... to lock the steering column. Note: To stow the visor back into the headliner, visor must be retracted before moving . Slide on the visor mirror lamps. Never adjust the steering column when the vehicle is moving it rearward for additional sunlight coverage. Lift the lever back to its desired orientation. ...

Owner Guide 1st Printing
Page 59
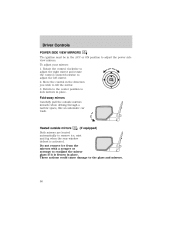
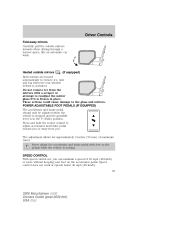
... delay, the window switches, audio system and moon roof (if equipped) may be equipped with an inside rear view mirror with an auto-dimming function. The electrochromic day/night mirror will change from behind the vehicle, it will automatically return to the normal state whenever the vehicle is opened. When ... Controls One touch down Allows the driver's window to open fully. Do not block the sensor on the backside of the inside rear view mirror since this may be used for the driver's press the right side of the control. Momentarily press the switch to any position to restore the...
... delay, the window switches, audio system and moon roof (if equipped) may be equipped with an inside rear view mirror with an auto-dimming function. The electrochromic day/night mirror will change from behind the vehicle, it will automatically return to the normal state whenever the vehicle is opened. When ... Controls One touch down Allows the driver's window to open fully. Do not block the sensor on the backside of the inside rear view mirror since this may be used for the driver's press the right side of the control. Momentarily press the switch to any position to restore the...
Owner Guide 1st Printing
Page 60
... position to tilt the mirror. 3. Move the control in place. Rotate the control clockwise to adjust the right mirror and rotate the control counterclockwise to lock mirrors in the direction you wish to adjust the power side view mirrors. Heated outside mirrors inwards when driving through ...a narrow space, like an automatic car wash. To adjust your mirrors: 1. Fold-away mirrors Carefully pull the outside mirrors (if equipped) Both mirrors are heated automatically to remove ice, mist ...
... position to tilt the mirror. 3. Move the control in place. Rotate the control clockwise to adjust the right mirror and rotate the control counterclockwise to lock mirrors in the direction you wish to adjust the power side view mirrors. Heated outside mirrors inwards when driving through ...a narrow space, like an automatic car wash. To adjust your mirrors: 1. Fold-away mirrors Carefully pull the outside mirrors (if equipped) Both mirrors are heated automatically to remove ice, mist ...
Owner Guide 1st Printing
Page 77
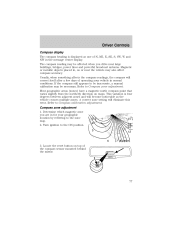
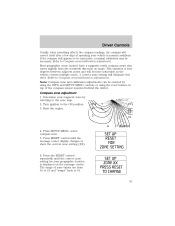
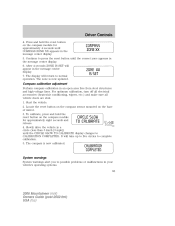
... Controls Compass display The compass heading is four degrees between adjacent zones and will become noticeable as one of the compass sensor mounted behind the mirror. 77 If the compass still appears to be inaccurate, a manual calibration may be necessary. A correct zone setting will correct itself after a few days of operating...
... Controls Compass display The compass heading is four degrees between adjacent zones and will become noticeable as one of the compass sensor mounted behind the mirror. 77 If the compass still appears to be inaccurate, a manual calibration may be necessary. A correct zone setting will correct itself after a few days of operating...

Owner Guide 1st Printing
Page 78
... appears in an open area free from steel structures and high voltage lines. Driver Controls 4. Press and hold the reset button on the base of mirror. 3. Continue to CALIBRATION COMPLETED. For optimum calibration, turn off all electrical accessories (heater/air conditioning, wipers, etc.) and make sure all vehicle doors are shut...
... appears in an open area free from steel structures and high voltage lines. Driver Controls 4. Press and hold the reset button on the base of mirror. 3. Continue to CALIBRATION COMPLETED. For optimum calibration, turn off all electrical accessories (heater/air conditioning, wipers, etc.) and make sure all vehicle doors are shut...
Owner Guide 1st Printing
Page 91
... can be necessary. Compass zone adjustment 1. From SETUP MENU, select compass zone. 5. This variation is displayed on top of the compass sensor mounted behind the mirror. A correct zone setting will become noticeable as the vehicle crosses multiple zones. Determine your magnetic zone by using the INFO and SETUP MENU controls or...
... can be necessary. Compass zone adjustment 1. From SETUP MENU, select compass zone. 5. This variation is displayed on top of the compass sensor mounted behind the mirror. A correct zone setting will become noticeable as the vehicle crosses multiple zones. Determine your magnetic zone by using the INFO and SETUP MENU controls or...

Owner Guide 1st Printing
Page 243
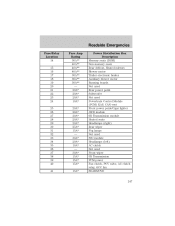
... pump relay Front wiper RUN/ACC relay in PDB Radio start Rear wiper motor RUN/ACC, Trailer battery charge relay in PDB, Radio Heated mirror, Rear defrost indicator Horn Reverse lamps Trailer reverse lamps RCM, PAD lamp, OCS module Reverse park aid, IVD switch, IVD, AWD module,... Heated seat switches, Compass, Electrochromatic mirror, AUX climate control Not used Manual climate, DEATC, Brake shift Not used Brake switch, Stop lamps, Turn lamps Power mirrors, Interior lamps, Puddle lamps, Battery saver, Instrument illumination, Homelink 13 14 15 16 17...
... pump relay Front wiper RUN/ACC relay in PDB Radio start Rear wiper motor RUN/ACC, Trailer battery charge relay in PDB, Radio Heated mirror, Rear defrost indicator Horn Reverse lamps Trailer reverse lamps RCM, PAD lamp, OCS module Reverse park aid, IVD switch, IVD, AWD module,... Heated seat switches, Compass, Electrochromatic mirror, AUX climate control Not used Manual climate, DEATC, Brake shift Not used Brake switch, Stop lamps, Turn lamps Power mirrors, Interior lamps, Puddle lamps, Battery saver, Instrument illumination, Homelink 13 14 15 16 17...
Owner Guide 1st Printing
Page 247
...* 20A* 20A* 25A* 15A* - 30A* 20A* 10A* - 30A* 15A* 15A* 15A* 15A* Power Distribution Box Description Memory seats (DSM) Non-memory seats Rear defrost, Heated mirrors Blower motor Trailer electronic brakes Auxiliary blower motor Running boards Not used Rear power point Subwoofer Not used Powertrain Control Module (PCM) KAP, CAN vent...
...* 20A* 20A* 25A* 15A* - 30A* 20A* 10A* - 30A* 15A* 15A* 15A* 15A* Power Distribution Box Description Memory seats (DSM) Non-memory seats Rear defrost, Heated mirrors Blower motor Trailer electronic brakes Auxiliary blower motor Running boards Not used Rear power point Subwoofer Not used Powertrain Control Module (PCM) KAP, CAN vent...

Owner Guide 1st Printing
Page 273
... salt are difficult to remove and cause damage to the vehicle. • Immediately remove items such as grained door handles, roof racks, bumpers, side moldings, mirror housings or the windshield cowl area.
... salt are difficult to remove and cause damage to the vehicle. • Immediately remove items such as grained door handles, roof racks, bumpers, side moldings, mirror housings or the windshield cowl area.

Owner Guide 1st Printing
Page 321
...boards Splash guards Wheels Interior style Electrochromatic compass/temperature interior mirrors Floor mats 321 Contact your authorized dealer for details and a copy of several Genuine Mercury Accessory products. This means that Genuine Mercury Accessories purchased along with your new vehicle and installed by ... be defective in factory-supplied materials or workmanship during the warranty period, as well as any properly dealer-installed Genuine Mercury Accessory found to fulfill your authorized dealer or visit our online store at: www.mercuryaccessories.com. In addition, each ...
...boards Splash guards Wheels Interior style Electrochromatic compass/temperature interior mirrors Floor mats 321 Contact your authorized dealer for details and a copy of several Genuine Mercury Accessory products. This means that Genuine Mercury Accessories purchased along with your new vehicle and installed by ... be defective in factory-supplied materials or workmanship during the warranty period, as well as any properly dealer-installed Genuine Mercury Accessory found to fulfill your authorized dealer or visit our online store at: www.mercuryaccessories.com. In addition, each ...

Owner Guide 1st Printing
Page 326
... Message center ...71, 82-83 english/metric button ...74, 87 system check button ...73, 86 warning messages ...79, 93 Mirrors ...54 automatic dimming rearview mirror ...59 fold away ...60 heated ...60 side view mirrors (power) ...60 Moon roof ...66 Motorcraft parts ...278, 298, 311 N Navigation system ...34 O Octane rating ...301 Oil (see Engine...
... Message center ...71, 82-83 english/metric button ...74, 87 system check button ...73, 86 warning messages ...79, 93 Mirrors ...54 automatic dimming rearview mirror ...59 fold away ...60 heated ...60 side view mirrors (power) ...60 Moon roof ...66 Motorcraft parts ...278, 298, 311 N Navigation system ...34 O Octane rating ...301 Oil (see Engine...
Owner Guide 1st Printing
Page 327
Index Power distribution box (see Fuses) ...245 Power door locks ...101 Power mirrors ...60 Power point ...56-57 Power steering ...217 fluid, checking and adding ...308 fluid, refill capacity ...312 fluid, specifications ...314, 316 Power Windows ...58 Preparing ...
Index Power distribution box (see Fuses) ...245 Power door locks ...101 Power mirrors ...60 Power point ...56-57 Power steering ...217 fluid, checking and adding ...308 fluid, refill capacity ...312 fluid, specifications ...314, 316 Power Windows ...58 Preparing ...
Owner Guide 2nd Printing (Spanish)
Page 371
... defroster 41 41 43 46 47 Lights Driver Controls Windshield wiper/washer control Steering wheel adjustment Power windows Mirrors Speed control Message center 48 59 59 60 64 66 67 77 Locks and Security Keys Locks Anti-theft system 108 108 108 111 1 2006 Mountaineer (mnt) Owners Guide (post-2002-fmt) USA (fus)
... defroster 41 41 43 46 47 Lights Driver Controls Windshield wiper/washer control Steering wheel adjustment Power windows Mirrors Speed control Message center 48 59 59 60 64 66 67 77 Locks and Security Keys Locks Anti-theft system 108 108 108 111 1 2006 Mountaineer (mnt) Owners Guide (post-2002-fmt) USA (fus)
Owner Guide 2nd Printing (Spanish)
Page 430
Never adjust the steering column when the vehicle is moving. Lift the lever back to its desired orientation. ILLUMINATED VISOR MIRROR Lift the mirror cover to lock the steering column. With the lever in the down and release, to its original position to turn on the visor mirror lamps. 60 2006 Mountaineer (mnt) Owners Guide (post-2002-fmt) USA (fus) Do not push or pull the lever while tilting the wheel. Driver Controls TILT STEERING COLUMN Pull the lever down position, tilt the steering column and wheel to unlock the steering column tilt lock.
Never adjust the steering column when the vehicle is moving. Lift the lever back to its desired orientation. ILLUMINATED VISOR MIRROR Lift the mirror cover to lock the steering column. With the lever in the down and release, to its original position to turn on the visor mirror lamps. 60 2006 Mountaineer (mnt) Owners Guide (post-2002-fmt) USA (fus) Do not push or pull the lever while tilting the wheel. Driver Controls TILT STEERING COLUMN Pull the lever down position, tilt the steering column and wheel to unlock the steering column tilt lock.

Owner Guide 2nd Printing (Spanish)
Page 436
... the backside of the inside rear view mirror since this may be in R (Reverse) to adjust the power side view mirrors. Return to the center position to adjust the left mirror. 2. To adjust your mirrors: 1. Move the control in place. 66 2006 Mountaineer (mnt) Owners Guide (post-2002-fmt...) USA (fus) When the mirror detects bright light from the normal (high reflective...
... the backside of the inside rear view mirror since this may be in R (Reverse) to adjust the power side view mirrors. Return to the center position to adjust the left mirror. 2. To adjust your mirrors: 1. Move the control in place. 66 2006 Mountaineer (mnt) Owners Guide (post-2002-fmt...) USA (fus) When the mirror detects bright light from the normal (high reflective...
Owner Guide 2nd Printing (Spanish)
Page 437
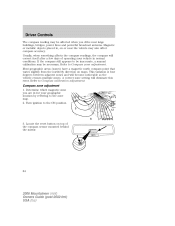
...the glass and mirrors. The adjustment allows for approximately 3 inches (73 mm) of 30 mph (48 km/h) or more without keeping your foot on the pedals while the vehicle is frozen in the P (Park) position. Speed control does not work at speeds below 30 mph (48 km/h). 67 2006 Mountaineer (mnt) ...Owners Guide (post-2002-fmt) USA (fus) Never adjust the accelerator and brake pedal with a scraper or attempt to readjust the mirror glass if it is moving. Do not remove ice from you can maintain a ...
...the glass and mirrors. The adjustment allows for approximately 3 inches (73 mm) of 30 mph (48 km/h) or more without keeping your foot on the pedals while the vehicle is frozen in the P (Park) position. Speed control does not work at speeds below 30 mph (48 km/h). 67 2006 Mountaineer (mnt) ...Owners Guide (post-2002-fmt) USA (fus) Never adjust the accelerator and brake pedal with a scraper or attempt to readjust the mirror glass if it is moving. Do not remove ice from you can maintain a ...
Owner Guide 2nd Printing (Spanish)
Page 454
... in normal conditions. Usually, when something affects the compass readings, the compass will correct itself after a few days of the compass sensor mounted behind the mirror. 84 2006 Mountaineer (mnt) Owners Guide (post-2002-fmt) USA (fus) Refer to the zone map. 2. Driver Controls The compass reading may be necessary. This variation is...
... in normal conditions. Usually, when something affects the compass readings, the compass will correct itself after a few days of the compass sensor mounted behind the mirror. 84 2006 Mountaineer (mnt) Owners Guide (post-2002-fmt) USA (fus) Refer to the zone map. 2. Driver Controls The compass reading may be necessary. This variation is...
Owner Guide 2nd Printing (Spanish)
Page 455
... mounted on the compass module for approximately eight seconds and release. 4. Driver Controls 4. Compass calibration adjustment Perform compass calibration in your vehicle's operating systems. 85 2006 Mountaineer (mnt) Owners Guide (post-2002-fmt) USA (fus) The zone is now calibrated. The compass is now updated. For optimum calibration, turn off all electrical... malfunctions in an open area free from steel structures and high voltage lines. To calibrate, press and hold the reset button on the base of mirror. 3.
... mounted on the compass module for approximately eight seconds and release. 4. Driver Controls 4. Compass calibration adjustment Perform compass calibration in your vehicle's operating systems. 85 2006 Mountaineer (mnt) Owners Guide (post-2002-fmt) USA (fus) The zone is now calibrated. The compass is now updated. For optimum calibration, turn off all electrical... malfunctions in an open area free from steel structures and high voltage lines. To calibrate, press and hold the reset button on the base of mirror. 3.
Owner Guide 2nd Printing (Spanish)
Page 467
... a magnetic north compass point that varies slightly from the SETUP MENU or put the vehicle in , on top of the compass sensor mounted behind the mirror. 97 2006 Mountaineer (mnt) Owners Guide (post-2002-fmt) USA (fus) Refer to turn the park aid ON or OFF. 3.
... a magnetic north compass point that varies slightly from the SETUP MENU or put the vehicle in , on top of the compass sensor mounted behind the mirror. 97 2006 Mountaineer (mnt) Owners Guide (post-2002-fmt) USA (fus) Refer to turn the park aid ON or OFF. 3.


