

Owner Guide 1st Printing (Spanish)
Page 327
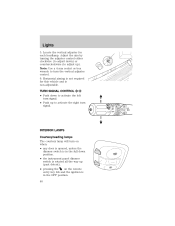
...lamp will turn on the remote • pressing the entry key fob and the ignition is not required for each headlamp. on when: • any door is opened, unless the dimmer switch is in the OFF position. 40 TURN SIGNAL CONTROL • Push down position. • the instrument... panel dimmer switch is non-adjustable. Adjust the aim by turning the adjuster control either clockwise (to adjust down) or counterclockwise (to activate the right turn...
...lamp will turn on the remote • pressing the entry key fob and the ignition is not required for each headlamp. on when: • any door is opened, unless the dimmer switch is in the OFF position. 40 TURN SIGNAL CONTROL • Push down position. • the instrument... panel dimmer switch is non-adjustable. Adjust the aim by turning the adjuster control either clockwise (to adjust down) or counterclockwise (to activate the right turn...

Owner Guide 1st Printing (Spanish)
Page 329
Lights Function Number of bulbs Trade number Park/turn lamps 2 3157 AK (amber) (front) Headlamps 2 9007 Rear stop/turn/tail 4 3057 lamps Rear license plate 2 168 lamps Backup lamp 2 3156K High-mount brake 5 W5W lamps Side repeater 2 WY5W (amber) Front sidemarker 2 194 Rear sidemarker 2 194 Fog lamp 2 9145 Cargo lamp 1 211-2 Interior overhead lamp 1 912 (906) Front door courtesy 1 168 lamp Map lamps 2 168 (T10) Ashtray lamp 1 161 All replacement bulbs are clear in color except where noted. To replace all instrument panel lights - see your dealer. 42
Lights Function Number of bulbs Trade number Park/turn lamps 2 3157 AK (amber) (front) Headlamps 2 9007 Rear stop/turn/tail 4 3057 lamps Rear license plate 2 168 lamps Backup lamp 2 3156K High-mount brake 5 W5W lamps Side repeater 2 WY5W (amber) Front sidemarker 2 194 Rear sidemarker 2 194 Fog lamp 2 9145 Cargo lamp 1 211-2 Interior overhead lamp 1 912 (906) Front door courtesy 1 168 lamp Map lamps 2 168 (T10) Ashtray lamp 1 161 All replacement bulbs are clear in color except where noted. To replace all instrument panel lights - see your dealer. 42
Owner Guide 1st Printing (Spanish)
Page 349
... to three hand-held transmitters with any garage door opener model manufactured before April 1, 1982). Do not use in this includes any garage door opener that people and objects are out of the control until the glass panel stops moving. new HomeLink equipped vehicle ... is disconnected, discharged, or a new battery is closed when the glass panel is also suggested that upon the sale of most current transmitters to operate garage doors, entry gate operators, security systems, entry door locks, and home or office lighting. federal safety standards. For more information...
... to three hand-held transmitters with any garage door opener model manufactured before April 1, 1982). Do not use in this includes any garage door opener that people and objects are out of the control until the glass panel stops moving. new HomeLink equipped vehicle ... is disconnected, discharged, or a new battery is closed when the glass panel is also suggested that upon the sale of most current transmitters to operate garage doors, entry gate operators, security systems, entry door locks, and home or office lighting. federal safety standards. For more information...

Owner Guide 1st Printing (Spanish)
Page 367
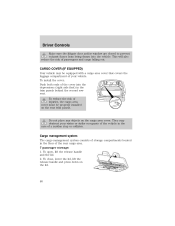
... of passengers and cargo falling out. To close, lower the lid, lift the release handle and press down on the rear trim panels. Driver Controls Make sure the liftgate door and/or window are closed to prevent exhaust fumes from being drawn into the depressions (right side first) in the case of... the vehicle in the trim panels behind the second row seat. Do not place any objects on the cargo area cover. To open, lift...
... of passengers and cargo falling out. To close, lower the lid, lift the release handle and press down on the rear trim panels. Driver Controls Make sure the liftgate door and/or window are closed to prevent exhaust fumes from being drawn into the depressions (right side first) in the case of... the vehicle in the trim panels behind the second row seat. Do not place any objects on the cargo area cover. To open, lift...
Owner Guide 1st Printing (Spanish)
Page 370
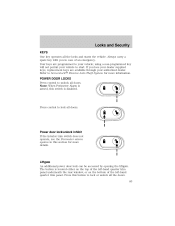
...located either on the top of the left -hand quarter trim panel. POWER DOOR LOCKS Press control to your vehicle; Liftgate An additional power door lock can be accessed by opening the liftgate. Press this button to lock all doors. Press control to lock or unlock all the locks and starts... using a non-programmed key will not permit your authorized dealer. Power door lock/unlock inhibit If the interior trim switch does not operate, see the Perimeter alarm system in case of the left -hand quarter trim panel underneath the rear window, or on the bottom of an emergency. Always ...
...located either on the top of the left -hand quarter trim panel. POWER DOOR LOCKS Press control to your vehicle; Liftgate An additional power door lock can be accessed by opening the liftgate. Press this button to lock all doors. Press control to lock or unlock all the locks and starts... using a non-programmed key will not permit your authorized dealer. Power door lock/unlock inhibit If the interior trim switch does not operate, see the Perimeter alarm system in case of the left -hand quarter trim panel underneath the rear window, or on the bottom of an emergency. Always ...

Owner Guide 1st Printing (Spanish)
Page 373
...seat and adjustable pedals to the desired memory position (the seat position corresponds to the position desired. 2. Press the SET control on the driver's door panel to which you would like to associate with the seat 1 2 and Driver 1 or Driver 2 positions. 4. Within 5 five seconds, press... the vehicle and • other vehicles parked next to deactivate and then press the SET control on the driver's door panel. 2. Press the SET control on the driver's door panel. 3. Locks and Security Memory seats/adjustable pedals/easy entry-exit feature (if equipped) The remote entry system can ...
...seat and adjustable pedals to the desired memory position (the seat position corresponds to the position desired. 2. Press the SET control on the driver's door panel to which you would like to associate with the seat 1 2 and Driver 1 or Driver 2 positions. 4. Within 5 five seconds, press... the vehicle and • other vehicles parked next to deactivate and then press the SET control on the driver's door panel. 2. Press the SET control on the driver's door panel. 3. Locks and Security Memory seats/adjustable pedals/easy entry-exit feature (if equipped) The remote entry system can ...

Owner Guide 1st Printing (Spanish)
Page 546
... system ...89 Keys positions of the ignition ...142 L Lamps bulb replacement specifications chart ...41 daytime running light ...37 fog lamps ...37 high beams ...38 instrument panel, dimming ...38 interior lamps ...40 Liftgate ...79, 85 Lights, warning and indicator ...10 anti-lock brakes (ABS) ...146 Limited-slip axle ...155 M Manual ...Parking brake ...146 Parts (see Motorcraft parts) ...243 259 Load limits ...156 GAWR ...156 GVWR ...156 trailer towing ...156 Loading instructions ...157 Locks childproof ...84 doors ...83 Lubricant specifications ...246, 248 Lumbar support, seats ...101
... system ...89 Keys positions of the ignition ...142 L Lamps bulb replacement specifications chart ...41 daytime running light ...37 fog lamps ...37 high beams ...38 instrument panel, dimming ...38 interior lamps ...40 Liftgate ...79, 85 Lights, warning and indicator ...10 anti-lock brakes (ABS) ...146 Limited-slip axle ...155 M Manual ...Parking brake ...146 Parts (see Motorcraft parts) ...243 259 Load limits ...156 GAWR ...156 GVWR ...156 trailer towing ...156 Loading instructions ...157 Locks childproof ...84 doors ...83 Lubricant specifications ...246, 248 Lumbar support, seats ...101
Owner Guide 3rd Printing
Page 40
... aiming is not required for each headlamp. Note: Use a 4 mm socket or box wrench to adjust down position. • the instrument panel dimmer switch is in the OFF position. 40 Lights 5. Locate the vertical adjuster for this vehicle and is in the full down ) or counterclockwise... (to adjust up). TURN SIGNAL CONTROL • Push down to activate the right turn signal. on when: • any door is opened, unless the dimmer switch is rotated all the way up to activate the left turn the vertical adjuster control. 6. OFF INT2 INT1 OFF...
... aiming is not required for each headlamp. Note: Use a 4 mm socket or box wrench to adjust down position. • the instrument panel dimmer switch is in the OFF position. 40 Lights 5. Locate the vertical adjuster for this vehicle and is in the full down ) or counterclockwise... (to adjust up). TURN SIGNAL CONTROL • Push down to activate the right turn signal. on when: • any door is opened, unless the dimmer switch is rotated all the way up to activate the left turn the vertical adjuster control. 6. OFF INT2 INT1 OFF...

Owner Guide 3rd Printing
Page 42
see your dealer. 42 Lights Function Number of bulbs Trade number Park/turn lamps 2 3157 AK (amber) (front) Headlamps 2 9007 Rear stop/turn/tail 4 3057 lamps Rear license plate 2 168 lamps Backup lamp 2 3156K High-mount brake 5 W5W lamps Side repeater 2 WY5W (amber) Front sidemarker 2 194 Rear sidemarker 2 194 Fog lamp 2 9145 Cargo lamp 1 211-2 Interior overhead lamp 1 912 (906) Front door courtesy 1 168 lamp Map lamps 2 168 (T10) Ashtray lamp 1 161 All replacement bulbs are clear in color except where noted. To replace all instrument panel lights -
see your dealer. 42 Lights Function Number of bulbs Trade number Park/turn lamps 2 3157 AK (amber) (front) Headlamps 2 9007 Rear stop/turn/tail 4 3057 lamps Rear license plate 2 168 lamps Backup lamp 2 3156K High-mount brake 5 W5W lamps Side repeater 2 WY5W (amber) Front sidemarker 2 194 Rear sidemarker 2 194 Fog lamp 2 9145 Cargo lamp 1 211-2 Interior overhead lamp 1 912 (906) Front door courtesy 1 168 lamp Map lamps 2 168 (T10) Ashtray lamp 1 161 All replacement bulbs are clear in color except where noted. To replace all instrument panel lights -

Owner Guide 3rd Printing
Page 62
...that can be opened or closed ), press and hold the rear portion of the control until the glass panel stops moving. When programming your HomeLink Wireless Control System to a garage door or gate, be sure that lacks safety stop and reverse, does not meet current U.S. They may ...located on the overhead console, provides a convenient way to replace up to operate garage doors, entry gate operators, security systems, entry door locks, and home or office lighting. It is closed when the glass panel is installed, the moon roof needs to be opened to the vent position to prevent...
...that can be opened or closed ), press and hold the rear portion of the control until the glass panel stops moving. When programming your HomeLink Wireless Control System to a garage door or gate, be sure that lacks safety stop and reverse, does not meet current U.S. They may ...located on the overhead console, provides a convenient way to replace up to operate garage doors, entry gate operators, security systems, entry door locks, and home or office lighting. It is closed when the glass panel is installed, the moon roof needs to be opened to the vent position to prevent...
Owner Guide 3rd Printing
Page 80
... the vehicle in the case of your vehicle. They may be properly installed on the rear trim panels. Cargo management system The cargo management system consists of storage compartments located in the trim panels behind the second row seat. To reduce the risk of the rear cargo area. 7 passenger stowage...on the cargo area cover. To install the cover: Push both ends of passengers and cargo falling out. Driver Controls Make sure the liftgate door and/or window are closed to prevent exhaust fumes from being drawn into the depressions (right side first) in the floor of injuries, ...
... the vehicle in the case of your vehicle. They may be properly installed on the rear trim panels. Cargo management system The cargo management system consists of storage compartments located in the trim panels behind the second row seat. To reduce the risk of the rear cargo area. 7 passenger stowage...on the cargo area cover. To install the cover: Push both ends of passengers and cargo falling out. Driver Controls Make sure the liftgate door and/or window are closed to prevent exhaust fumes from being drawn into the depressions (right side first) in the floor of injuries, ...

Owner Guide 3rd Printing
Page 83
... see the Perimeter alarm system in case of the left-hand quarter trim panel. Liftgate An additional power door lock can be accessed by opening the liftgate. Locks and Security Locks and Security KEYS One key operates all doors. using a non-programmed key will not permit your authorized dealer. Press ...this switch is located either on the top of the left-hand quarter trim panel underneath the rear window, or on the bottom of an emergency....
... see the Perimeter alarm system in case of the left-hand quarter trim panel. Liftgate An additional power door lock can be accessed by opening the liftgate. Locks and Security Locks and Security KEYS One key operates all doors. using a non-programmed key will not permit your authorized dealer. Press ...this switch is located either on the top of the left-hand quarter trim panel underneath the rear window, or on the bottom of an emergency....
Owner Guide 3rd Printing
Page 86
... five seconds, press one coin type three-volt lithium battery CR2032 or equivalent. Within 5 five seconds, press any control on the driver's door panel. 3. Repeat this procedure for another remote transmitter if desired. Position the seat and adjustable pedals to the transmitter being used). Replacing the battery... The remote entry transmitter uses one control on the remote transmitter and then press the 1 or 2 control on the driver's door panel to which you would like to deactivate and then press the SET control on the remote transmitter which you would like to the...
... five seconds, press one coin type three-volt lithium battery CR2032 or equivalent. Within 5 five seconds, press any control on the driver's door panel. 3. Repeat this procedure for another remote transmitter if desired. Position the seat and adjustable pedals to the transmitter being used). Replacing the battery... The remote entry transmitter uses one control on the remote transmitter and then press the 1 or 2 control on the driver's door panel to which you would like to deactivate and then press the SET control on the remote transmitter which you would like to the...

Owner Guide 3rd Printing
Page 259
... system ...89 Keys positions of the ignition ...142 L Lamps bulb replacement specifications chart ...41 daytime running light ...37 fog lamps ...37 high beams ...38 instrument panel, dimming ...38 interior lamps ...40 Liftgate ...79, 85 Lights, warning and indicator ...10 anti-lock brakes (ABS) ...146 Limited-slip axle ...155 M Manual ...Parking brake ...146 Parts (see Motorcraft parts) ...243 259 Load limits ...156 GAWR ...156 GVWR ...156 trailer towing ...156 Loading instructions ...157 Locks childproof ...84 doors ...83 Lubricant specifications ...246, 248 Lumbar support, seats ...101
... system ...89 Keys positions of the ignition ...142 L Lamps bulb replacement specifications chart ...41 daytime running light ...37 fog lamps ...37 high beams ...38 instrument panel, dimming ...38 interior lamps ...40 Liftgate ...79, 85 Lights, warning and indicator ...10 anti-lock brakes (ABS) ...146 Limited-slip axle ...155 M Manual ...Parking brake ...146 Parts (see Motorcraft parts) ...243 259 Load limits ...156 GAWR ...156 GVWR ...156 trailer towing ...156 Loading instructions ...157 Locks childproof ...84 doors ...83 Lubricant specifications ...246, 248 Lumbar support, seats ...101
Quick Reference Guide 2nd Printing
Page 1
..., please see your Owner's Guide. 2003 Mercury Mountaineer QUICK REFERENCE GUIDE ROADSIDE ASSISTANCE During your entire Owner's Guide carefully as a spare or a regular tire. (It's identical to close , press and hold the rear portion of the control until the glass panel stops moving . *F3L9J19G217AA* 3L9J-19G217... has been stored. UNLEADED FUEL RECOMMENDATIONS Use "Regular" unleaded gasoline with a spare tire that it to their travels. LOCKING THE DOORS/LIFTGATE Press this control to rewind, press REW. 11. MEMORY SEAT FEATURE (IF EQUIPPED) The remote entry system can be used...
..., please see your Owner's Guide. 2003 Mercury Mountaineer QUICK REFERENCE GUIDE ROADSIDE ASSISTANCE During your entire Owner's Guide carefully as a spare or a regular tire. (It's identical to close , press and hold the rear portion of the control until the glass panel stops moving . *F3L9J19G217AA* 3L9J-19G217... has been stored. UNLEADED FUEL RECOMMENDATIONS Use "Regular" unleaded gasoline with a spare tire that it to their travels. LOCKING THE DOORS/LIFTGATE Press this control to rewind, press REW. 11. MEMORY SEAT FEATURE (IF EQUIPPED) The remote entry system can be used...


