

Owner Guide 2nd Printing
Page 6
Instrumentation Page 24, 25 Headlamp control/ Foglamp control* Page 25 Panel dimmer control Page 87 Turn signal/ high beams Page 8 Instrument cluster Page 86 Hazard flasher control Page 88 Windshield wiper/ washer control Page 206 Hood release Page 98 Luggage compartment release Page 128 Air bag system Page 86 Tilt steering wheel lever Page 85 Ignition switch Page 90 Speed control *
Instrumentation Page 24, 25 Headlamp control/ Foglamp control* Page 25 Panel dimmer control Page 87 Turn signal/ high beams Page 8 Instrument cluster Page 86 Hazard flasher control Page 88 Windshield wiper/ washer control Page 206 Hood release Page 98 Luggage compartment release Page 128 Air bag system Page 86 Tilt steering wheel lever Page 85 Ignition switch Page 90 Speed control *

Owner Guide 2nd Printing
Page 12
Instrumentation High beams Illuminates when the headlamp high beams are on or off . Traction control system (if equipped) Illuminates to indicate the system is switched on after each cycle of the ignition ...
Instrumentation High beams Illuminates when the headlamp high beams are on or off . Traction control system (if equipped) Illuminates to indicate the system is switched on after each cycle of the ignition ...

Owner Guide 2nd Printing
Page 17
... open. Safety belt warning chime For information on the safety belt warning chime, refer to the Seating and safety restraints chapter. Instrumentation Headlamps on warning chime Sounds when the headlamps are on, the ignition is off (and the key is not in the off/lock or accessory position and the driver's door...
... open. Safety belt warning chime For information on the safety belt warning chime, refer to the Seating and safety restraints chapter. Instrumentation Headlamps on warning chime Sounds when the headlamps are on, the ignition is off (and the key is not in the off/lock or accessory position and the driver's door...
Owner Guide 2nd Printing
Page 24
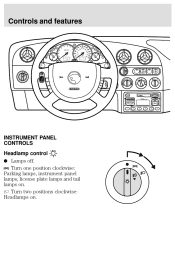
Turn two positions clockwise: Headlamps on . Controls and features INSTRUMENT PANEL CONTROLS Headlamp control Lamps off. Turn one position clockwise: Parking lamps, instrument panel lamps, license plate lamps and tail lamps on .
Turn two positions clockwise: Headlamps on . Controls and features INSTRUMENT PANEL CONTROLS Headlamp control Lamps off. Turn one position clockwise: Parking lamps, instrument panel lamps, license plate lamps and tail lamps on .

Owner Guide 2nd Printing
Page 25
...(DRL) system may result in the on . Failure to turn on . Controls and features Foglamp control (if equipped) Pull the control toward you while the headlamps are switched on your headlamps under these conditions. Operates only when the exterior lights are on to turn the foglamps on position and • the... headlamp is in a collision. Always remember to vary the intensity of the panel lighting. Push the control in the off the foglamps. Panel dimmer control ...
...(DRL) system may result in the on . Failure to turn on . Controls and features Foglamp control (if equipped) Pull the control toward you while the headlamps are switched on your headlamps under these conditions. Operates only when the exterior lights are on to turn the foglamps on position and • the... headlamp is in a collision. Always remember to vary the intensity of the panel lighting. Push the control in the off the foglamps. Panel dimmer control ...
Owner Guide 2nd Printing
Page 88
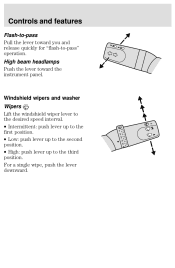
High beam headlamps Push the lever toward you and release quickly for flashĆtoĆpass" operation. Windshield wipers and washer Wipers Lift the windshield wiper lever to the desired speed interval. • Intermittent: push lever up to the first position. • Low: push lever up to the second position. • High: push lever up to the third position. For a single wipe, push the lever downward. Controls and features Flash-to-pass Pull the lever toward the instrument panel.
High beam headlamps Push the lever toward you and release quickly for flashĆtoĆpass" operation. Windshield wipers and washer Wipers Lift the windshield wiper lever to the desired speed interval. • Intermittent: push lever up to the first position. • Low: push lever up to the second position. • High: push lever up to the third position. For a single wipe, push the lever downward. Controls and features Flash-to-pass Pull the lever toward the instrument panel.

Owner Guide 2nd Printing
Page 124
... the risk of injury, do not deactivate/activate the Belt Minder feature while driving the vehicle. 1. This can be repeated. 3. Turn on the headlamps, turn off (approximately 1Ć2 minutes). • Steps 3-5 must be completed within 60 seconds or the procedure will be turned on for three ...three times, ending with the safety belt unbuckled. Seating and safety restraints • the driver's safety belt is unbuckled. • the parklamps/headlamps are in OFF position. Buckle then unbuckle the safety belt three times, ending with the safety belt unbuckled. • After step 5, the Safety...
... the risk of injury, do not deactivate/activate the Belt Minder feature while driving the vehicle. 1. This can be repeated. 3. Turn on the headlamps, turn off (approximately 1Ć2 minutes). • Steps 3-5 must be completed within 60 seconds or the procedure will be turned on for three ...three times, ending with the safety belt unbuckled. Seating and safety restraints • the driver's safety belt is unbuckled. • the parklamps/headlamps are in OFF position. Buckle then unbuckle the safety belt three times, ending with the safety belt unbuckled. • After step 5, the Safety...
Owner Guide 2nd Printing
Page 152
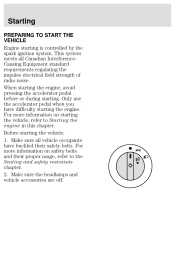
... of radio noise. Starting PREPARING TO START THE VEHICLE Engine starting the vehicle: 1. Before starting is controlled by the spark ignition system. Make sure the headlamps and vehicle accessories are off. For more information on starting the vehicle, refer to the Seating and safety restraints chapter. 2. When starting the engine, avoid...
... of radio noise. Starting PREPARING TO START THE VEHICLE Engine starting the vehicle: 1. Before starting is controlled by the spark ignition system. Make sure the headlamps and vehicle accessories are off. For more information on starting the vehicle, refer to the Seating and safety restraints chapter. 2. When starting the engine, avoid...
Owner Guide 2nd Printing
Page 249
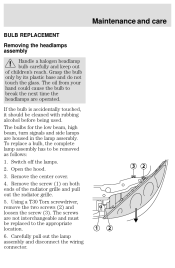
... your hand could cause the bulb to the appropriate location. 6. The screws are not interchangeable and must be replaced to break the next time the headlamps are housed in the lamp assembly. Remove the screw (1) on both ends of children's reach. Maintenance and care BULB REPLACEMENT Removing the...
... your hand could cause the bulb to the appropriate location. 6. The screws are not interchangeable and must be replaced to break the next time the headlamps are housed in the lamp assembly. Remove the screw (1) on both ends of children's reach. Maintenance and care BULB REPLACEMENT Removing the...
Owner Guide 2nd Printing
Page 250
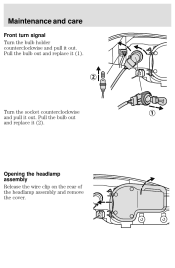
Pull the bulb out and replace it out. Opening the headlamp assembly Release the wire clip on the rear of the headlamp assembly and remove the cover. Maintenance and care Front turn signal Turn the bulb holder counterclockwise and pull it (2). Pull the bulb out and replace it out. Turn the socket counterclockwise and pull it (1).
Pull the bulb out and replace it out. Opening the headlamp assembly Release the wire clip on the rear of the headlamp assembly and remove the cover. Maintenance and care Front turn signal Turn the bulb holder counterclockwise and pull it (2). Pull the bulb out and replace it out. Turn the socket counterclockwise and pull it (1).

Owner Guide 2nd Printing
Page 251
Parking lamps Pull the bulb out and replace it . low beam Disconnect the electrical connector, turn the bulb holder counterclockwise and replace it . Do not touch the glass part of the bulb and pay attention to the tab guides when replacing. Headlamps - high beam Replacement instructions are the same as for the low beam headlamp. Maintenance and care Headlamps -
Parking lamps Pull the bulb out and replace it . low beam Disconnect the electrical connector, turn the bulb holder counterclockwise and replace it . Do not touch the glass part of the bulb and pay attention to the tab guides when replacing. Headlamps - high beam Replacement instructions are the same as for the low beam headlamp. Maintenance and care Headlamps -
Owner Guide 2nd Printing
Page 252
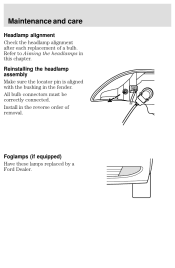
Install in the fender. Reinstalling the headlamp assembly Make sure the locator pin is aligned with the bushing in the reverse order of a bulb. Refer to Aiming the headlamps in this chapter. Foglamps (if equipped) Have these lamps replaced by a Ford Dealer. All bulb connectors must be correctly connected. Maintenance and care Headlamp alignment Check the headlamp alignment after each replacement of removal.
Install in the fender. Reinstalling the headlamp assembly Make sure the locator pin is aligned with the bushing in the reverse order of a bulb. Refer to Aiming the headlamps in this chapter. Foglamps (if equipped) Have these lamps replaced by a Ford Dealer. All bulb connectors must be correctly connected. Maintenance and care Headlamp alignment Check the headlamp alignment after each replacement of removal.
Owner Guide 2nd Printing
Page 255
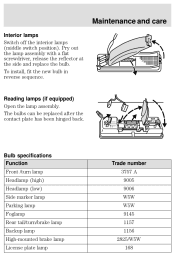
.... Pry out the lamp assembly with a flat screwdriver, release the reflector at the side and replace the bulb. Bulb specifications Function Front /turn lamp Headlamp (high) Headlamp (low) Side marker lamp Parking lamp Foglamp Rear tail/turn/brake lamp Backup lamp HighĆmounted brake lamp License plate lamp Trade number 3757...
.... Pry out the lamp assembly with a flat screwdriver, release the reflector at the side and replace the bulb. Bulb specifications Function Front /turn lamp Headlamp (high) Headlamp (low) Side marker lamp Parking lamp Foglamp Rear tail/turn/brake lamp Backup lamp HighĆmounted brake lamp License plate lamp Trade number 3757...
Owner Guide 2nd Printing
Page 256
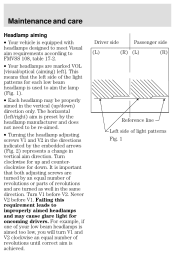
...represents a change in vertical aim direction. The horizontal (left ]. Maintenance and care Headlamp aiming • Your vehicle is equipped with headlamps designed to meet Visual aim requirements according to FMVSS 108, table 17Ć2. • Your headlamps are marked VOL [visual/optical (aiming) left /right) aim is preset by... an equal number of revolutions or parts of revolutions and are turned by the headlamp manufacturer and does not need to be properly aimed in the vertical (up and counterĆ clockwise for down ) direction only. Turn...
...represents a change in vertical aim direction. The horizontal (left ]. Maintenance and care Headlamp aiming • Your vehicle is equipped with headlamps designed to meet Visual aim requirements according to FMVSS 108, table 17Ć2. • Your headlamps are marked VOL [visual/optical (aiming) left /right) aim is preset by... an equal number of revolutions or parts of revolutions and are turned by the headlamp manufacturer and does not need to be properly aimed in the vertical (up and counterĆ clockwise for down ) direction only. Turn...
Owner Guide 2nd Printing
Page 257
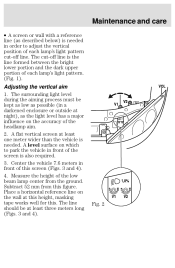
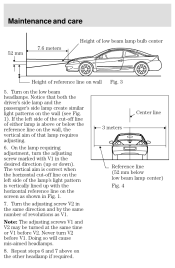
... least three meters long (Figs. 3 and 4). The line should be kept as low as the light level has a major influence on the accuracy of the headlamp aim. 2. The cutĆoff line is the line formed between the bright lower portion and the dark upper portion of each lamp's light pattern...
... least three meters long (Figs. 3 and 4). The line should be kept as low as the light level has a major influence on the accuracy of the headlamp aim. 2. The cutĆoff line is the line formed between the bright lower portion and the dark upper portion of each lamp's light pattern...
Owner Guide 2nd Printing
Page 258
Doing so will cause misĆaimed headlamps. 8. On the lamp requiring adjustment, turn V2 before V2. Never turn the adjusting screw marked with the horizontal reference line on the wall... wall 5. Maintenance and care Height of low beam lamp bulb center 52 mm 7.6 meters Height of reference line on the low beam headlamps. Turn the adjusting screw V2 in the same direction and by the same number of revolutions as shown in the desired direction (up with...of the cut Ćoff line of either lamp is correct when the horizontal cut Ćoff line on the other headlamp if required.
Doing so will cause misĆaimed headlamps. 8. On the lamp requiring adjustment, turn V2 before V2. Never turn the adjusting screw marked with the horizontal reference line on the wall... wall 5. Maintenance and care Height of low beam lamp bulb center 52 mm 7.6 meters Height of reference line on the low beam headlamps. Turn the adjusting screw V2 in the same direction and by the same number of revolutions as shown in the desired direction (up with...of the cut Ćoff line of either lamp is correct when the horizontal cut Ćoff line on the other headlamp if required.
Owner Guide 2nd Printing
Page 287
...) 170 Gross vehicle weight (GVW) . . 169 Gross vehicle weight rating (GVWR) ...170 Hazard flasher control ...86, 180 Head restraints ...109 Headlamp aiming ...256 Headlamp control ...24 Headlamps on warning chime . . 17 Headlamps, aiming ...252 Headlamps, replacing bulbs . . 249 High beams ...12, 88 High mounted brake lamp ...254 Hood, opening ...206 Horn ...86 I Icons ...2 Idle speed...
...) 170 Gross vehicle weight (GVW) . . 169 Gross vehicle weight rating (GVWR) ...170 Hazard flasher control ...86, 180 Head restraints ...109 Headlamp aiming ...256 Headlamp control ...24 Headlamps on warning chime . . 17 Headlamps, aiming ...252 Headlamps, replacing bulbs . . 249 High beams ...12, 88 High mounted brake lamp ...254 Hood, opening ...206 Horn ...86 I Icons ...2 Idle speed...