
Owner Guide 1st Printing
Page 4
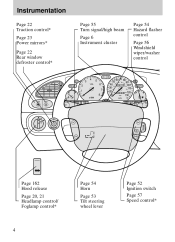
... 0 0 1 2 3 100 160 30 40 10 180 1 20 20 0 0 0 0 200 120 1 0 130 BRAKE E F MPH CHECK ENGINE On Res MI RRORS Set Acc Off Coast Page 162 Hood release Page 20, 21 Headlamp control/ Foglamp control* Page 54 Horn Page 53 Tilt steering wheel lever Page 52 Ignition switch Page 57 Speed control* 4
... 0 0 1 2 3 100 160 30 40 10 180 1 20 20 0 0 0 0 200 120 1 0 130 BRAKE E F MPH CHECK ENGINE On Res MI RRORS Set Acc Off Coast Page 162 Hood release Page 20, 21 Headlamp control/ Foglamp control* Page 54 Horn Page 53 Tilt steering wheel lever Page 52 Ignition switch Page 57 Speed control* 4

Owner Guide 1st Printing
Page 26
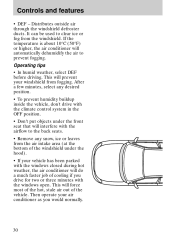
... airflow to the back seats. • Remove any snow, ice or leaves from the air intake area (at the bottom of the windshield under the hood). • When placing objects on top of your instrument panel, be used to not place them over the defroster outlets. Controls and features • FLR...
... airflow to the back seats. • Remove any snow, ice or leaves from the air intake area (at the bottom of the windshield under the hood). • When placing objects on top of your instrument panel, be used to not place them over the defroster outlets. Controls and features • FLR...
Owner Guide 1st Printing
Page 30
.... • To prevent humidity buildup inside the vehicle, don't drive with the climate control system in the OFF position. • Don't put objects under the hood). • If your vehicle has been parked with the windows closed during hot weather, the air conditioner will prevent your air conditioner as you drive...
.... • To prevent humidity buildup inside the vehicle, don't drive with the climate control system in the OFF position. • Don't put objects under the hood). • If your vehicle has been parked with the windows closed during hot weather, the air conditioner will prevent your air conditioner as you drive...
Owner Guide 1st Printing
Page 151
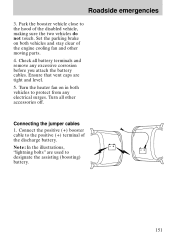
... battery terminals and remove any electrical surges. Note: In the illustrations, "lightning bolts" are tight and level. 5. Ensure that vent caps are used to the hood of the disabled vehicle, making sure the two vehicles do not touch. Set the parking brake on in both vehicles and stay clear of the...
... battery terminals and remove any electrical surges. Note: In the illustrations, "lightning bolts" are tight and level. 5. Ensure that vent caps are used to the hood of the disabled vehicle, making sure the two vehicles do not touch. Set the parking brake on in both vehicles and stay clear of the...
Owner Guide 1st Printing
Page 162
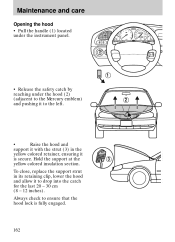
... into the catch for the last 20 - 30 cm (8 - 12 inches). Hold the support at the yellow colored insulation section. Maintenance and care Opening the hood • Pull the handle (1) located under the instrument panel. 4 55 60 70 80 50 100 120 90 140 40 60 800 0 0 1 2 3 100...TROL CONTROL 8 E F MPH CHECK ENGINE O/D OFF MI RRORS 1 • Release the safety catch by reaching under the hood (2) (adjacent to the Mercury emblem) and pushing it to ensure that the hood lock is secure. To close, replace the support strut in the yellow colored retainer, ensuring it is fully engaged. 3 162...
... into the catch for the last 20 - 30 cm (8 - 12 inches). Hold the support at the yellow colored insulation section. Maintenance and care Opening the hood • Pull the handle (1) located under the instrument panel. 4 55 60 70 80 50 100 120 90 140 40 60 800 0 0 1 2 3 100...TROL CONTROL 8 E F MPH CHECK ENGINE O/D OFF MI RRORS 1 • Release the safety catch by reaching under the hood (2) (adjacent to the Mercury emblem) and pushing it to ensure that the hood lock is secure. To close, replace the support strut in the yellow colored retainer, ensuring it is fully engaged. 3 162...
Owner Guide 1st Printing
Page 165
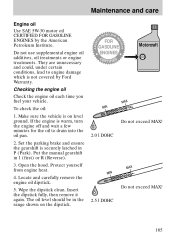
... wait a few minutes for the oil to engine damage which is on the dipstick. Protect yourself from engine heat. 4. Wipe the dipstick clean. Open the hood. Insert the dipstick fully, then remove it again. Checking the engine oil Check the engine oil each time you fuel your vehicle. If the engine...
... wait a few minutes for the oil to engine damage which is on the dipstick. Protect yourself from engine heat. 4. Wipe the dipstick clean. Open the hood. Insert the dipstick fully, then remove it again. Checking the engine oil Check the engine oil each time you fuel your vehicle. If the engine...
Owner Guide 1st Printing
Page 181
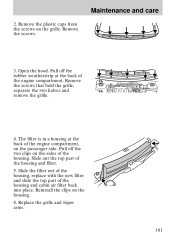
... weatherstrip at the back of the engine compartment. Slide out the top part of the housing and cabin air filter back into place. Open the hood. Remove the screws. 3. Pull off the two clips on the grille. Slide the filter out of the housing, replace with the new filter and slide...
... weatherstrip at the back of the engine compartment. Slide out the top part of the housing and cabin air filter back into place. Open the hood. Remove the screws. 3. Pull off the two clips on the grille. Slide the filter out of the housing, replace with the new filter and slide...
Owner Guide 1st Printing
Page 198
.... Maintenance and care Do not make any unauthorized changes to your check engine light is on the Vehicle Emission Control Information Decal located under the hood. If your vehicle or engine. Your vehicle may be a legal requirement to intentionally remove an emission control device or prevent it from working. By law...
.... Maintenance and care Do not make any unauthorized changes to your check engine light is on the Vehicle Emission Control Information Decal located under the hood. If your vehicle or engine. Your vehicle may be a legal requirement to intentionally remove an emission control device or prevent it from working. By law...
Owner Guide 1st Printing
Page 200
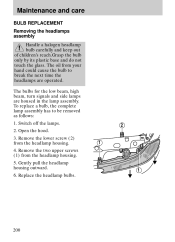
... housing outward. 6. To replace a bulb, the complete lamp assembly has to break the next time the headlamps are housed in the lamp assembly. Open the hood. 3. Remove the two upper screws (1) from the headlamp housing. 4. Switch off the lamps. 2. The bulbs for the low beam, high beam, turn signals and side...
... housing outward. 6. To replace a bulb, the complete lamp assembly has to break the next time the headlamps are housed in the lamp assembly. Open the hood. 3. Remove the two upper screws (1) from the headlamp housing. 4. Switch off the lamps. 2. The bulbs for the low beam, high beam, turn signals and side...
Owner Guide 1st Printing
Page 208
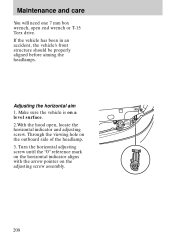
Make sure the vehicle is on a level surface. 2.With the hood open end wrench or T-15 Torx drive. Through the viewing hole on the adjusting screw assembly. 208 Maintenance and care You will need one 7 mm ...
Make sure the vehicle is on a level surface. 2.With the hood open end wrench or T-15 Torx drive. Through the viewing hole on the adjusting screw assembly. 208 Maintenance and care You will need one 7 mm ...
Owner Guide 1st Printing
Page 209
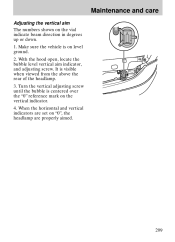
When the horizontal and vertical indicators are properly aimed. 209 Turn the vertical adjusting screw until the bubble is centered over the "0" reference mark on "0", the headlamp are set on the vertical indicator. 4. Maintenance and care Adjusting the vertical aim The numbers shown on level ground. 2. Make sure the vehicle is visible when viewed from the above the rear of the headlamp. 3. It is on the vial indicate beam direction in degrees up or down. 1. With the hood open, locate the bubble level vertical aim indicator, and adjusting screw.
When the horizontal and vertical indicators are properly aimed. 209 Turn the vertical adjusting screw until the bubble is centered over the "0" reference mark on "0", the headlamp are set on the vertical indicator. 4. Maintenance and care Adjusting the vertical aim The numbers shown on level ground. 2. Make sure the vehicle is visible when viewed from the above the rear of the headlamp. 3. It is on the vial indicate beam direction in degrees up or down. 1. With the hood open, locate the bubble level vertical aim indicator, and adjusting screw.
Owner Guide 1st Printing
Page 210
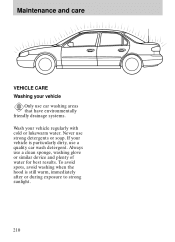
If your vehicle is still warm, immediately after or during exposure to strong sunlight. 210 To avoid spots, avoid washing when the hood is particularly dirty, use car washing areas that have environmentally friendly drainage systems. Wash your vehicle regularly with cold or lukewarm water. Always use strong detergents or soap. Never use a clean sponge, washing glove or similar device and plenty of water for best results. Maintenance and care VEHICLE CARE Washing your vehicle Only use a quality car wash detergent.
If your vehicle is still warm, immediately after or during exposure to strong sunlight. 210 To avoid spots, avoid washing when the hood is particularly dirty, use car washing areas that have environmentally friendly drainage systems. Wash your vehicle regularly with cold or lukewarm water. Always use strong detergents or soap. Never use a clean sponge, washing glove or similar device and plenty of water for best results. Maintenance and care VEHICLE CARE Washing your vehicle Only use a quality car wash detergent.

Owner Guide 1st Printing
Page 232
... Bed mats Bedliners Car/truck covers Cargo liners, interior Carpet floor mats Cleaners, waxes and polishes Flat splash guards Frond end covers (full and mini) Hood deflectors Locking gas cap Lubricants and oils Molded splash guards Molded vinyl floor mats Rallye bars Rear air deflectors Rear decklid spoilers Side window air...
... Bed mats Bedliners Car/truck covers Cargo liners, interior Carpet floor mats Cleaners, waxes and polishes Flat splash guards Frond end covers (full and mini) Hood deflectors Locking gas cap Lubricants and oils Molded splash guards Molded vinyl floor mats Rallye bars Rear air deflectors Rear decklid spoilers Side window air...
Owner Guide 1st Printing
Page 239
Index H Page High-mount brakelamp ...204 Hood latch location ...162 release lever ...162 Horn ...54 I Identification Number, Vehicle (VIN) ...222 Idle, relearning ...179 Idle, speed ...179, 220 Ignition chime ...17 positions on ...
Index H Page High-mount brakelamp ...204 Hood latch location ...162 release lever ...162 Horn ...54 I Identification Number, Vehicle (VIN) ...222 Idle, relearning ...179 Idle, speed ...179, 220 Ignition chime ...17 positions on ...
Owner Guide 1st Printing
Page 244
Filling station information Fuel Fuel tank capacity Engine oil UNLEADED FUEL ONLY Octane 87 58.5 litres (15.4 gallons) Use Motorcraft 5W-30 Formula E Fuel Economy Motor Oil, Ford specification WSS-M2C153-G. Refer to Safety Compliance Certification label on driver's door pillar Pull handle under the left side of the instrument panel Right rear of vehicle Tire size and pressure Hood release location Fuel filler location 244
Filling station information Fuel Fuel tank capacity Engine oil UNLEADED FUEL ONLY Octane 87 58.5 litres (15.4 gallons) Use Motorcraft 5W-30 Formula E Fuel Economy Motor Oil, Ford specification WSS-M2C153-G. Refer to Safety Compliance Certification label on driver's door pillar Pull handle under the left side of the instrument panel Right rear of vehicle Tire size and pressure Hood release location Fuel filler location 244
