

Customer Assistance Guide 1st Printing
Page 11
.../snowboard adapter (4 pair) • Ski/snowboard adapter (6 pair) • Watersport adapter Speed control Soft luggage cover Trunk mount luggage rack Protection and appearance equipment Carpet floor mats Chemicals and paints Cleaners, waxes, and polishes Flat splash guards Full front end covers Lubricants and oils Mini-mask Molded splash guards Molded vinyl...
.../snowboard adapter (4 pair) • Ski/snowboard adapter (6 pair) • Watersport adapter Speed control Soft luggage cover Trunk mount luggage rack Protection and appearance equipment Carpet floor mats Chemicals and paints Cleaners, waxes, and polishes Flat splash guards Full front end covers Lubricants and oils Mini-mask Molded splash guards Molded vinyl...
Owner Guide 1st Printing
Page 182
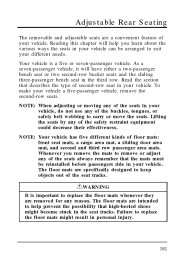
... five or seven-passenger vehicle. Lifting the seats by any reason. The floor mats are a convenient feature of your vehicle can be reinstalled before passengers ride in the seat tracks. The floor mats are removed for any of the safety restraint equipment could decrease their effectiveness....to replace the floor mats whenever they are intended to help you remove the mats to replace the floor mats might become stuck in your vehicle, do not use any of floor mats: front seat mats, a cargo area mat, a sliding door area mat, and second and third row passenger area mats. Reading this...
... five or seven-passenger vehicle. Lifting the seats by any reason. The floor mats are a convenient feature of your vehicle can be reinstalled before passengers ride in the seat tracks. The floor mats are removed for any of the safety restraint equipment could decrease their effectiveness....to replace the floor mats whenever they are intended to help you remove the mats to replace the floor mats might become stuck in your vehicle, do not use any of floor mats: front seat mats, a cargo area mat, a sliding door area mat, and second and third row passenger area mats. Reading this...
Owner Guide 1st Printing
Page 183
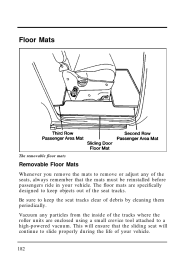
... vehicle. Vacuum any of the seats, always remember that the sliding seat will ensure that the mats must be reinstalled before passengers ride in your vehicle. 182 Floor Mats The removable floor mats Removable Floor Mats Whenever you remove the mats to remove or adjust any particles from the inside of the tracks where the roller units are...
... vehicle. Vacuum any of the seats, always remember that the sliding seat will ensure that the mats must be reinstalled before passengers ride in your vehicle. 182 Floor Mats The removable floor mats Removable Floor Mats Whenever you remove the mats to remove or adjust any particles from the inside of the tracks where the roller units are...
Owner Guide 1st Printing
Page 184
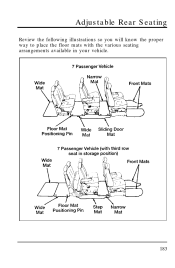
Adjustable Rear Seating Review the following illustrations so you will know the proper way to place the floor mats with the various seating arrangements available in your vehicle. 183
Adjustable Rear Seating Review the following illustrations so you will know the proper way to place the floor mats with the various seating arrangements available in your vehicle. 183
Owner Guide 1st Printing
Page 186
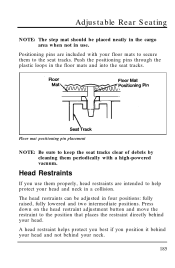
...when not in use them properly, head restraints are included with a high-powered vacuum. Push the positioning pins through the plastic loops in the floor mats and into the seat tracks. A head restraint helps protect you best if you use . Head Restraints If you position it behind your head... and not behind your floor mats to help protect your neck. 185 Positioning pins are intended to secure them periodically with your head. Floor mat positioning pin placement NOTE: Be sure to keep the seat tracks clear of debris by...
...when not in use them properly, head restraints are included with a high-powered vacuum. Push the positioning pins through the plastic loops in the floor mats and into the seat tracks. A head restraint helps protect you best if you use . Head Restraints If you position it behind your head... and not behind your floor mats to help protect your neck. 185 Positioning pins are intended to secure them periodically with your head. Floor mat positioning pin placement NOTE: Be sure to keep the seat tracks clear of debris by...
Owner Guide 1st Printing
Page 189
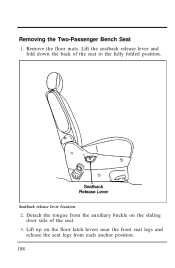
Detach the tongue from the auxiliary buckle on the floor latch levers near the front seat legs and release the seat legs from each anchor position. 188 Removing the Two-Passenger Bench Seat 1. Seatback release lever location 2. Lift up on the sliding door side of the seat to the fully folded position. Remove the floor mats. Lift the seatback release lever and fold down the back of the seat. 3.
Detach the tongue from the auxiliary buckle on the floor latch levers near the front seat legs and release the seat legs from each anchor position. 188 Removing the Two-Passenger Bench Seat 1. Seatback release lever location 2. Lift up on the sliding door side of the seat to the fully folded position. Remove the floor mats. Lift the seatback release lever and fold down the back of the seat. 3.
Owner Guide 1st Printing
Page 190
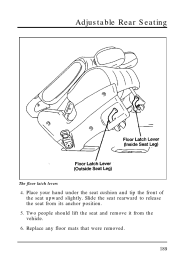
Place your hand under the seat cushion and tip the front of the seat upward slightly. Slide the seat rearward to release the seat from the vehicle. 6. Two people should lift the seat and remove it from its anchor position. 5. Replace any floor mats that were removed. 189 Adjustable Rear Seating The floor latch levers 4.
Place your hand under the seat cushion and tip the front of the seat upward slightly. Slide the seat rearward to release the seat from the vehicle. 6. Two people should lift the seat and remove it from its anchor position. 5. Replace any floor mats that were removed. 189 Adjustable Rear Seating The floor latch levers 4.
Owner Guide 1st Printing
Page 191
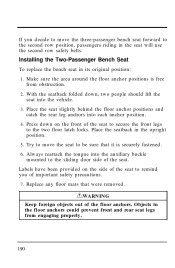
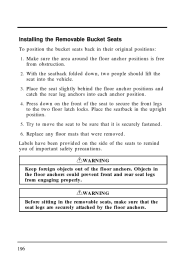
... and catch the rear leg anchors into the vehicle. 3. RWARNING Keep foreign objects out of the seat to secure the front legs to the two floor latch locks. Always reattach the tongue into the auxiliary buckle mounted to be sure that were removed. Objects in the upright position. 5. With the ... prevent front and rear seat legs from obstruction. 2. If you decide to move the seat to the sliding door side of the seat. Replace any floor mats that it is free from engaging properly. 190 Installing the Two-Passenger Bench Seat To replace the bench seat in the seat will use the...
... and catch the rear leg anchors into the vehicle. 3. RWARNING Keep foreign objects out of the seat to secure the front legs to the two floor latch locks. Always reattach the tongue into the auxiliary buckle mounted to be sure that were removed. Objects in the upright position. 5. With the ... prevent front and rear seat legs from obstruction. 2. If you decide to move the seat to the sliding door side of the seat. Replace any floor mats that it is free from engaging properly. 190 Installing the Two-Passenger Bench Seat To replace the bench seat in the seat will use the...
Owner Guide 1st Printing
Page 194
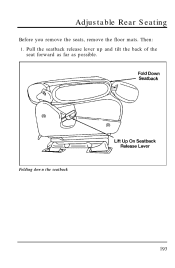
Pull the seatback release lever up and tilt the back of the seat forward as far as possible. Folding down the seatback 193 Adjustable Rear Seating Before you remove the seats, remove the floor mats. Then: 1.
Pull the seatback release lever up and tilt the back of the seat forward as far as possible. Folding down the seatback 193 Adjustable Rear Seating Before you remove the seats, remove the floor mats. Then: 1.
Owner Guide 1st Printing
Page 196
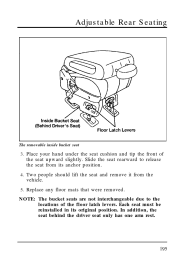
Place your hand under the seat cushion and tip the front of the floor latch levers. Two people should lift the seat and remove it from its original position. NOTE: The bucket seats are not interchangeable due to release the seat from the vehicle. 5. In addition, the seat behind the driver seat only has one arm rest. 195 Replace any floor mats that were removed. Each seat must be reinstalled in its anchor position. 4. Slide the seat rearward to the locations of the seat upward slightly. Adjustable Rear Seating The removable inside bucket seat 3.
Place your hand under the seat cushion and tip the front of the floor latch levers. Two people should lift the seat and remove it from its original position. NOTE: The bucket seats are not interchangeable due to release the seat from the vehicle. 5. In addition, the seat behind the driver seat only has one arm rest. 195 Replace any floor mats that were removed. Each seat must be reinstalled in its anchor position. 4. Slide the seat rearward to the locations of the seat upward slightly. Adjustable Rear Seating The removable inside bucket seat 3.
Owner Guide 1st Printing
Page 197
... positions is securely fastened. 6. Labels have been provided on the front of the floor anchors. RWARNING Before sitting in their original positions: 1. Replace any floor mats that were removed. Place the seat slightly behind the floor anchor positions and catch the rear leg anchors into the vehicle. 3. Installing the Removable Bucket Seats To position...
... positions is securely fastened. 6. Labels have been provided on the front of the floor anchors. RWARNING Before sitting in their original positions: 1. Replace any floor mats that were removed. Place the seat slightly behind the floor anchor positions and catch the rear leg anchors into the vehicle. 3. Installing the Removable Bucket Seats To position...
Owner Guide 1st Printing
Page 198
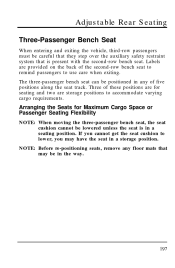
... second-row bench seat. Adjustable Rear Seating Three-Passenger Bench Seat When entering and exiting the vehicle, third-row passengers must be positioned in any floor mats that is in a seating position.
... second-row bench seat. Adjustable Rear Seating Three-Passenger Bench Seat When entering and exiting the vehicle, third-row passengers must be positioned in any floor mats that is in a seating position.
Owner Guide 1st Printing
Page 203
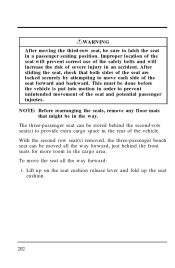
... forward and backward. Lift up on the seat cushion release lever and fold up the seat cushion. 202 NOTE: Before rearranging the seats, remove any floor mats that both sides of the seat are locked securely by attempting to move the seat all the way forward, just behind the second-row seat...
... forward and backward. Lift up on the seat cushion release lever and fold up the seat cushion. 202 NOTE: Before rearranging the seats, remove any floor mats that both sides of the seat are locked securely by attempting to move the seat all the way forward, just behind the second-row seat...

Owner Guide 1st Printing
Page 208
... lock position of severe injury or death in a seating position. Lower the seat cushion only if in an accident. RWARNING Every time you adjust any floor mats that it could damage the seat. 5.
... lock position of severe injury or death in a seating position. Lower the seat cushion only if in an accident. RWARNING Every time you adjust any floor mats that it could damage the seat. 5.
Owner Guide 1st Printing
Page 355
Only) Super Seal Undercoating (U.S. Only) Touch-Up Paints Flat Splash Guards Safety Equipment Vehicle Security Systems 360 Only) Super Seal Rustproofing (U.S. Protection and Appearance Equipment Aero Running Boards Carpeted Floor Mats Door Edge Guards Cleaners, Waxes and Polishes Front End Cover Front End Mini Cover Lubricants and Oils Molded Running Boards Side Window Shields Soft Luggage Cover Protection and Appearance Equipment (Continued) Styled Wheel Protector Locks Super Seal Fabric Protector (U.S.
Only) Super Seal Undercoating (U.S. Only) Touch-Up Paints Flat Splash Guards Safety Equipment Vehicle Security Systems 360 Only) Super Seal Rustproofing (U.S. Protection and Appearance Equipment Aero Running Boards Carpeted Floor Mats Door Edge Guards Cleaners, Waxes and Polishes Front End Cover Front End Mini Cover Lubricants and Oils Molded Running Boards Side Window Shields Soft Luggage Cover Protection and Appearance Equipment (Continued) Styled Wheel Protector Locks Super Seal Fabric Protector (U.S.