
Owner's Manual
Page 29
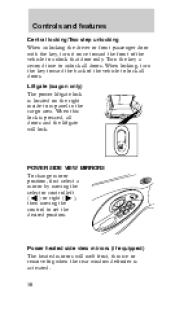
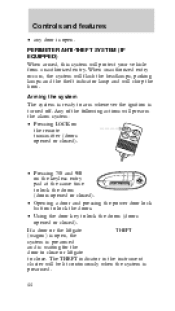
POWER DOOR LOCKS (IF EQUIPPED) Press U to unlock all doors. 29 The window lock feature allows only the driver to lock all doors and L to operate the power windows. Each passenger has window controls. When AUTO is pressed and released quickly, the driver's window will open and close windows. Controls and features POWER WINDOWS Press and hold the rocker switches to open completely without holding the switch down.
POWER DOOR LOCKS (IF EQUIPPED) Press U to unlock all doors. 29 The window lock feature allows only the driver to lock all doors and L to operate the power windows. Each passenger has window controls. When AUTO is pressed and released quickly, the driver's window will open and close windows. Controls and features POWER WINDOWS Press and hold the rocker switches to open completely without holding the switch down.
Owner's Manual
Page 30
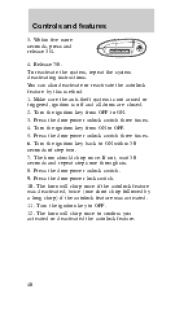
...position, first select a mirror by moving the selector control left ) or right ( ), ( then moving the control to unlock all doors. Liftgate (wagon only) The power liftgate lock is located on the right inside trim panel in the cargo area. When locking, turn it once toward the back of the vehicle... to unlock that door only. Power heated side view mirrors (if equipped) The heated mirrors will lock. Turn the key a second time to set the desired position. Controls and features...
...position, first select a mirror by moving the selector control left ) or right ( ), ( then moving the control to unlock all doors. Liftgate (wagon only) The power liftgate lock is located on the right inside trim panel in the cargo area. When locking, turn it once toward the back of the vehicle... to unlock that door only. Power heated side view mirrors (if equipped) The heated mirrors will lock. Turn the key a second time to set the desired position. Controls and features...

Owner's Manual
Page 34
... and window, close them completely before driving. 34 The window locks when the liftgate is locked. You must lock the liftgate with the key or power lock control;
... and window, close them completely before driving. 34 The window locks when the liftgate is locked. You must lock the liftgate with the key or power lock control;
Owner's Manual
Page 40
To reactivate the system, repeat the system deactivating instructions. Press the door power unlock switch three times. 6. Make sure the anti-theft system is not armed or triggered, ignition is off and all doors are closed. 2. If ... step two. 7. Turn the ignition key from OFF to OFF. 5. Turn the ignition key from ON to ON. 3. Release 7/8. Press the door power unlock switch three times. 4. Press the door power lock switch. 10. Controls and features 3. Within five more seconds, press and release 3/4. 1 2 3 4 5 6 7 8 9 0 4. You can also deactivate or reactivate the...
To reactivate the system, repeat the system deactivating instructions. Press the door power unlock switch three times. 6. Make sure the anti-theft system is not armed or triggered, ignition is off and all doors are closed. 2. If ... step two. 7. Turn the ignition key from OFF to OFF. 5. Turn the ignition key from ON to ON. 3. Release 7/8. Press the door power unlock switch three times. 4. Press the door power lock switch. 10. Controls and features 3. Within five more seconds, press and release 3/4. 1 2 3 4 5 6 7 8 9 0 4. You can also deactivate or reactivate the...
Owner's Manual
Page 43
... lamps illuminate when: • the remote entry system is used to the START or ACC position. Controls and features Replacing the batteries The transmitter is powered by : • battery failure • weather conditions • structures around the vehicle To replace the batteries: 1. Twist a thin coin between the two halves of new...
... lamps illuminate when: • the remote entry system is used to the START or ACC position. Controls and features Replacing the batteries The transmitter is powered by : • battery failure • weather conditions • structures around the vehicle To replace the batteries: 1. Twist a thin coin between the two halves of new...
Owner's Manual
Page 44
...; Pressing LOCK on the keyless entry pad at the same time to lock the doors (doors opened or closed). • Opening a door and pressing the power door lock button to lock the doors. • Using the door key to close or liftgate to lock the doors (doors opened or closed ). Arming...
...; Pressing LOCK on the keyless entry pad at the same time to lock the doors (doors opened or closed). • Opening a door and pressing the power door lock button to lock the doors. • Using the door key to close or liftgate to lock the doors (doors opened or closed ). Arming...
Owner's Manual
Page 49
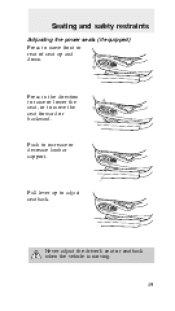
Never adjust the driver's seat or seatback when the vehicle is moving. 49 Press in the direction to raise or lower the seat, or to move front or rear of seat up to adjust seatback. Push to increase or decrease lumbar support. Pull lever up and down. Seating and safety restraints Adjusting the power seats (if equipped) Press to move the seat forward or backward.
Never adjust the driver's seat or seatback when the vehicle is moving. 49 Press in the direction to raise or lower the seat, or to move front or rear of seat up to adjust seatback. Push to increase or decrease lumbar support. Pull lever up and down. Seating and safety restraints Adjusting the power seats (if equipped) Press to move the seat forward or backward.
Owner's Manual
Page 63
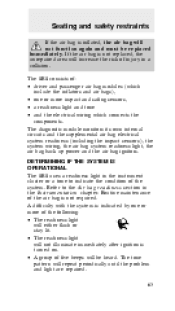
... the supplemental air bag electrical system readiness (including the impact sensors), the system wiring, the air bag system readiness light, the air bag back up power and the air bag ignitors. Refer to indicate the condition of : • driver and passenger air bag modules (which include the inflators and air bags...
... the supplemental air bag electrical system readiness (including the impact sensors), the system wiring, the air bag system readiness light, the air bag back up power and the air bag ignitors. Refer to indicate the condition of : • driver and passenger air bag modules (which include the inflators and air bags...
Owner's Manual
Page 87
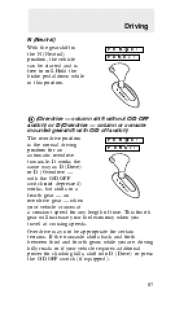
... same way as D (Drive) or D (Overdrive - with O/D off switch) The overdrive position P R N D D 1 is free to a fourth gear - an overdrive gear - when your vehicle requires additional power for any length of time. Hold the brake pedal down while in the N (Neutral) position, the vehicle can be appropriate for an automatic overdrive transaxle.
... same way as D (Drive) or D (Overdrive - with O/D off switch) The overdrive position P R N D D 1 is free to a fourth gear - an overdrive gear - when your vehicle requires additional power for any length of time. Hold the brake pedal down while in the N (Neutral) position, the vehicle can be appropriate for an automatic overdrive transaxle.
Owner's Manual
Page 93
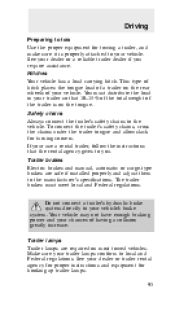
... safe if installed properly and adjust them to your vehicle. If your trailer lamps conform to the vehicle. Your vehicle may not have enough braking power and your dealer or a reliable trailer dealer if you . Safety chains Always connect the trailer's safety chains to local and Federal regulations. Driving Preparing to...
... safe if installed properly and adjust them to your vehicle. If your trailer lamps conform to the vehicle. Your vehicle may not have enough braking power and your dealer or a reliable trailer dealer if you . Safety chains Always connect the trailer's safety chains to local and Federal regulations. Driving Preparing to...

Owner's Manual
Page 100
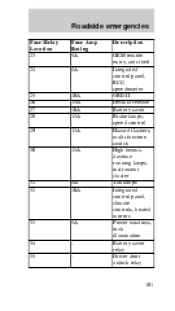
Roadside emergencies Fuse/Relay Location 12 Fuse Amp Rating 5A Description Instrument cluster, autolamps, transaxle control switch, integrated control panel, GEM Air bag, blower motor, electronic automatic temperature control module Lamp outage indication Turn signals Not used Wiper system (front) Headlamp switch Wiper system (rear) Integrated control panel, remote entry, cellular phone, cigar lighter Cigar lighter Power mirrors, power antenna, autolamps, decklid lamps 13 5A 14 15 16 17 18 19 20 5A 10A 30A 5A 15A 5A 21 22 20A 5A 100
Roadside emergencies Fuse/Relay Location 12 Fuse Amp Rating 5A Description Instrument cluster, autolamps, transaxle control switch, integrated control panel, GEM Air bag, blower motor, electronic automatic temperature control module Lamp outage indication Turn signals Not used Wiper system (front) Headlamp switch Wiper system (rear) Integrated control panel, remote entry, cellular phone, cigar lighter Cigar lighter Power mirrors, power antenna, autolamps, decklid lamps 13 5A 14 15 16 17 18 19 20 5A 10A 30A 5A 15A 5A 21 22 20A 5A 100
Owner's Manual
Page 101
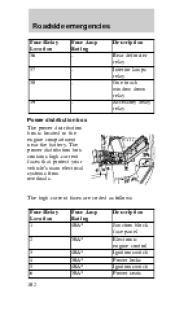
Roadside emergencies Fuse/Relay Location 23 24 Fuse Amp Rating 5A 5A Description GEM remote entry, anti-theft Integrated control panel, RCC, speedometer OBD II Decklid release Battery saver Brake lamps, speed control Hazard flashers, multi-function switch High beams, daytime running lamps, instrument cluster Tail lamps Integrated control panel, climate controls, heated mirrors Power windows, lock illumination Battery saver relay Driver door unlock relay 25 26 27 28 29 10A 15A 10A 15A 15A 30 15A 31 32 5A 10A 33 5A 34 35 - 101
Roadside emergencies Fuse/Relay Location 23 24 Fuse Amp Rating 5A 5A Description GEM remote entry, anti-theft Integrated control panel, RCC, speedometer OBD II Decklid release Battery saver Brake lamps, speed control Hazard flashers, multi-function switch High beams, daytime running lamps, instrument cluster Tail lamps Integrated control panel, climate controls, heated mirrors Power windows, lock illumination Battery saver relay Driver door unlock relay 25 26 27 28 29 10A 15A 10A 15A 15A 30 15A 31 32 5A 10A 33 5A 34 35 - 101
Owner's Manual
Page 102
... 40A* 30A* 40A* 30A* 40A* 30A* Description Junction block fuse panel Electronic engine control Ignition switch Power locks Ignition switch Power seats The power distribution box contains high-current fuses that protect your vehicle's main electrical systems from overloads. Power distribution box The power distribution box is located in the engine compartment near the battery.
... 40A* 30A* 40A* 30A* 40A* 30A* Description Junction block fuse panel Electronic engine control Ignition switch Power locks Ignition switch Power seats The power distribution box contains high-current fuses that protect your vehicle's main electrical systems from overloads. Power distribution box The power distribution box is located in the engine compartment near the battery.
Owner's Manual
Page 104
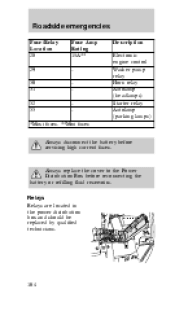
Always replace the cover to the Power Distribution Box before servicing high current fuses. Relays Relays are located in the power distribution box and should be replaced by qualified technicians. 104 Roadside emergencies Fuse/Relay Location 28 29 30 31 32 33 Fuse Amp Rating 15A** Description Electronic engine control Washer pump relay Horn relay Autolamp (headlamps) Starter relay Autolamp (parking lamps) *Maxi fuses. **Mini fuses Always disconnect the battery before reconnecting the battery or refilling fluid reservoirs.
Always replace the cover to the Power Distribution Box before servicing high current fuses. Relays Relays are located in the power distribution box and should be replaced by qualified technicians. 104 Roadside emergencies Fuse/Relay Location 28 29 30 31 32 33 Fuse Amp Rating 15A** Description Electronic engine control Washer pump relay Horn relay Autolamp (headlamps) Starter relay Autolamp (parking lamps) *Maxi fuses. **Mini fuses Always disconnect the battery before reconnecting the battery or refilling fluid reservoirs.
Owner's Manual
Page 117
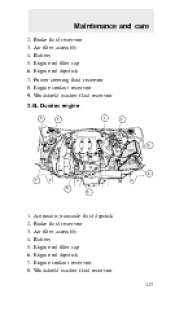
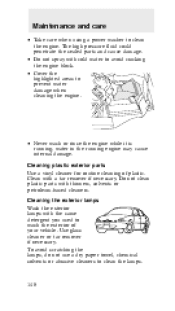
Automatic transaxle fluid dipstick Brake fluid reservoir Air filter assembly Battery Engine oil filler cap Engine oil dipstick Engine coolant reservoir Windshield washer fluid reservoir 117 Brake fluid reservoir Air filter assembly Battery Engine oil filler cap Engine oil dipstick Power steering fluid reservoir Engine coolant reservoir Windshield washer fluid reservoir 3.0L Duratec engine 8 9 1 2 3 4 7 6 5 1. 2. 3. 4. 5. 6. 7. 8. Maintenance and care 2. 3. 4. 5. 6. 7. 8. 9.
Automatic transaxle fluid dipstick Brake fluid reservoir Air filter assembly Battery Engine oil filler cap Engine oil dipstick Engine coolant reservoir Windshield washer fluid reservoir 117 Brake fluid reservoir Air filter assembly Battery Engine oil filler cap Engine oil dipstick Power steering fluid reservoir Engine coolant reservoir Windshield washer fluid reservoir 3.0L Duratec engine 8 9 1 2 3 4 7 6 5 1. 2. 3. 4. 5. 6. 7. 8. Maintenance and care 2. 3. 4. 5. 6. 7. 8. 9.
Owner's Manual
Page 118
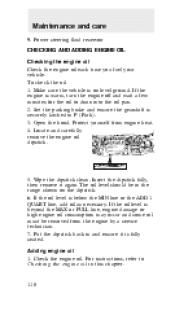
... dipstick back in this chapter. 118 Open the hood. Check the engine oil. Adding engine oil 1. For instructions, refer to drain into the oil pan. 2. Power steering fluid reservoir CHECKING AND ADDING ENGINE OIL Checking the engine oil Check the engine oil each time you fuel your vehicle. Wipe the dipstick...
... dipstick back in this chapter. 118 Open the hood. Check the engine oil. Adding engine oil 1. For instructions, refer to drain into the oil pan. 2. Power steering fluid reservoir CHECKING AND ADDING ENGINE OIL Checking the engine oil Check the engine oil each time you fuel your vehicle. Wipe the dipstick...
Owner's Manual
Page 124
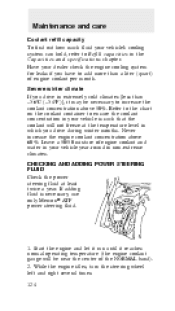
... the coolant will be necessary to Refill capacities in your vehicle is necessary, use only Mercon ATF power steering fluid. 1. Never increase the engine coolant concentration above 50%. CHECKING AND ADDING POWER STEERING FLUID Check the power steering fluid at the temperature level in which you drive in non-extreme climates. Maintenance and...
... the coolant will be necessary to Refill capacities in your vehicle is necessary, use only Mercon ATF power steering fluid. 1. Never increase the engine coolant concentration above 50%. CHECKING AND ADDING POWER STEERING FLUID Check the power steering fluid at the temperature level in which you drive in non-extreme climates. Maintenance and...
Owner's Manual
Page 128
... cell up to spill. If necessary, distilled water may be reset once the battery is electronically controlled by a computer, some control conditions are maintained by power from the battery. Let the engine idle for checking electrolyte level and adding water. Servicing your battery The low-maintenance battery has removable vent caps...
... cell up to spill. If necessary, distilled water may be reset once the battery is electronically controlled by a computer, some control conditions are maintained by power from the battery. Let the engine idle for checking electrolyte level and adding water. Servicing your battery The low-maintenance battery has removable vent caps...
Owner's Manual
Page 148
..., chemical solvents or abrasive cleaners to clean the engine. Use glass cleaner or tar remover if necessary. Maintenance and care • Take care when using a power washer to clean the lamps. 148 water in the running ;
..., chemical solvents or abrasive cleaners to clean the engine. Use glass cleaner or tar remover if necessary. Maintenance and care • Take care when using a power washer to clean the lamps. 148 water in the running ;
Owner's Manual
Page 152
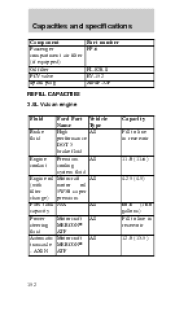
... fluid performance DOT 3 brake fluid Engine Premium cooling coolant system fluid Engine oil Motocraft motor oil (with filter 5W30 super change) premium Fuel tank N/A capacity Power Motorcraft steering MERCON fluid ATF Automatic Motorcraft transaxle MERCON -
... fluid performance DOT 3 brake fluid Engine Premium cooling coolant system fluid Engine oil Motocraft motor oil (with filter 5W30 super change) premium Fuel tank N/A capacity Power Motorcraft steering MERCON fluid ATF Automatic Motorcraft transaxle MERCON -


