
Owner's Manual
Page 6
Introduction These are some of the symbols you may see on your vehicle. Vehicle Symbol Glossary Safety Alert Protecting the Environment Air Bag-Front See Owner's Guide Fasten Safety Belt Air Bag-Side Child Seat Installation Warning Child Seat Tether Anchor Anti-Lock Brake System Traction Control Child Seat Child Seat Lower Anchor Brake System Brake Fluid Non-Petroleum Based Master Lighting Switch Hazard Warning Flasher Fog Lamps-Front Fuse Compartment Fuel Pump Reset Windshield Defrost/Demist Windshield Wash/Wipe Rear Window Defrost/Demist 6
Introduction These are some of the symbols you may see on your vehicle. Vehicle Symbol Glossary Safety Alert Protecting the Environment Air Bag-Front See Owner's Guide Fasten Safety Belt Air Bag-Side Child Seat Installation Warning Child Seat Tether Anchor Anti-Lock Brake System Traction Control Child Seat Child Seat Lower Anchor Brake System Brake Fluid Non-Petroleum Based Master Lighting Switch Hazard Warning Flasher Fog Lamps-Front Fuse Compartment Fuel Pump Reset Windshield Defrost/Demist Windshield Wash/Wipe Rear Window Defrost/Demist 6
Owner's Manual
Page 8
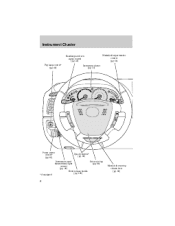
Instrument Cluster Headlamp and turn signal control (pg. 48) Fog lamp control* (pg. 48) Instrument cluster (pg. 10) Windshield wiper/washer control (pg. 56) Power mirror control* (pg. 61) Speed controls* (pg. 62) * if equipped Driver air bag Instrument panel (pg. 99) dimmer/dome light control (pg. 49) Hood release handle (pg. 198) Manual tilt steering column lever (pg. 58) 8
Instrument Cluster Headlamp and turn signal control (pg. 48) Fog lamp control* (pg. 48) Instrument cluster (pg. 10) Windshield wiper/washer control (pg. 56) Power mirror control* (pg. 61) Speed controls* (pg. 62) * if equipped Driver air bag Instrument panel (pg. 99) dimmer/dome light control (pg. 49) Hood release handle (pg. 198) Manual tilt steering column lever (pg. 58) 8
Owner's Manual
Page 42
... side without a label). • Dust, finger smudges, and dirt can decrease the amount of light reflected from the center to avoid warping. • The CD player ejects the CD is recommended ...AM and FM stations may peel and cause the CD to play commercially pressed 12 cm (4.75 in Mazda CD players. Entertainment Systems • Do not stick paper or tape on the CD. CD units...Please contact your dealer for further information. Volatile chemicals such as benzine and thinner can damage, warp or fog CDs. • Keep CDs in a given area. 42 Irregular shaped CDs, CDs with a scratch ...
... side without a label). • Dust, finger smudges, and dirt can decrease the amount of light reflected from the center to avoid warping. • The CD player ejects the CD is recommended ...AM and FM stations may peel and cause the CD to play commercially pressed 12 cm (4.75 in Mazda CD players. Entertainment Systems • Do not stick paper or tape on the CD. CD units...Please contact your dealer for further information. Volatile chemicals such as benzine and thinner can damage, warp or fog CDs. • Keep CDs in a given area. 42 Irregular shaped CDs, CDs with a scratch ...
Owner's Manual
Page 48
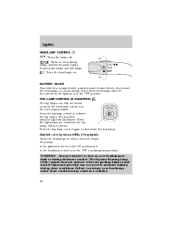
...be turned on , automatically turns off . When the highbeams are activated, the fog lamps will illuminate. WARNING: Always remember to activate your parking lights or side marker lights and generally may not provide adequate lighting during inclement weather. Daytime running lamps (DRL) (if equipped) Turns the headlamps...the ON position and • the headlamp control is in the OFF position. Press the foglamp control to deactivate the fog lamps. Lights HEADLAMP CONTROL Turns the lamps off the headlamps after 30 seconds when the ignition is in the OFF or parking lamp position...
...be turned on , automatically turns off . When the highbeams are activated, the fog lamps will illuminate. WARNING: Always remember to activate your parking lights or side marker lights and generally may not provide adequate lighting during inclement weather. Daytime running lamps (DRL) (if equipped) Turns the headlamps...the ON position and • the headlamp control is in the OFF position. Press the foglamp control to deactivate the fog lamps. Lights HEADLAMP CONTROL Turns the lamps off the headlamps after 30 seconds when the ignition is in the OFF or parking lamp position...

Owner's Manual
Page 52
.... 52 Make sure that the headlamp control is in color except where noted. To replace all instrument panel lights - Open the hood. 3. Disconnect the electrical connector from the bulb. 6. Your Mazda dealer has the proper tools, training and parts to perform this procedure, visit your dealer.... Lights Function Number of bulbs Trade number Park/turn lamps (front) 2 3157 AK (amber) Headlamps 2 9003 Rear stop/tail lamps 2 3157K Rear turn lamps 2 3156K Rear license plate lamps 2 3156K/168 Backup lamp 2 3156K Rear/turn/sidemarker 2 916NA (amber) Fog lamp (if equipped) ...
.... 52 Make sure that the headlamp control is in color except where noted. To replace all instrument panel lights - Open the hood. 3. Disconnect the electrical connector from the bulb. 6. Your Mazda dealer has the proper tools, training and parts to perform this procedure, visit your dealer.... Lights Function Number of bulbs Trade number Park/turn lamps (front) 2 3157 AK (amber) Headlamps 2 9003 Rear stop/tail lamps 2 3157K Rear turn lamps 2 3156K Rear license plate lamps 2 3156K/168 Backup lamp 2 3156K Rear/turn/sidemarker 2 916NA (amber) Fog lamp (if equipped) ...
Owner's Manual
Page 54
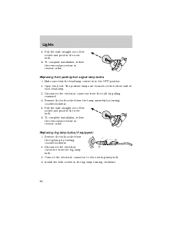
Open the hood. Disconnect the electrical connector from the lamp assembly by pulling rearward. 4. Replacing fog lamp bulbs (if equipped) 1. The position lamps are located on the bottom half of the socket and push in reverse order. Remove the ...in the OFF position. 2. To complete installation, follow the removal procedure in the new bulb. 6. Lights 5. Connect the electrical connector to the new fog lamp bulb. 4. Make sure that the headlamp control is in the fog lamp turning clockwise. 54 Pull the bulb straight out of each headlamp. 3. To complete installation, ...
Open the hood. Disconnect the electrical connector from the lamp assembly by pulling rearward. 4. Replacing fog lamp bulbs (if equipped) 1. The position lamps are located on the bottom half of the socket and push in reverse order. Remove the ...in the OFF position. 2. To complete installation, follow the removal procedure in the new bulb. 6. Lights 5. Connect the electrical connector to the new fog lamp bulb. 4. Make sure that the headlamp control is in the fog lamp turning clockwise. 54 Pull the bulb straight out of each headlamp. 3. To complete installation, ...
Owner's Manual
Page 243
... bulb replacement specifications chart ...51 cargo lamps ...49 daytime running light ...48 fog lamps ...48 headlamps ...48 headlamps, flash to pass ...49 instrument panel, dimming ...49 interior lamps ...50-51 replacing bulbs ...51-55 Lane change indicator (see Turn signal) ...50 Liftgate ...67 Lights, warning and indicator ...10 anti-lock brakes (ABS) ...126...
... bulb replacement specifications chart ...51 cargo lamps ...49 daytime running light ...48 fog lamps ...48 headlamps ...48 headlamps, flash to pass ...49 instrument panel, dimming ...49 interior lamps ...50-51 replacing bulbs ...51-55 Lane change indicator (see Turn signal) ...50 Liftgate ...67 Lights, warning and indicator ...10 anti-lock brakes (ABS) ...126...


