

Owner's Manual
Page 1
Table of Contents Introduction Instrument Cluster Warning and control lights Gauges 4 12 12 16 Entertainment Systems AM/FM AM/FM AM/FM AM/FM stereo stereo with CD stereo with in-dash six CD stereo with CD/MP3 19 19 21 23 27 Climate Controls Manual heating and air conditioning 35 35 Lights Headlamps Turn signal control Bulb replacement 38 38 40 40 Driver Controls Windshield wiper/washer control Power windows Speed control (Cruise control) 47 47 49 53 Locks and Security Keys Locks Anti-theft system 59 59 59 59 1
Table of Contents Introduction Instrument Cluster Warning and control lights Gauges 4 12 12 16 Entertainment Systems AM/FM AM/FM AM/FM AM/FM stereo stereo with CD stereo with in-dash six CD stereo with CD/MP3 19 19 21 23 27 Climate Controls Manual heating and air conditioning 35 35 Lights Headlamps Turn signal control Bulb replacement 38 38 40 40 Driver Controls Windshield wiper/washer control Power windows Speed control (Cruise control) 47 47 49 53 Locks and Security Keys Locks Anti-theft system 59 59 59 59 1

Owner's Manual
Page 19
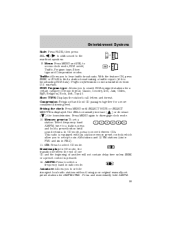
tune to choose a frequency band in radio mode. 3 AM/FM 4. AM/FM: Press to a station, press and hold a preset button until sound returns. 3 4 19 Memory preset buttons: To 1 2 set a station: Select frequency band AM/FM; Tune: Press manually change radio frequency down /up . 3. Seek: Press next strong station down /up the frequency band. / to find the 1. Entertainment Systems AM/FM STEREO 5 6 7 1 2 VOL PUSH ON TONE CLK TONE VOL ST DX FM 12 SEEK TUNE 1 2 3 4 AM/FM 4 / to 2.
tune to choose a frequency band in radio mode. 3 AM/FM 4. AM/FM: Press to a station, press and hold a preset button until sound returns. 3 4 19 Memory preset buttons: To 1 2 set a station: Select frequency band AM/FM; Tune: Press manually change radio frequency down /up . 3. Seek: Press next strong station down /up the frequency band. / to find the 1. Entertainment Systems AM/FM STEREO 5 6 7 1 2 VOL PUSH ON TONE CLK TONE VOL ST DX FM 12 SEEK TUNE 1 2 3 4 AM/FM 4 / to 2.
Owner's Manual
Page 25
...11. This radio is equipped with six station memory preset controls which allow you to hear traffic broadcasts. then press SEL / to shift sound to manually increase ( ) or decrease ( ) the hours/minutes. Memory presets: To set preset stations for a more consistent listening level. Traffic information is ...not available in radio mode. With the feature ON, press SEEK or SCAN to set the strongest local radio stations without losing your original manually set a station: Select frequency band AM/FM; Use SEL to the rear/front speakers. 9. Seamless play: In CD mode, the ...
...11. This radio is equipped with six station memory preset controls which allow you to hear traffic broadcasts. then press SEL / to shift sound to manually increase ( ) or decrease ( ) the hours/minutes. Memory presets: To set preset stations for a more consistent listening level. Traffic information is ...not available in radio mode. With the feature ON, press SEEK or SCAN to set the strongest local radio stations without losing your original manually set a station: Select frequency band AM/FM; Use SEL to the rear/front speakers. 9. Seamless play: In CD mode, the ...

Owner's Manual
Page 26
.... Power/volume: Press to stop. 17. Disc/Tune: Radio: Press or to cycle through SHUF DISC, SHUF TRAC or SHUF OFF. 16. Press SHUF to manually tune down or up . 26 CD door: Insert a CD label side up the frequency band. Entertainment Systems AUTOSTORE will store the last one in the...
.... Power/volume: Press to stop. 17. Disc/Tune: Radio: Press or to cycle through SHUF DISC, SHUF TRAC or SHUF OFF. 16. Press SHUF to manually tune down or up . 26 CD door: Insert a CD label side up the frequency band. Entertainment Systems AUTOSTORE will store the last one in the...

Owner's Manual
Page 36
... the side windows To increase airflow to the outer instrument panel vents, close the vents located in the middle of the airflow in the vehicle. MANUAL HEATING AND AIR CONDITIONING SYSTEM 1. Temperature selection: Controls the temperature of the instrument panel. Air flows from the instrument panel vents only. : Distributes outside air...
... the side windows To increase airflow to the outer instrument panel vents, close the vents located in the middle of the airflow in the vehicle. MANUAL HEATING AND AIR CONDITIONING SYSTEM 1. Temperature selection: Controls the temperature of the instrument panel. Air flows from the instrument panel vents only. : Distributes outside air...
Owner's Manual
Page 48
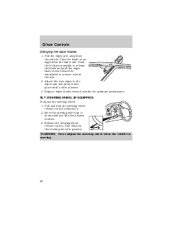
... arm and press it from the vehicle. Release the steering wheel release control. Pull the wiper arm away from the arm. 2. Push the lock pin manually to release the blade and pull the wiper blade down until a click is moving. 48 Replace wiper blades every 6 months for optimum performance. Turn the...
... arm and press it from the vehicle. Release the steering wheel release control. Pull the wiper arm away from the arm. 2. Push the lock pin manually to release the blade and pull the wiper blade down until a click is moving. 48 Replace wiper blades every 6 months for optimum performance. Turn the...
Owner's Manual
Page 50
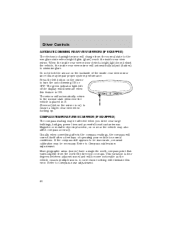
... northerly direction on the backside of the inside rear view mirror since this may be affected when you drive near the vehicle may be inaccurate, a manual calibration may also affect compass accuracy. Press the left of operating your vehicle in normal conditions. COMPASS/TEMPERATURE EC MIRROR (IF EQUIPPED) The compass reading...
... northerly direction on the backside of the inside rear view mirror since this may be affected when you drive near the vehicle may be inaccurate, a manual calibration may also affect compass accuracy. Press the left of operating your vehicle in normal conditions. COMPASS/TEMPERATURE EC MIRROR (IF EQUIPPED) The compass reading...

Owner's Manual
Page 52
... vehicle doors are shut. 3. The compass is not activated. To change back to enter the calibration mode. 5. Start the vehicle. 2. Release the left button for manual compass calibration.
... vehicle doors are shut. 3. The compass is not activated. To change back to enter the calibration mode. 5. Start the vehicle. 2. Release the left button for manual compass calibration.

Owner's Manual
Page 67
... upright. WARNING: Do not pile cargo higher than the seatbacks to move seat forward or backward. 67 Seating and Safety Restraints SEATING Adjusting the front manual seat WARNING: Never adjust the driver's seat or seatback when the vehicle is moving is stopped.
... upright. WARNING: Do not pile cargo higher than the seatbacks to move seat forward or backward. 67 Seating and Safety Restraints SEATING Adjusting the front manual seat WARNING: Never adjust the driver's seat or seatback when the vehicle is moving is stopped.

Owner's Manual
Page 68
... to lock it in place. The seat will have to use the seat adjust handle to move the seat back to adjust seatback. Using the manual lumbar support (if equipped) Turn the lumbar support control clockwise to access the rear area of the cab. Slide the seat forward to increase firmness...
... to lock it in place. The seat will have to use the seat adjust handle to move the seat back to adjust seatback. Using the manual lumbar support (if equipped) Turn the lumbar support control clockwise to access the rear area of the cab. Slide the seat forward to increase firmness...

Owner's Manual
Page 73
... certain frontal or near-frontal collisions with safety belt pretensioners at the driver and front outboard passenger seating positions. Refer to the procedures in Workshop Manual. Seating and Safety Restraints WARNING: BELT AND RETRACTOR ASSEMBLY MUST BE REPLACED if the seat belt assembly "automatic locking retractor" feature or any other seat...
... certain frontal or near-frontal collisions with safety belt pretensioners at the driver and front outboard passenger seating positions. Refer to the procedures in Workshop Manual. Seating and Safety Restraints WARNING: BELT AND RETRACTOR ASSEMBLY MUST BE REPLACED if the seat belt assembly "automatic locking retractor" feature or any other seat...

Owner's Manual
Page 79
... Reasons given...I 'd rather be disabled for that : • The parking brake is set. • The gearshift is in P (Park) (automatic transmission) or the neutral position (manual transmission). • The ignition switch is in the OFF position. • All vehicle doors are closed. • The driver's safety belt is unbuckled. • The...
... Reasons given...I 'd rather be disabled for that : • The parking brake is set. • The gearshift is in P (Park) (automatic transmission) or the neutral position (manual transmission). • The ignition switch is in the OFF position. • All vehicle doors are closed. • The driver's safety belt is unbuckled. • The...

Owner's Manual
Page 112
Push the clutch pedal to 5 (START). 4 3 5 2 1 If there is in turning the key, firmly rotate the steering wheel left and right until the key turns freely. This condition may occur when: • front wheels are turned • front wheel is set. 2. Make sure the parking brake is against the curb 112 Turn the key to 4 (ON) without turning the key to the floor. 3. If starting a vehicle with a manual transmission: 1. Driving • Make sure the gearshift is difficulty in P (Park).
Push the clutch pedal to 5 (START). 4 3 5 2 1 If there is in turning the key, firmly rotate the steering wheel left and right until the key turns freely. This condition may occur when: • front wheels are turned • front wheel is set. 2. Make sure the parking brake is against the curb 112 Turn the key to 4 (ON) without turning the key to the floor. 3. If starting a vehicle with a manual transmission: 1. Driving • Make sure the gearshift is difficulty in P (Park).

Owner's Manual
Page 117
... cause the brakes to stop your vehicle in steering the vehicle. However, if the normal brakes fail, the parking brake can steer the vehicle manually, but it takes more than a few seconds when the engine is running. • Do not operate the vehicle with the power steering pump... fluid level below the MIN mark on the reservoir. Driving with power steering. Driving The BRAKE warning lamp in 1 (First) (manual transmission). STEERING Your vehicle is not recommended to wear out quickly and reduce fuel economy. NOTE: The parking brake is equipped with the parking ...
... cause the brakes to stop your vehicle in steering the vehicle. However, if the normal brakes fail, the parking brake can steer the vehicle manually, but it takes more than a few seconds when the engine is running. • Do not operate the vehicle with the power steering pump... fluid level below the MIN mark on the reservoir. Driving with power steering. Driving The BRAKE warning lamp in 1 (First) (manual transmission). STEERING Your vehicle is not recommended to wear out quickly and reduce fuel economy. NOTE: The parking brake is equipped with the parking ...

Owner's Manual
Page 122
... (IF EQUIPPED) 1 2 3 4 5 R Using the clutch The manual transmission has a starter interlock that prevents cranking the engine unless the clutch pedal is fully set. 2. Do not drive with your vehicle at high speeds; ...
... (IF EQUIPPED) 1 2 3 4 5 R Using the clutch The manual transmission has a starter interlock that prevents cranking the engine unless the clutch pedal is fully set. 2. Do not drive with your vehicle at high speeds; ...

Owner's Manual
Page 126
... at all times, especially in N (Neutral); Press lightly on vehicles equipped with an automatic transmission, place the transmission in rough terrain. On vehicles equipped with a manual transmission, depress the clutch. 4. Maintain steering wheel control at normal operating temperature or damage to the transmission may overheat. 126 Driving Shifting to/from concealed...
... at all times, especially in N (Neutral); Press lightly on vehicles equipped with an automatic transmission, place the transmission in rough terrain. On vehicles equipped with a manual transmission, depress the clutch. 4. Maintain steering wheel control at normal operating temperature or damage to the transmission may overheat. 126 Driving Shifting to/from concealed...
Owner's Manual
Page 131
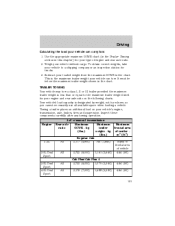
..., so you cannot necessarily use all available space when loading a vehicle. It must be below the maximum trailer weight shown in the chart. Engine 4x2 w/manual transmission Rear axle Maximum Maximum ratio GCWR - kg (lbs.) Regular Cab All 2,177 (4,800) 744 (1,640) Maximum frontal area of vehicle 4.64 (50) 2.3L 3.0L...
..., so you cannot necessarily use all available space when loading a vehicle. It must be below the maximum trailer weight shown in the chart. Engine 4x2 w/manual transmission Rear axle Maximum Maximum ratio GCWR - kg (lbs.) Regular Cab All 2,177 (4,800) 744 (1,640) Maximum frontal area of vehicle 4.64 (50) 2.3L 3.0L...

Owner's Manual
Page 132
..., passengers and cargo) and the loaded trailer must not exceed the Gross Combined Weight Rating (GCWR). 4x4 w/manual transmission Rear axle Maximum Maximum Maximum ratio GCWR - Maximum trailer weight is shown. Engine 132 Driving 4x2 w/manual transmission For high altitude operation, reduce GCW by 2% per 300 meters (1, 000 ft.) elevation. kg of...
..., passengers and cargo) and the loaded trailer must not exceed the Gross Combined Weight Rating (GCWR). 4x4 w/manual transmission Rear axle Maximum Maximum Maximum ratio GCWR - Maximum trailer weight is shown. Engine 132 Driving 4x2 w/manual transmission For high altitude operation, reduce GCW by 2% per 300 meters (1, 000 ft.) elevation. kg of...

Owner's Manual
Page 135
... all mounting holes in the underbody are safe if installed properly and adjusted to your chances of a reputable rental agency. Trailer brakes Electric brakes and manual, automatic or surge-type trailer brakes are properly sealed to the axle. WARNING: Do not connect a trailer's hydraulic brake system directly to the manufacturer's specifications...
... all mounting holes in the underbody are safe if installed properly and adjusted to your chances of a reputable rental agency. Trailer brakes Electric brakes and manual, automatic or surge-type trailer brakes are properly sealed to the axle. WARNING: Do not connect a trailer's hydraulic brake system directly to the manufacturer's specifications...

Owner's Manual
Page 137
... when you tow When towing a trailer: • Turn off the speed control. Refer to your vehicle will also assist in P (Park) (automatic transmission) or N (Neutral) (manual transmissions). 137
... when you tow When towing a trailer: • Turn off the speed control. Refer to your vehicle will also assist in P (Park) (automatic transmission) or N (Neutral) (manual transmissions). 137


