

Owner's Manual
Page 2
... or translation in whole or part is not permitted without incurring obligation. Mazda may change the contents without notice and without written authorization from Mazda Motor Corporation. Copyright © 2002 Mazda Motor Corporation 2 Table of Contents Transmission operation Vehicle loading Trailer towing 139...168 180 186 Customer Assistance Reporting safety defects (U.S. only) 188 197 Cleaning Maintenance and Specifications Engine compartment Engine oil Battery Fuel information Air filter(s) Refill capacities Engine data 198 203 211 213 217 224 238 244 246 Accessories Index 250 ...
... or translation in whole or part is not permitted without incurring obligation. Mazda may change the contents without notice and without written authorization from Mazda Motor Corporation. Copyright © 2002 Mazda Motor Corporation 2 Table of Contents Transmission operation Vehicle loading Trailer towing 139...168 180 186 Customer Assistance Reporting safety defects (U.S. only) 188 197 Cleaning Maintenance and Specifications Engine compartment Engine oil Battery Fuel information Air filter(s) Refill capacities Engine data 198 203 211 213 217 224 238 244 246 Accessories Index 250 ...

Owner's Manual
Page 7
Mazda may change the contents without notice. 7 Introduction Vehicle Symbol Glossary Power Window Lockout Panic Alarm System Feature Engine Coolant Child Safety Door Lock/Unlock Engine Oil Engine Coolant Temperature Battery Do Not Open When Hot Avoid Smoking, Flames, or Sparks Explosive Gas Battery Acid Fan Warning Maintain Correct Fluid Level Engine Air Filter Jack MAX MIN Power Steering Fluid Emission System Passenger Compartment Air Filter Check fuel cap Low tire warning INFORMATION ABOUT THIS GUIDE The information found in this guide was accurate at the time of printing.
Mazda may change the contents without notice. 7 Introduction Vehicle Symbol Glossary Power Window Lockout Panic Alarm System Feature Engine Coolant Child Safety Door Lock/Unlock Engine Oil Engine Coolant Temperature Battery Do Not Open When Hot Avoid Smoking, Flames, or Sparks Explosive Gas Battery Acid Fan Warning Maintain Correct Fluid Level Engine Air Filter Jack MAX MIN Power Steering Fluid Emission System Passenger Compartment Air Filter Check fuel cap Low tire warning INFORMATION ABOUT THIS GUIDE The information found in this guide was accurate at the time of printing.

Owner's Manual
Page 13
... faster, check for a burned-out bulb. Turn signals Illuminates when the turn signals or the hazard lights are turned on . Charging system Illuminates when the battery is functional.
... faster, check for a burned-out bulb. Turn signals Illuminates when the turn signals or the hazard lights are turned on . Charging system Illuminates when the battery is functional.
Owner's Manual
Page 20
... the AM or FM1/2 control to raise or lower the volume. AM/FM select Ensure that the ignition is not running. NOTE: To prevent the battery from being received, ST will be displayed. Tune audio control The TUNE control is a multi-functional control which works in the ACC or ON position...
... the AM or FM1/2 control to raise or lower the volume. AM/FM select Ensure that the ignition is not running. NOTE: To prevent the battery from being received, ST will be displayed. Tune audio control The TUNE control is a multi-functional control which works in the ACC or ON position...
Owner's Manual
Page 27
... scanning operations, A will automatically begin tape play and TAPE will flash in the display. NOTE: If the power supply is interrupted, (fuse blows or the battery is helpful on trips when you to set strong radio stations without losing your original manually set preset stations.
... scanning operations, A will automatically begin tape play and TAPE will flash in the display. NOTE: If the power supply is interrupted, (fuse blows or the battery is helpful on trips when you to set strong radio stations without losing your original manually set preset stations.
Owner's Manual
Page 30
... the CLOCK control again to adjust the hours. 3. NOTE: If the power supply to the unit is interrupted (if the fuse blows or the vehicle's battery is in CD mode and plays the selections on the minute set at any time when the ignition switch is disconnected), the clock will need...
... the CLOCK control again to adjust the hours. 3. NOTE: If the power supply to the unit is interrupted (if the fuse blows or the vehicle's battery is in CD mode and plays the selections on the minute set at any time when the ignition switch is disconnected), the clock will need...

Owner's Manual
Page 32
NOTE: To prevent the battery from being received, ST will be indicated. Band selection Select AM by pressing the AM button and FM1 or FM2 by pressing the FM1/2 button. ...
NOTE: To prevent the battery from being received, ST will be indicated. Band selection Select AM by pressing the AM button and FM1 or FM2 by pressing the FM1/2 button. ...

Owner's Manual
Page 39
... is pressed. Press the AM or FM1/2 control to select from the stored stations. NOTE: If the power supply is interrupted, (fuse blows or the battery is disconnected), the preset channels will be canceled. If there is helpful on trips when you to set strong radio stations without losing your original...
... is pressed. Press the AM or FM1/2 control to select from the stored stations. NOTE: If the power supply is interrupted, (fuse blows or the battery is disconnected), the preset channels will be canceled. If there is helpful on trips when you to set strong radio stations without losing your original...
Owner's Manual
Page 45
... the CLOCK control again to adjust the minutes. 4. NOTE: If the power supply to the unit is interrupted (if the fuse blows or the vehicle's battery is disconnected), the clock will be set at any time when the ignition switch is heard. The next selection will need to adjust the hours...
... the CLOCK control again to adjust the minutes. 4. NOTE: If the power supply to the unit is interrupted (if the fuse blows or the vehicle's battery is disconnected), the clock will be set at any time when the ignition switch is heard. The next selection will need to adjust the hours...
Owner's Manual
Page 74
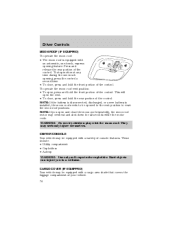
... to be opened to the vent position to reset the moon roof positions. Press and release the rear portion of console features. NOTE: If the battery is disconnected, discharged, or a new battery is equipped with the moon roof. NOTE: If you in the cupholder.
... to be opened to the vent position to reset the moon roof positions. Press and release the rear portion of console features. NOTE: If the battery is disconnected, discharged, or a new battery is equipped with the moon roof. NOTE: If you in the cupholder.
Owner's Manual
Page 80
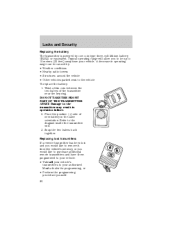
...the two halves back together. Twist a thin coin between the two halves of new battery in the same orientation. Typical operating range will allow you would like to remove it from your authorized Mazda dealer for programming, or • Perform the programming procedure yourself. 80 DO NOT... TAKE THE FRONT PART OF THE TRANSMITTER APART. Refer to the diagram inside the transmitter unit. 3. Locks and Security Replacing the battery The transmitter is powered by :...
...the two halves back together. Twist a thin coin between the two halves of new battery in the same orientation. Typical operating range will allow you would like to remove it from your authorized Mazda dealer for programming, or • Perform the programming procedure yourself. 80 DO NOT... TAKE THE FRONT PART OF THE TRANSMITTER APART. Refer to the diagram inside the transmitter unit. 3. Locks and Security Replacing the battery The transmitter is powered by :...
Owner's Manual
Page 82
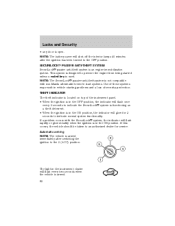
...the indicator will shut off the interior lamps 40 minutes after switching the ignition to the OFF position. If a problem occurs with non-Mazda aftermarket remote start systems. Use of these systems may result in vehicle starting problems and a loss of the instrument panel. •... • any door is an engine immobilization system. SECURILOCK PASSIVE ANTI-THEFT SYSTEM SecuriLock passive anti-theft system is open. NOTE: The battery saver will flash once every 2 seconds to indicate the SecuriLock system is functioning as a theft deterrent. • When the ignition is armed...
...the indicator will shut off the interior lamps 40 minutes after switching the ignition to the OFF position. If a problem occurs with non-Mazda aftermarket remote start systems. Use of these systems may result in vehicle starting problems and a loss of the instrument panel. •... • any door is an engine immobilization system. SECURILOCK PASSIVE ANTI-THEFT SYSTEM SecuriLock passive anti-theft system is open. NOTE: The battery saver will flash once every 2 seconds to indicate the SecuriLock system is functioning as a theft deterrent. • When the ignition is armed...

Owner's Manual
Page 141
... (Park) Always come to the LOCK position and remove the key whenever you leave your vehicle in P (Park). When the battery is disconnected or a new battery is securely latched in gear, start in P (Park). Driving with the O/D OFF switch depressed. Make sure the gearshift lever is... installed, the transaxle must relearn its adaptive strategy. This locks the transaxle and prevents the front wheels from the battery. The adaptive learning strategy is normal for normal driving conditions. To put your vehicle. 141 Turn the ignition to a complete stop ...
... (Park) Always come to the LOCK position and remove the key whenever you leave your vehicle in P (Park). When the battery is disconnected or a new battery is securely latched in gear, start in P (Park). Driving with the O/D OFF switch depressed. Make sure the gearshift lever is... installed, the transaxle must relearn its adaptive strategy. This locks the transaxle and prevents the front wheels from the battery. The adaptive learning strategy is normal for normal driving conditions. To put your vehicle. 141 Turn the ignition to a complete stop ...

Owner's Manual
Page 172
If the battery has been disconnected and reconnected, refer to the Power Distribution Box before servicing high current fuses. HTR 40A MAIN 120A IG MAIN 40A (DRL) 5A A/C ... PWR 2 15A FOG RELAY MICRO A/C RELAY MICRO ST RELAY ISO DEF RELAY ISO ADD FAN 2 ISO H/L RH 15A DIODE Roadside Emergencies WARNING: Always disconnect the battery before reconnecting the battery or refilling fluid reservoirs. WARNING: To reduce risk of electrical shock, always replace the cover to the...
If the battery has been disconnected and reconnected, refer to the Power Distribution Box before servicing high current fuses. HTR 40A MAIN 120A IG MAIN 40A (DRL) 5A A/C ... PWR 2 15A FOG RELAY MICRO A/C RELAY MICRO ST RELAY ISO DEF RELAY ISO ADD FAN 2 ISO H/L RH 15A DIODE Roadside Emergencies WARNING: Always disconnect the battery before reconnecting the battery or refilling fluid reservoirs. WARNING: To reduce risk of electrical shock, always replace the cover to the...
Owner's Manual
Page 180
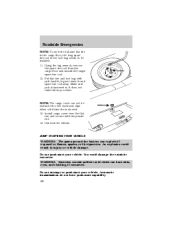
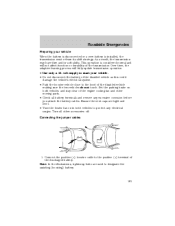
WARNING: Batteries contain sulfuric acid which can explode if exposed to the back seat clips when a full size tire is fastened so it does not rattle when ... the spare tire rod from the cargo floor and install the longer spare tire rod. 12. JUMP STARTING YOUR VEHICLE WARNING: The gases around the battery can burn skin, eyes, and clothing, if contacted. Do not attempt to be reattached to flames, sparks, or lit cigarettes.
WARNING: Batteries contain sulfuric acid which can explode if exposed to the back seat clips when a full size tire is fastened so it does not rattle when ... the spare tire rod from the cargo floor and install the longer spare tire rod. 12. JUMP STARTING YOUR VEHICLE WARNING: The gases around the battery can burn skin, eyes, and clothing, if contacted. Do not attempt to be reattached to flames, sparks, or lit cigarettes.
Owner's Manual
Page 181
...is considered normal and will fully update transmission operation. • Use only a 12-volt supply to start your vehicle When the battery is disconnected or a new battery is installed, the transmission must relearn its shift strategy. As a result, the transmission may have firm and/or soft shifts. Roadside... Emergencies Preparing your vehicle. • Do not disconnect the battery of the disabled vehicle as this could damage the vehicle's electrical system. • Park the booster vehicle close to the hood of the ...
...is considered normal and will fully update transmission operation. • Use only a 12-volt supply to start your vehicle When the battery is disconnected or a new battery is installed, the transmission must relearn its shift strategy. As a result, the transmission may have firm and/or soft shifts. Roadside... Emergencies Preparing your vehicle. • Do not disconnect the battery of the disabled vehicle as this could damage the vehicle's electrical system. • Park the booster vehicle close to the hood of the ...

Owner's Manual
Page 182
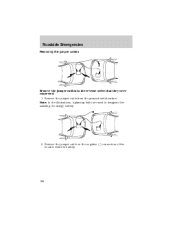
Connect the negative (-) cable to the positive (+) terminal of the assisting battery. 182 - - - + + - + + Roadside Emergencies 2. Connect the other end of the positive (+) cable to the negative (-) terminal of the assisting battery. 3.
Connect the negative (-) cable to the positive (+) terminal of the assisting battery. 182 - - - + + - + + Roadside Emergencies 2. Connect the other end of the positive (+) cable to the negative (-) terminal of the assisting battery. 3.

Owner's Manual
Page 183
... of the negative (-) cable to be jumped. WARNING: Do not connect the end of the second cable to the negative (-) terminal of the battery to an exposed metal part of both engines for an additional three minutes before disconnecting the jumper cables. - - + + 183 A spark may...an explosion of the gases that the cables are clear of fan blades, belts, moving parts of the disabled vehicle's engine, away from the battery and the fuel injection system. Once the disabled vehicle has been started, run the engine at moderately increased speed. 2. Roadside Emergencies 4. Jump...
... of the negative (-) cable to be jumped. WARNING: Do not connect the end of the second cable to the negative (-) terminal of the battery to an exposed metal part of both engines for an additional three minutes before disconnecting the jumper cables. - - + + 183 A spark may...an explosion of the gases that the cables are clear of fan blades, belts, moving parts of the disabled vehicle's engine, away from the battery and the fuel injection system. Once the disabled vehicle has been started, run the engine at moderately increased speed. 2. Roadside Emergencies 4. Jump...
Owner's Manual
Page 184
Remove the jumper cable from the ground metal surface. Roadside Emergencies Removing the jumper cables Remove the jumper cables in the reverse order that they were connected. 1. Remove the jumper cable on the negative (-) connection of the booster vehicle's battery. 184 - - - - + + + + Note: In the illustrations, lightning bolts are used to designate the assisting (boosting) battery. 2.
Remove the jumper cable from the ground metal surface. Roadside Emergencies Removing the jumper cables Remove the jumper cables in the reverse order that they were connected. 1. Remove the jumper cable on the negative (-) connection of the booster vehicle's battery. 184 - - - - + + + + Note: In the illustrations, lightning bolts are used to designate the assisting (boosting) battery. 2.

Owner's Manual
Page 185
Remove the jumper cable from the positive (+) terminal of the booster vehicle's battery. 4. Remove the jumper cable from the positive (+) terminal of the disabled vehicle's battery. Roadside Emergencies 3. After the disabled vehicle has been started and the jumper cables removed, allow it to idle for several minutes so the engine computer can relearn its idle conditions. - - - + + - + + 185
Remove the jumper cable from the positive (+) terminal of the booster vehicle's battery. 4. Remove the jumper cable from the positive (+) terminal of the disabled vehicle's battery. Roadside Emergencies 3. After the disabled vehicle has been started and the jumper cables removed, allow it to idle for several minutes so the engine computer can relearn its idle conditions. - - - + + - + + 185


