

Owner Guide 2nd Printing
Page 21
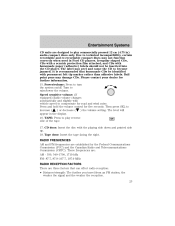
...is reached. press to the rear 5. In tape mode, radio play CD tracks in random order. 6. In the tape mode, tape direction automatically reverses when the end of the tape is reached. Press FADE then press SEL to shift the sound to activate/deactivate. 8. Side 1-2: Press to ...adjust bass, treble, balance and fade levels. 7. In CD mode, REW control reverses the CD within the current track. 9. Select: Use to change sides on the tape. Entertainment Systems Fade: Allows you to bring soft and loud ...
...is reached. press to the rear 5. In tape mode, radio play CD tracks in random order. 6. In the tape mode, tape direction automatically reverses when the end of the tape is reached. Press FADE then press SEL to shift the sound to activate/deactivate. 8. Side 1-2: Press to ...adjust bass, treble, balance and fade levels. 7. In CD mode, REW control reverses the CD within the current track. 9. Select: Use to change sides on the tape. Entertainment Systems Fade: Allows you to bring soft and loud ...
Owner Guide 2nd Printing
Page 23
... setting. Tape door: Insert the tape facing the right. Irregular shaped CDs, CDs with a scratch protection film attached, and CDs with vehicle speed to play reverse side of the tape. 17. Press and hold the volume control for further information. 15. Then press SEL to play commercially pressed 12 cm (4.75...
... setting. Tape door: Insert the tape facing the right. Irregular shaped CDs, CDs with a scratch protection film attached, and CDs with vehicle speed to play reverse side of the tape. 17. Press and hold the volume control for further information. 15. Then press SEL to play commercially pressed 12 cm (4.75...

Owner Guide 2nd Printing
Page 39
Press again to the Press next/previous track. Once the screen closes, the system will close automatically or you may press CD OPEN CLOSE on the current CD. Track / to advance to disengage and remain with the current track. 39 Entertainment Systems After an allotted time, the screen will start playing the last CD loaded. Rewind/fast forward in CD mode Press to reverse or advance / ) in the current CD track. ( Scan feature in CD mode Press SCAN to hear a brief sampling of all tracks on the bezel again. 6.
Press again to the Press next/previous track. Once the screen closes, the system will close automatically or you may press CD OPEN CLOSE on the current CD. Track / to advance to disengage and remain with the current track. 39 Entertainment Systems After an allotted time, the screen will start playing the last CD loaded. Rewind/fast forward in CD mode Press to reverse or advance / ) in the current CD track. ( Scan feature in CD mode Press SCAN to hear a brief sampling of all tracks on the bezel again. 6.
Owner Guide 2nd Printing
Page 86
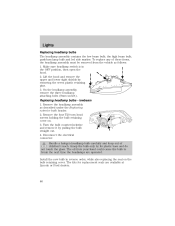
...the headlamp assembly must be removed from your hand could cause the bulb to break the next time the headlamps are avaliable at Lincoln or Ford dealers. 86 Disconnect the electrical connector. The kits for replacement seals are operated. To replace any of children's reach.... Make sure headlamp switch is in reverse order, while also replacing the seal on . 3. lowbeam 1. Lights Replacing headlamp bulbs The headlamp assembly contains the low beam bulb, the...
...the headlamp assembly must be removed from your hand could cause the bulb to break the next time the headlamps are avaliable at Lincoln or Ford dealers. 86 Disconnect the electrical connector. The kits for replacement seals are operated. To replace any of children's reach.... Make sure headlamp switch is in reverse order, while also replacing the seal on . 3. lowbeam 1. Lights Replacing headlamp bulbs The headlamp assembly contains the low beam bulb, the...
Owner Guide 2nd Printing
Page 87
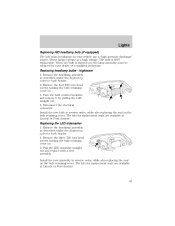
... with a new assembly. The kits for replacement seals are avaliable at a high voltage. The kits for replacement seals are avaliable at Lincoln or Ford dealers. 87 Remove the four T20 torx head screws holding the bulb retaining cover on the bulb retaining cover. Install the ... cover. The bulb is burned out, the lamp assembly must be replaced by pulling the bulb straight out. 4. Install the new assembly in reverse order, while also replacing the seal on . 3. Replacing the LED sidemarker 1. Remove the headlamp assembly as described under the Replacing exterior bulb header...
... with a new assembly. The kits for replacement seals are avaliable at a high voltage. The kits for replacement seals are avaliable at Lincoln or Ford dealers. 87 Remove the four T20 torx head screws holding the bulb retaining cover on the bulb retaining cover. Install the ... cover. The bulb is burned out, the lamp assembly must be replaced by pulling the bulb straight out. 4. Install the new assembly in reverse order, while also replacing the seal on . 3. Replacing the LED sidemarker 1. Remove the headlamp assembly as described under the Replacing exterior bulb header...

Owner Guide 2nd Printing
Page 88
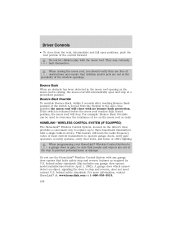
Lights Replacing front parking lamp/turn signal lamp bulbs 1. Replacing foglamp bulbs 1. Install the new bulb in reverse order. Make sure the headlamp switch is in the OFF position and disconnect the electrical connector from the foglamp. Rotate the foglamp bulb counterclockwise and remove from the foglamp bulb. 2. Remove the headlamp assembly as described under the Replacing exterior bulb header. 2. Install the new bulb in reverse order. 88 Turn the bulb counterclockwise and pull it straight out of the headlamp assembly.
Lights Replacing front parking lamp/turn signal lamp bulbs 1. Replacing foglamp bulbs 1. Install the new bulb in reverse order. Make sure the headlamp switch is in the OFF position and disconnect the electrical connector from the foglamp. Rotate the foglamp bulb counterclockwise and remove from the foglamp bulb. 2. Remove the headlamp assembly as described under the Replacing exterior bulb header. 2. Install the new bulb in reverse order. 88 Turn the bulb counterclockwise and pull it straight out of the headlamp assembly.

Owner Guide 2nd Printing
Page 89
... down on the headliner, near the location of the high-mount stop lamp, to last the life of the vehicle. Install the new lamp in reverse order. If replacement is equipped with an LED center high-mount stop lamp bulb. Replacing license plate lamp bulbs For bulb replacement, see a dealer or...
... down on the headliner, near the location of the high-mount stop lamp, to last the life of the vehicle. Install the new lamp in reverse order. If replacement is equipped with an LED center high-mount stop lamp bulb. Replacing license plate lamp bulbs For bulb replacement, see a dealer or...

Owner Guide 2nd Printing
Page 96
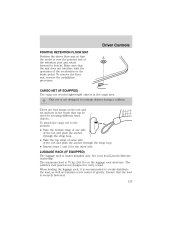
... is equipped with an inside rear view mirror (if equipped) Your vehicle is pulled down low enough to magnetic fields and subtle, slow changes in R (Reverse)(when the mirror is continuously recalibrating due to prevent visibility interference with the overhead console. Driver Controls Window lock The window lock feature allows only...
... is equipped with an inside rear view mirror (if equipped) Your vehicle is pulled down low enough to magnetic fields and subtle, slow changes in R (Reverse)(when the mirror is continuously recalibrating due to prevent visibility interference with the overhead console. Driver Controls Window lock The window lock feature allows only...
Owner Guide 2nd Printing
Page 106
... door opener model manufactured before the moon roof reaches fully closed position, the moon roof will stop and reverse, does not meet current U.S. When closing , the moon roof will automatically open and stop and reverse features as the moon roof is moved from the vent, intermediate and full open positions, push the...
... door opener model manufactured before the moon roof reaches fully closed position, the moon roof will stop and reverse, does not meet current U.S. When closing , the moon roof will automatically open and stop and reverse features as the moon roof is moved from the vent, intermediate and full open positions, push the...
Owner Guide 2nd Printing
Page 123
... to evenly distribute the load, as well as maintain a low center of gravity. To remove the floor mat, reverse the installation procedure. There are four straps on the luggage rack structure. See your local Lincoln Mercury dealership. When loading the luggage rack, it is recommended to restrain objects during a collision. Driver Controls...
... to evenly distribute the load, as well as maintain a low center of gravity. To remove the floor mat, reverse the installation procedure. There are four straps on the luggage rack structure. See your local Lincoln Mercury dealership. When loading the luggage rack, it is recommended to restrain objects during a collision. Driver Controls...
Owner Guide 2nd Printing
Page 132
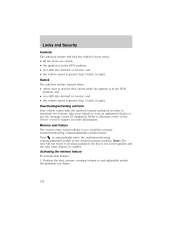
... when: • either door is opened then closed , • the ignition is in the RUN position, and • you shift into forward or reverse, and • the vehicle speed is enabled. in order to deactivate the feature, take your an authorized dealer, or use the message center (if equipped...the vehicle's doors when: • all the doors are closed while the ignition is in the RUN position, • you shift into forward or reverse, and • the vehicle speed is not in the Driver controls chapter for more information. Position the seat, mirrors, steering column to its final ...
... when: • either door is opened then closed , • the ignition is in the RUN position, and • you shift into forward or reverse, and • the vehicle speed is enabled. in order to deactivate the feature, take your an authorized dealer, or use the message center (if equipped...the vehicle's doors when: • all the doors are closed while the ignition is in the RUN position, • you shift into forward or reverse, and • the vehicle speed is not in the Driver controls chapter for more information. Position the seat, mirrors, steering column to its final ...

Owner Guide 2nd Printing
Page 192
... the AdvanceTrac system. However, the system does not function when the vehicle is detected in the AdvanceTrac system, the warning indicator light in R (Reverse);
... the AdvanceTrac system. However, the system does not function when the vehicle is detected in the AdvanceTrac system, the warning indicator light in R (Reverse);

Owner Guide 2nd Printing
Page 195
Driving Driving with an adaptive learning strategy found in P (Park). R (Reverse) With the gearshift lever in R (Reverse), the vehicle will fully update transmission operation. Always come to a complete stop • Move the gearshift lever and securely latch it in P (Park)... provide consistent shift feel over the life of the vehicle. Additionally, whenever the battery is considered normal and will not affect function or durability of R (Reverse). 195 1 Turn the ignition to a complete stop before shifting into the desired gear To put your vehicle in P (Park): • Come to ...
Driving Driving with an adaptive learning strategy found in P (Park). R (Reverse) With the gearshift lever in R (Reverse), the vehicle will fully update transmission operation. Always come to a complete stop • Move the gearshift lever and securely latch it in P (Park)... provide consistent shift feel over the life of the vehicle. Additionally, whenever the battery is considered normal and will not affect function or durability of R (Reverse). 195 1 Turn the ignition to a complete stop before shifting into the desired gear To put your vehicle in P (Park): • Come to ...
Owner Guide 2nd Printing
Page 197
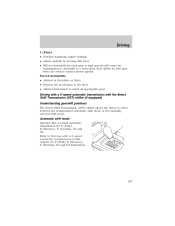
...; Allows upshifts by moving shift lever. • Will not downshift into first gear at high speeds; Forced downshifts • Allowed in this chapter for P (Park), R (Reverse), N (Neutral), D5 and D4 information. 197 Driving with a 5-speed automatic transmission with a 5-speed automatic transmission in Overdrive or Drive. • Depress the accelerator to the...) Understanding gearshift positions The Select Shift Transmission (SST) shifter allows the driver to select an appropriate gear. Refer to a lower gear, then allows for P (Park), R (Reverse), N (Neutral), D5 and D4.
...; Allows upshifts by moving shift lever. • Will not downshift into first gear at high speeds; Forced downshifts • Allowed in this chapter for P (Park), R (Reverse), N (Neutral), D5 and D4 information. 197 Driving with a 5-speed automatic transmission with a 5-speed automatic transmission in Overdrive or Drive. • Depress the accelerator to the...) Understanding gearshift positions The Select Shift Transmission (SST) shifter allows the driver to select an appropriate gear. Refer to a lower gear, then allows for P (Park), R (Reverse), N (Neutral), D5 and D4.
Owner Guide 2nd Printing
Page 199
...gear. Press lightly on the instrument cluster will allow a downshift into the next lower gear if again selected by shifting from forward and reverse gears, stopping between shifts in a steady pattern. To help avoid personal injury, please read and understand the limitations of obstacles near ...the rear bumper when the R (Reverse) gear is to prevent engine and transmission damage and to the following chart: Recommended upshift schedule Shift from: 24 km/h (15 mph) 40...
...gear. Press lightly on the instrument cluster will allow a downshift into the next lower gear if again selected by shifting from forward and reverse gears, stopping between shifts in a steady pattern. To help avoid personal injury, please read and understand the limitations of obstacles near ...the rear bumper when the R (Reverse) gear is to prevent engine and transmission damage and to the following chart: Recommended upshift schedule Shift from: 24 km/h (15 mph) 40...
Owner Guide 2nd Printing
Page 200
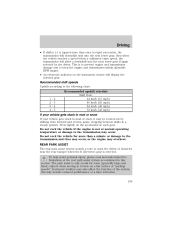
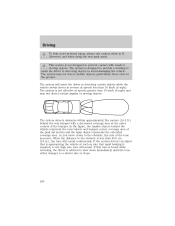
... coverage area. The system is advised to slow down immediately until the tone either changes to assist the driver in reverse at speeds greater than 45.0 cm (18 in R (Reverse) and when using the rear park assist. The system may not detect certain angular or moving objects. The system ... of the tone increases. In the figure, the smaller objects behind the rear bumper with small or moving objects. If this tone is heard while reversing, the driver is designed to provide a warning to a slower rate or stops. 200 When the distance to prevent contact with a decreased coverage area...
... coverage area. The system is advised to slow down immediately until the tone either changes to assist the driver in reverse at speeds greater than 45.0 cm (18 in R (Reverse) and when using the rear park assist. The system may not detect certain angular or moving objects. The system ... of the tone increases. In the figure, the smaller objects behind the rear bumper with small or moving objects. If this tone is heard while reversing, the driver is designed to provide a warning to a slower rate or stops. 200 When the distance to prevent contact with a decreased coverage area...
Owner Guide 2nd Printing
Page 201
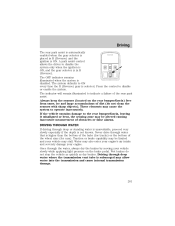
... or false alarms. DRIVING THROUGH WATER If driving through water that is ON. Once through deep water where the transmission vent tube is in R (Reverse) and the ignition is higher than the bottom of the hubs (for trucks) or the bottom of the wheel rims (for cars). Driving through...system is selected. Press the control to indicate a failure of the rear park assist. Water may cause the system to ON every time the R (Reverse) gear is disabled. Always keep the sensors (located on the brake pedal. Never drive through deep or standing water is unavoidable, proceed very slowly ...
... or false alarms. DRIVING THROUGH WATER If driving through water that is ON. Once through deep water where the transmission vent tube is in R (Reverse) and the ignition is higher than the bottom of the hubs (for trucks) or the bottom of the wheel rims (for cars). Driving through...system is selected. Press the control to indicate a failure of the rear park assist. Water may cause the system to ON every time the R (Reverse) gear is disabled. Always keep the sensors (located on the brake pedal. Never drive through deep or standing water is unavoidable, proceed very slowly ...

Owner Guide 2nd Printing
Page 209
... used (spare) DDM, Driver door mirror Right front high beam PATS Left front low beam/HID Wiper module Radio, Navigation unit Not Used (spare) FEM, Reverse park assist 209 8 5A 9 10 15A 5A 11 12 13 14 15 16 17 18 19 20 21 22 23 24 25 26 27 28...
... used (spare) DDM, Driver door mirror Right front high beam PATS Left front low beam/HID Wiper module Radio, Navigation unit Not Used (spare) FEM, Reverse park assist 209 8 5A 9 10 15A 5A 11 12 13 14 15 16 17 18 19 20 21 22 23 24 25 26 27 28...

Owner Guide 2nd Printing
Page 224
Remove the jumper cable on the negative (-) connection of the booster vehicle's battery. 224 - - - - + + + + Remove the jumper cable from the spare tire tie-down stud. 2. Roadside Emergencies Removing the jumper cables Remove the jumper cables in the reverse order that they were connected. 1.
Remove the jumper cable on the negative (-) connection of the booster vehicle's battery. 224 - - - - + + + + Remove the jumper cable from the spare tire tie-down stud. 2. Roadside Emergencies Removing the jumper cables Remove the jumper cables in the reverse order that they were connected. 1.

Owner Guide 2nd Printing
Page 284
... cover Carpet floor mats First aid kit Front end covers (mini and full) Highway safety kit Molded splash guards Moon roof air deflector Park pilot/reverse park aid Rear spoiler Side window deflector For maximum vehicle performance, keep the following information in your vehicle should be installed only by a qualified service...
... cover Carpet floor mats First aid kit Front end covers (mini and full) Highway safety kit Molded splash guards Moon roof air deflector Park pilot/reverse park aid Rear spoiler Side window deflector For maximum vehicle performance, keep the following information in your vehicle should be installed only by a qualified service...


