
Owners Manual
Page 3
... (Accessory meters)...212 2-3. Driving procedures Driving the vehicle...168 Engine (ignition) switch ...179 Automatic transmission...186 Turn signal lever ...192 Parking brake ...193 Horn...194 2-2. 2-4. Using other driving systems 2 When driving 2-1. Driving information 1 2 3 4 5 6 Off-road precautions ...353 Cargo and luggage...358 Vehicle load limits...364 7 Winter driving tips ...366 Trailer towing...
... (Accessory meters)...212 2-3. Driving procedures Driving the vehicle...168 Engine (ignition) switch ...179 Automatic transmission...186 Turn signal lever ...192 Parking brake ...193 Horn...194 2-2. 2-4. Using other driving systems 2 When driving 2-1. Driving information 1 2 3 4 5 6 Off-road precautions ...353 Cargo and luggage...358 Vehicle load limits...364 7 Winter driving tips ...366 Trailer towing...
Owners Manual
Page 4
... player...423 Playing MP3 and WMA discs...431 Operating an iPod...440 Operating a USB memory...448 Optimal use of the audio system ...457 Using the AUX port...459 Using the steering wheel audio switches ...460 4 GX460_U.S.A. (OM60J00U) Using the air conditioning system and defogger Front automatic air conditioning system ...392 Rear automatic air conditioning system...
... player...423 Playing MP3 and WMA discs...431 Operating an iPod...440 Operating a USB memory...448 Optimal use of the audio system ...457 Using the AUX port...459 Using the steering wheel audio switches ...460 4 GX460_U.S.A. (OM60J00U) Using the air conditioning system and defogger Front automatic air conditioning system ...392 Rear automatic air conditioning system...
Owners Manual
Page 5
... ...551 Armrest ...554 Coat hooks ...555 Floor mat...556 Luggage compartment features...558 Garage door opener...567 Compass...575 Safety Connect ...580 4 Maintenance and care 4-1. Using the storage features List of storage features...523 • Glove box ...525 • Console box...526 • Coin holder...528 • Bottle holders/door pockets...
... ...551 Armrest ...554 Coat hooks ...555 Floor mat...556 Luggage compartment features...558 Garage door opener...567 Compass...575 Safety Connect ...580 4 Maintenance and care 4-1. Using the storage features List of storage features...523 • Glove box ...525 • Console box...526 • Coin holder...528 • Bottle holders/door pockets...
Owners Manual
Page 23
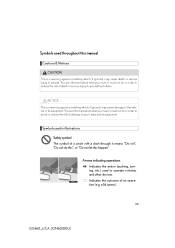
... or "Do not let this manual Cautions & Notices CAUTION This is a warning against something which , if ignored, may cause damage to your Lexus and its equipment. Indicates the outcome of damage to the vehicle or its equipment. NOTICE This is a warning against something which , if ignored,... may cause death or serious injury to operate switches and other devices. a lid opens). 23 GX460_U.S.A. (OM60J00U) Symbols used to people. You are informed about what you must or must not do in order to reduce the risk of a circle with a slash through...
... or "Do not let this manual Cautions & Notices CAUTION This is a warning against something which , if ignored, may cause damage to your Lexus and its equipment. Indicates the outcome of damage to the vehicle or its equipment. NOTICE This is a warning against something which , if ignored,... may cause death or serious injury to operate switches and other devices. a lid opens). 23 GX460_U.S.A. (OM60J00U) Symbols used to people. You are informed about what you must or must not do in order to reduce the risk of a circle with a slash through...
Owners Manual
Page 25
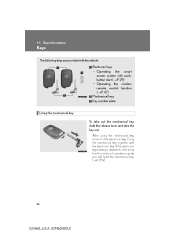
... keys are provided with pushbutton start (→P. 29) • Operating the wireless remote control function (→P. 47) Mechanical keys Key number plate Using the mechanical key To take out the mechanical key, slide the release lever and take the key out. If the electronic key battery is depleted...you will need the mechanical key. (→P. 739) 26 GX460_U.S.A. (OM60J00U) Electronic keys • Operating the smart access system with the vehicle. After using the mechanical key, store it in the electronic key. Carry the mechanical key together with the electronic key.
... keys are provided with pushbutton start (→P. 29) • Operating the wireless remote control function (→P. 47) Mechanical keys Key number plate Using the mechanical key To take out the mechanical key, slide the release lever and take the key out. If the electronic key battery is depleted...you will need the mechanical key. (→P. 739) 26 GX460_U.S.A. (OM60J00U) Electronic keys • Operating the smart access system with the vehicle. After using the mechanical key, store it in the electronic key. Carry the mechanical key together with the electronic key.
Owners Manual
Page 34
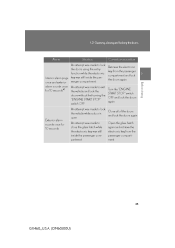
... Alarm Situation Correction procedure Retrieve the electronic key from the passenger compartment and lock the doors again An attempt was made to lock the doors using the entry function while the electronic Interior alarm pings key was still inside the pasonce and exterior senger compartment alarm sounds once An attempt was...
... Alarm Situation Correction procedure Retrieve the electronic key from the passenger compartment and lock the doors again An attempt was made to lock the doors using the entry function while the electronic Interior alarm pings key was still inside the pasonce and exterior senger compartment alarm sounds once An attempt was...
Owners Manual
Page 39
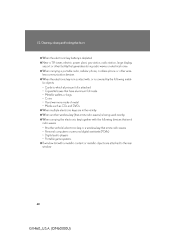
... key is in contact with a metallic content or metallic objects are in the vicinity ● When another wireless key (that emits radio waves) is being used nearby ● When carrying the electronic key together with the following devices that emit radio waves • Another vehicle's electronic key or a wireless key that...
... key is in contact with a metallic content or metallic objects are in the vicinity ● When another wireless key (that emits radio waves) is being used nearby ● When carrying the electronic key together with the following devices that emit radio waves • Another vehicle's electronic key or a wireless key that...
Owners Manual
Page 46
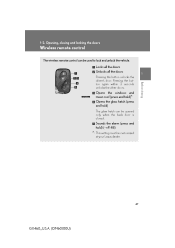
... control can be opened only when the back door is closed. Sounds the alarm (press and hold ) The glass hatch can be customized at your Lexus dealer. 47 GX460_U.S.A. (OM60J00U) Pressing the button again within 3 seconds unlocks the other doors. 1 Before driving Opens the windows and moon roof (press ...and hold)* Opens the glass hatch (press and hold ) (→P. 48) *: This setting must be used to lock and unlock the vehicle. Locks all the doors Unlocks all the doors Pressing the button unlocks the driver's door. 1-2.
... control can be opened only when the back door is closed. Sounds the alarm (press and hold ) The glass hatch can be customized at your Lexus dealer. 47 GX460_U.S.A. (OM60J00U) Pressing the button again within 3 seconds unlocks the other doors. 1 Before driving Opens the windows and moon roof (press ...and hold)* Opens the glass hatch (press and hold ) (→P. 48) *: This setting must be used to lock and unlock the vehicle. Locks all the doors Unlocks all the doors Pressing the button unlocks the driver's door. 1-2.
Owners Manual
Page 49
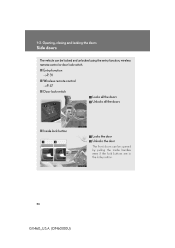
Opening, closing and locking the doors Side doors The vehicle can be locked and unlocked using the entry function, wireless remote control or door lock switch. 1-2.
Opening, closing and locking the doors Side doors The vehicle can be locked and unlocked using the entry function, wireless remote control or door lock switch. 1-2.
Owners Manual
Page 57
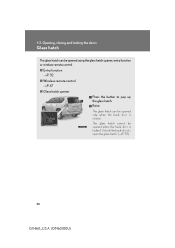
1-2. Opening, closing and locking the doors Glass hatch The glass hatch can be opened using the glass hatch opener, entry function or wireless remote control.
1-2. Opening, closing and locking the doors Glass hatch The glass hatch can be opened using the glass hatch opener, entry function or wireless remote control.
Owners Manual
Page 79
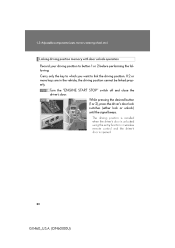
... 2), press the driver's door lock switches (either lock or unlock) until the signal beeps. 1-3. The driving position is recalled when the driver's door is unlocked using the entry function or wireless remote control and the driver's door is opened. 80 GX460_U.S.A. (OM60J00U) STEP 1 STEP 2 Turn the "ENGINE START STOP" switch off...
... 2), press the driver's door lock switches (either lock or unlock) until the signal beeps. 1-3. The driving position is recalled when the driver's door is unlocked using the entry function or wireless remote control and the driver's door is opened. 80 GX460_U.S.A. (OM60J00U) STEP 1 STEP 2 Turn the "ENGINE START STOP" switch off...
Owners Manual
Page 94
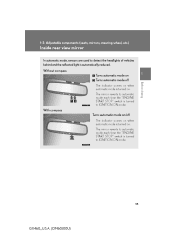
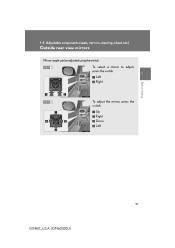
... indicator comes on when automatic mode is automatically reduced. Adjustable components (seats, mirrors, steering wheel, etc.) Inside rear view mirror In automatic mode, sensors are used to IGNITION ON mode. 95 GX460_U.S.A. (OM60J00U) 1-3. The mirror reverts to automatic mode each time the "ENGINE START STOP" switch is turned to detect the...
... indicator comes on when automatic mode is automatically reduced. Adjustable components (seats, mirrors, steering wheel, etc.) Inside rear view mirror In automatic mode, sensors are used to IGNITION ON mode. 95 GX460_U.S.A. (OM60J00U) 1-3. The mirror reverts to automatic mode each time the "ENGINE START STOP" switch is turned to detect the...
Owners Manual
Page 96
Up Right Down Left 97 GX460_U.S.A. (OM60J00U) Left Right 1 Before driving STEP 2 To adjust the mirror, press the switch. 1-3. Adjustable components (seats, mirrors, steering wheel, etc.) Outside rear view mirrors Mirror angle can be adjusted using the switch. STEP 1 To select a mirror to adjust, press the switch.
Up Right Down Left 97 GX460_U.S.A. (OM60J00U) Left Right 1 Before driving STEP 2 To adjust the mirror, press the switch. 1-3. Adjustable components (seats, mirrors, steering wheel, etc.) Outside rear view mirrors Mirror angle can be adjusted using the switch. STEP 1 To select a mirror to adjust, press the switch.

Owners Manual
Page 100
... switches. Opening and closing the windows and moon roof Power windows The power windows can still be opened and closed using the power window switches on the driver's side even if the lock switch is on . Operating the switch moves the windows as follows: Closing One-... children from accidentally opening or closing * Opening One-touch opening* 1 Before driving *: Pushing the switch in the opposite direction will come on . 101 GX460_U.S.A. (OM60J00U) Use this switch to lock the passenger window switches.
... switches. Opening and closing the windows and moon roof Power windows The power windows can still be opened and closed using the power window switches on the driver's side even if the lock switch is on . Operating the switch moves the windows as follows: Closing One-... children from accidentally opening or closing * Opening One-touch opening* 1 Before driving *: Pushing the switch in the opposite direction will come on . 101 GX460_U.S.A. (OM60J00U) Use this switch to lock the passenger window switches.

Owners Manual
Page 103
Opening and closing the windows and moon roof Moon roof Use the overhead switches to open and close the moon roof and tilt it up and down. 1-4.
Opening and closing the windows and moon roof Moon roof Use the overhead switches to open and close the moon roof and tilt it up and down. 1-4.

Owners Manual
Page 145
... of the child. ● For installation details, follow the instructions provided with the lap portion of the lap/shoulder belt. and Canada now require the use of child restraint systems. Points to remember Studies have shown that installing a child restraint on the seat with the child restraint system. Safety information Child...
... of the child. ● For installation details, follow the instructions provided with the lap portion of the lap/shoulder belt. and Canada now require the use of child restraint systems. Points to remember Studies have shown that installing a child restraint on the seat with the child restraint system. Safety information Child...
Owners Manual
Page 150
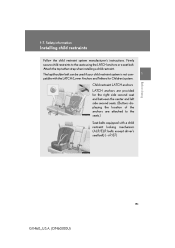
... child restraint locking mechanism (ALR/ELR belts except driver's seat belt) (→P. 87) GX460_U.S.A. (OM60J00U) The lap/shoulder belt can be used if your child restraint system is not compatible with the LATCH (Lower Anchors and Tethers for Children) system. 1 Before driving 151 Child restraint ... second seat and between the center and left side second seats. (Buttons displaying the location of the anchors are attached to the seats using the LATCH anchors or a seat belt. Attach the top tether strap when installing a child restraint. 1-7. Safety information Installing child restraints...
... child restraint locking mechanism (ALR/ELR belts except driver's seat belt) (→P. 87) GX460_U.S.A. (OM60J00U) The lap/shoulder belt can be used if your child restraint system is not compatible with the LATCH (Lower Anchors and Tethers for Children) system. 1 Before driving 151 Child restraint ... second seat and between the center and left side second seats. (Buttons displaying the location of the anchors are attached to the seats using the LATCH anchors or a seat belt. Attach the top tether strap when installing a child restraint. 1-7. Safety information Installing child restraints...
Owners Manual
Page 153
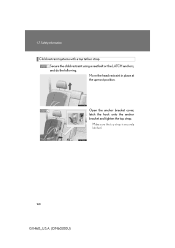
1-7. Safety information Installing child restraints using a seat belt (child restraint lock function belt)
1-7. Safety information Installing child restraints using a seat belt (child restraint lock function belt)
Owners Manual
Page 159
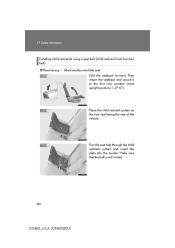
1-7. Safety information Child restraint systems with a top tether strap STEP 1 Secure the child restraint using a seat belt or the LATCH anchors, and do the following. Move the head restraint in place at the upmost position. Make sure the top strap is securely latched. 160 GX460_U.S.A. (OM60J00U) STEP 2 Open the anchor bracket cover, latch the hook onto the anchor bracket and tighten the top strap.
1-7. Safety information Child restraint systems with a top tether strap STEP 1 Secure the child restraint using a seat belt or the LATCH anchors, and do the following. Move the head restraint in place at the upmost position. Make sure the top strap is securely latched. 160 GX460_U.S.A. (OM60J00U) STEP 2 Open the anchor bracket cover, latch the hook onto the anchor bracket and tighten the top strap.
Owners Manual
Page 189
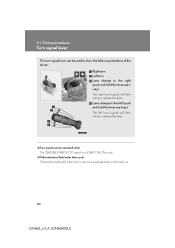
2-1. Driving procedures Turn signal lever The turn signal lever can be used to show the following intentions of the driver: Right turn Left turn Lane change to the right (push and hold the lever partway) The left hand signals will flash until you release the lever. Lane change to the left (push and hold the lever partway) The right hand signals will flash until you release the lever.
2-1. Driving procedures Turn signal lever The turn signal lever can be used to show the following intentions of the driver: Right turn Left turn Lane change to the right (push and hold the lever partway) The left hand signals will flash until you release the lever. Lane change to the left (push and hold the lever partway) The right hand signals will flash until you release the lever.

