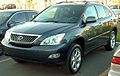
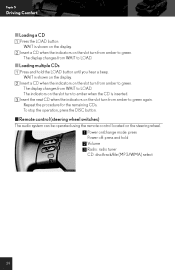
2008 Lexus Rx 350 Audio - 2008 Lexus RX 350
Research for this Lexus vehicle
View Results Below
Free 2008 Lexus RX 350 manuals!
Problems with 2008 Lexus RX 350?
Ask a Question
Other Models
Free 2008 Lexus RX 350 manuals!
Problems with 2008 Lexus RX 350?
Ask a Question
Other Models
Related Manual Pages


Related Videos

2008 Lexus RX 350 AWD-2ND BENCH-LEATHER-SUNROOF-6 CD-1 OWNER
Duration: 2:54
Total Views: 251
Duration: 2:54
Total Views: 251
Related Terms
The following terms were also used when searching for 2008 Lexus Rx 350 Audio - 2008 Lexus RX 350:- 2008 lexus rx 350
- 2008 lexus rx 350 accessories
- 2008 lexus rx 350 afs
- 2008 lexus rx 350 afs light
- 2008 lexus rx 350 air conditioning filters
- 2008 lexus rx 350 air filter
- 2008 lexus rx 350 air filter replacement
- 2008 lexus rx 350 air flow
- 2008 lexus rx 350 all wheel drive
- 2008 lexus rx 350 alternator
- 2008 lexus rx 350 and reviews
- 2008 lexus rx 350 antenna
- 2008 lexus rx 350 audio
- 2008 lexus rx 350 auto parts
- 2008 lexus rx 350 automatic lights
- 2008 lexus rx 350 auxiliary jack
- 2008 lexus rx 350 awd
- 2008 lexus rx 350 awd colors
- 2008 lexus rx 350 awd for sale
- 2008 lexus rx 350 awd heated leather
- 2008 lexus rx 350 awd maintenance schedule
- 2008 lexus rx 350 awd mpg
- 2008 lexus rx 350 awd sale
- 2008 lexus rx 350 awd system
- 2008 lexus rx 350 back door part
- 2008 lexus rx 350 back seat
- 2008 lexus rx 350 bamboo
- 2008 lexus rx 350 bamboo pearl
- 2008 lexus rx 350 base
- 2008 lexus rx 350 battery
- 2008 lexus rx 350 battery life
- 2008 lexus rx 350 battery warranty
- 2008 lexus rx 350 black
- 2008 lexus rx 350 blue
- 2008 lexus rx 350 blue book
- 2008 lexus rx 350 blue book value
- 2008 lexus rx 350 bluetooth
- 2008 lexus rx 350 bluetooth adapter
- 2008 lexus rx 350 brake pads
- 2008 lexus rx 350 brake problems
- 2008 lexus rx 350 brakes
- 2008 lexus rx 350 bulletins
- 2008 lexus rx 350 bumper to bumper warranty
- 2008 lexus rx 350 cabin air filter
- 2008 lexus rx 350 cabin filter
- 2008 lexus rx 350 caliper bolt torque
- 2008 lexus rx 350 canada
- 2008 lexus rx 350 cargo cover
- 2008 lexus rx 350 cargo space
- 2008 lexus rx 350 cars.com
- 2008 lexus rx 350 cd player problems
- 2008 lexus rx 350 changes
- 2008 lexus rx 350 chip
- 2008 lexus rx 350 chrome
- 2008 lexus rx 350 chrome accessories
- 2008 lexus rx 350 chrome wheels
- 2008 lexus rx 350 color code
- 2008 lexus rx 350 color options
- 2008 lexus rx 350 colors
- 2008 lexus rx 350 common problems
- 2008 lexus rx 350 complaint
- 2008 lexus rx 350 complaints
- 2008 lexus rx 350 cost
- 2008 lexus rx 350 crystal white
- 2008 lexus rx 350 curb weight
- 2008 lexus rx 350 customer reviews
- 2008 lexus rx 350 d passenger side mirror
- 2008 lexus rx 350 dallas
- 2008 lexus rx 350 dallas tx
- 2008 lexus rx 350 dash
- 2008 lexus rx 350 dashboard
- 2008 lexus rx 350 deals
- 2008 lexus rx 350 desert sage metallic
- 2008 lexus rx 350 detroit
- 2008 lexus rx 350 diagram
- 2008 lexus rx 350 dimensions
- 2008 lexus rx 350 driver set
- 2008 lexus rx 350 drivers manual
- 2008 lexus rx 350 dvd
- 2008 lexus rx 350 dvd player
- 2008 lexus rx 350 ect snow
- 2008 lexus rx 350 edmunds
- 2008 lexus rx 350 engine
- 2008 lexus rx 350 engine air filter
- 2008 lexus rx 350 engine compartment
- 2008 lexus rx 350 engine light
- 2008 lexus rx 350 engine noise
- 2008 lexus rx 350 engine oil
- 2008 lexus rx 350 engine problems
- 2008 lexus rx 350 engine specifications
- 2008 lexus rx 350 entertainment
- 2008 lexus rx 350 epa
- 2008 lexus rx 350 expert review
- 2008 lexus rx 350 exterior colors
- 2008 lexus rx 350 factory warranty
- 2008 lexus rx 350 features
- 2008 lexus rx 350 flint mica
- 2008 lexus rx 350 floor mat
- 2008 lexus rx 350 floor mats
- 2008 lexus rx 350 for sale
- 2008 lexus rx 350 for sale by owner
- 2008 lexus rx 350 for sale canada
- 2008 lexus rx 350 front bumper
- 2008 lexus rx 350 front single bulb
- 2008 lexus rx 350 fuel
- 2008 lexus rx 350 fuel capacity
- 2008 lexus rx 350 fuel consumption
- 2008 lexus rx 350 fuel economy
- 2008 lexus rx 350 fuel mileage
- 2008 lexus rx 350 fuel required
- 2008 lexus rx 350 fuel requirements
- 2008 lexus rx 350 fuel tank capacity
- 2008 lexus rx 350 fuel type
- 2008 lexus rx 350 fuse box
- 2008 lexus rx 350 fwd
- 2008 lexus rx 350 fwd 4dr
- 2008 lexus rx 350 garage door opener
- 2008 lexus rx 350 gas
- 2008 lexus rx 350 gas cover
- 2008 lexus rx 350 gas tank
- 2008 lexus rx 350 gas tank capacity
- 2008 lexus rx 350 gas type
- 2008 lexus rx 350 gps
- 2008 lexus rx 350 green
- 2008 lexus rx 350 grill
- 2008 lexus rx 350 grille
- 2008 lexus rx 350 gross weight
- 2008 lexus rx 350 guide
- 2008 lexus rx 350 gvwr
- 2008 lexus rx 350 handling
- 2008 lexus rx 350 headlamp
- 2008 lexus rx 350 headlight
- 2008 lexus rx 350 headlight condensation
- 2008 lexus rx 350 headlights shut off
- 2008 lexus rx 350 heated seats
- 2008 lexus rx 350 height
- 2008 lexus rx 350 hitch
- 2008 lexus rx 350 homelink
- 2008 lexus rx 350 horsepower
- 2008 lexus rx 350 houston
- 2008 lexus rx 350 houston texas
- 2008 lexus rx 350 houston tx
- 2008 lexus rx 350 how many qt. oil take
- 2008 lexus rx 350 hp
- 2008 lexus rx 350 hybrid
- 2008 lexus rx 350 image
- 2008 lexus rx 350 images
- 2008 lexus rx 350 in chicago
- 2008 lexus rx 350 in houston
- 2008 lexus rx 350 in mobile al
- 2008 lexus rx 350 in snow
- 2008 lexus rx 350 info
- 2008 lexus rx 350 instrument panel lights
- 2008 lexus rx 350 interior
- 2008 lexus rx 350 interior colors
- 2008 lexus rx 350 interiors
- 2008 lexus rx 350 invoice
- 2008 lexus rx 350 irvine
- 2008 lexus rx 350 issues
- 2008 lexus rx 350 jd power
- 2008 lexus rx 350 kelley blue book
- 2008 lexus rx 350 key
- 2008 lexus rx 350 key battery
- 2008 lexus rx 350 key replacement
- 2008 lexus rx 350 las vegas
- 2008 lexus rx 350 leak
- 2008 lexus rx 350 lease
- 2008 lexus rx 350 length
- 2008 lexus rx 350 light bulbs
- 2008 lexus rx 350 limited
- 2008 lexus rx 350 list price
- 2008 lexus rx 350 listing
- 2008 lexus rx 350 los angeles
- 2008 lexus rx 350 luggage capacity
- 2008 lexus rx 350 luggage cover
- 2008 lexus rx 350 luxury
- 2008 lexus rx 350 luxury suv
- 2008 lexus rx 350 maintenance
- 2008 lexus rx 350 maintenance light
- 2008 lexus rx 350 maintenance required
- 2008 lexus rx 350 maintenance required light
- 2008 lexus rx 350 maintenance required light reset
- 2008 lexus rx 350 maintenance schedule
- 2008 lexus rx 350 manual
- 2008 lexus rx 350 manual guide
- 2008 lexus rx 350 map update
- 2008 lexus rx 350 mark levinson
- 2008 lexus rx 350 mats
- 2008 lexus rx 350 mileage
- 2008 lexus rx 350 mirror
- 2008 lexus rx 350 mirror replacement cover
- 2008 lexus rx 350 models
- 2008 lexus rx 350 mp3
- 2008 lexus rx 350 mpg
- 2008 lexus rx 350 nav
- 2008 lexus rx 350 navigation
- 2008 lexus rx 350 navigation dvd
- 2008 lexus rx 350 navigation manual
- 2008 lexus rx 350 navigation sale
- 2008 lexus rx 350 navigation system
- 2008 lexus rx 350 navigation system manual